Help/Topology Tab: Difference between revisions
No edit summary |
m Change link |
||
| (7 intermediate revisions by 3 users not shown) | |||
| Line 1: | Line 1: | ||
The Topology Menu provides | The <b>Topology Menu</b> provides access to the tools for creating various | ||
the tools for creating various | types of terrain. On this Wiki Page you will learn how to make | ||
types of terrain. | hills, valleys, mountains, lakes and rivers. Once you become skilled in the use of these tools, you may want to check out <span class="plainlinks">[https://online.ts2009.com/mediaWiki/index.php/How_To_Make_Scenery How To: Make Better Scenery]</span> to enhance the scenery along your Route. | ||
you will learn how to make | |||
hills, valleys, mountains, lakes | NOTE: In <b>TRS2019</b>, this Topology Tab is also used for accessing the new [[Help:Using_Effect_Layers|"Effect Layers"]] | ||
and rivers. | |||
Click on the Topology Tab (or | Click on the Topology Tab (or | ||
| Line 22: | Line 21: | ||
{{clear}} | {{clear}} | ||
= | = Topology Tools = | ||
== [[File:Height up.jpg]] Height up (U) == | == [[File:Height up.jpg]] Height up (U) == | ||
| Line 30: | Line 29: | ||
to a circle. This circle is the “area of influence” for your cursor | to a circle. This circle is the “area of influence” for your cursor | ||
when using the land shaping tools. | when using the land shaping tools. | ||
Click | Click once near the center of your baseboard. The terrain is stretched upwards, if you hold the mouse button it will continue to rise. | ||
{{clear}} | {{clear}} | ||
== [[File:Height down.jpg]] Height down (D) == | == [[File:Height down.jpg]] Height down (D) == | ||
Move to a flat area then make an indentation by | Move to a flat area then make an indentation by clicking where you want | ||
to lower the terrain. The size of the cursor circle determines the amount | to lower the terrain. The size of the cursor circle determines the amount | ||
of land that is lowered and the sensitivity determines how | of land that is lowered and the sensitivity determines how | ||
| Line 42: | Line 41: | ||
== [[File:Height adjust.jpg]] Adjust height (A) == | == [[File:Height adjust.jpg]] Adjust height (A) == | ||
Adjust Height allows finer control of the up | Adjust Height allows finer control of the up | ||
and down movement. Click | and down movement. Click and hold then | ||
push your mouse away from you to raise the | push your mouse away from you to raise the | ||
terrain. Click | terrain. Click and hold then pull the mouse | ||
towards you to lower the terrain. | towards you to lower the terrain. | ||
{{clear}} | {{clear}} | ||
== [[File:Radius.jpg]] Radius == | == [[File:Radius.jpg]] Radius == | ||
Click | Click on the Radius Tool and move mouse to either side to change the circle of influence. Move right to increase sensitivity ("+" on keyboard, not keypad), move left to decrease sensitivity ("-"). | ||
{{clear}} | {{clear}} | ||
== [[File:Sensitivity.jpg]] Sensitivity == | == [[File:Sensitivity.jpg]] Sensitivity == | ||
Click | Click on the Sensitivity Tool and move the mouse to either side to change the amount of height changed each time the circle of influence is affected: Move right to increase sensitivity ("+" on keyboard, not keypad), move left to decrease sensitivity ("-"). | ||
{{clear}} | {{clear}} | ||
== [[File:Height get.jpg]] Get height (G) == | == [[File:Height get.jpg]] Get height (G) == | ||
Select Get Height (G), then Click | Select Get Height (G), then Click on the side of | ||
a hill. Notice that the number in the Height Value | a hill. Notice that the number in the Height Value | ||
field changes. You have captured the height of the | field changes. You have captured the height of the | ||
spot you clicked on. | spot you clicked on. NOTE: In <b>TRS2019</b>, the elevation of a point on the baseboard is obtained only by selecting the <B>Plateau 'P'</b> tool and clicking on a point, the elevation of which then appears in the Height Value window to the left. Get height 'G' does not return a value for the baseboard elevation (not functional). | ||
{{clear}} | {{clear}} | ||
== [[File:Height use.jpg]] Use height (H) == | == [[File:Height use.jpg]] Use height (H) == | ||
Click on Use Height (H) Then Click | Click on Use Height (H) Then Click to apply the | ||
selected Height Value to the terrain. The Use Height | selected Height Value to the terrain. The Use Height | ||
tool creates a plateau at your selected height and | tool creates a plateau at your selected height and | ||
the radius of your cursor circle determines the | the radius of your cursor circle determines the | ||
amount of land that is leveled at one time. | amount of land that is leveled at one time. | ||
Click | Click and hold then move your mouse around the terrain to | ||
plateau a broader section. | plateau a broader section. | ||
{{clear}} | {{clear}} | ||
== [[File:Plateu.jpg]] | == [[File:Plateu.jpg]] Plateau (P) == | ||
Plateau (P) | '<b>Plateau (P)</b>' levels the topography at the current height of the | ||
cursor, the elevation of which displays in the height value window to the left. Click on the side of a hill to create | |||
a | a flat area at the selected level, raising (downslope) and lowering (upslope) the terrain. | ||
terrain. | |||
{{clear}} | {{clear}} | ||
| Line 88: | Line 86: | ||
== [[File:Water add.jpg]] Add water (W) == | == [[File:Water add.jpg]] Add water (W) == | ||
Click | Click on Add Water (W) | ||
and paint the water texture along the | and paint the water texture along the | ||
desired area by moving | desired area by moving | ||
| Line 96: | Line 94: | ||
== [[File:Water remove.jpg]] Remove water (Q) == | == [[File:Water remove.jpg]] Remove water (Q) == | ||
Click | Click on Remove Water (Q) and you then delete | ||
the water texture one panel at a time by Clicking | the water texture one panel at a time by Clicking | ||
on each water panel. | |||
{{clear}} | {{clear}} | ||
| Line 104: | Line 102: | ||
== [[File:Water adjust height.jpg]] Adjust water height (E) == | == [[File:Water adjust height.jpg]] Adjust water height (E) == | ||
Select the Adjust Water Height | Select the Adjust Water Height | ||
tool and Click | tool and Click and hold (on the water texture) then drag | ||
your mouse forward and back, adjusting the water texture | your mouse forward and back, adjusting the water texture | ||
height until it is the appropriate | height until it is the appropriate | ||
| Line 112: | Line 110: | ||
== [[File:Ground add.jpg]] Add ground (X) == | == [[File:Ground add.jpg]] Add ground (X) == | ||
Select the Add Ground | Select the Add Ground | ||
(X) tool. Click | (X) tool. Click in the void just off the edge of | ||
the baseboard to add another baseboard in that direction. | the baseboard to add another baseboard in that direction. | ||
{{clear}} | {{clear}} | ||
| Line 118: | Line 116: | ||
== [[File:Ground remove.jpg]] Delete ground == | == [[File:Ground remove.jpg]] Delete ground == | ||
Click | Click on the Delete Section button. Then Click | ||
on any baseboard section to delete it. | |||
{{clear}} | {{clear}} | ||
| Line 145: | Line 143: | ||
== [[File:Area select.jpg]] Select area (B) == | == [[File:Area select.jpg]] Select area (B) == | ||
Click on Select Area (B). Click | Click on Select Area (B). Click and drag the | ||
mouse to make a large square as shown below. | mouse to make a large square as shown below. | ||
The size of the square (or rectangle) | The size of the square (or rectangle) | ||
| Line 161: | Line 159: | ||
== [[File:Area cancel.jpg]] Cancel selection (D) == | == [[File:Area cancel.jpg]] Cancel selection (D) == | ||
Click | Click on Cancel Selection (D) to cancel the | ||
selection. | selection. | ||
{{clear}} | {{clear}} | ||
| Line 167: | Line 165: | ||
== [[File:Area grab.jpg]] Get displacement (B) == | == [[File:Area grab.jpg]] Get displacement (B) == | ||
Click on Select Area (B). Click | Click on Select Area (B). Click on the baseboard | ||
and drag the mouse to make a large square that | and drag the mouse to make a large square that | ||
covers an existing area of modified terrain. Now | covers an existing area of modified terrain. Now | ||
| Line 175: | Line 173: | ||
in another area. | in another area. | ||
{{clear}} | {{clear}} | ||
[[Category:Help]] | |||
Latest revision as of 15:57, 5 November 2021
The Topology Menu provides access to the tools for creating various types of terrain. On this Wiki Page you will learn how to make hills, valleys, mountains, lakes and rivers. Once you become skilled in the use of these tools, you may want to check out How To: Make Better Scenery to enhance the scenery along your Route.
NOTE: In TRS2019, this Topology Tab is also used for accessing the new "Effect Layers"
Click on the Topology Tab (or press the F1 key) to open the Topology Menu. Here you will see a number of different tools that can be used to shape the terrain. Hold your mouse cursor over each one to see a short description as well as the appropriate Hotkey to press. To see the whole menu as in the diagram above, click on the “Advanced” button to expand the menu.

Topology Tools
 Height up (U)

Click on the Height Up icon to select the Height Up tool, and notice that your mouse cursor changes to a circle. This circle is the “area of influence” for your cursor when using the land shaping tools. Click once near the center of your baseboard. The terrain is stretched upwards, if you hold the mouse button it will continue to rise.
 Height down (D)

Move to a flat area then make an indentation by clicking where you want to lower the terrain. The size of the cursor circle determines the amount of land that is lowered and the sensitivity determines how quickly it lowers.
 Adjust height (A)

Adjust Height allows finer control of the up and down movement. Click and hold then push your mouse away from you to raise the terrain. Click and hold then pull the mouse towards you to lower the terrain.
 Radius

Click on the Radius Tool and move mouse to either side to change the circle of influence. Move right to increase sensitivity ("+" on keyboard, not keypad), move left to decrease sensitivity ("-").
 Sensitivity

Click on the Sensitivity Tool and move the mouse to either side to change the amount of height changed each time the circle of influence is affected: Move right to increase sensitivity ("+" on keyboard, not keypad), move left to decrease sensitivity ("-").
 Get height (G)

Select Get Height (G), then Click on the side of a hill. Notice that the number in the Height Value field changes. You have captured the height of the spot you clicked on. NOTE: In TRS2019, the elevation of a point on the baseboard is obtained only by selecting the Plateau 'P' tool and clicking on a point, the elevation of which then appears in the Height Value window to the left. Get height 'G' does not return a value for the baseboard elevation (not functional).
 Use height (H)

Click on Use Height (H) Then Click to apply the selected Height Value to the terrain. The Use Height tool creates a plateau at your selected height and the radius of your cursor circle determines the amount of land that is leveled at one time. Click and hold then move your mouse around the terrain to plateau a broader section.
 Plateau (P)

'Plateau (P)' levels the topography at the current height of the cursor, the elevation of which displays in the height value window to the left. Click on the side of a hill to create a flat area at the selected level, raising (downslope) and lowering (upslope) the terrain.
 Height value field

As an alternative to Get Height to select a Height Value, you can also enter specific height in the Height Value field. You can enter positive or negative values. Negative values allow you to depress the terrain.
 Add water (W)

Click on Add Water (W) and paint the water texture along the desired area by moving your mouse around. The radius of the cursor circle determines the texture panel size.
 Remove water (Q)

Click on Remove Water (Q) and you then delete the water texture one panel at a time by Clicking on each water panel.
 Adjust water height (E)

Select the Adjust Water Height tool and Click and hold (on the water texture) then drag your mouse forward and back, adjusting the water texture height until it is the appropriate height.
 Add ground (X)

Select the Add Ground (X) tool. Click in the void just off the edge of the baseboard to add another baseboard in that direction.
 Delete ground

Click on the Delete Section button. Then Click on any baseboard section to delete it.
Advanced
The Advanced features menu can be opened and closed by using Shift-F1 or clicking on the Advanced Tab.
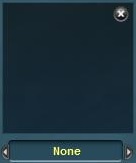 Displacement map

A displacement map is a grayscale image used to create an instant height map.
 Direction

Move the direction dial in the directon you wish the grayscale map to be put down on the baseboard.
 Threshold

Move the Threshold dial to increase the size of the height change set on the displacement map.
 Select area (B)

Click on Select Area (B). Click and drag the mouse to make a large square as shown below. The size of the square (or rectangle) determines the area that will be affected by the next operation.
 Fill area (F)

Scroll through the Displacement Maps, then click on Fill Area (F). The terrain is instantly transformed into the shape determined by the grayscale images of the displacement map chosen.
 Cancel selection (D)

Click on Cancel Selection (D) to cancel the selection.
 Get displacement (B)

Click on Select Area (B). Click on the baseboard and drag the mouse to make a large square that covers an existing area of modified terrain. Now click the “Get Displacement” button and you’ll notice that a displacement map has been derived from the shape of the terrain. This can now be used to apply the same terrain effect in another area.
