SAR Yandiah Switches: Difference between revisions
From TrainzOnline
Jump to navigationJump to search
mNo edit summary |
mNo edit summary |
||
| (3 intermediate revisions by the same user not shown) | |||
| Line 1: | Line 1: | ||
<!-- V1.0 --> | |||
<table> | |||
<tr valign="top"> | <tr valign="top"> | ||
<td width=750> | <td width=750> | ||
<table width=750 | <table width=750> | ||
<tr valign="top"> | <tr valign="top"> | ||
<td align="center">[[Image:line740.png|link=]]</td> | <td align="center">[[Image:line740.png|link=]]</td> | ||
| Line 13: | Line 14: | ||
<td align="center">[[Image:line740.png|link=]]</td> | <td align="center">[[Image:line740.png|link=]]</td> | ||
</tr> | </tr> | ||
</table | </table> | ||
<table bgcolor="lightgrey" bordercolor="lightgrey" width=750 | <table bgcolor="lightgrey" bordercolor="lightgrey" width=750> | ||
<tr valign="middle"> | <tr valign="middle"> | ||
| Line 25: | Line 26: | ||
</tr> | </tr> | ||
</table | </table> | ||
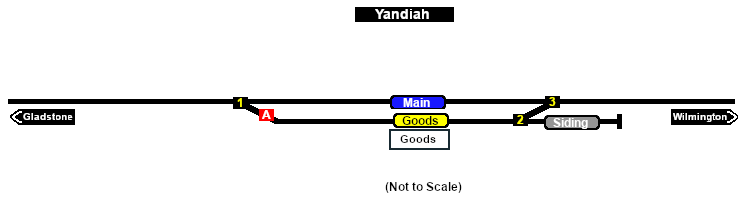
[[image:SAR_Yandiah_Basic.png|link=|alt=Yandiah Switches map]] | [[image:SAR_Yandiah_Basic.png|link=|alt=Yandiah Switches map]] | ||
<table bgcolor="LightYellow" width=750 | <table bgcolor="LightYellow" width=750> | ||
<tr valign="top"> | <tr valign="top"> | ||
| Line 57: | Line 58: | ||
<td><span style="background-color: yellow; font-weight: 700;">Down</span> '''(L) Main, (R) Goods Shed'''</td> | <td><span style="background-color: yellow; font-weight: 700;">Down</span> '''(L) Main, (R) Goods Shed'''</td> | ||
<td align="center">[[Image:Ared_sq.png|20px|link=]]</td> | <td align="center">[[Image:Ared_sq.png|20px|link=]]</td> | ||
<td | <td><span style="color: white; font-weight: 700; background-color: red"> YDCP A </span></td> | ||
<td><span style="background-color: cyan; font-weight: 700;">Up</span> '''<span style="background-color: red; color: white;"> (L) Catchpoint </span>, (R) Gladstone'''</td> | <td><span style="background-color: cyan; font-weight: 700;">Up</span> '''<span style="background-color: red; color: white;"> (L) Catchpoint </span>, (R) Gladstone'''</td> | ||
</tr> | </tr> | ||
| Line 79: | Line 80: | ||
<td colspan=6> | <td colspan=6> | ||
<table | <table> | ||
<tr valign="top"> | <tr valign="top"> | ||
| Line 91: | Line 92: | ||
</tr> | </tr> | ||
</table | </table> | ||
<table | <table> | ||
<tr valign="top"> | <tr valign="top"> | ||
| Line 105: | Line 106: | ||
</tr> | </tr> | ||
</table | </table> | ||
<tr valign="top"> | <tr valign="top"> | ||
| Line 111: | Line 112: | ||
</tr> | </tr> | ||
</table | </table> | ||
</td> | </td> | ||
| Line 119: | Line 120: | ||
</td> | </td> | ||
</tr> | </tr> | ||
</table | </table> | ||
Latest revision as of 06:24, 16 November 2022
|
|
||||||||||||||||||||||||||||||||||||||||||||||||||||||||||||||||||||||||||||