SAR Scenario Terowie Shunter V2: Difference between revisions
From TrainzOnline
Jump to navigationJump to search
Created page with "<!-- V2.0 (V1.0 separate file) --> <!-- SAR Scenario 14 --> <table width=1000> <!-- BEGIN Title table --> <tr valign="top"> <td width=50 align="left">[[image:ArrowLeftBt..." |
mNo edit summary |
||
| (11 intermediate revisions by the same user not shown) | |||
| Line 3: | Line 3: | ||
<table width=1000> <!-- BEGIN Title table --> | <table width=1000> <!-- BEGIN Title table --> | ||
<tr valign="top"> | <tr valign="top"> | ||
<td width= | <td width=30 align="center">[[image:ArrowLeftBtn.png|link=SAR Scenario Gladstone Shunter_V2|30px]]<br> | ||
<td width= | <span style="font-weight: 700; font-size: 15px; color: white; background-color: black;"> 13 </span></td> | ||
<td width=940 align="center"><span style="font-size: 21px; font-weight: 700;"> <span style="background-color: black; color: white;"> 14 </span> <span style="background-color: black; color: white;"> Terowie Shunter </span></span><br> | |||
A scenario in the '''[[SAR Peterborough Base Session_V2|SAR Peterborough Base Session v2.0]]'''<br> | |||
<span style="font-weight: 700;">This scenario has been updated in V2.0. For the original <span style="color: blue;">V1.0</span> scenario, click <span style="background-color: yellow;">[[SAR Scenario Terowie Shunter_V1|here]]</span></span></td> | |||
<td width=30 align="center">[[image:ArrowRightBtn.png|link=SAR Scenario Quorn Shunter_V2|30px]]<br> | |||
<span style="font-weight: 700;">This scenario has been updated in V2.0. For the original <span style="color: blue;">V1.0</span> scenario, click <span style="background-color: yellow;">[[SAR Scenario Terowie | <span style="font-weight: 700; font-size: 15px; color: white; background-color: black;"> 15 </span></td> | ||
</tr> | </tr> | ||
</table> <!-- END Title table --> | </table> <!-- END Title table --> | ||
<table width=1000> <!-- BEGIN Summary table --> | <table width=1000> <!-- BEGIN Summary table --> | ||
<tr valign="top"> | <tr valign="top"> | ||
<td align="left">Narrow gauge shunting operations in '''Terowie Yard'''.</td> | <td align="left">Narrow gauge shunting operations in '''Terowie Yard'''. This scenario can be continued as one of the scenario <span style="font-weight: 700;"><span style="font-size: 15px; color: white; background-color: black;"> 10 </span> [[SAR Scenario Transcontinental Express Freight_V2|Transcontinental Express Freights]]</span> operations starting from '''Terowie'''.</td> | ||
<td align="right">[[file:BackToBottom.png|link=#bottom|alt=Bottom|Bottom]]</td> | <td align="right">[[file:BackToBottom.png|link=#bottom|alt=Bottom|Bottom]]</td> | ||
</tr> | |||
<tr valign="top"> | |||
<td colspan=2 bgcolor="black"></td> | |||
</tr> | </tr> | ||
</table> <!-- END Title and summary tables --> | </table> <!-- END Title and summary tables --> | ||
<table width=1000> | <table width=1000> | ||
<tr valign="top"> | <tr valign="top"> | ||
| Line 26: | Line 30: | ||
'''Terowie's''' only role was as a change of gauge location. Passengers and freight from '''Adelaide''' arrived from the south on the '''broad gauge (5ft 3in - 1600mm)''' line and were transferred to wagons on the '''narrow gauge (3ft 6in - 1067mm)''' line to continue north to '''Peterborough''' and onto destinations on the '''Broken Hill''', '''Trans Continental''' and '''Central Australia''' lines. The reverse arrangement applied to traffic travelling south to '''Adelaide'''.<br> | '''Terowie's''' only role was as a change of gauge location. Passengers and freight from '''Adelaide''' arrived from the south on the '''broad gauge (5ft 3in - 1600mm)''' line and were transferred to wagons on the '''narrow gauge (3ft 6in - 1067mm)''' line to continue north to '''Peterborough''' and onto destinations on the '''Broken Hill''', '''Trans Continental''' and '''Central Australia''' lines. The reverse arrangement applied to traffic travelling south to '''Adelaide'''.<br> | ||
Passengers simply | Passengers simply walked from a train on one side of the platform to a train on the other side at the station. Goods and livestock were manually moved from wagons of one gauge on one side of a transfer platform to wagons of the other gauge on the other side, or by gantry crane from one train to the other. Much later a bogie exchange system was introduced to help eliminate the manual handling of freight. By 1970 the line from '''Peterborough''' to '''Terowie''' became dual gauge with the addition of a standard gauge track. By 1988 the line from '''Adelaide''' to '''Peterborough''' via '''Terowie''' was closed.</td> | ||
</tr> | </tr> | ||
</table> | </table> | ||
--- | |||
<span style="font-weight: 700; font-size: 15px; color: white; background-color: black;"> When, Where and With What </span><br> | |||
<table width=1000> <!-- BEGIN Scenario image and loco/consist table --> | <table width=1000> <!-- BEGIN Scenario image and loco/consist table --> | ||
<tr valign="top"> | <tr valign="top"> | ||
| Line 80: | Line 86: | ||
</tr> | </tr> | ||
</table> <!-- END Scenario image and loco/consist table --> | </table> <!-- END Scenario image and loco/consist table --> | ||
<span style="font-weight: 700; font-size: 15px; color: white; background-color: black;"> Similar/Related Scenarios </span><br> | |||
<table width=1000> | |||
<tr valign="top"> | |||
<td width=20><span style="font-weight: 700; background-color: black; color: white;"> 10 </span> </td> | |||
<td width=310>'''[[SAR Scenario Transcontinental Express Freight_V2|Transcontinental Express Freights]]'''</td> | |||
<td width=20><span style="font-weight: 700; background-color: black; color: white;"> 12 </span> </td> | |||
<td width=310>'''[[SAR Scenario Peterborough Shunter_V2|Peterborough Shunter]]'''</td> | |||
<td width=20><span style="font-weight: 700; background-color: black; color: white;"> 14 </span> </td> | |||
<td width=310>'''[[SAR Scenario Gladstone Shunter_V2|Gladstone Shunter]]'''</td> | |||
</tr> | |||
<tr valign="top"> | |||
<td><span style="font-weight: 700; background-color: black; color: white;"> 15 </span> </td> | |||
<td>'''[[SAR Scenario Quorn Shunter_V2|Quorn Shunter]]'''</td> | |||
<td><span style="font-weight: 700; background-color: black; color: yellow;"> 19 </span> </td> | |||
<td>'''[[SAR Scenario Broad Gauge Express_V2|Servicing the Broad Gauge Express]]'''</td> | |||
<td colspan=2> </td> | |||
</tr> | |||
</table> | |||
<br> | |||
<table bgcolor="lightcyan" width=1000> <!-- BEGIN Location Data table --> | <table bgcolor="lightcyan" width=1000> <!-- BEGIN Location Data table --> | ||
<tr> | <tr> | ||
| Line 96: | Line 123: | ||
<tr valign="top"> | <tr valign="top"> | ||
<td> | <td> | ||
# If you have already closed the opening message window then | # Open the session '''SAR Northern Division Free Roam Session V2''' into '''Trainz Driver'''. To do this:<br> | ||
#* From the '''Driver/Surveyor''' loading screen select the route '''SAR Northern Division (Narrow Gauge) Route v2''' | |||
#* Then select <span style="font-weight: 700; color: white; background-color: grey;"> VIEW SESSIONS </span> | |||
#* Then select the session '''SAR Northern Division Free Roam Session V2''' | |||
#* Click <span style="font-weight: 700; color: white; background-color: grey;"> DRIVE SESSION </span> | |||
# If you have already closed the opening message window then pause the session by pressing the <span style="font-weight: 700; font-size: 15px; color: white; background-color: black;"> P </span> key. | |||
# If you decide to set the session clock to a different starting time then follow the instructions shown in the '''Orders''' section below | # If you decide to set the session clock to a different starting time then follow the instructions shown in the '''Orders''' section below | ||
# Next locate your loco. '''Either''':- | # Next locate your loco. '''Either''':- | ||
| Line 109: | Line 141: | ||
# When you are ready to start, reload the '''Peterborough Base Session''' page (click the '''Scenarios''' button on your current location page) and select this '''Scenario''' again or just use the '''Back''' button on your browser - whichever is quicker. | # When you are ready to start, reload the '''Peterborough Base Session''' page (click the '''Scenarios''' button on your current location page) and select this '''Scenario''' again or just use the '''Back''' button on your browser - whichever is quicker. | ||
# Switch back to '''Trainz Driver Mode''' | # Switch back to '''Trainz Driver Mode''' | ||
# Close the opening message window | # Close the opening message window if it is on the screen '''OR''' if '''Pause''' is shown on the screen instead, press the <span style="font-weight: 700; font-size: 15px; color: white; background-color: black;"> P </span> key. Both actions will start the session. | ||
</td> | </td> | ||
</tr> | </tr> | ||
| Line 164: | Line 196: | ||
# The two rakes of loaded wagons on <span style="font-weight: 700; color: black; background-color: yellow;"> Goods Siding 1 </span> and <span style="font-weight: 700; color: black; background-color: yellow;"> Goods Siding 2 </span> must be split and recombined into two consists according to their destinations. The destinations, '''Peterborough''' and '''Port Augusta''', are shown in the name of each wagon. All the '''Port Augusta''' wagons are to be placed into one consist and the '''Peterborough''' wagons into the other consist. | # The two rakes of loaded wagons on <span style="font-weight: 700; color: black; background-color: yellow;"> Goods Siding 1 </span> and <span style="font-weight: 700; color: black; background-color: yellow;"> Goods Siding 2 </span> must be split and recombined into two consists according to their destinations. The destinations, '''Peterborough''' and '''Port Augusta''', are shown in the name of each wagon. All the '''Port Augusta''' wagons are to be placed into one consist and the '''Peterborough''' wagons into the other consist. | ||
# Combine the two consists into one with the '''Peterborough''' wagons at the front ('''Peterborough''' end) and the '''Guard Van''' at the rear of the '''Port Augusta''' wagons. | # Combine the two consists into one with the '''Peterborough''' wagons at the front ('''Peterborough''' end) and the '''Guard Van''' at the rear of the '''Port Augusta''' wagons. | ||
# Move the combined consist onto the <span style="font-weight: 700;"><span style="color: white; background-color: #b8860b;"> Relief </span> road</span> in the main '''Terowie Yard'''. | # Move the combined consist onto the <span style="font-weight: 700;"><span style="color: white; background-color: #b8860b;"> Relief </span> road</span> in the main '''Terowie Yard'''. The assembled consist will be used in one of the freight operations in scenario <span style="font-weight: 700;"><span style="font-size: 15px; color: white; background-color: black;"> 10 </span> [[SAR Scenario Transcontinental Express Freight_V2|Transcontinental Express Freights]]</span>. | ||
# Return the loco to its starting position in the <span style="font-weight: 700;"><span style="color: white; background-color: black;"> Loco </span> Depot</span>. | # Return the loco to its starting position in the <span style="font-weight: 700;"><span style="color: white; background-color: black;"> Loco </span> Depot</span>. | ||
</td> | </td> | ||
| Line 189: | Line 221: | ||
<table width=180> <!-- BEGIN Strip Map Table --> | <table width=180> <!-- BEGIN Strip Map Table --> | ||
<tr valign="top"> | <tr valign="top"> | ||
<td align="center">[[image:SAR Scenario Terowie Strip | <td align="center">[[image:SAR Scenario Terowie Shunter Strip Map_V2.png|link=|alt=Strip Map]]<br>[[image:SAR Scenario Route.png|link=|alt=Route Key]]<br> | ||
</td> | |||
</tr> | </tr> | ||
</table> <!-- END Strip Map Table --> | </table> <!-- END Strip Map Table --> | ||
| Line 202: | Line 235: | ||
<tr valign="top"> | <tr valign="top"> | ||
<td> | <td> | ||
*You have permission to pass | *You have permission to pass signals at stop provided you are satisfied that the road ahead is clear. | ||
*When driving manually in yards, you are responsible for correctly setting any '''catch points'''. | *When driving manually in yards, you are responsible for correctly setting any '''catch points'''. | ||
</td> | </td> | ||
| Line 210: | Line 243: | ||
</tr> | </tr> | ||
</table> <!-- END Black border for Driving Notes sub table --> | </table> <!-- END Black border for Driving Notes sub table --> | ||
<table width=1000> <!-- BEGIN End Links Table --> | <table width=1000> <!-- BEGIN End Links Table --> | ||
<tr valign="top"> | <tr valign="top"> | ||
| Line 216: | Line 249: | ||
</tr> | </tr> | ||
<tr valign="center"> | <tr valign="center"> | ||
<td width= | <td width=30 align="center">[[image:ArrowLeftBtn.png|link=SAR Scenario Gladstone Shunter_V2|30px]]<br> | ||
<td width= | <span style="font-weight: 700; font-size: 15px; color: white; background-color: black;"> 13 </span></td> | ||
<td width= | <td width=135 align="center">[[image:Session Scenario Index.png|link=SAR Peterborough Base Session_V2|alt=Scenarios|Scenario Index]]<br>'''[[SAR Peterborough Base Session_V2|Scenario Index]]'''</td> | ||
<td width= | <td width=134 align="center">[[Image:Location Index.png|link=SAR Index_V2|alt=Location Index|Location Index]]<br>'''[[SAR Index_V2|Location Index]]'''</td> | ||
<td width= | <td width=134 align="center">[[image:SAR Tutorial.png|link=SAR Scenarios Tutorial_V2|alt=Tutorial|Drive Tutorial]]<br>'''[[SAR Scenarios Tutorial_V2|Drive Tutorial]]'''</td> | ||
<td width= | <td width=134 align="center">[[image:Rolling Stock Index.png|link=SAR Scenario Rolling Stock_V2|alt=Rolling Stock|Rolling Stock List]]<br>'''[[SAR Scenario Rolling Stock_V2|Rolling Stock List]]'''</td> | ||
<td width= | <td width=134 align="center">[[image:Loco Index.png|link=SAR Peterborough Division Loco Roster_V2|alt=Loco Roster|Loco Roster]]<br>'''[[SAR Peterborough Division Loco Roster_V2|Loco Roster]]'''</td> | ||
<td width= | <td width=134 align="center">[[image:Industry Index.png|link=SAR Scenario Industries_V2|alt=Industries|Active Industries]]<br>'''[[SAR Scenario Industries_V2|Active Industries]]'''</td> | ||
<td width= | <td width=135 align="center">[[image:BackToTop.png|link=#top|alt=Top|Top]]</td> | ||
<td width=30 align="center">[[image:ArrowRightBtn.png|link=SAR Scenario Quorn Shunter_V2|30px]]<br> | |||
<span style="font-weight: 700; font-size: 15px; color: white; background-color: black;"> 15 </span></td> | |||
</tr> | |||
<tr valign="top"> | |||
<td colspan=9 bgcolor="black"></td> | |||
</tr> | </tr> | ||
</table> <!-- END End Links Table --> | </table> <!-- END End Links Table --> | ||
<span id="bottom"></span> | <span id="bottom"></span> | ||
This page was created by Trainz user '''<span class="plainlinks">[http://online.ts2009.com/mediaWiki/index.php/User:Pware pware]</span>''' in February 2021 and was last updated as shown below. | This page was created by Trainz user '''<span class="plainlinks">[http://online.ts2009.com/mediaWiki/index.php/User:Pware pware]</span>''' in February 2021 and was last updated as shown below. | ||
---- | ---- | ||
Latest revision as of 06:21, 24 February 2026
| Error creating thumbnail: /bin/bash: line 1: /usr/bin/convert: No such file or directory Error code: 127 13 |
14 Terowie Shunter A scenario in the SAR Peterborough Base Session v2.0 |
Error creating thumbnail: /bin/bash: line 1: /usr/bin/convert: No such file or directory Error code: 127 15 |
| Narrow gauge shunting operations in Terowie Yard. This scenario can be continued as one of the scenario 10 Transcontinental Express Freights operations starting from Terowie. |  |
|
The Historical Bit Terowie's only role was as a change of gauge location. Passengers and freight from Adelaide arrived from the south on the broad gauge (5ft 3in - 1600mm) line and were transferred to wagons on the narrow gauge (3ft 6in - 1067mm) line to continue north to Peterborough and onto destinations on the Broken Hill, Trans Continental and Central Australia lines. The reverse arrangement applied to traffic travelling south to Adelaide. |
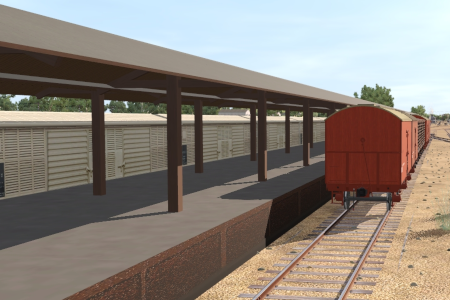
When, Where and With What
 |
|
|||||||||||||||

Similar/Related Scenarios
| 10 | Transcontinental Express Freights | 12 | Peterborough Shunter | 14 | Gladstone Shunter |
| 15 | Quorn Shunter | 19 | Servicing the Broad Gauge Express | ||
|
|
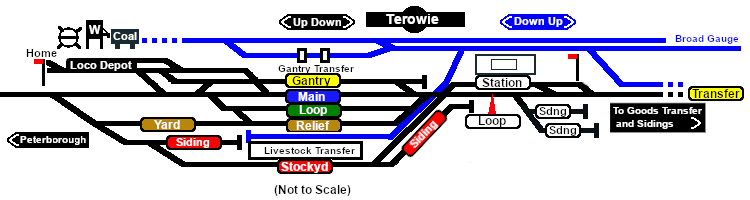
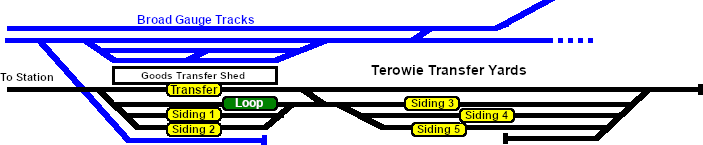
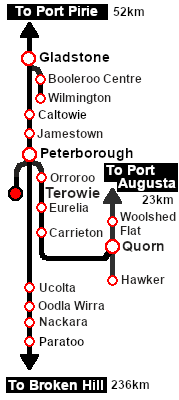
Each location in the layout has a detailed set of track diagrams that provide a variety of useful information The Getting Started guide below gives a summary of what is available.  graphic, or go to the bottom of the page for all the session links (all links will open in this window). |

Getting Started:
|


Tutorial:
|

|
|
|||||||||||



Driving Notes:
|


This page was created by Trainz user pware in February 2021 and was last updated as shown below.


