SAR Changes Log: Difference between revisions
mNo edit summary |
mNo edit summary |
||
| (2 intermediate revisions by the same user not shown) | |||
| Line 7: | Line 7: | ||
</tr> | </tr> | ||
<tr valign="top"> | <tr valign="top"> | ||
<td>'''Version 1.0''' of the route and base session were created for '''TRS19 (SP3)''' and above. '''Version 2.0''' of the route and | <td>'''Version 1.0''' of the route and base session were created for '''TRS19 (SP3)''' and above. '''Version 2.0''' of the route and sessions were created for '''TRS22 (SP3)''' and '''Trainz Plus''' and above.<br> | ||
Most of the changes made to the maps, industries, switches and track marks between the two versions are due to more up to date historical information becoming available.<br> | Most of the changes made to the maps, industries, switches and track marks between the two versions are due to more up to date historical information becoming available.<br> | ||
I recently gained access to a vast online archive of historical photographs and documents covering all Australian railways. As a result I have noted, in most cases, minor differences and, in a few cases, major differences between the details revealed in the archive and the original published material on which the Peterborough Division route was based. Those location where differences were discovered have been updated in '''Version 2.0''' of the route | I recently gained access to a vast online archive of historical photographs and documents covering all Australian railways. As a result I have noted, in most cases, minor differences and, in a few cases, major differences between the details revealed in the archive and the original published material on which the Peterborough Division route was based. Those location where differences were discovered have been updated in '''Version 2.0''' of the route.<br> | ||
The changes made are:-</td> | The changes made are:-</td> | ||
| Line 17: | Line 17: | ||
</table> | </table> | ||
[[Image:line740.png|link=]]<br> | [[Image:line740.png|link=]]<br> | ||
<span style="font-weight: 700; font-size: | <span style="font-weight: 700; font-size: 17px; color: white; background-color: blue;"> Port Pirie to Broken Hill Line </span> | ||
<table width=1000> | <table width=1000> | ||
<tr valign="top"> | <tr valign="top"> | ||
| Line 161: | Line 161: | ||
<br> | <br> | ||
[[Image:line740.png|link=]]<br> | [[Image:line740.png|link=]]<br> | ||
<span style="font-weight: 700; font-size: | <span style="font-weight: 700; font-size: 17px; color: white; background-color: blue;"> Peterborough to Quorn Line </span> | ||
<table width=1000> | <table width=1000> | ||
<tr valign="top"> | <tr valign="top"> | ||
| Line 196: | Line 196: | ||
<td width=10>[[image:DotPoint.JPG|10px|link=]]</td> | <td width=10>[[image:DotPoint.JPG|10px|link=]]</td> | ||
<td>Additional water columns and track marks have been added</td> | <td>Additional water columns and track marks have been added</td> | ||
</tr> | |||
</table> | |||
<br> | |||
<table width=750> | |||
<tr valign="top"> | |||
<td colspan=2><span style="font-weight: 700; font-size: 15px; color: white; background-color: black;"> Hammond: </span></td> | |||
</tr> | |||
<tr valign="top"> | |||
<td width=10>[[image:DotPoint.JPG|10px|link=]]</td> | |||
<td>Old photographs revealed that a stockyard existed on a siding on the northern end of the goods road</td> | |||
</tr> | |||
<tr valign="top"> | |||
<td>[[image:DotPoint.JPG|10px|link=]]</td> | |||
<td>Water Columns on main and loop (as shown in an old photograph) plus track marks added</td> | |||
</tr> | |||
</table> | |||
<br> | |||
<table width=750> | |||
<tr valign="top"> | |||
<td colspan=2><span style="font-weight: 700; font-size: 15px; color: white; background-color: black;"> Bruce: </span></td> | |||
</tr> | |||
<tr valign="top"> | |||
<td width=10>[[image:DotPoint.JPG|10px|link=]]</td> | |||
<td>Water Columns on main and loop (as shown in an old photograph) plus track marks added</td> | |||
</tr> | </tr> | ||
</table> | </table> | ||
| Line 223: | Line 247: | ||
<br> | <br> | ||
[[Image:line740.png|link=]]<br> | [[Image:line740.png|link=]]<br> | ||
<span style="font-weight: 700; font-size: | <span style="font-weight: 700; font-size: 17px; color: white; background-color: blue;"> Gladstone to Wilmington Line </span> | ||
<br> | <br> | ||
<table width=1000> | <table width=1000> | ||
| Line 319: | Line 343: | ||
[[Image:line740.png|link=]]<br> | [[Image:line740.png|link=]]<br> | ||
<span style="font-weight: 700; font-size: | <span style="font-weight: 700; font-size: 17px; color: white; background-color: blue;"> Peterborough to Terowie Line </span> | ||
<br> | <br> | ||
<table width=1000> | <table width=1000> | ||
| Line 341: | Line 365: | ||
[[Image:line740.png|link=]]<br> | [[Image:line740.png|link=]]<br> | ||
<span style="font-weight: 700; font-size: | <span style="font-weight: 700; font-size: 17px; color: white; background-color: blue;"> Base Session </span> | ||
<br> | <br> | ||
More rolling stock has been added.<br> | More rolling stock has been added.<br> | ||
<br> | <br> | ||
[[Image:line740.png|link=]]<br> | [[Image:line740.png|link=]]<br> | ||
<span style="font-weight: 700; font-size: | <span style="font-weight: 700; font-size: 17px; color: white; background-color: blue;"> Scenarios </span> | ||
<br> | <br> | ||
<span style="font-weight: 700; font-size: 15px; color: white; background-color: black;"> Original Scenarios: </span><br> | <span style="font-weight: 700; font-size: 15px; color: white; background-color: black;"> Original Scenarios: </span><br> | ||
| Line 361: | Line 385: | ||
<tr valign="top"> | <tr valign="top"> | ||
<td>The new '''V2.0''' scenarios make use of additional rolling stock that has been added to the '''SAR Peterborough Division Base Session V2.0''' and the additional trackage from '''Woolshed Flats''' to '''Hawker'''. Most have also been provided with a sample timetable for one or several trains that could be run. | <td>The new '''V2.0''' scenarios make use of additional rolling stock that has been added to the '''SAR Peterborough Division Base Session V2.0''' and the additional trackage from '''Woolshed Flats''' to '''Hawker'''. Most have also been provided with a sample timetable for one or several trains that could be run. | ||
</td> | |||
</tr> | |||
</table> | |||
[[Image:line740.png|link=]]<br> | |||
<br> | |||
<span style="font-weight: 700; font-size: 17px; color: white; background-color: blue;"> New Sessions for V2.0: </span><br> | |||
<table width=1000> | |||
<tr valign="top"> | |||
<td>A number of independent self drive sessions have been created. All are based on the '''SAR Northern Division Free Roam Session V2''' as the starting point but with some changes to the placement of rolling stock objects. All the sessions are available on the Download Station ('''DLS''').<br> | |||
<br> | |||
A list of these sessions with their '''DLS''' names and '''<kuid>''' codes with basic descriptions and run time information can be found at '''[[SAR_Peterborough_Base_Session_V2#V2_Sessions|SAR Northern Division V2 Sessions]]'''. | |||
</td> | </td> | ||
</tr> | </tr> | ||
</table> | </table> | ||
[[Image:line740.png|link=]]<br> | [[Image:line740.png|link=]]<br> | ||
Latest revision as of 23:41, 12 April 2026
| SAR Peterborough Narrow Gauge Division |
| Changes Between Version 1.0 and Version 2.0 |
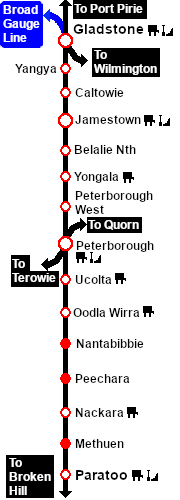
| Version 1.0 of the route and base session were created for TRS19 (SP3) and above. Version 2.0 of the route and sessions were created for TRS22 (SP3) and Trainz Plus and above. Most of the changes made to the maps, industries, switches and track marks between the two versions are due to more up to date historical information becoming available. I recently gained access to a vast online archive of historical photographs and documents covering all Australian railways. As a result I have noted, in most cases, minor differences and, in a few cases, major differences between the details revealed in the archive and the original published material on which the Peterborough Division route was based. Those location where differences were discovered have been updated in Version 2.0 of the route. |

Port Pirie to Broken Hill Line

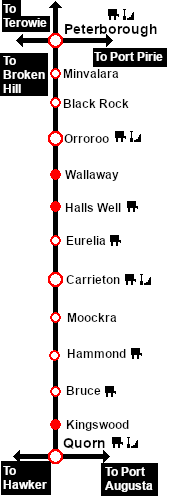
Peterborough to Quorn Line
|
  |
||||||||||||||||||||||||||||||||
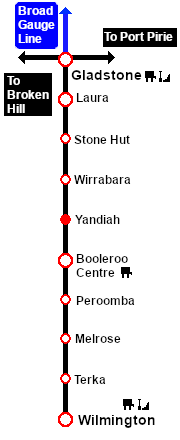
Gladstone to Wilmington Line
|
  |
||||||||||||||||||||||||||||||||||||
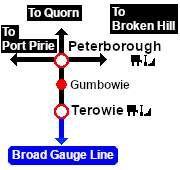
Peterborough to Terowie Line
|
  |
||||
Base Session
More rolling stock has been added.
Scenarios
Original Scenarios:
| Most of these have been updated to take advantage of the changes that have been made to many of the location in the route. All the original (unchanged) scenarios have been duplicated and renamed to include V2 in their Wiki name and have had their links updated. In all scenarios a link has been provided to the original V1.0 version. Most of the scenarios have been provided with a sample timetable for one or several trains that could be run. |
New V2.0 Scenarios:
| The new V2.0 scenarios make use of additional rolling stock that has been added to the SAR Peterborough Division Base Session V2.0 and the additional trackage from Woolshed Flats to Hawker. Most have also been provided with a sample timetable for one or several trains that could be run. |
New Sessions for V2.0:
| A number of independent self drive sessions have been created. All are based on the SAR Northern Division Free Roam Session V2 as the starting point but with some changes to the placement of rolling stock objects. All the sessions are available on the Download Station (DLS).
|

