Route and Session Basics: Difference between revisions
mNo edit summary |
|||
| (23 intermediate revisions by the same user not shown) | |||
| Line 11: | Line 11: | ||
</table> <!-- END Nav Buttons Table --> | </table> <!-- END Nav Buttons Table --> | ||
<table width=1000 bgcolor=#000000 cellpadding=2> | |||
<tr valign="top"> | |||
<td> | |||
<table width=996 bgcolor=#ffffff cellpadding=2> | |||
<tr valign="middle"> | |||
<td width=35>[[image:Information.png|35px|link=]]</td> | |||
<td><span style="font-size: 15px;">The information in this Wiki Page applies to '''Trainz Plus''', '''TRS22''' and '''TRS19'''. It explains the basic concepts and processes involved in creating and editing '''Routes''' and '''Sessions'''.</span></td> | |||
</tr> | |||
</table> | |||
</td> | |||
</tr> | |||
</table> | |||
<br> | |||
<table width=1000> | <table width=1000> | ||
<tr valign="top"> | <tr valign="top"> | ||
<td> | <td>This page is intended to provide you with an overview of the properties and features of '''Routes''' and '''Sessions''' when creating layouts for Trainz. More detailed descriptions of these various features plus instructions on getting you started with creating '''Routes''' and '''Sessions''' can be found in the Trainz Wiki '''How To Guides'''. Links are provided at the end of this document.</td> | ||
</tr> | </tr> | ||
</table> | </table> | ||
| Line 171: | Line 184: | ||
<tr valign="top"> | <tr valign="top"> | ||
<td>[[image:DotPoint.JPG|10px|link=]]</td> | <td>[[image:DotPoint.JPG|10px|link=]]</td> | ||
<td>'''TurfFX, Clutter, Water, Color | <td>'''Effect Layers''' - '''TurfFX, Clutter, Water, Color''' (the '''Color Effect Layer''' is <span style="background-color: yellow;">only available in '''Trainz Plus''' when using '''High Definition (HD)'''</span>)</td> | ||
</tr> | </tr> | ||
<tr valign="top"> | <tr valign="top"> | ||
| Line 212: | Line 225: | ||
<tr valign="top"> | <tr valign="top"> | ||
<td width=10>[[image:DotPoint.JPG|10px|link=]]</td> | <td width=10>[[image:DotPoint.JPG|10px|link=]]</td> | ||
<td>Track and Track Objects (such as signals, switches, bridges, tunnels, speed signs, etc)</td> | <td>'''Track''' and '''Track Objects''' (such as signals, switches, bridges, tunnels, speed signs, etc)</td> | ||
</tr> | </tr> | ||
<tr valign="top"> | <tr valign="top"> | ||
<td>[[image:DotPoint.JPG|10px|link=]]</td> | <td>[[image:DotPoint.JPG|10px|link=]]</td> | ||
<td>Most (or all) scenery items (e.g. buildings, trees, rocks, active industries/stations) and scenery splines (e.g. roads, fences, etc)</td> | <td>Most (or all) '''scenery''' items (e.g. buildings, trees, rocks, active industries/stations) and scenery '''splines''' (e.g. roads, fences, etc)</td> | ||
</tr> | </tr> | ||
<tr valign="top"> | <tr valign="top"> | ||
<td>[[image:DotPoint.JPG|10px|link=]]</td> | <td>[[image:DotPoint.JPG|10px|link=]]</td> | ||
<td>Rolling Stock (including locos) - <span style="background-color: yellow; font-weight: 700;"> Note: </span> It is '''strongly recommended''' that all rolling stock be placed into a '''Session Layer'''</td> | <td>'''Rolling Stock''' (including locos) - <span style="background-color: yellow; font-weight: 700;"> Note: </span> It is '''strongly recommended''' that all rolling stock be placed into a '''Session Layer'''</td> | ||
</tr> | </tr> | ||
<tr valign="top"> | <tr valign="top"> | ||
<td>[[image:DotPoint.JPG|10px|link=]]</td> | <td>[[image:DotPoint.JPG|10px|link=]]</td> | ||
<td>Lineside and Fixed Cameras</td> | <td>Lineside and Fixed '''Cameras'''</td> | ||
</tr> | </tr> | ||
<tr valign="top"> | <tr valign="top"> | ||
<td>[[image:DotPoint.JPG|10px|link=]]</td> | <td>[[image:DotPoint.JPG|10px|link=]]</td> | ||
<td>Trackmarks, Triggers, Direction and Priority Marks</td> | <td>'''Trackmarks, Triggers, Direction''' and '''Priority Marks''' - these are often placed into a '''Session Layer''' so that they can be specific to a particular session</td> | ||
</tr> | </tr> | ||
</table> | </table> | ||
| Line 323: | Line 336: | ||
<table bgcolor=#ffffff cellpadding=2> | <table bgcolor=#ffffff cellpadding=2> | ||
<tr valign="top"> | <tr valign="top"> | ||
<td colspan=2><span style="font-weight: 700; font-size: 15px;">Steps: | <td colspan=2><span style="font-weight: 700; font-size: 15px;">Steps: To Load or Create a Route:-</span></td> | ||
</tr> | </tr> | ||
<tr valign="top"> | <tr valign="top"> | ||
| Line 337: | Line 350: | ||
<tr valign="top"> | <tr valign="top"> | ||
<td colspan=2><br><br> | <td colspan=2><br><br> | ||
In the '''Driver/Surveyor''' screen a strip of thumbnails of all the Routes, installed and as well as available as '''DLC''', will be shown at the base of the screen | In the '''Driver/Surveyor''' screen a strip of thumbnails of all the Routes, installed and as well as available as '''DLC''', will be shown at the base of the screen.<br> | ||
[[image:TRS19SelectRoute.png|link=|alt=TRS19 Main Screen Route Selection]]<br><br></td> | [[image:TRS19SelectRoute.png|link=|alt=TRS19 Main Screen Route Selection]]<br><br></td> | ||
</tr> | </tr> | ||
<tr valign="top"> | <tr valign="top"> | ||
<td colspan=2><span style="font-weight: 700; font-size: 15px; background-color: lightcyan;">Left Click and Drag</span> the scroll bar left or right to reveal the additional routes or use the '''Expand View''' button described below</td> | <td colspan=2>If there are too many to fit in the available space, then either:- | ||
<table> | |||
<tr valign="top"> | |||
<td width=10>[[image:DotPoint.JPG|10px|link=]]</td> | |||
<td>move the mouse pointer onto the base of any thumbnail image to reveal the scroll bar device, as shown above, then <span style="font-weight: 700; font-size: 15px; background-color: lightcyan;">Left Click and Drag</span> the scroll bar left or right to reveal the additional routes <span style="font-weight: 700; font-size: 15px;">OR</span></td> | |||
</tr> | |||
<tr valign="top"> | |||
<td>[[image:DotPoint.JPG|10px|link=]]</td> | |||
<td>move the mouse pointer onto any thumbnail image and roll the mouse scroll wheel forwards or backwards to reveal the additional routes <span style="font-weight: 700; font-size: 15px;">OR</span></td></tr> | |||
<tr valign="top"> | |||
<td>[[image:DotPoint.JPG|10px|link=]]</td> | |||
<td>use the '''Expand View''' [[image:MainScreenDownArrow.png|link=]] button described below. This will fill the screen with thumbnail images. If there are still too many to fit then use either of the two methods listed above to scroll the full screen view left and right</td> | |||
</tr> | |||
</table> | |||
</td> | |||
</tr> | </tr> | ||
</table> | </table> | ||
| Line 359: | Line 386: | ||
<tr valign="top"> | <tr valign="top"> | ||
<td>[[image:DotPoint.JPG|10px|link=]]</td> | <td>[[image:DotPoint.JPG|10px|link=]]</td> | ||
<td>A <span style="font-weight: 700; font-size: 15px; background-color: lightcyan;">Left Click</span> on the '''Expand View''' [[image:MainScreenDownArrow.png|link=]] button (top right) will expand the thumbnail list to fill the screen | <td>A <span style="font-weight: 700; font-size: 15px; background-color: lightcyan;">Left Click</span> on the '''Expand View''' [[image:MainScreenDownArrow.png|link=]] button (top right) will expand the thumbnail list to fill the screen. <span style="font-weight: 700; font-size: 15px; background-color: lightcyan;">Left Click</span> the '''Expand View''' [[image:MainScreenDownArrow.png|link=]] button again to return the thumbnails to the strip at the bottom of the screen.</td> | ||
</tr> | </tr> | ||
</table> | </table> | ||
| Line 509: | Line 536: | ||
<table bgcolor=#ffffff cellpadding=2> | <table bgcolor=#ffffff cellpadding=2> | ||
<tr valign="top"> | <tr valign="top"> | ||
<td colspan=2><span style="font-weight: 700; font-size: 15px;">Steps: | <td colspan=2><span style="font-weight: 700; font-size: 15px;">Steps: To Edit the Route Details at Any Time:-</span></td> | ||
</tr> | </tr> | ||
<tr valign="top"> | <tr valign="top"> | ||
| Line 566: | Line 593: | ||
<td width=500>[[image:RouteEditWindowExample_S20.png|link=]]<br><br> | <td width=500>[[image:RouteEditWindowExample_S20.png|link=]]<br><br> | ||
A <span style="font-weight: 700; font-size: 15px; background-color: lightcyan;">Left Click</span> on the [[image:Tick.PNG|link=|alt=Tick]] icon at the bottom right of the window will apply the new data settings to the single flat baseboard that you have just created.<br> | A <span style="font-weight: 700; font-size: 15px; background-color: lightcyan;">Left Click</span> on the [[image:Tick.PNG|link=|alt=Tick]] icon at the bottom right of the window will apply the new data settings to the single flat baseboard that you have just created.<br> | ||
A <span style="font-weight: 700; font-size: 15px; background-color: lightcyan;">Left Click</span> on the [[image:Cross.PNG|link=|alt=Cross]] icon at the bottom right of the window will cancel the data entry and continue to use the '''default''' data settings (usually the settings entered for the last route you created) in the single flat baseboard currently on the screen. | A <span style="font-weight: 700; font-size: 15px; background-color: lightcyan;">Left Click</span> on the [[image:Cross.PNG|link=|alt=Cross]] icon at the bottom right of the window will cancel the data entry and continue to use the '''default''' data settings (usually the settings entered for the last route you created) in the single flat baseboard currently on the screen.</td> | ||
</td> | |||
<td> | <td> | ||
<table width=500 bgcolor=#000000> | <table width=500 bgcolor=#000000> | ||
| Line 618: | Line 627: | ||
<tr valign="top"> | <tr valign="top"> | ||
<td>[[image:DotPoint6.JPG|link=]]</td> | <td>[[image:DotPoint6.JPG|link=]]</td> | ||
<td>The <span style="color: white; background-color: black; font-weight: 700; font-size: 15px;"> Working units </span> provides a choice between '''Metric''' (metres, kilometres) and '''Imperial''' (yards, miles) which only affects measurements used by rulers (in '''Surveyor 2.0''' separate metric and imperial rulers are available) | <td>The <span style="color: white; background-color: black; font-weight: 700; font-size: 15px;"> Working units </span> provides a choice between '''Metric''' (metres, kilometres) and '''Imperial''' (feet, yards, miles) which only affects measurements used by rulers (in '''Surveyor 2.0''' separate metric and imperial rulers are available) and train speeds ('''km/h''' or '''mph'''). See Notes below.</td> | ||
</tr> | </tr> | ||
<tr valign="top"> | <tr valign="top"> | ||
| Line 638: | Line 645: | ||
</table> | </table> | ||
<br> | <br> | ||
<table width=1000> | <table width=1000 bgcolor=#000000 cellpadding=2> | ||
<tr valign="top"> | |||
<td> | |||
<table width=996 bgcolor=#ffffb0 cellpadding=2> | |||
<tr valign="top"> | <tr valign="top"> | ||
<td><span style="font-weight: 700; font-size: 15px; color: white; background-color: blue;"> SD/HD Options </span></td> | <td width=25 rowspan=3>[[image:NotePad.PNG|link=]]</td> | ||
<td colspan=2><span style="font-size: 17px; font-weight: 700;">Notes: Height, Position and Speed Measurements</span></td> | |||
</tr> | |||
<tr valign="top"> | |||
<td width=10>[[image:DotPoint.JPG|10px|link=]]</td> | |||
<td>All '''Height''' and '''Position''' data in the '''Surveyor Tools''' are always entered and displayed in <span style="background-color: yellow; font-weight: 700;">metres</span> even if you are using '''Imperial''' units (feet) for your rulers and distance measurements.</td> | |||
</tr> | |||
<tr valign="top"> | |||
<td>[[image:DotPoint.JPG|10px|link=]]</td> | |||
<td>'''Track speed signs''' are always locked at either '''Metric''' (km/h) or '''Imperial''' (mph) - there are separate speed signs available for each. The number shown by a speed sign will not be changed if you switch between the two systems. However, their speed values will be converted. So a track speed sign that is set at '''40 mph''' will still be displayed as '''40''' but it will be read as '''64 km/h''' in '''Driver''' if the '''Working Units''' have been set to '''metric'''.</td> | |||
</tr> | |||
<tr valign="top"> | |||
<td width=25 rowspan=3>[[image:NotePad.PNG|link=]]</td> | |||
<td colspan=2><span style="font-size: 17px; font-weight: 700;">Notes: Ground Texture and Regions'''</span></td> | |||
</tr> | |||
<tr valign="top"> | |||
<td>[[image:DotPoint.JPG|10px|link=]]</td> | |||
<td>When a new route is created all the baseboards added will be covered with the '''Default Ground Texture''' which is usually the last one that you set. Selecting a '''Region''' ('''Point''' <span style="font-weight: 700; font-size: 15px; color: white; background-color: red;"> 3 </span> in the '''Notes: Route Options''' above) will set the ground texture to be used in every baseboard added to the new route. Some regions have a standard grid pattern as their default ground texture - look on the '''DLS''' for region assets with '''TRS19 Grid''' or similar in their titles. You can change the selected '''Region''' and its ground texture as often as you like but this can also change other properties of the route as described above.</td> | |||
</tr> | |||
<tr valign="top"> | |||
<td>[[image:DotPoint.JPG|10px|link=]]</td> | |||
<td>You can create your own '''Region''' with your preferred ground texture and other features - see the '''Trainz Wiki Page [[image:WikiLink.PNG|link=]] [[How to Create a Region Asset|How to Create a Region Asset]]''' for the details</td> | |||
</tr> | |||
</table> | |||
</td> | |||
</tr> | |||
</table> | |||
<br> | |||
<table width=1000> | |||
<tr valign="top"> | |||
<td><span style="font-weight: 700; font-size: 15px; color: white; background-color: blue;"> SD/HD Options </span></td> | |||
</tr> | </tr> | ||
<tr valign="top"> | <tr valign="top"> | ||
| Line 696: | Line 736: | ||
<table bgcolor=#ffffff> | <table bgcolor=#ffffff> | ||
<tr valign="top"> | <tr valign="top"> | ||
<td colspan=2><span style="font-weight: 700; font-size: 15px;">Steps: | <td colspan=2><span style="font-weight: 700; font-size: 15px;">Steps: To Switch Between HD and SD Modes at Any Time:-</span></td> | ||
</tr> | </tr> | ||
<tr valign="top"> | <tr valign="top"> | ||
| Line 917: | Line 957: | ||
<table> | <table> | ||
<tr valign="top"> | <tr valign="top"> | ||
<td colspan=2><span style="font-weight: 700; font-size: 15px;">Steps:</span> | <td colspan=2><span style="font-weight: 700; font-size: 15px;">Steps: To Add New Baseboards:-</span></td> | ||
</tr> | </tr> | ||
<tr valign="top"> | <tr valign="top"> | ||
| Line 1,024: | Line 1,064: | ||
<table bgcolor=#ffffff cellpadding=2> | <table bgcolor=#ffffff cellpadding=2> | ||
<tr valign="top"> | <tr valign="top"> | ||
<td colspan=2><span style="font-weight: 700; font-size: 15px;;">Steps: | <td colspan=2><span style="font-weight: 700; font-size: 15px;;">Steps: To Disable the Current Default Ground Texture (Easiest Method):-</span></td> | ||
</tr> | </tr> | ||
<tr valign="top"> | <tr valign="top"> | ||
| Line 1,119: | Line 1,159: | ||
<table width=1000> | <table width=1000> | ||
<tr valign="top"> | <tr valign="top"> | ||
<td>You must first find and select the route to load from those already installed. At the top of the '''Driver/Surveyor''' screen the | <td>You must first find and select the route to load from those already installed. At the top of the '''Driver/Surveyor''' screen the search options are shown as a set of buttons, the first 3 are drop down lists and the last is a text entry box.</td> | ||
</tr> | </tr> | ||
</table> | </table> | ||
[[image:RouteSearchButtons.png|link=|alt=Route Search]] | [[image:RouteSearchButtons.png|link=|alt=Route Search]] | ||
<table width=720> | |||
<tr valign="top"> | |||
<td width=260>[[image:SelectRouteMenu.png|link=|alt=Route List]]</td> | |||
<td width=240>[[image:SelectSourceMenu.png|link=|alt=Source List]]</td> | |||
<td width=210>[[image:SelectRegionMenu.png|link=|alt=Region List]]</td> | |||
</tr> | |||
</table> | |||
<table width=1000> | <table width=1000> | ||
| Line 1,219: | Line 1,267: | ||
<table bgcolor=#ffffff cellpadding=2> | <table bgcolor=#ffffff cellpadding=2> | ||
<tr valign="top"> | <tr valign="top"> | ||
<td><span style="font- | <td><span style="font-weight: 700; font-size: 15px;">Steps: To Load a Route from Content Manager:-</span> | ||
<table> | <table> | ||
<tr valign="top"> | <tr valign="top"> | ||
| Line 1,454: | Line 1,502: | ||
<tr valign="top"> | <tr valign="top"> | ||
<td>[[image:DotPoint6.JPG|link=]]</td> | <td>[[image:DotPoint6.JPG|link=]]</td> | ||
<td><span style="color: white; background-color: black; font-weight: 700; font-size: 15px;"> Working units </span>. Switching between '''Metric''' and '''Imperial''' will change how train speeds are calculated and displayed in Driver (in km/h or mph) | <td><span style="color: white; background-color: black; font-weight: 700; font-size: 15px;"> Working units </span>. Switching between '''Metric''' and '''Imperial''' will change how train speeds are calculated and displayed in Driver (in km/h or mph), the speeds set by track speed signs and the units used by the ruler tools</td> | ||
</tr> | </tr> | ||
</table> | </table> | ||
| Line 1,466: | Line 1,510: | ||
<td colspan=2> | <td colspan=2> | ||
<table> | <table> | ||
<tr valign="top"> | |||
<td>[[image:DotPoint7.JPG|link=]]</td> | |||
<td><span style="color: white; background-color: black; font-weight: 700; font-size: 15px;"> Route Edit Detail </span> <span style="background-color: yellow;">in '''Trainz Plus''' only</span>. This sets the minimum ground brush size when working with '''HD resolution'''. It can be swapped between the two settings at anytime when editing. See <span style="font-weight: 700; font-size: 15px; color: white; background-color: blue;"> SD/HD Options </span> below for more details</td> | |||
</tr> | |||
<tr valign="top"> | <tr valign="top"> | ||
<td>[[image:DotPoint8.JPG|link=]]</td> | <td>[[image:DotPoint8.JPG|link=]]</td> | ||
| Line 1,559: | Line 1,607: | ||
<table bgcolor=#ffffff> | <table bgcolor=#ffffff> | ||
<tr valign="top"> | <tr valign="top"> | ||
<td colspan=2><span style="font-weight: 700; font-size: 15px;">Steps: | <td colspan=2><span style="font-weight: 700; font-size: 15px;">Steps: To Switch Between HD and SD Modes at Any Time:-</span></td> | ||
</tr> | </tr> | ||
<tr valign="top"> | <tr valign="top"> | ||
| Line 2,403: | Line 2,451: | ||
<table width=996 bgcolor=#ffffff cellpadding=2> | <table width=996 bgcolor=#ffffff cellpadding=2> | ||
<tr valign="top"> | <tr valign="top"> | ||
<td colspan=2><span style="font-weight: 700; font-size: 15px;">Steps: | <td colspan=2><span style="font-weight: 700; font-size: 15px;">Steps: To Add a New Session to an Existing Route:-</span></td> | ||
</tr> | </tr> | ||
<tr valign="top"> | <tr valign="top"> | ||
| Line 2,520: | Line 2,568: | ||
</table> | </table> | ||
<table> | |||
<table | |||
<tr valign="top"> | <tr valign="top"> | ||
<td | <td colspan=2><br><br> | ||
A strip of thumbnails of all the Sessions, installed and as well as any that may be available from the '''DLC''', for the selected route will be shown at the base of the screen.<br> | |||
[[image:SessionSelectExisting.png|link=|alt=Existing Sessions]]<br><br></td> | |||
</tr> | </tr> | ||
<tr valign="top"> | <tr valign="top"> | ||
<td width=200><span style="background-color: #10c810;">            </span> <span style="font-weight: 700; font-size: 15px;">Payware installed</span></td> | <td colspan=2>If there are too many to fit in the available space, then either:- | ||
<table> | |||
<tr valign="top"> | |||
<td width=10>[[image:DotPoint.JPG|10px|link=]]</td> | |||
<td>move the mouse pointer onto the base of any thumbnail image to reveal the scroll bar device then <span style="font-weight: 700; font-size: 15px; background-color: lightcyan;">Left Click and Drag</span> the scroll bar left or right to reveal the additional sessions <span style="font-weight: 700; font-size: 15px;">OR</span></td> | |||
</tr> | |||
<tr valign="top"> | |||
<td>[[image:DotPoint.JPG|10px|link=]]</td> | |||
<td>move the mouse pointer onto any thumbnail image, as shown above, and roll the mouse scroll wheel forwards or backwards to reveal the additional sessions <span style="font-weight: 700; font-size: 15px;">OR</span></td></tr> | |||
<tr valign="top"> | |||
<td>[[image:DotPoint.JPG|10px|link=]]</td> | |||
<td>use the '''Expand View''' [[image:MainScreenDownArrow.png|link=]] button. This will fill the screen with thumbnail images. If there are still too many to fit then use either of the two methods listed above to scroll the full screen view left and right. <span style="font-weight: 700; font-size: 15px; background-color: lightcyan;">Left Click</span> the '''Expand View''' [[image:MainScreenDownArrow.png|link=]] button again to return the thumbnails to the strip at the bottom of the screen.</td> | |||
</tr> | |||
</table> | |||
</td> | |||
</tr> | |||
</table> | |||
The same colour coding system used in the route thumbnails also applies to session thumbnails.<br> | |||
<table width=990> | |||
<tr valign="top"> | |||
<td width=200><span style="background-color: #ffae00;">            </span> <span style="font-weight: 700; font-size: 15px;">Payware on DLC</span></td> | |||
<td>Must be purchased and downloaded, but some may be free - depending on your membership options. If you click a thumbnail with this colour a <span style="color: white; background-color: black; font-weight: 700; font-size: 15px;"> DOWNLOAD </span> button will appear on the bottom right of the screen. If a price is included in the button then that is the purchase price (in $US)</td> | |||
</tr> | |||
<tr valign="top"> | |||
<td width=200><span style="background-color: #10c810;">            </span> <span style="font-weight: 700; font-size: 15px;">Payware installed</span></td> | |||
<td>Already installed from the '''DLC'''. '''DLC''' items cannot be deleted. To remove them use the '''Uninstall''' option in the '''Content Store''' from the '''Launcher'''. You can reinstall them later without any additional cost</td> | <td>Already installed from the '''DLC'''. '''DLC''' items cannot be deleted. To remove them use the '''Uninstall''' option in the '''Content Store''' from the '''Launcher'''. You can reinstall them later without any additional cost</td> | ||
</tr> | </tr> | ||
| Line 2,591: | Line 2,660: | ||
<table> | <table> | ||
<tr valign="top"> | <tr valign="top"> | ||
<td colspan=2><span style="font-weight: 700; font-size: 15px;">Steps:</span></td> | <td colspan=2><span style="font-weight: 700; font-size: 15px;">Steps: To Load a Route and Then a Session:-</span></td> | ||
</tr> | </tr> | ||
<tr valign="top"> | <tr valign="top"> | ||
<td width=20>[[image:DotPoint1.JPG|link=]]</td> | <td width=20>[[image:DotPoint1.JPG|link=]]</td> | ||
<td>Select the route as described in the section '''[[image:PageLink.PNG|link=]] [[#Loading an Existing Route|Loading an Existing Route]]''' above. Then <span style="font-weight: 700; font-size: 15px; background-color: lightcyan;">Left Click</span> on the <span style="background-color: black; color: white; font-weight: 700; font-size: 15px;"> VIEW SESSIONS </span> button. | <td>Select the route as described in the section '''[[image:PageLink.PNG|link=]] [[#Loading an Existing Route|Loading an Existing Route]]''' above. Then <span style="font-weight: 700; font-size: 15px; background-color: lightcyan;">Left Click</span> on the <span style="background-color: black; color: white; font-weight: 700; font-size: 15px;"> VIEW SESSIONS </span> button. | ||
<table> | |||
[[image: | <tr valign="top"> | ||
<td colspan=2>A strip of thumbnails of all the Sessions, installed and as well as any that may be available from the '''DLC''', for the selected route will be shown at the base of the screen.<br> | |||
This will | [[image:SessionSelectExisting.png|link=|alt=Existing Sessions]]<br><br></td> | ||
</tr> | |||
<tr valign="top"> | |||
<td colspan=2>If there are too many to fit in the available space, then either:- | |||
<table> | |||
<tr valign="top"> | |||
<td width=10>[[image:DotPoint.JPG|10px|link=]]</td> | |||
<td>move the mouse pointer onto the base of any thumbnail image to reveal the scroll bar device then <span style="font-weight: 700; font-size: 15px; background-color: lightcyan;">Left Click and Drag</span> the scroll bar left or right to reveal the additional sessions <span style="font-weight: 700; font-size: 15px;">OR</span></td> | |||
</tr> | |||
<tr valign="top"> | |||
<td>[[image:DotPoint.JPG|10px|link=]]</td> | |||
<td>move the mouse pointer onto any thumbnail image, as shown above, and roll the mouse scroll wheel forwards or backwards to reveal the additional sessions <span style="font-weight: 700; font-size: 15px;">OR</span></td></tr> | |||
<tr valign="top"> | |||
<td>[[image:DotPoint.JPG|10px|link=]]</td> | |||
<td>use the '''Expand View''' [[image:MainScreenDownArrow.png|link=]] button. This will fill the screen with thumbnail images. If there are still too many to fit then use either of the two methods listed above to scroll the full screen view left and right. <span style="font-weight: 700; font-size: 15px; background-color: lightcyan;">Left Click</span> the '''Expand View''' [[image:MainScreenDownArrow.png|link=]] button again to return the thumbnails to the strip at the bottom of the screen.</td> | |||
</tr> | |||
</table> | |||
</td> | |||
</tr> | |||
</table> | |||
</td> | |||
</tr> | </tr> | ||
<tr valign="top"> | <tr valign="top"> | ||
<td>[[image:DotPoint2.JPG|link=]]</td> | <td>[[image:DotPoint2.JPG|link=]]</td> | ||
<td> Select the session thumbnail you need and then <span style="font-weight: 700; font-size: 15px; background-color: lightcyan;">Left Click</span> on the <span style="background-color: black; color: white; font-weight: 700; font-size: 15px;"> EDIT SESSION </span> button. | <td>Select the session thumbnail you need and then <span style="font-weight: 700; font-size: 15px; background-color: lightcyan;">Left Click</span> on the <span style="background-color: black; color: white; font-weight: 700; font-size: 15px;"> EDIT SESSION </span> button. | ||
[[image:SessionButtonsEdit2.png|link=|alt=Edit Session]] | [[image:SessionButtonsEdit2.png|link=|alt=Edit Session]] | ||
| Line 2,659: | Line 2,748: | ||
<table bgcolor=#ffffff cellpadding=2> | <table bgcolor=#ffffff cellpadding=2> | ||
<tr valign="top"> | <tr valign="top"> | ||
<td><span style="font- | <td><span style="font-weight: 700; font-size: 15px;">Steps: To Load a Session into Surveyor:-</span> | ||
<table> | <table> | ||
<tr valign="top"> | <tr valign="top"> | ||
| Line 2,735: | Line 2,824: | ||
<table bgcolor=#ffffff cellpadding=2> | <table bgcolor=#ffffff cellpadding=2> | ||
<tr valign="top"> | <tr valign="top"> | ||
<td><span style="font-size: 17px; font-weight: 700;">Steps | <td><span style="font-size: 17px; font-weight: 700;">Steps To Load a Session into Driver from Content Manager:-:</span> | ||
<table> | <table> | ||
<tr valign="top"> | <tr valign="top"> | ||
| Line 2,768: | Line 2,857: | ||
<tr valign="top"> | <tr valign="top"> | ||
<td width=629><span id="skipEditSession"></span> | <td width=629><span id="skipEditSession"></span> | ||
=='''Editing a Session'''== | =='''Editing a Session'''== | ||
</td> | </td> | ||
| Line 2,994: | Line 3,082: | ||
<table bgcolor=#ffffff cellpadding=2> | <table bgcolor=#ffffff cellpadding=2> | ||
<tr valign="top"> | <tr valign="top"> | ||
<td colspan=2><span style="font-weight: 700; font-size: 15px;">Steps: | <td colspan=2><span style="font-weight: 700; font-size: 15px;">Steps: To Save the Default Switch Direction in the Route:-</span></td> | ||
</tr> | </tr> | ||
<tr valign="top"> | <tr valign="top"> | ||
| Line 3,032: | Line 3,120: | ||
<table bgcolor=#ffffff cellpadding=2> | <table bgcolor=#ffffff cellpadding=2> | ||
<tr valign="top"> | <tr valign="top"> | ||
<td colspan=2><span style="font-weight: 700; font-size: 15px;">Steps: | <td colspan=2><span style="font-weight: 700; font-size: 15px;">Steps: To Save a Different Switch Direction in a Session:-</span></td> | ||
</tr> | </tr> | ||
<tr valign="top"> | <tr valign="top"> | ||
| Line 3,630: | Line 3,718: | ||
<tr valign="top"> | <tr valign="top"> | ||
<td>[[image:DotPoint.JPG|10px|link=]]</td> | <td>[[image:DotPoint.JPG|10px|link=]]</td> | ||
<td>There is a <span style="font-weight: 700; color: red;">BUG</span> in '''Trainz Plus''' and '''TRS22''' that will treat changing the name of a '''Track Object''' (e.g. a signal, track mark, switch, etc) as a change to the session and not to the route. If you have not edited anything else in the route then you will see the '''Session Save''' dialogue window (see [[image:PageLink.PNG|link=]] '''[[#skipSaveExistingSessionOnly|Saving an Edited Session Only]]''' below) to save the session and not the route. The workaround is to make a change to the route (e.g. move a tree a few centimetres) and select save again.</td> | <td>There is a <span style="font-weight: 700; color: red;">BUG</span> in '''Trainz Plus''' and '''TRS22''' that will treat changing the name of a '''Track Object''' (e.g. a signal, track mark, switch, etc) as a change to the session and not to the route. If you have not edited anything else in the route then you will see the '''Session Save''' dialogue window (see [[image:PageLink.PNG|link=]] '''[[#skipSaveExistingSessionOnly|Saving an Edited Session Only]]''' below) to save the session and not the route. The workaround is to make a change to the route (e.g. move a tree a few centimetres) and select save again. <span style="background-color: yellow;">'''NOTE:''' This bug has been fixed in the '''Release Candidate''' for the next update.</span></td> | ||
</tr> | </tr> | ||
</table> | </table> | ||
| Line 3,716: | Line 3,804: | ||
<tr valign="top"> | <tr valign="top"> | ||
<td width=10>[[image:BlueDot10x10.png|link=]]</td> | <td width=10>[[image:BlueDot10x10.png|link=]]</td> | ||
<td>The '''UDS''' | <td>The '''UDS''' allows you to switch quickly between '''Driver''' and '''Surveyor''' (in both directions) so you can edit a running session</td> | ||
</tr> | </tr> | ||
</table> | </table> | ||
| Line 3,722: | Line 3,810: | ||
<table width=1000> | <table width=1000> | ||
<tr valign="top"> | <tr valign="top"> | ||
<td>The '''UDS''' ('''<u>U</u>'''nified '''<u>D</u>'''river '''<u>S</u>'''urveyor) Interface allows you to quickly switch from '''Driver''' to '''Surveyor''' and back to '''Driver''' again without having to restart the session from the beginning. You can edit | <td>The '''UDS''' ('''<u>U</u>'''nified '''<u>D</u>'''river '''<u>S</u>'''urveyor) Interface (see the '''Trainz Wiki Page [[image:WikiLink.PNG|link=]] [[How_to_Use_the_UDS_Interface|How to Use the UDS Interface]]''' for more details) allows you to quickly switch from '''Driver''' to '''Surveyor''' and back to '''Driver''' again without having to restart the session from the beginning. You can edit the route and session while in '''Surveyor''' and then switch back to '''Driver''' to continue the session where you left it.</td> | ||
</tr> | </tr> | ||
</table> | </table> | ||
| Line 3,732: | Line 3,820: | ||
<tr valign="top"> | <tr valign="top"> | ||
<td>[[image:Stop.PNG|link=]]</td> | <td>[[image:Stop.PNG|link=]]</td> | ||
<td> | <td>This powerful ability does come with a warning. When you save your changes take particular care of what you are saving and how you are saving (overwrite or new save). See '''Notes:''' below.</td> | ||
This powerful ability does come with a warning. | |||
</td> | |||
</tr> | </tr> | ||
</table> | </table> | ||
| Line 3,743: | Line 3,829: | ||
<table width=1000> | <table width=1000> | ||
<tr valign="top"> | <tr valign="top"> | ||
<td>Most of the problems users seem to be experiencing with the '''UDS''', judging from the posts in the Trainz Forums, is when saving an edited '''Route''' or '''Session''' after switching | <td>Most of the problems users seem to be experiencing with the '''UDS''', judging from the posts in the Trainz Forums, is when saving an edited '''Route''' or '''Session''' after switching from '''Surveyor''' to '''Driver'''. The '''Notes:''' and '''Options:''' below contain some tips and steps you can use to avoid these problems.</td> | ||
</tr> | </tr> | ||
</table> | </table> | ||
| Line 3,758: | Line 3,844: | ||
</tr> | </tr> | ||
<tr valign="top"> | <tr valign="top"> | ||
<td>[[image:DotPoint.JPG|10px|link=]]</td> | <td width=10>[[image:DotPoint.JPG|10px|link=]]</td> | ||
<td> | <td>After switching to '''Surveyor''' you can edit any Route or Session objects and scenery. Be aware that the properties of some route objects are actually stored in the Session and that editing/deleting some objects, such as tracks, signals and switches, could have a serious effect on saved Sessions and Games</td> | ||
</tr> | </tr> | ||
<tr valign="top"> | <tr valign="top"> | ||
<td>[[image:DotPoint.JPG|10px|link=]]</td> | <td>[[image:DotPoint.JPG|10px|link=]]</td> | ||
<td>''' | <td>Using '''Driver Mode''' involves driving consists (either manually or through the '''AI''') and starting or completing '''Session Rules'''. <span style="font-weight: 700; background-color: yellow;">This will change the session parameters</span></td> | ||
</tr> | </tr> | ||
<tr valign="top"> | <tr valign="top"> | ||
<td>[[image:DotPoint.JPG|10px|link=]]</td> | <td>[[image:DotPoint.JPG|10px|link=]]</td> | ||
<td> | <td>Switching from '''Driver''' to '''Surveyor''' and editing the session is almost the same as loading the session directly into Surveyor from the opening Trainz menu. But the big difference is that after using '''Driver''':- | ||
<table width=990 cellpadding=2> | |||
<tr valign="top"> | |||
<td width=10>[[image:RedDot10x10.png|link=]]</td> | |||
<td width=490>the consists may have moved to new positions</td> | |||
<td width=10>[[image:RedDot10x10.png|link=]]</td> | |||
<td width=490>some driver commands may have already been completed</td> | |||
</tr> | </tr> | ||
<tr valign="top"> | <tr valign="top"> | ||
<td>[[image: | <td>[[image:RedDot10x10.png|link=]]</td> | ||
<td> | <td>some of the session rules may have started or completed</td> | ||
<td>[[image:RedDot10x10.png|link=]]</td> | |||
<td>commodity levels (industries and wagons) may have changed</td> | |||
</tr> | |||
<tr valign="top"> | |||
<td>[[image:RedDot10x10.png|link=]]</td> | |||
<td>switch levers may be in new positions</td> | |||
<td>[[image:RedDot10x10.png|link=]]</td> | |||
<td>signals may be in new states</td> | |||
</tr> | |||
<tr valign="top"> | |||
<td>[[image:RedDot10x10.png|link=]]</td> | |||
<td colspan=3>the clock and possibly the weather would have changed</td> | |||
</tr> | |||
</table> | |||
</td> | |||
</tr> | |||
<tr valign="top"> | |||
<td> </td> | |||
<td> | |||
<table bgcolor=#fcbcbc cellpadding=2> | |||
<tr valign="top"> | |||
<td>[[image:Stop.PNG|link=]]</td> | |||
<td>'''Saving the Session''' after editing will save all of these changes. If you choose to save using the '''Overwrite existing session''' option then you will be replacing your original starting Session with a new one with the possible changes listed above. So when you later load and restart the Session things will not be the same as they were in the original or starting Session.</td> | |||
</tr> | |||
</table> | |||
</td> | |||
</tr> | </tr> | ||
</table> | </table> | ||
| Line 3,801: | Line 3,919: | ||
<table bgcolor=#ffffff cellpadding=2> | <table bgcolor=#ffffff cellpadding=2> | ||
<tr valign="top"> | <tr valign="top"> | ||
<td colspan=2><span style="font-weight: 700; font-size: 15px;">Steps: | <td colspan=2><span style="font-weight: 700; font-size: 15px;">Steps: To Save the Route Only:-</span></td> | ||
</tr> | </tr> | ||
<tr valign="top"> | <tr valign="top"> | ||
| Line 3,816: | Line 3,934: | ||
</table> | </table> | ||
<table width=1000> | <table width=1000> | ||
<tr valign="top"> | <tr valign="top"> | ||
<td colspan=2>[[Image:line740.png|link=]]</td> | <td colspan=2>[[Image:line740.png|link=]]</td> | ||
</tr> | </tr> | ||
<tr valign="top"> | <tr valign="top"> | ||
<td colspan=2><span style="font-weight: 700; font-size: 17px;">Option </span>[[image:Bblue.png|link=]] <span style="font-weight: 700; font-size: 17px;">Create a New Session</span></td> | <td colspan=2><span style="font-weight: 700; font-size: 17px;">Option </span>[[image:Bblue.png|link=]] <span style="font-weight: 700; font-size: 17px;">Create a New Session</span></td> | ||
</tr> | </tr> | ||
<tr valign="top"> | <tr valign="top"> | ||
<td> | <td> | ||
<table width=290> | <table width=290> | ||
<tr valign="top"> | <tr valign="top"> | ||
<td width=20> </td> | <td width=20> </td> | ||
<td>[[image:UDS-CreateNewSession.png|link=]]</td> | <td>[[image:UDS-CreateNewSession.png|link=]]</td> | ||
</tr> | </tr> | ||
</table> | </table> | ||
</td> | |||
<td> | |||
<table bgcolor=#000000 cellpadding=2> | |||
<tr valign="top"> | |||
<td> | |||
<table bgcolor=#ffffff cellpadding=2> | |||
<tr valign="top"> | |||
<td colspan=2><span style="font-weight: 700; font-size: 15px;">Steps: To Save the Route and a NEW Session:-</span></td> | |||
</tr> | |||
<tr valign="top"> | |||
<td width=20>[[image:DotPoint1.JPG|link=]]</td> | |||
<td><span style="font-weight: 700; font-size: 15px; background-color: lightcyan;">Left Click</span> the checkbox <span style="font-weight: 700; font-size: 15px; color: white; background-color: black;"> Create new session </span> </td> | |||
</tr> | |||
<tr valign="top"> | |||
<td>[[image:DotPoint2.JPG|link=]]</td> | |||
<td>Enter a name for the new session</td> | |||
</tr> | |||
</table> | |||
</td> | |||
</tr> | |||
</table> | |||
This will save the '''Route''' using its existing name and it will overwrite the original route. It will also save the '''Session''' using the name you enter in the text box below the checkbox ('''Stage 3''' in the example shown). The original '''Session''' will not be altered. This is useful when you want to test out changes to consists, industry settings, Rules, driver commands, etc but do not want to destroy the original '''Session'''. | |||
</td> | |||
</tr> | |||
<tr valign="top"> | |||
<td colspan=2>[[Image:line740.png|link=]]</td> | |||
</tr> | |||
</table> | |||
<table width=1000> | |||
<tr valign="top"> | |||
<td> | |||
If you have '''NOT''' edited anything while in '''Surveyor''' and select <span style="font-weight: 700; color: white; background-color: black; font-size: 15px;"> Save </span> then you will be shown the '''Save Driver Session''' dialogue window to save the session in its current state as a '''Game''' (also called a '''Driver Game'''). This is exactly the same as pressing <span style="font-weight: 700; font-size: 15px;"><span style="color: white; background-color: black;"> Ctrl </span> + <span style="color: white; background-color: black;"> S </span></span> while in '''Driver'''. | |||
<table> | |||
<tr valign="top"> | |||
<td width=465>[[image:RouteSARSaveDriverSession.png|link=|alte=Save Driver Session]]</td> | |||
<td> | |||
<br> | |||
<table bgcolor=#000000 cellpadding=2> | |||
<tr valign="top"> | |||
<td> | |||
<table bgcolor=#ffffb0 cellpadding=2> | |||
<tr valign="top"> | |||
<td width=25>[[image:NotePad.PNG|link=]]</td> | |||
<td width=975><span style="font-size: 17px; font-weight: 700;">Notes:'''</span><br> | |||
---- | |||
The area below the name text entry box will show any existing games that have already been saved for this session. You can select one of them and your current game will be saved with that name and it '''will replace''' (overwrite) that game. | |||
</td> | </td> | ||
</tr> | </tr> | ||
</table> | </table> | ||
| Line 3,852: | Line 4,002: | ||
</tr> | </tr> | ||
</table> | </table> | ||
</td> | </td> | ||
</tr> | </tr> | ||
</table> | </table> | ||
Your saved '''Game''' will appear in the '''Select Session''' menu for the route. Loading it will resume '''Driver''' at the point where it was saved.</td> | |||
</tr> | </tr> | ||
</table> | </table> | ||
<br> | <br> | ||
<table width=1000> <!-- BEGIN Nav Buttons Table --> | <table width=1000> <!-- BEGIN Nav Buttons Table --> | ||
<tr valign="top"> | <tr valign="top"> | ||
<td width=629><span id="stepExit"></span> | <td width=629><span id="stepExit"></span> | ||
='''Exiting Surveyor'''= | ='''Exiting Surveyor'''= | ||
</td> | </td> | ||
| Line 3,901: | Line 4,039: | ||
<table bgcolor=#ffffff cellpadding=2> | <table bgcolor=#ffffff cellpadding=2> | ||
<tr valign="top"> | <tr valign="top"> | ||
<td><span style="font- | <td><span style="font-weight: 700; font-size: 15px;">Steps: To Exit Surveyor:-</span><br> | ||
<table> | <table> | ||
<tr valign="top"> | <tr valign="top"> | ||
| Line 3,996: | Line 4,134: | ||
<table bgcolor=#ffffff cellpadding=2> | <table bgcolor=#ffffff cellpadding=2> | ||
<tr valign="top"> | <tr valign="top"> | ||
<td><span style="font- | <td><span style="font-weight: 700; font-size: 15px;">Steps: To Exit Driver:-</span> | ||
<table> | <table> | ||
<tr valign="top"> | <tr valign="top"> | ||
| Line 4,296: | Line 4,434: | ||
<table bgcolor=#ffffff cellpadding=2> | <table bgcolor=#ffffff cellpadding=2> | ||
<tr valign="top"> | <tr valign="top"> | ||
<td><span style="font- | <td><span style="font-weight: 700; font-size: 15px;">Steps: To Create a Clone:-</span> | ||
<table> | <table> | ||
<tr valign="top"> | <tr valign="top"> | ||
| Line 4,349: | Line 4,487: | ||
<table bgcolor=#ffffff cellpadding=2> | <table bgcolor=#ffffff cellpadding=2> | ||
<tr valign="top"> | <tr valign="top"> | ||
<td><span style="font- | <td><span style="font-weight: 700; font-size: 15px;">Steps: To Find the Clone:-</span><br> | ||
<table> | <table> | ||
<tr valign="top"> | <tr valign="top"> | ||
| Line 4,382: | Line 4,520: | ||
<table bgcolor=#ffffff cellpadding=2> | <table bgcolor=#ffffff cellpadding=2> | ||
<tr valign="top"> | <tr valign="top"> | ||
<td><span style="font- | <td><span style="font-weight: 700; font-size: 15px;">Steps: To Rename a Clone:-</span> | ||
<table> | <table> | ||
<tr valign="top"> | <tr valign="top"> | ||
| Line 4,449: | Line 4,587: | ||
<table width=996 bgcolor=#ffffff cellpadding=2> | <table width=996 bgcolor=#ffffff cellpadding=2> | ||
<tr valign="top"> | <tr valign="top"> | ||
<td><span style="font- | <td><span style="font-weight: 700; font-size: 15px;">Steps: To Submit the Clone as a New Asset:-</span> | ||
<table> | <table> | ||
<tr valign="top"> | <tr valign="top"> | ||
| Line 4,612: | Line 4,750: | ||
<table bgcolor=#ffffff cellpadding=2> | <table bgcolor=#ffffff cellpadding=2> | ||
<tr valign="top"> | <tr valign="top"> | ||
<td colspan=2><span style="font-weight: 700; font-size: 15px;">Steps: | <td colspan=2><span style="font-weight: 700; font-size: 15px;">Steps: To Save a Game in Driver:-</span></td> | ||
</tr> | </tr> | ||
<tr valign="top"> | <tr valign="top"> | ||
| Line 4,651: | Line 4,789: | ||
<tr valign="top"> | <tr valign="top"> | ||
<td width=10>[[image:DotPoint.JPG|10px|link=]]</td> | <td width=10>[[image:DotPoint.JPG|10px|link=]]</td> | ||
<td>You can use the [[image:WikiLink.PNG|link=]] '''[[How to Use the UDS Interface|UDS]]''' to switch from '''Driver''' to '''Surveyor''' during gameplay to edit the '''Route''' and/or the '''Session''' (see '''[[image:PageLink.PNG|link=]] [[#Editing | <td>You can use the [[image:WikiLink.PNG|link=]] '''[[How to Use the UDS Interface|UDS]]''' to switch from '''Driver''' to '''Surveyor''' during gameplay to edit the '''Route''' and/or the '''Session''' (see '''[[image:PageLink.PNG|link=]] [[#Editing Games|Editing Games]]''' below for the details). If you edit the game it is <span style="font-weight: 700; background-color: yellow;">strongly recommended</span> that you save your edits before switching back to '''Driver''' to continue the game</td> | ||
</tr> | </tr> | ||
<tr valign="top"> | <tr valign="top"> | ||
<td>[[image:DotPoint.JPG|10px|link=]]</td> | <td>[[image:DotPoint.JPG|10px|link=]]</td> | ||
<td>If you edit the '''Route''' only and switch back to '''Driver''' without saving your edits, then the first save you make in '''Driver''' will ask you to save the '''Route''' with the usual choices. The next and all following saves will save the '''Game'''. <span style="background-color: yellow; font-weight: 700; font-size: 15px;">Note:</span> Some route objects have properties that are stored in the session. Editing those properties will also be editing the session</td> | <td>If you edit the '''Route''' only and switch back to '''Driver''' without saving your edits, then the first save you make in '''Driver''' will ask you to save the '''Route''' with the usual choices of overwriting the original route or creating a new one. The next and all following saves will save the '''Game'''. <span style="background-color: yellow; font-weight: 700; font-size: 15px;">Note:</span> Some route objects have properties that are stored in the session. Editing those properties will also be editing the session</td> | ||
</tr> | </tr> | ||
<tr valign="top"> | <tr valign="top"> | ||
<td width=10>[[image:DotPoint.JPG|10px|link=]]</td> | <td width=10>[[image:DotPoint.JPG|10px|link=]]</td> | ||
<td>If you edit the '''Session''' and switch back to '''Driver''' without saving your edits, then | <td>If you edit the '''Session''' and switch back to '''Driver''' without saving your edits, then the first save you make in '''Driver''' will ask you to save the '''Session''' with the usual choices of overwriting the original session or creating a new one. The next and all following saves will save the '''Game'''.</td> | ||
</td> | |||
</tr> | </tr> | ||
</table> | </table> | ||
| Line 4,676: | Line 4,807: | ||
<tr valign="top"> | <tr valign="top"> | ||
<td width=629><span id="skipLoadDriverGames"></span> | <td width=629><span id="skipLoadDriverGames"></span> | ||
=='''Loading Games'''== | =='''Loading Games'''== | ||
</td> | </td> | ||
| Line 4,735: | Line 4,865: | ||
<table bgcolor=#ffffff cellpadding=2> | <table bgcolor=#ffffff cellpadding=2> | ||
<tr valign="top"> | <tr valign="top"> | ||
<td colspan=2><span style="font-weight: 700; font-size: 15px;">Steps: | <td colspan=2><span style="font-weight: 700; font-size: 15px;">Steps: To Load a Game into Driver - Either:-</span></td> | ||
</tr> | </tr> | ||
<tr valign="top"> | <tr valign="top"> | ||
| Line 4,821: | Line 4,951: | ||
<tr valign="top"> | <tr valign="top"> | ||
<td width=629><span id="skipEditDriver"></span> | <td width=629><span id="skipEditDriver"></span> | ||
=='''Editing Games'''== | =='''Editing Games'''== | ||
</td> | </td> | ||
| Line 4,856: | Line 4,985: | ||
<table bgcolor=#ffffff cellpadding=2> | <table bgcolor=#ffffff cellpadding=2> | ||
<tr valign="top"> | <tr valign="top"> | ||
<td colspan=2><span style="font-weight: 700; font-size: 15px;">Steps: | <td colspan=2><span style="font-weight: 700; font-size: 15px;">Steps: To Edit a Game:-</span></td> | ||
</tr> | </tr> | ||
<tr valign="top"> | <tr valign="top"> | ||
| Line 4,969: | Line 5,098: | ||
<td> | <td> | ||
<span style="font-size: 17px;">'''Route and Session Building Guides'''</span><br> | <span style="font-size: 17px;">'''Route and Session Building Guides'''</span><br> | ||
*'''<span class="plain; | *'''<span class="plain;">[http://online.ts2009.com/mediaWiki/index.php/HowTo How to Guides]</span>''' | ||
*'''[[HowTo/Create_a_Route_in_10_Minutes|Create a Route in 10 Minutes]]''' | *'''[[HowTo/Create_a_Route_in_10_Minutes|Create a Route in 10 Minutes]]''' | ||
*'''[[How_to_Make_Good_Scenery|How to Make Good Scenery]]''' | *'''[[How_to_Make_Good_Scenery|How to Make Good Scenery]]''' | ||
| Line 4,979: | Line 5,108: | ||
<td> | <td> | ||
<span style="font-size: 17px;">'''More Tutorials and Guides to Using Trainz'''</span><br> | <span style="font-size: 17px;">'''More Tutorials and Guides to Using Trainz'''</span><br> | ||
*'''<span class="plain; | *'''<span class="plain;">[http://online.ts2009.com/mediaWiki/index.php/HowTo How to Guides]</span>''' | ||
*'''[[Driver Commands List]]''' | *'''[[Driver Commands List]]''' | ||
*'''[[Session Rule List with Parameters|Session Rules List (Alphabetical) with Parameters]]''' | *'''[[Session Rule List with Parameters|Session Rules List (Alphabetical) with Parameters]]''' | ||
| Line 5,005: | Line 5,134: | ||
</table> | </table> | ||
---- | ---- | ||
This page was created by Trainz user '''<span class="plain; | This page was created by Trainz user '''<span class="plain;">[http://online.ts2009.com/mediaWiki/index.php/User:Pware pware]</span>''' in September 2021 and was last updated as shown below. | ||
---- | ---- | ||
[[Category:How-to guides]] | [[Category:How-to guides]] | ||
Latest revision as of 10:52, 27 August 2026
 |
 |
|
| This page is intended to provide you with an overview of the properties and features of Routes and Sessions when creating layouts for Trainz. More detailed descriptions of these various features plus instructions on getting you started with creating Routes and Sessions can be found in the Trainz Wiki How To Guides. Links are provided at the end of this document. |
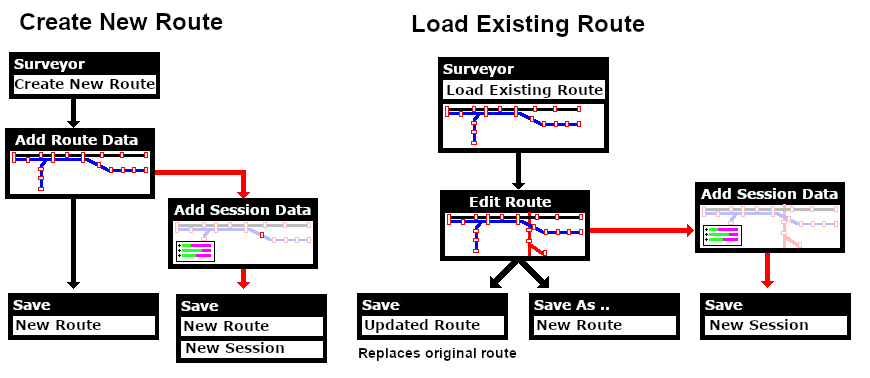
| Workflow Diagrams
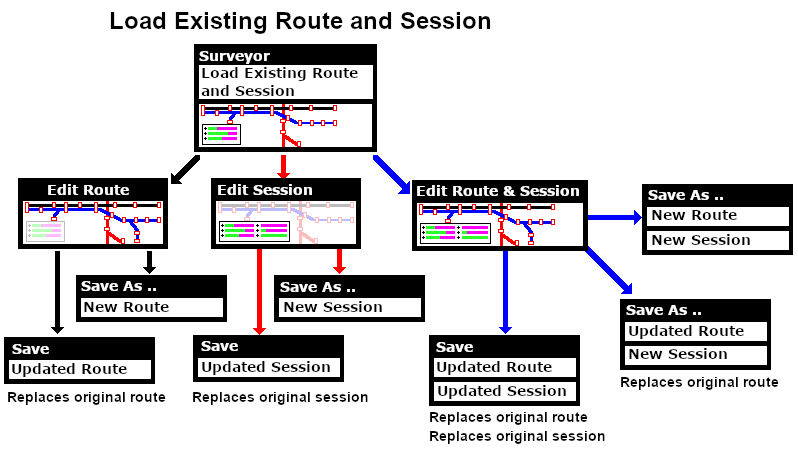 |
Trainz Worlds |
 |
|
|
| The virtual worlds that Trainz creates can be classified as:- |
| Error creating thumbnail: /bin/bash: line 1: /usr/bin/convert: No such file or directory Error code: 127 |
Routes are created in Surveyor and contain most (if not all) of what you will see in your virtual Trainz world. You can have many different routes, limited only by your storage space. They can be built to represent different geographical regions (real or imagined) and different periods of time (past, present, future). They also control the environment settings in your virtual world, such as your geographic location and altitude, the season of the year, lighting conditions and the weather. Each route can have multiple saved Sessions.
Sessions are also created in Surveyor but are designed to be run in Driver. They contain the instructions that will control your trains when they are operating in automatic or "AI" mode in your route. They also control the goods your trains will carry, load and unload at industries along the way. You can create different sessions for different aspects of your railway - freight, passenger, shunting or a mixture - or for different seasons of the year or times of the day. Sessions are where you can program the behaviour of objects in your virtual Trainz world. A session can also contain scenery items that are specific to a particular railway operation, season or time of day. Sessions also control the environment settings in your virtual world, such as lighting conditions and the weather. Each session can have multiple saved Games.
|

What is a Route? |
|
 |
|
|
| A route (also known as a "Layout") consists of most of what you will see on the screen when using Surveyor and Driver. Things such as the landform or terrain, most (if not all) of the scenery items, the ground textures, the effect layers (such as TurfFX and Clutter), plus some "environmental" features. A route consists of two parts:- |
|
|
 Route Data: |
 |
The Route Data stores all those features that are painted into a layout using a brush tool and all the Environmental Data including the World Origin (latitude, longitude, altitude) |
| The Route Data includes the Terrain, Textures, Effect Layers, Legacy Water and the Environmental features. |
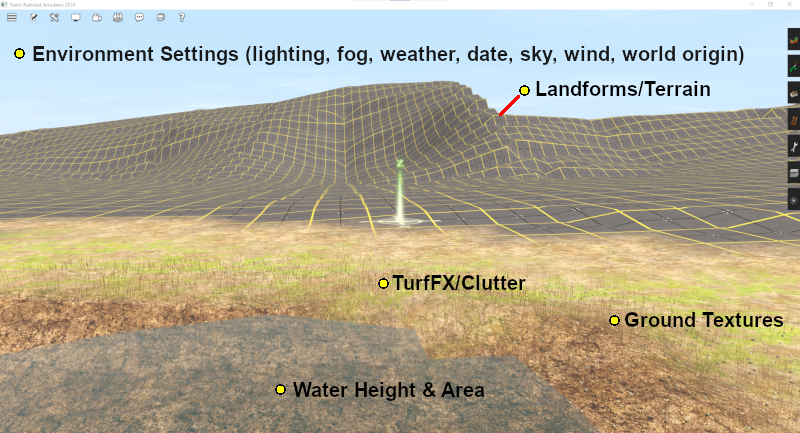
|
||||||||||||
 Route Layers: |
|
Route Layers are used to hold the scenery assets that you want to appear in all sessions created for the route |
| All scenery assets are held in layers. Route Layers (you can have many layers) give you a way of organising or grouping the assets displayed in your route. |
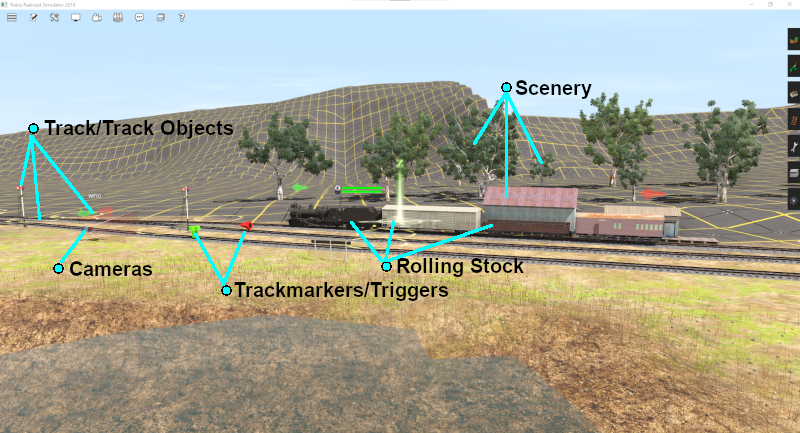
|
||||||||||||
|
 |
A detailed description of Layers can be found on the Trainz Wiki Page:-
|

Loading (and Creating) a Route |
 |
|
|
|
|
| The Main Menu screen is shown below. The first option (shown highlighted in the image) opens Driver/Surveyor with all its options including loading and creating a route. | |||||||||||||||||
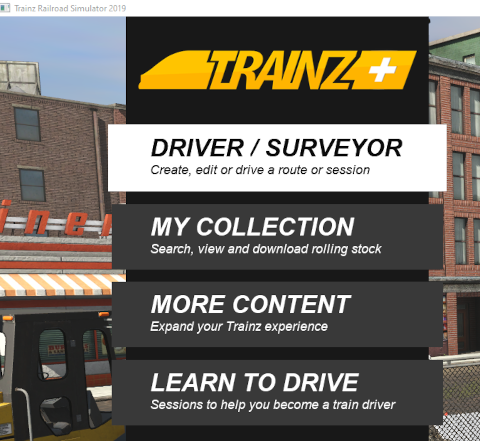 |
|
||||||||||||||||
In the Driver/Surveyor screen a strip of thumbnails of all the Routes, installed and as well as available as DLC, will be shown at the base of the screen.  |
|||||||||||||||||
If there are too many to fit in the available space, then either:-
|
|||||||||||||||||

|
| The thumbnail images are colour coded. |
| Payware on DLC | Must be purchased and downloaded, but some may be free - depending on your membership options. If you click a thumbnail with this colour a DOWNLOAD button will appear on the bottom right of the screen. If a price is included in the button then that is the purchase price (in $US) |
| Payware installed | Already installed from the DLC. DLC items cannot be deleted. To remove them use the Uninstall option in the Content Store from the Launcher. You can reinstall them later without any additional cost |
| Installed | Downloaded from the Download Station (DLS) or created by you. This includes any cloned DLC Routes and Sessions (see  Cloning a Route/Session below) |
| Multiplayer | For simultaneous development by multiple players. Special conditions apply |
Creating a New Route |
|
 |
|


| In both Surveyor Classic (also known as S1.0 or S10) and in Surveyor 2.0 (also known as S2.0 or S20) Left Click on CREATE ROUTE . This will start Trainz Surveyor and create a new blank route with a single baseboard using the Default settings which are usually those that were used when you last created and saved a route. The default settings may include a ground texture other than the grid pattern, for example - thick grass. | |||||||||||||||||||
| Error creating thumbnail: /bin/bash: line 1: /usr/bin/convert: No such file or directory Error code: 127 Surveyor 2.0 screen shown |
|
||||||||||||||||||
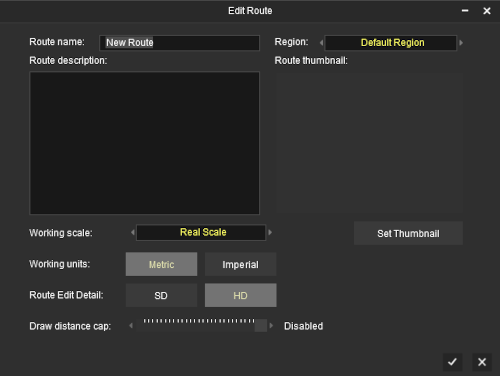 |
|
|||||||||

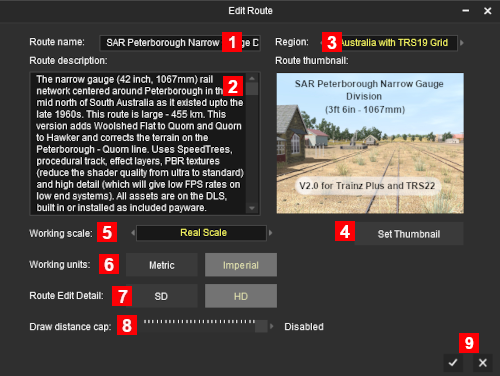
It is recommended that you enter some details before you click the  icon to create the new route. A bare minimum is listed on the right that will save you some time and effort later, and you can always change them at any time. |
|
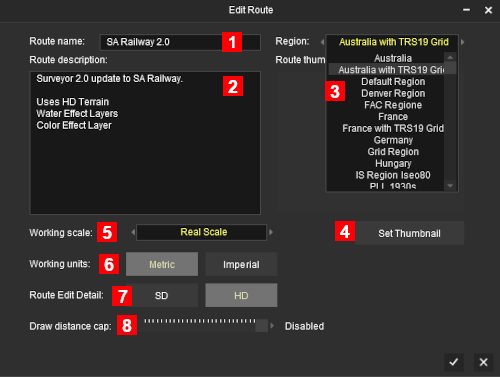 A Left Click on the  icon at the bottom right of the window will cancel the data entry and continue to use the default data settings (usually the settings entered for the last route you created) in the single flat baseboard currently on the screen. |
|


|
||||||||||||||
| SD/HD Options | |||||||||||||||||||||||||||||||
 This option, available in Trainz Plus only, allows you to set the route detail when working in HD resolution to the default HD (High Definition) or to a lower SD (Standard Definition) which is easier to work with over larger areas.
|
|||||||||||||||||||||||||||||||
The Surveyor World View |
|
|
|

| Depending on the Route Editor settings and the version of Trainz you are using, you may see or be affected by the following factors:- Baseboards and Grid Squares: |
||||||||||||||||||||||||
|
||||||||||||||||||||||||

In Surveyor Classic (S10)
| Surveyor Classic or S10 is the version of Surveyor found in TRS19, TRS19PE and TRS22. It is one of two versions of Surveyor available in TRS22PE and Trainz Plus. In Surveyor Classic the baseboards are controlled using the Topology Tools. To open the tools fly-out either Left Click the Topology Tool Tab or press the F1 key. |
Error creating thumbnail: /bin/bash: line 1: /usr/bin/convert: No such file or directory Error code: 127 |
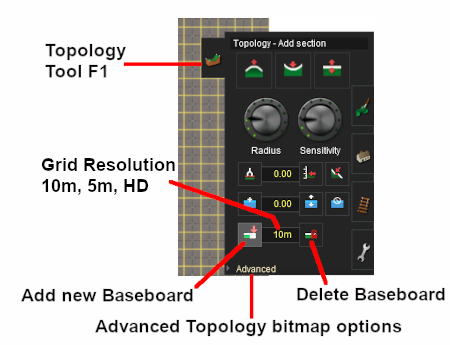
| The Key Topology Tools, as shown in the diagram above, are:- | |||||||||
| Error creating thumbnail: /bin/bash: line 1: /usr/bin/convert: No such file or directory Error code: 127 | Add New Baseboard - Left Click (it will stay active until another button is clicked) and then Left Click in a blank area outside the baseboard to add a new baseboard in that position. Each click will add a new baseboard at the same altitude as the first | ||||||||
| Error creating thumbnail: /bin/bash: line 1: /usr/bin/convert: No such file or directory Error code: 127 | Delete Baseboard - Left Click (it will stay active until another button is clicked) and then Left Click anywhere on a baseboard to delete that baseboard. You will get a warning dialogue window - you CANNOT undo this operation to restore a deleted baseboard | ||||||||
| Error creating thumbnail: /bin/bash: line 1: /usr/bin/convert: No such file or directory Error code: 127 | Grid Resolution - a pop-out menu will give you a choice of 10m (the default) or 5m. The option for the HD resolution is only available in Trainz Plus. This sets the resolution of the baseboard. It does not alter the size of the grid squares which is actually a painted texture and will always stay at 10m x 10m.
|
||||||||
| Error creating thumbnail: /bin/bash: line 1: /usr/bin/convert: No such file or directory Error code: 127 | Advanced - this will open another window in the Topology Tab that will allow you to select a grey scale bit map image to set the height of each grid |
In Surveyor 2.0 (S20)
| Surveyor 2.0 or S20 is an alternative version of Surveyor found in TRS22PE and Trainz Plus. Surveyor Classic is also available as an option in both TRS22PE and Trainz Plus. In Surveyor 2.0 there is no separate Topology Tools fly-out. A single Tools Palette replaces all the separate tools "fly-outs" found in the original Surveyor Classic. |
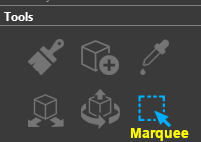 |
|
||||||||
| The Marquee area, shown with a green border in the image below right, shows the positions where 3 new baseboards will be created to add to the existing baseboard. The Marquee area has a Context Menu icon as shown in the image. | |||
 |
Left Click on the Context Menu icon or press the T key to open up the Marquee Context Menu.
|
||
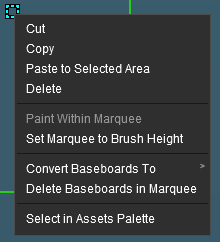
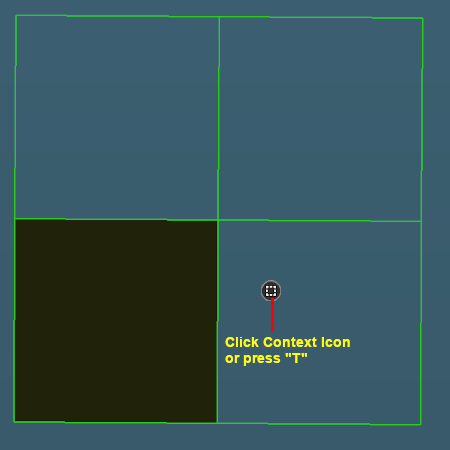
|
|||||||||||||
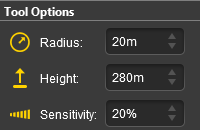
Default Baseboard Ground Texture |
|
|
| When a new route is created or a new baseboard is added in both Surveyor Classic and Surveyor 2.0 it will be covered with the ground texture for the selected Region or the default texture/grid if no region has been set. This can be changed to a different texture (including to the standard TRS19/TRS22 grid pattern). | ||||||||||
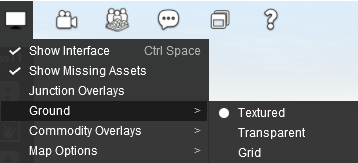 |
|
|||||||||
| A more complex solution is to edit an existing Region or create one of your own to add your preferred ground texture (such as the standard TRS22 grid pattern) to each new route you create and every new baseboard that you add. | ||||||||||
|
|
Information on creating and editing Region assets can be found on the Trainz Wiki at:-
|
Loading an Existing Route |
|
|
|
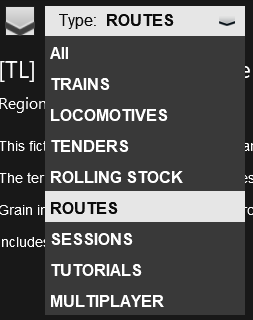
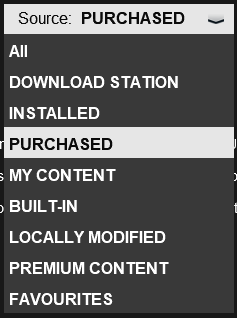
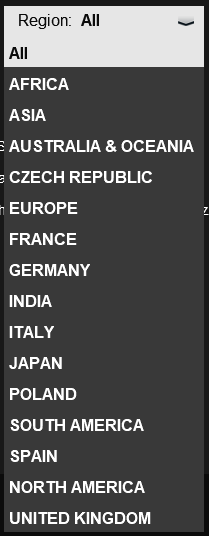
| You must first find and select the route to load from those already installed. At the top of the Driver/Surveyor screen the search options are shown as a set of buttons, the first 3 are drop down lists and the last is a text entry box. |

 |
 |
 |
| Type: | ROUTES is the default selection. No need to change this. |
| Source: | PURCHASED is the default selection, Click and change to MY CONTENT for a route you have created (or already modified) or to INSTALLED for one you have downloaded from the DLS. |
| Region: | ALL is the default selection. You can select a particular geographic region if required and IF the route had a geographic region set when it was created. |
| Search: | You can narrow down the list of routes by typing the first few letters of its name (e.g. SA) as shown in the image above. |
| This will produce a display of thumbnails at the bottom of the screen. |
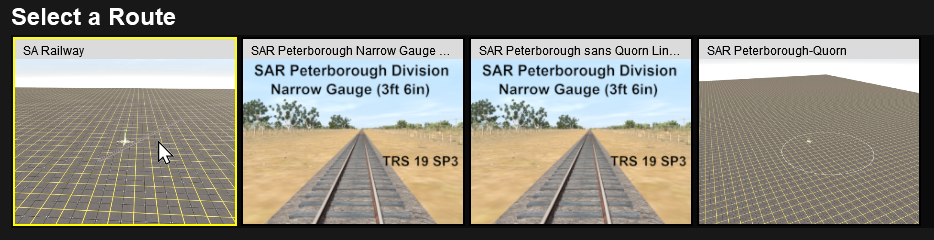
| Left Click on the thumbnail for the route you want to load, then Left Click on the EDIT ROUTE button to load the route into Surveyor. |

|
Loading a Route Into Surveyor From Content Manager |
|
|
| Trainz provides a shortcut that allows you to load an existing route directly into Surveyor for editing from Content Manager. |
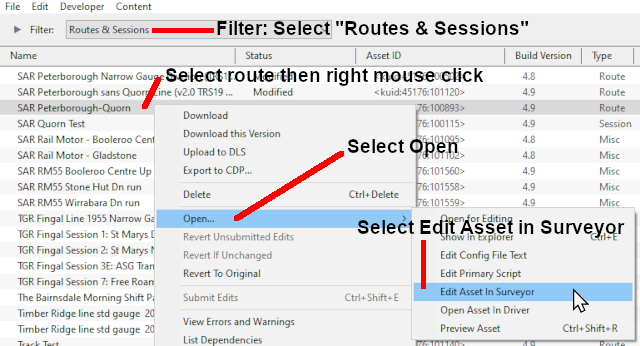 |
|
Loading After an Unexpected Shutdown |
|
|
| If you select a route for loading after an unexpected shutdown of Trainz then any route (or route and session) that was open and running in Trainz Surveyor or Driver will be left marked as Open for Edit. When you attempt to load this route into Surveyor or Driver you will see a message listing the route and session (if any) that were affected. | ||||
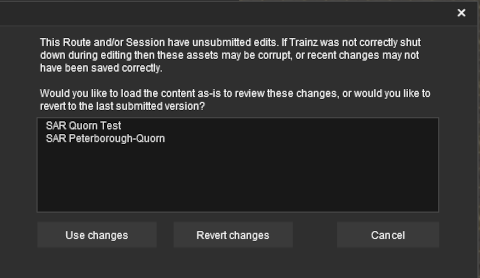 |
The message is saying that the assets in the list may have been changed since the last time you loaded them and exited Trainz normally. For example if you had been editing the route and/or session and had experienced a crash to the desktop or had used Windows Task Manager to terminate the program.
|
|||
| The options you will see are:- |
|
||||||||
Editing a Route |
|
|
|
When a Route is loaded or a new Route is created all the assets you add will be automatically placed into a Route Layer |
When you create a new route, or load an existing route without a session, and start adding scenery assets they will automatically be placed into a Route Layer. See  How to Use Layers for more details. Any ground textures, effect layers (e.g. TurfFX, Water, Clutter) you add, or terrain changes (including new baseboards) you make, will be added to the Route Data. |
|
|
|
 |
|
||||||||||||
|
|||||||||||||

| SD/HD Options |
|
| The Surveyor Route Editor will allow you to switch between two minimum brush sizes when working with HD resolution routes. | ||||||||||||||||||||||||||||||||||||||||||||
| This option, available in Trainz Plus only, allows you to set the brush detail to the default HD (High Definition) or to a lower SD (Standard Definition) which is easier to work with over larger areas.
|
||||||||||||||||||||||||||||||||||||||||||||
Adding Terrain Height, Textures, Effect Layers in a Route |
|
|
|
Terrain, Textures, Effect Layers can only be added to a route not a session |
|
The height of the terrain can be adjusted to represent hills, valleys, plains, slopes |
|
The Terrain can be painted with textures to represent real ground surfaces |
|
Effect Layers (grasses, rocks, water, etc) can be added to the terrain to enhance its appearence. The types of effect layers that are available will depend on your Trainz version, GPU and Operating System |
|
||||||||||||
In Surveyor Classic (S10)
| In Surveyor Classic (S10) the tools and objects are in tabbed icons on the right of the screen which can be opened by a Left Click on the icon or by pressing its Function Key |
|
|||||||||


In Surveyor 2.0 (S20)
| In Surveyor 2.0 (S20) there is a single set of common tools that can add and manipulate objects of any type. Select a tool by a Left Click on its icon in the Tools Palette or by pressing its key. You can also select multiple objects, that can be of different types, and manipulate them (move, rotate, delete) as if they were a single object. |
|
||||||

|
||||||||||
Adding Assets to a Route |
|
|
|
Assets include all visible objects (trees, buildings, roads, tracks, signals, rolling stock, etc) and invisible objects (track triggers, track marks, etc) that can be added to your route |
|
Objects added to your route will be present in all sessions created using that route |
In Surveyor Classic (S10)
| In Surveyor Classic (S10) the tools and objects are in tabbed icons on the right of the screen which can be opened by a Left Click on the icon or by pressing its Function Key. |
|
||||||||||||


In Surveyor 2.0 (S20)
| In Surveyor 2.0 (S20) there is a single set of common tools that can add and manipulate objects of any type. Select a tool by a Left Click on its icon in the Tools Palette or by pressing its key. You can also select multiple objects, that can be of different types, and manipulate them (move, rotate, delete) as if they were a single object. |
|
||||||||||||


Editing the Environment of a Route |
|
|
|
|
Edit Effect Layers |
|
|
|
The Edit Effect Layers menu option allows you to add, remove and edit the special effect layers |
|
|
||||||||||||||||||||||
Merging Routes
|
Two (or more) separate routes can be joined together (merged) to create a new route |
| There are some important restrictions on the merging of two routes:- |
| Error creating thumbnail: /bin/bash: line 1: /usr/bin/convert: No such file or directory Error code: 127 | Payware (DLC) routes cannot be merged with Freeware (DLS) or other Payware routes |
| Error creating thumbnail: /bin/bash: line 1: /usr/bin/convert: No such file or directory Error code: 127 | The Session Data and Session Layers in the first route can be saved in the merger (if required) but those in the other route cannot |
| Error creating thumbnail: /bin/bash: line 1: /usr/bin/convert: No such file or directory Error code: 127 | There may be a significant height difference between the two routes and this may not be easy to overcome |
| Error creating thumbnail: /bin/bash: line 1: /usr/bin/convert: No such file or directory Error code: 127 | The orientation of the two routes (East-West or North-South) cannot be changed (it is possible but will usually require a lot of time, effort and patience) |
|
A detailed description of the process of Merging Routes can be found on the Trainz Wiki Page:-
|
What is a Session? |
|
|
|
|
|
|
A Session is always a part of an existing Route - you cannot have a Session that does not belong to a Route |
|
If you create a Route without a Session then ALL the active industries and rolling stock, time, environmental conditions, etc, will revert to their original (default) values. There will be no AI drivers and drivers will have a very limited set of available commands for manual driving |
| In general, while a route provides the physical structures (or "hardware"), a session provides the services (or "software"). While you can easily have a route without a session, it could be a very limited (or even a boring) experience. A single route can have multiple sessions, or none, but a session must always belong to a route. To put it into Trainz terminology, a session has a route as a dependency. A session consists of two parts:- |
|
|
Session Data:
| Session Data are often the "invisibles" that control the operation of a session. Session rules, driver orders and loco assignments, commodities (loaded, unloaded and carried) and most of the Environmental Settings are examples of Session Data. |
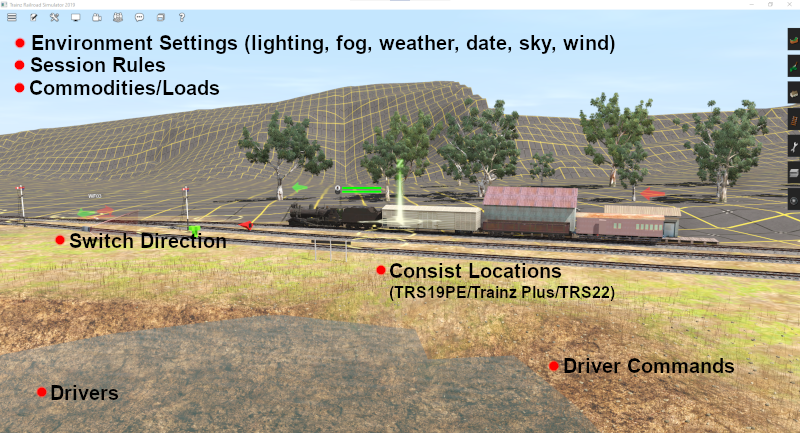
|
||||||||||||||||||
Session Layers:
|
Session Layers are used to hold the scenery assets that you want to only appear in that particular Session and not in all Sessions. The Session Layers can be left empty and the Route Layers can contain all the scenery assets |
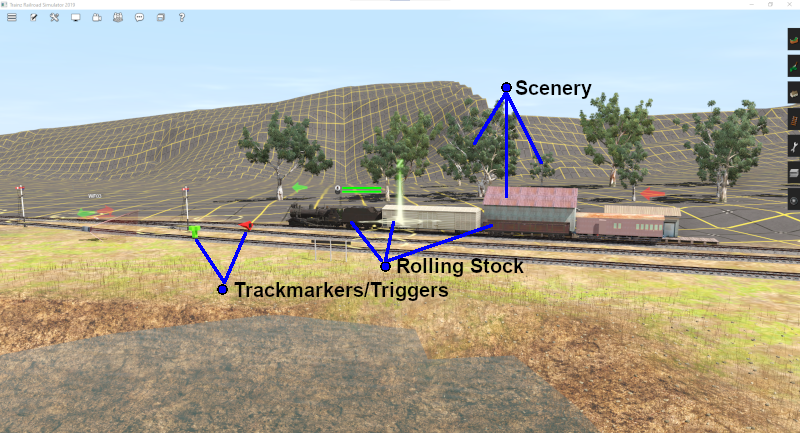
Session Layers give you a way of organising or grouping the assets displayed in your session.
|
|
|
A detailed description of Layers can be found on the Trainz Wiki Page:-
|
|
Loading (and Creating) a Session |
|
|
|
|
|
Creating a New Session
|
To create a new Session you must first create a new Route or load an existing Route |
|
|
||||||||


Loading an Existing Session |
|
|
There are two different ways to load existing sessions into Surveyor.
|
||||||||||||||||||||||||||||||||||||||||||||||||

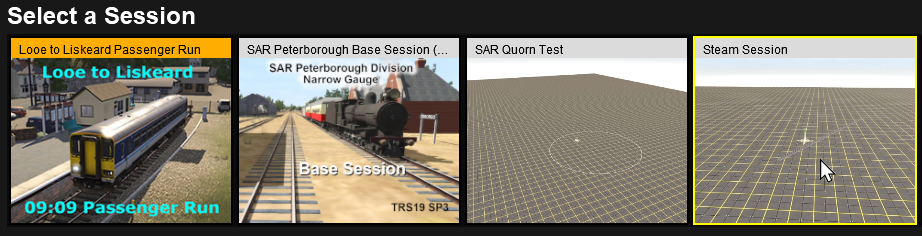

| OR |
|
||||||||||||||||||||||||
| Both and will load the route and session into Surveyor. |
Loading a Session Into Surveyor From Content Manager |
|
|
Trainz provides a shortcut that allows you to load an existing session directly into Surveyor for editing from Content Manager.
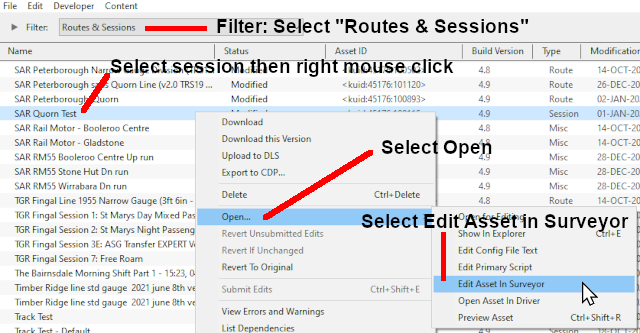 |
|
Loading a Session into Driver From Surveyor |
|
|
To start Driver simply select a session as described above in Loading an Existing Session and Left Click on the DRIVE SESSION button.

This will load both the session and the route into Driver.
You can save your "game play" in Driver at anytime. See Loading Games below.
Loading a Session into Driver From Content Manager |
|
|
Trainz provides a shortcut that allows you to load an existing session directly into Driver from Content Manager.
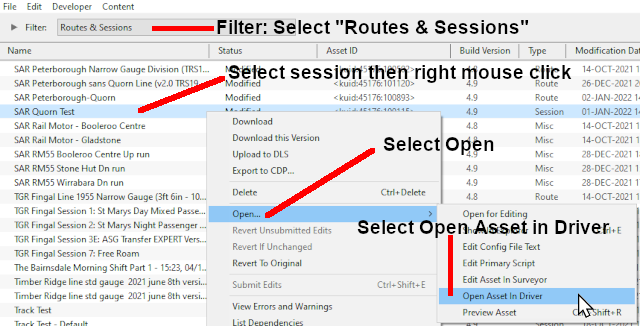 |
|
Editing a Session |
|
|
|
| Any changes made to the Session Rules (including drivers and their commands), the Environment Tools, Industry or Rolling Stock settings, will be added to the Session Data.
|
|
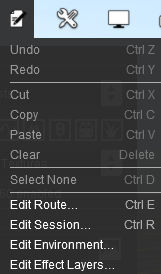
You can edit the Session Characteristics at any time by selecting the Edit Session... option from the The Session Editor - screenshot shown below. |
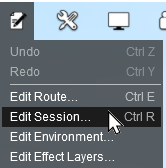 |
|
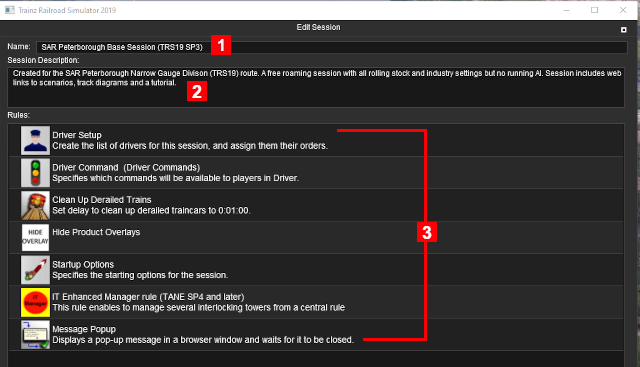 |
|
||||||||
Adding Assets to a Session |
|
|
|
Assets include all visible objects (trees, buildings, roads, tracks, signals, rolling stock, etc) and invisible objects (track triggers, track marks, etc) that can be added to your session |
|
Any objects added to a session will only be available in that session |
In Surveyor Classic (S10)
| In Surveyor Classic (S10) the tools and objects are in tabbed icons on the right of the screen which can be opened by a Left Click on the icon or by pressing its Function Key |
|
||||||||||||
In Surveyor 2.0 (S20)
| In Surveyor 2.0 (S20) there is a single set of common tools that can add and manipulate objects of any type. Select a tool by a Left Click on its icon in the Tools Palette or by pressing its key. You can also select multiple objects, that can be of different types, and manipulate them (move, rotate, delete) as if they were a single object. |
|
||||||||||||
|
||||||||||||||||||||||||||||||||


Editing the Environment of a Session |
|
|
|
Environmental settings in a Session will have priotity over those in a Route |
|
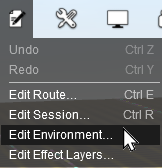
You can edit the Environment Controls of a Session by selecting the Edit Environment... option from the |
 |
|
|
||||||||||


Saving a Route and a Session |
|
|
|
|
|
|
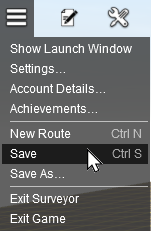
Routes and Sessions are saved from the System Menu on the Surveyor screen.
 |
|
|||||||||||||||||
 |
Notes on Saving DLS/DLC Routes and Sessions: |
||||||||||||||||||||||||
|
|||||||||||||||||||||||||
|
|||||||||||||||||||||||||


Saving a New Route and Session |
|
|
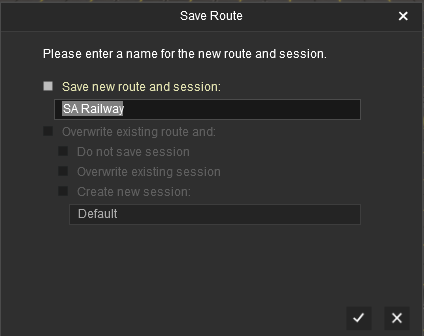
If you have created a new route and select Save or Save As..., then you will be presented with the following Save Route Dialogue Windows.
 |
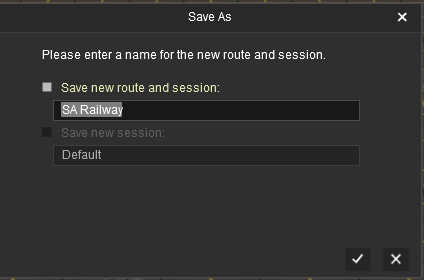 |
| In both cases the name of the route that was entered when it was created will be shown and you can change the name, even in the Save option. However, there is no option in either case to change the name of the created session because the other options have been greyed out and cannot be selected. | |
Saving an Existing Route |
|
|
| If you have loaded the route only and not the session and HAVE NOT edited any Session Data or Session Layers, then selecting Save will produce the following Save Route Dialogue Window. |
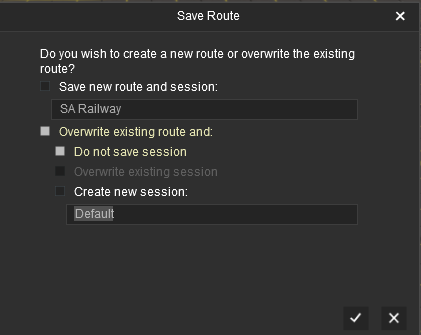 |
|
||||||||


| If you have loaded the route only and not the session and HAVE edited Session Data or Session Layers, then selecting Save will produce the following Save Route Dialogue Window. |
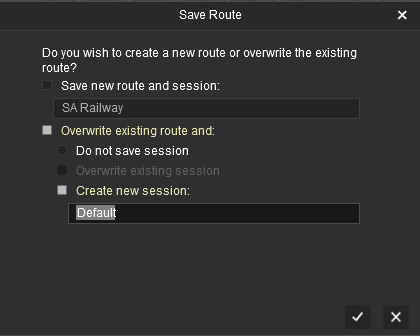 |
|
||||||||
|
Saving an Existing Route and Session |
|
|
| If you have loaded a route and a session and have edited the route OR both the route AND the session, then selecting Save will produce the following Save Route Dialogue Window. |
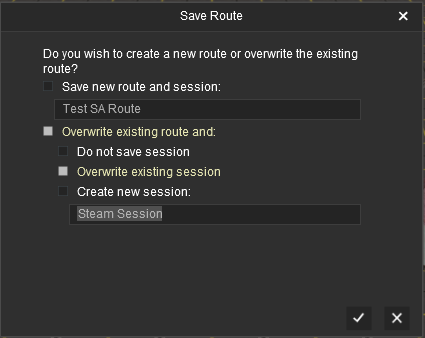 |
|
||||||||

|
Saving an Edited Session Only |
|
|
|
If you have only edited the session then you will be given the option to save the Session only |
| If you have loaded a route and a session and have edited the session (Data or Layers) only and not the route, or have already saved the route but not the session, then selecting Save will produce the following Save Session Dialogue Window. |
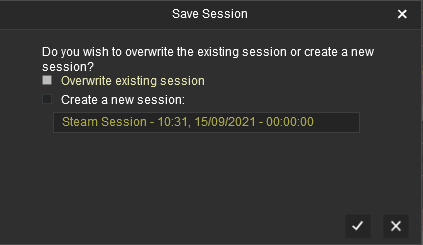 |
|
||||||||
Saving a Route and Session Using the UDS |
|
|
|
The UDS allows you to switch quickly between Driver and Surveyor (in both directions) so you can edit a running session |
| The UDS (Unified Driver Surveyor) Interface (see the Trainz Wiki Page How to Use the UDS Interface for more details) allows you to quickly switch from Driver to Surveyor and back to Driver again without having to restart the session from the beginning. You can edit the route and session while in Surveyor and then switch back to Driver to continue the session where you left it. |
|
| Most of the problems users seem to be experiencing with the UDS, judging from the posts in the Trainz Forums, is when saving an edited Route or Session after switching from Surveyor to Driver. The Notes: and Options: below contain some tips and steps you can use to avoid these problems. |
|
||||||||||||||||||||||||||||
Unless you have a particular reason for overwriting the original Session then the recommended save options are:-
 |
||||||||
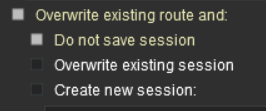
| Option Do Not Save the Session |
||||||||
|
This will save the Route only, using its existing name and it will overwrite the original route. This will save any edits that you have made to the Route but not to the Session. |
|||||||
|
||||||||||
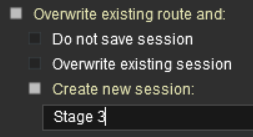
| Option Create a New Session |
||||||||||
|
This will save the Route using its existing name and it will overwrite the original route. It will also save the Session using the name you enter in the text box below the checkbox (Stage 3 in the example shown). The original Session will not be altered. This is useful when you want to test out changes to consists, industry settings, Rules, driver commands, etc but do not want to destroy the original Session. |
|||||||||
|
||||||||||
|
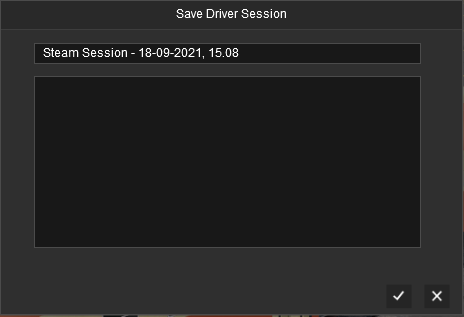
If you have NOT edited anything while in Surveyor and select Save then you will be shown the Save Driver Session dialogue window to save the session in its current state as a Game (also called a Driver Game). This is exactly the same as pressing Ctrl + S while in Driver.
|
Exiting Surveyor |
|
|
|
|
|
|
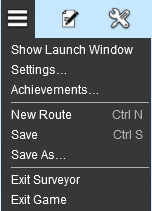
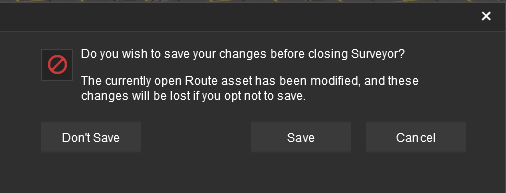
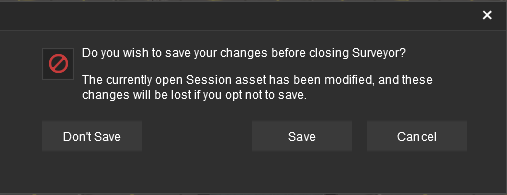
If you exit Surveyor after editing without saving then you will be prompted to Save. |
 |
|
||||||||||||
| Unsaved Route | Unsaved Session |
 |
 |
|
||||||||
Exiting Driver |
|
|
|
|
|
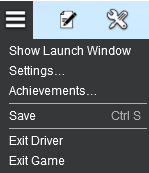
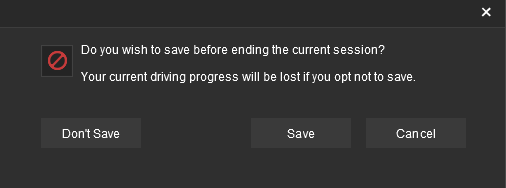
If you exit Driver after running a session you will be prompted to Save the current Game |
 |
|
||||||||||||
|
||||||||
Cloning a Route/Session |
|
|
|
|
|
|
A Clone is an exact or duplicate copy of an asset. Some Payware routes and sessions cannot be cloned |
|
Cloned routes and sessions can be edited and saved as Your Content |
| Cloning a Route or a Session allows you to work on a duplicate copy of the original. All changes that you make will be saved in the cloned copy leaving the original copy unchanged. |
|
|
Cloning Using Surveyor |
|
|
| Routes and Sessions that have been loaded into Surveyor can be cloned using the Save As... command from the Surveyor System Menu |
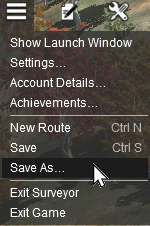 |
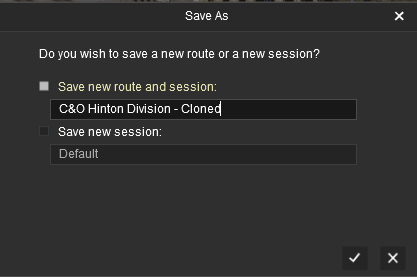 |
| Enter a new name or edit the original name (as shown above) for your cloned route or session. |
|
||||||||||||||
Cloning Using Content Manager |
|
|
 Select the Route or Session to Clone |
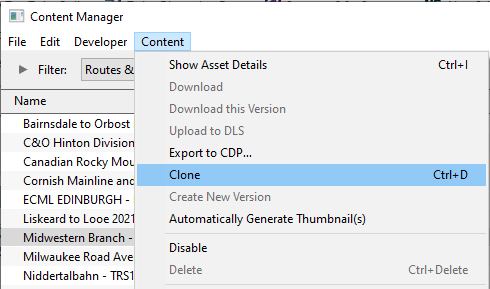 |
|
| A Task Window will open to display the result.
In the image above the original Route has been cloned and given a new <kuid> value. |
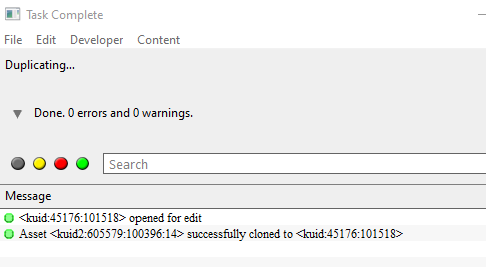
|

|
|


| Submit the Clone (a Necessary Step) |
|
When submitted a cloned DLC Route or Session will be described as Payware, Modified while a cloned DLS Route or Session will be described as Modified |
|
|
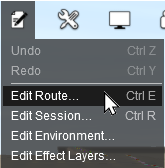
Saving and Loading Games in Driver |
|
|
|
|
|
|
|
Games are the state of play when a route and session is saved while in Driver Mode |
|
A Game can be loaded back into Trainz to continue running from the point where it was saved |
|
||||||||||
Saving Games |
|
|
| Games save the "state of play" in Driver. Once saved, the Game can be loaded back into Driver to continue the play at the point where it was saved. The Game will be saved with:-
|
|
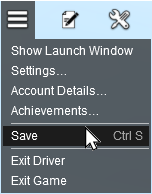 |
|||||||
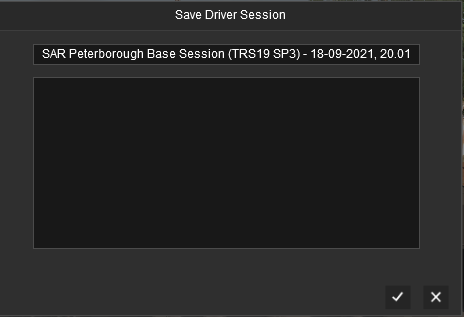 |
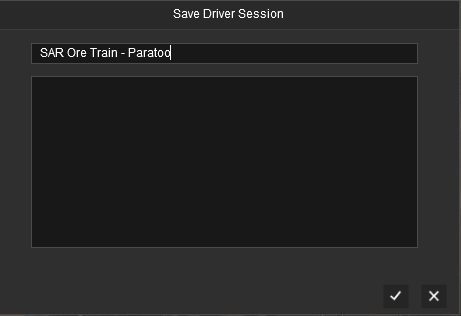 |
|
Loading Games |
|
|
| Saved Games will be shown along with all the Sessions for a selected Route. The section Loading an Existing Session shows two different methods of displaying saved sessions and their games. Method select the route first and then click the VIEW SESSIONS button. This will display a list of thumbnails for all the sessions and games for that route. |
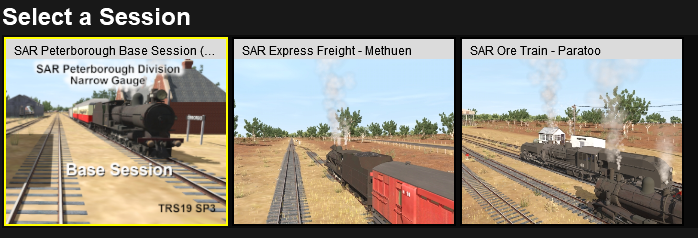
|
| Where there is only one session in a route, the session will be the first thumbnail shown in the list followed by its games (if any). Note that the session is selected by default. |
|
||||||||||

|
Editing Games |
|
|
You can edit a saved Game using the UDS (Unified Driver Surveyor) interface. However:-
In both cases the changes you make will appear in the Game when you use the UDS to return to Driver and will be part of the Game when you next save. |
|
||||||||
Deleting Routes and Sessions |
|
|
|
|
|
Deleting a Route will delete that Route, all its Sessions and all its saved Games (if any) |
|
Deleting a Session will delete that Session and its saved Games (if any). It will NOT delete the Route it was created from. It will NOT delete other Sessions created for that Route. It will NOT delete any other Games created for those other Sessions |
|
Deleting a Game will only delete that Game. It will NOT delete the Route or Session it was created from or any other Games from that Session |
| All the Surveyor and Driver screens for loading routes and sessions have a DELETE ... button as an option. |
|
| If you need a more selective way of deleting routes, sessions and games, then use Content Manager from the Trainz Launch Screen. Select the Filter Routes & Sessions.
The Type column will identify each entry as a route, session or Misc. Misc in this case means a saved Game. |
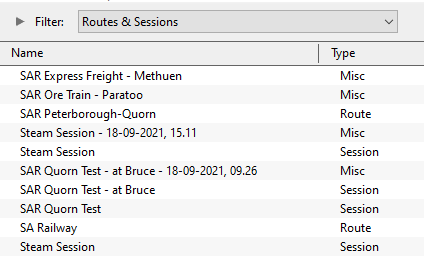
|
|
|
|
Trainz Wiki
|
|

This page was created by Trainz user pware in September 2021 and was last updated as shown below.


