How to Use Layers: Difference between revisions
mNo edit summary |
|||
| (10 intermediate revisions by the same user not shown) | |||
| Line 1: | Line 1: | ||
The information in this Wiki Page | <table width=1000 bgcolor=#000000 cellpadding=2> | ||
<tr valign="top"> | |||
<td> | |||
<table width=996 bgcolor=#ffffff cellpadding=2> | |||
<tr valign="middle"> | |||
<td width=35>[[image:Information.png|35px|link=]]</td> | |||
<td><span style="font-size: 15px;">The information in this Wiki Page explains how to create and manage layers in '''T:ANE''', '''TRS19''', '''TRS22''' and '''Trainz Plus''' using '''Surveyor Classic''' (all Trainz versions) and '''Surveyor 2.0''' ('''TRS22PE''' and '''Trainz Plus''').</span></td> | |||
</tr> | |||
</table> | |||
</td> | |||
</tr> | |||
</table> | |||
<br> | |||
<table> <!-- BEGIN Nav Buttons Table --> | <table> <!-- BEGIN Nav Buttons Table --> | ||
<tr valign="top"> | <tr valign="top"> | ||
| Line 93: | Line 105: | ||
<tr valign="top"> | <tr valign="top"> | ||
<td>[[image:PencilTips.PNG|link=]]</td> | <td>[[image:PencilTips.PNG|link=]]</td> | ||
<td>'''For TRS19PE and later, you | <td>'''For TRS19PE and later, it is strongly recommended that you place all rolling stock into a session layer to be saved with the session and not the route'''</td> | ||
</tr> | </tr> | ||
</table> | </table> | ||
| Line 247: | Line 259: | ||
<td>[[image:DotPoint.JPG|10px|link=]]</td> | <td>[[image:DotPoint.JPG|10px|link=]]</td> | ||
<td>'''Renamed'''</td> | <td>'''Renamed'''</td> | ||
<td colspan= | <td colspan=3> </td> | ||
</tr> | </tr> | ||
</table> | </table> | ||
| Line 302: | Line 314: | ||
<table cellpadding=2 bgcolor="Aquamarine"> <!-- BEGIN Trainz Wiki Link --> | <table cellpadding=2 bgcolor="Aquamarine"> <!-- BEGIN Trainz Wiki Link --> | ||
<tr valign="top"> | <tr valign="top"> | ||
<td>[[image:LinkWiki.PNG|link=]]</td> | <td width=50>[[image:LinkWiki.PNG|link=]]</td> | ||
<td> | <td>More information on creating, loading and saving '''Routes''' and '''Sessions''' can be found on the '''Trainz Wiki Page''' | ||
More information on creating, loading and saving '''Routes''' and '''Sessions''' can be found on the '''Trainz Wiki Page''' | <table> | ||
<tr valign="top"> | |||
<td width=10>[[image:BlackDot10x10.png|link=]]</td> | |||
<td>'''[[Route_and_Session_Basics|Route and Session Basics]]</td> | |||
</tr> | |||
</table> | |||
</td> | </td> | ||
</tr> | </tr> | ||
| Line 567: | Line 584: | ||
<table bgcolor=#ffffff cellpadding=2> | <table bgcolor=#ffffff cellpadding=2> | ||
<tr valign="top"> | <tr valign="top"> | ||
<td colspan=2><span style="font-weight: 700; font-size: 15px;">Steps: | <td colspan=2><span style="font-weight: 700; font-size: 15px;">Steps: To Name and Place the New Layer:-</span></td> | ||
</tr> | </tr> | ||
<tr valign="top"> | <tr valign="top"> | ||
| Line 655: | Line 672: | ||
<tr valign="top"> | <tr valign="top"> | ||
<td>[[image:Stop.PNG|link=]]</td> | <td>[[image:Stop.PNG|link=]]</td> | ||
<td>Due to a "bug" '''deleting a layer that contains a ruler will not delete the ruler'''. It will be hidden from view but it may reappear if another layer with the same name as the deleted layer is created or it will, eventually, reappear in the '''route-layer'''. | <td>In '''TANE''': Due to a "bug" '''deleting a layer that contains a ruler will not delete the ruler'''. It will be hidden from view but it may reappear if another layer with the same name as the deleted layer is created or it will, eventually, reappear in the '''route-layer'''. | ||
</td> | </td> | ||
</tr> | </tr> | ||
| Line 800: | Line 817: | ||
<table bgcolor=#ffffff cellpadding=2> | <table bgcolor=#ffffff cellpadding=2> | ||
<tr valign="top"> | <tr valign="top"> | ||
<td colspan=2><span style="font-weight: 700; font-size: 15px;">Steps:</span> | <td colspan=2><span style="font-weight: 700; font-size: 15px;">Steps: To Merge Two Layers:-</span></td> | ||
</tr> | </tr> | ||
<tr valign="top"> | <tr valign="top"> | ||
| Line 965: | Line 982: | ||
<table bgcolor=#ffffff cellpadding=2> | <table bgcolor=#ffffff cellpadding=2> | ||
<tr valign="top"> | <tr valign="top"> | ||
<td colspan=2><span style="font-weight: 700; font-size: 15px;">Steps:</span> | <td colspan=2><span style="font-weight: 700; font-size: 15px;">Steps: To Move a Layer:-</span></td> | ||
</tr> | </tr> | ||
<tr valign="top"> | <tr valign="top"> | ||
| Line 1,177: | Line 1,194: | ||
<tr valign="top"> | <tr valign="top"> | ||
<td>[[image:DotPoint.JPG|10px|link=]]</td> | <td>[[image:DotPoint.JPG|10px|link=]]</td> | ||
<td>Environment Settings are saved in both the '''Route''' and the '''Session''' - see the Trainz Wiki Page [[image:WikiLink.PNG|link=]] '''[[How_to_Use_Environment_Tools|Environment Tools]]''' for more details</td> | <td>Environment Settings are saved in both the '''Route''' and the '''Session''' - see the '''Trainz Wiki Page''' [[image:WikiLink.PNG|link=]] '''[[How_to_Use_Environment_Tools|Environment Tools]]''' for more details</td> | ||
</tr> | </tr> | ||
<tr valign="top"> | <tr valign="top"> | ||
| Line 1,291: | Line 1,308: | ||
<table bgcolor=#ffffff cellpadding=2> | <table bgcolor=#ffffff cellpadding=2> | ||
<tr valign="top"> | <tr valign="top"> | ||
<td colspan=2><span style="font-weight: 700; font-size: 15px;">Steps:</span> | <td colspan=2><span style="font-weight: 700; font-size: 15px;">Steps To Move an Object to Another Layer:-:</span></td> | ||
</tr> | </tr> | ||
<tr valign="top"> | <tr valign="top"> | ||
| Line 1,427: | Line 1,444: | ||
<td>[[image:DotPoint.JPG|10px|link=]]</td> | <td>[[image:DotPoint.JPG|10px|link=]]</td> | ||
<td>'''Renamed'''</td> | <td>'''Renamed'''</td> | ||
<td colspan= | <td colspan=3> </td> | ||
</tr> | </tr> | ||
</table> | </table> | ||
| Line 1,445: | Line 1,462: | ||
</tr> | </tr> | ||
</table> | </table> | ||
The following sections show how these tasks can be done using '''Surveyor | The following sections show how these tasks can be done using '''Surveyor 2.0'''</td> | ||
</tr> | </tr> | ||
</table> | </table> | ||
| Line 1,472: | Line 1,489: | ||
<table bgcolor=#ffffff> | <table bgcolor=#ffffff> | ||
<tr valign="top"> | <tr valign="top"> | ||
<td colspan=2><span style="font-weight: 700; font-size: 15px;">Steps:</span> | <td colspan=2><span style="font-weight: 700; font-size: 15px;">Steps: To Display Palettes:-</span></td> | ||
</tr> | </tr> | ||
<tr valign="top"> | <tr valign="top"> | ||
| Line 1,655: | Line 1,672: | ||
<table width=996 bgcolor=#ffffff cellpadding=2> | <table width=996 bgcolor=#ffffff cellpadding=2> | ||
<tr valign="top"> | <tr valign="top"> | ||
<td colspan=2><span style="font-weight: 700; font-size: 15px;">Steps: | <td colspan=2><span style="font-weight: 700; font-size: 15px;">Steps: To Move a Layer:-</span></td> | ||
</tr> | </tr> | ||
<tr valign="top"> | <tr valign="top"> | ||
| Line 1,684: | Line 1,701: | ||
=='''Merging a Layer (S20)'''== | =='''Merging a Layer (S20)'''== | ||
<table> | <table width=1000 bgcolor=#000000 cellpadding=2> | ||
<tr valign="top"> | |||
<td> | |||
<table width=996 bgcolor=#ffffb0 cellpadding=2> | |||
<tr valign="top"> | |||
<td width=25>[[image:NotePad.PNG|link=]]</td> | |||
<td>In '''S20''' layers can only be merged with the layer directly above. To merge layers separated by other layers you will need to move one of the layers before the merge.</td> | |||
</tr> | |||
</table> | |||
</td> | |||
</tr> | |||
</table> | |||
<br> | |||
<table width=1000> | |||
<tr valign="top"> | <tr valign="top"> | ||
<td width=120>[[image:LayerMerge_S20.png|link=]]</td> | <td width=120>[[image:LayerMerge_S20.png|link=]]</td> | ||
| Line 1,714: | Line 1,744: | ||
</table> | </table> | ||
<br> | <br> | ||
=='''Hiding Layers (S20)'''== | =='''Hiding Layers (S20)'''== | ||
| Line 1,808: | Line 1,839: | ||
<table width=996 bgcolor=#ffffff cellpadding=2> | <table width=996 bgcolor=#ffffff cellpadding=2> | ||
<tr valign="top"> | <tr valign="top"> | ||
<td colspan=2><span style="font-weight: 700; font-size: 15px;">Steps: | <td colspan=2><span style="font-weight: 700; font-size: 15px;">Steps: To Move an Object to Another Layer:-</span></td> | ||
</tr> | </tr> | ||
<tr valign="top"> | <tr valign="top"> | ||
| Line 1,922: | Line 1,953: | ||
<tr valign="top"> | <tr valign="top"> | ||
<td width=10>[[image:RedDot10x10.png|link=]]</td> | <td width=10>[[image:RedDot10x10.png|link=]]</td> | ||
<td>junction switches - the left/right switch direction is stored in the Session (but the '''default''' switch direction is stored in the Route)</td> | <td>junction switches - the left/right switch direction is stored in the Session (but the '''default''' switch direction is stored in the Route). See '''Tips:''' below</td> | ||
</tr> | </tr> | ||
<tr valign="top"> | <tr valign="top"> | ||
| Line 1,970: | Line 2,001: | ||
</tr> | </tr> | ||
<tr valign="top"> | <tr valign="top"> | ||
<td colspan=2>For more details see the Trainz Wiki | <td colspan=2>For more details see the '''Trainz Wiki Page''' [[image:WikiLink.PNG|link=]]'''[[How_to_Use_the_UDS_Interface|How to Use the UDS Interface]]'''</td> | ||
</tr> | </tr> | ||
</table> | </table> | ||
| Line 1,977: | Line 2,008: | ||
</table> | </table> | ||
<br> | <br> | ||
<table width=1000 | <table width=1000 bgcolor=#000000 cellpadding=2> | ||
<tr valign="top"> | <tr valign="top"> | ||
<td width=629><span id="skipRouteGroup"></span> | <td> | ||
=='''The Route Layers Group'''== | <table width=996 bgcolor=#ffffe0 cellpadding=2> | ||
</td> | <tr valign="top"> | ||
<td width=50>[[image:SkipDown.png|link=#skipSessionGroup|Skip Down]]</td> <!-- skip Down --> | <td width=25>[[image:PencilTips.PNG|link=]]</td> | ||
<td width=50>[[image:SkipUp.png|link=#stepRouteSession|Skip Up]]</td> <!-- skip Up --> | <td><span style="font-weight: 700; font-size: 15px;">Setting Different Switch Directions in Routes and Sessions</span><br> | ||
<td width=46> </td> | A switch, when added to a route, can be set to a '''default''' direction and all sessions created using that route can use that default switch direction. However, you can set the switch to a different direction in one or more sessions without changing its default direction in the route.</td> | ||
<td width=75> </td> | </tr> | ||
<td width=75> </td> | <tr valign="top"> | ||
<td width=75> </td> | <td colspan=2> | ||
</tr> | <table bgcolor=#ffffff cellpadding=2> | ||
</table> <!-- END Nav Buttons Table --> | <tr valign="top"> | ||
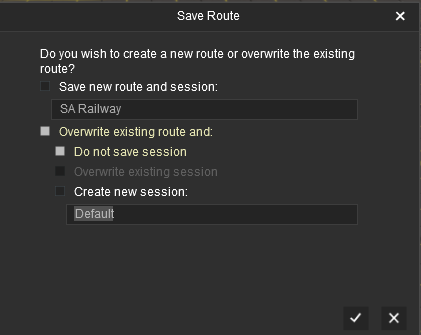
<td colspan=2><span style="font-weight: 700; font-size: 15px;">Steps: To Save the Default Switch Direction in the Route:-</span></td> | |||
<table width=1000 bgcolor="lightcyan" cellpadding=2> | </tr> | ||
<tr valign="top"> | <tr valign="top"> | ||
<td width=10>[[image:BlueDot10x10.png|link=]]</td> | <td width=25>[[image:DotPoint1.JPG|link=]]</td> | ||
<td>The '''Route Layer Group''' should be used for everything that will always appear in '''Driver Mode''' regardless of which Session is playing.''' </td> | <td>Set the switch to the desired direction for the route. If the switch is already in that direction then change something in the route (e.g. move a tree a few centimetres) to make sure that the route has been edited</td> | ||
</tr> | <td rowspan=3>[[image:RouteSARSaveExistingNoSession.png|link=]]</td> | ||
</table> | </tr> | ||
<br> | <tr valign="top"> | ||
<table width=1000> | <td>[[image:DotPoint2.JPG|link=]]</td> | ||
<tr valign="top"> | <td>Save (<span style="font-weight: 700; font-size: 15px;"><span style="color: white; background-color: black;"> Ctrl </span> + <span style="color: white; background-color: black;"> S </span></span> or select <span style="font-weight: 700; font-size: 15px; color: white; background-color: black;"> Save </span> from the [[image:SurveyorSystemIcon.png|link=]] '''System Menu''')</td> | ||
<td>There is nothing stopping you from placing everything in the '''"route-layer"''' of the '''Route Layers Group''' and never having to worry about dealing with layers ever again - some creators prefer to work this way. However, layers do provide you with a way of organising your scenery objects to make them more manageable, particularly in more complicated layouts. | <!-- extra row in rowspan --> | ||
<br> | </tr> | ||
<table width=1000 bgcolor=#000000 cellpadding=2> | <tr valign="top"> | ||
<tr valign="top"> | <td>[[image:DotPoint3.JPG|link=]]</td> | ||
<td> | <td>In the '''Save Dialogue Window''', make sure that the options | ||
<table bgcolor=#ffffff cellpadding=2> | <table> | ||
<tr valign="top"> | <tr valign="top"> | ||
<td colspan=2>Some examples:-</td> | <td> | ||
</tr> | <table> | ||
<tr valign="top"> | <tr valign="top"> | ||
<td width=10>[[image:DotPoint.JPG|10px|link=]]</td> | <td width=10>[[image:DotPoint.JPG|10px|link=]]</td> | ||
<td>A '''Special Objects''' layer or layers that can be used to hold certain scenery objects. For example all the trees or a particular building. This can be very useful when you need to hide those objects to locate or place other objects. Trackside cameras in particular can be very difficult to find when placed in a forest</td> | <td>'''Overwrite existing route and'''</td> | ||
</tr> | </tr> | ||
<tr valign="top"> | <tr valign="top"> | ||
<td>[[image:DotPoint.JPG|10px|link=]]</td> | <td>[[image:DotPoint.JPG|10px|link=]]</td> | ||
<td>A '''Platform Objects''' layer can be used to hold all platform items such as seats, luggage, luggage trolleys, people, lamp posts, etc. Because these items are placed on top of a platform object they can be very difficult to move or delete without first moving the platform. The layer containing the platform can be locked allowing these objects to be easily moved or deleted</td> | <td>'''Do not save session'''</td> | ||
</tr> | |||
</table> | |||
...are selected and then save</td> | |||
</tr> | |||
</table> | |||
</td> | |||
<!-- extra row in rowspan --> | |||
</tr> | |||
</table> | |||
<br> | |||
<table bgcolor=#ffffff cellpadding=2> | |||
<tr valign="top"> | |||
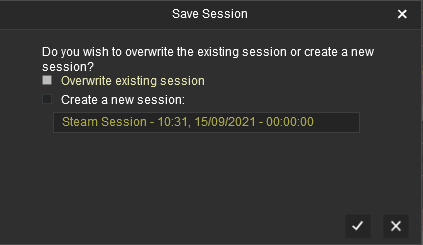
<td colspan=2><span style="font-weight: 700; font-size: 15px;">Steps: To Save a Different Switch Direction in a Session:-</span></td> | |||
</tr> | |||
<tr valign="top"> | |||
<td width=25>[[image:DotPoint1.JPG|link=]]</td> | |||
<td>Set the switch to the desired direction for the Session</td> | |||
<td rowspan=3>[[image:SessionSARSaveExistingNoRoute.png|link=]]</td> | |||
</tr> | |||
<tr valign="top"> | |||
<td>[[image:DotPoint2.JPG|link=]]</td> | |||
<td>Save (<span style="font-weight: 700; font-size: 15px;"><span style="color: white; background-color: black;"> Ctrl </span> + <span style="color: white; background-color: black;"> S </span></span> or select <span style="font-weight: 700; font-size: 15px; color: white; background-color: black;"> Save </span> from the [[image:SurveyorSystemIcon.png|link=]] '''System Menu''')</td> | |||
<!-- extra row in rowspan --> | |||
</tr> | |||
<tr valign="top"> | |||
<td>[[image:DotPoint3.JPG|link=]]</td> | |||
<td>The Save Dialogue Window '''SHOULD''' only contain the options | |||
<table> | |||
<tr valign="top"> | |||
<td> | |||
<table> | |||
<tr valign="top"> | |||
<td width=10>[[image:DotPoint.JPG|10px|link=]]</td> | |||
<td>'''Overwrite existing session'''</td> | |||
</tr> | |||
<tr valign="top"> | |||
<td>[[image:DotPoint.JPG|10px|link=]]</td> | |||
<td>'''Create new session'''</td> | |||
</tr> | |||
</table> | |||
Select one of the options and then save</td> | |||
<!-- extra row in rowspan --> | |||
</tr> | |||
</table> | |||
</td> | |||
</tr> | |||
</table> | |||
<br> | |||
</td> | |||
</tr> | |||
</table> | |||
</td> | |||
</tr> | |||
</table> | |||
<br> | |||
<table width=1000> <!-- BEGIN Nav Buttons Table SKIPS NO SECTIONS --> | |||
<tr valign="top"> | |||
<td width=629><span id="skipRouteGroup"></span> | |||
=='''The Route Layers Group'''== | |||
</td> | |||
<td width=50>[[image:SkipDown.png|link=#skipSessionGroup|Skip Down]]</td> <!-- skip Down --> | |||
<td width=50>[[image:SkipUp.png|link=#stepRouteSession|Skip Up]]</td> <!-- skip Up --> | |||
<td width=46> </td> | |||
<td width=75> </td> | |||
<td width=75> </td> | |||
<td width=75> </td> | |||
</tr> | |||
</table> <!-- END Nav Buttons Table --> | |||
<table width=1000 bgcolor="lightcyan" cellpadding=2> | |||
<tr valign="top"> | |||
<td width=10>[[image:BlueDot10x10.png|link=]]</td> | |||
<td>The '''Route Layer Group''' should be used for everything that will always appear in '''Driver Mode''' regardless of which Session is playing.''' </td> | |||
</tr> | |||
</table> | |||
<br> | |||
<table width=1000> | |||
<tr valign="top"> | |||
<td>There is nothing stopping you from placing everything in the '''"route-layer"''' of the '''Route Layers Group''' and never having to worry about dealing with layers ever again - some creators prefer to work this way. However, layers do provide you with a way of organising your scenery objects to make them more manageable, particularly in more complicated layouts. | |||
<br> | |||
<table width=1000 bgcolor=#000000 cellpadding=2> | |||
<tr valign="top"> | |||
<td> | |||
<table bgcolor=#ffffff cellpadding=2> | |||
<tr valign="top"> | |||
<td colspan=2>Some examples:-</td> | |||
</tr> | |||
<tr valign="top"> | |||
<td width=10>[[image:DotPoint.JPG|10px|link=]]</td> | |||
<td>A '''Special Objects''' layer or layers that can be used to hold certain scenery objects. For example all the trees or a particular building. This can be very useful when you need to hide those objects to locate or place other objects. Trackside cameras in particular can be very difficult to find when placed in a forest</td> | |||
</tr> | |||
<tr valign="top"> | |||
<td>[[image:DotPoint.JPG|10px|link=]]</td> | |||
<td>A '''Platform Objects''' layer can be used to hold all platform items such as seats, luggage, luggage trolleys, people, lamp posts, etc. Because these items are placed on top of a platform object they can be very difficult to move or delete without first moving the platform. The layer containing the platform can be locked allowing these objects to be easily moved or deleted</td> | |||
</tr> | </tr> | ||
<tr valign="top"> | <tr valign="top"> | ||
| Line 2,244: | Line 2,369: | ||
<tr valign="top"> | <tr valign="top"> | ||
<td width=629><span id="stepBound"></span> | <td width=629><span id="stepBound"></span> | ||
='''The Bound Layer'''= | ='''The Bound Layer'''= | ||
</td> | </td> | ||
| Line 2,359: | Line 2,485: | ||
<tr valign="top"> | <tr valign="top"> | ||
<td width=25>[[image:PencilTips.PNG|link=]]</td> | <td width=25>[[image:PencilTips.PNG|link=]]</td> | ||
<td>In '''Surveyor 2.0''' you can also use the asset filters found in the <span style="font-weight: 700; font-size: 15px; color: white; background-color: #797979;"> Filter Palette </span> and the <span style="font-weight: 700; font-size: 15px; color: white; background-color: #797979;"> Assets Palette </span> to lock or hide specific assets or types of assets from selection when you are working in Surveyor. See the | <td>In '''Surveyor 2.0''' you can also use the asset filters found in the <span style="font-weight: 700; font-size: 15px; color: white; background-color: #797979;"> Filter Palette </span> and the <span style="font-weight: 700; font-size: 15px; color: white; background-color: #797979;"> Assets Palette </span> to lock or hide specific assets or types of assets from selection when you are working in Surveyor. See the '''Trainz Wiki Page''' [[image:WikiLink.PNG|link=]] '''[[How_to_Use_S20_Tools#Narrowing the Search|S20 Tools - Narrowing the Search]]''' for more details</td> | ||
</tr> | </tr> | ||
</table> | </table> | ||
| Line 2,401: | Line 2,527: | ||
<table bgcolor=#ffffff cellpadding=2> | <table bgcolor=#ffffff cellpadding=2> | ||
<tr valign="top"> | <tr valign="top"> | ||
<td colspan=2><span style="font-weight: 700; font-size: 15px;">Steps:</span> | <td colspan=2><span style="font-weight: 700; font-size: 15px;">Steps: To Use a Bound Layer:-</span></td> | ||
</tr> | </tr> | ||
<tr valign="top"> | <tr valign="top"> | ||
| Line 2,460: | Line 2,586: | ||
<table bgcolor=#ffffff cellpadding=2> | <table bgcolor=#ffffff cellpadding=2> | ||
<tr valign="top"> | <tr valign="top"> | ||
<td colspan=2><span style="font-weight: 700; font-size: 15px;">Steps: | <td colspan=2><span style="font-weight: 700; font-size: 15px;">Steps: To Set a Bound Layer:-</span></td> | ||
</tr> | </tr> | ||
<tr valign="top"> | <tr valign="top"> | ||
| Line 2,530: | Line 2,656: | ||
<table bgcolor=#ffffff cellpadding=2> | <table bgcolor=#ffffff cellpadding=2> | ||
<tr valign="top"> | <tr valign="top"> | ||
<td colspan=2><span style="font-weight: 700; font-size: 15px;">Steps: | <td colspan=2><span style="font-weight: 700; font-size: 15px;">Steps: To Set the Bound Layer in Surveyor 2.0:-</span></td> | ||
</tr> | </tr> | ||
<tr valign="top"> | <tr valign="top"> | ||
| Line 2,728: | Line 2,854: | ||
<td> | <td> | ||
<span style="font-size: 17px;">'''More Tutorials and Guides to Using Trainz'''</span><br> | <span style="font-size: 17px;">'''More Tutorials and Guides to Using Trainz'''</span><br> | ||
*'''<span class="plain; | *'''<span class="plain;">[http://online.ts2009.com/mediaWiki/index.php/HowTo How to Guides]</span>''' | ||
*'''[[Driver Commands List]]''' | *'''[[Driver Commands List]]''' | ||
*'''[[Session Rule List with Parameters|Session Rules List (Alphabetical) with Parameters]]''' | *'''[[Session Rule List with Parameters|Session Rules List (Alphabetical) with Parameters]]''' | ||
| Line 2,736: | Line 2,862: | ||
</table> | </table> | ||
---- | ---- | ||
This page was created by Trainz user '''<span class="plain; | This page was created by Trainz user '''<span class="plain;">[http://online.ts2009.com/mediaWiki/index.php/User:Pware pware]</span>''' in June 2018 and was last updated as shown below. | ||
---- | ---- | ||
[[Category:How-to guides]] | [[Category:How-to guides]] | ||
Latest revision as of 00:22, 1 September 2026
|
 |
 |
|
Some Helpful Tips
|
|||||||||||||||||||||||||||||

What Are Layers? |
 |
|
|
 |
Layers are a Surveyor tool that allow you to better manage the objects that are placed in your Trainz World. |
|
Layers are a Driver tool that allow you to change what the players see as they drive around your Trainz World. |
| Layers can contain any objects, visible and invisible, that can be placed into a layout in Surveyor Classic using the Object, Track and Train tools or using the Placement Tool in Surveyor 2.0. The layers and their contents can be hidden from view (in both Surveyor and in Driver) or locked against alteration whenever required. Their main use is in the development of a Route and a Session but they can also be used as a way of providing some additional novelty during a Driver session. |
|
Almost all of what you will see in a Trainz World will be found in layers, and mostly in the Route Layers and Session Layers.
| Error creating thumbnail: /bin/bash: line 1: /usr/bin/convert: No such file or directory Error code: 127 | Route Layers will contain the objects that will appear in ALL the sessions created using the current route |
| Error creating thumbnail: /bin/bash: line 1: /usr/bin/convert: No such file or directory Error code: 127 | Session Layers will contain the objects that will only appear in the current session |
| Error creating thumbnail: /bin/bash: line 1: /usr/bin/convert: No such file or directory Error code: 127 | Effect Layers (TRS19, Trainz Plus and TRS22) will contain the TurfFX, Clutter, Water and (in Trainz Plus routes using HD) Color effects created using the current route |
The Layers Tool in Surveyor Classic (S10) |
 |
|
 |
|
|

Loading a Route and Loading a Session (S10) |
|
 |
|
Route Layers are saved with the Route. Session Layers are saved with the Session |
|
If you edit a Session Layer and later load just the Route then those edits will not appear. |
 |
More information on creating, loading and saving Routes and Sessions can be found on the Trainz Wiki Page
|

The layers you see will depend on whether you have loaded a Route by itself (with no "child" Session) or a Session and its "parent" Route.
 |
 |
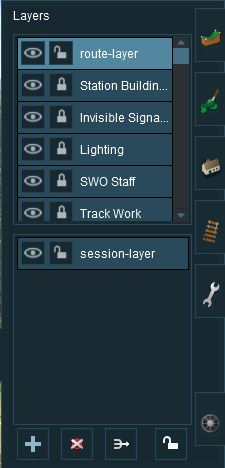
The first image on the left gives an example of the layers that can appear if a Route only is loaded into Surveyor. These are the layers that are saved with the Route. Note that a default "session-layer" is present.
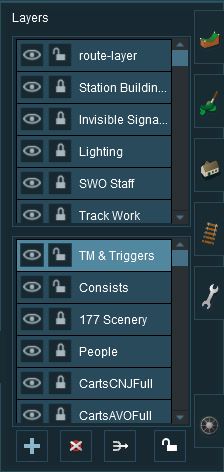
The second image on the left gives an example of the layers that can appear if a Session based on that Route is loaded into Surveyor. It shows Route Layers and Session Layers. In both cases, the Route Layers are identical because the same Route has been loaded. A Session contains its own layers, the Session Layers, that are loaded and saved with the Session but are not loaded or saved with the Route.
|
|

Creating a New Route (S10) |
|
|
 |
|
|||||||||||
The "Active Layer" (S10) |
|
|
|
The Active Layer is the selected (highlighted) layer |
|
When you load the Route only into Surveyor, the first Route layer will be the Active Layer |
|
When you load a Session into Surveyor, the first Session layer will be the Active Layer |
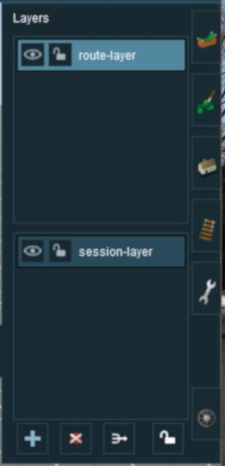
| In the image above, the route-layer is the Active Layer. You can change the Active Layer at any time by a Left Click on the name of another layer. |
|
|
||||||||||||
Adding Another Layer (S10) |
|
|
 |
Left Click the Add Button |
An Add layer dialogue window will appear.
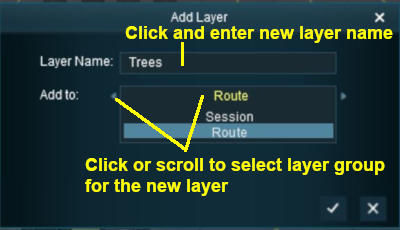 |
|
||||||||||||


Deleting a Layer (S10) |
|
|
|
 |
Select the layer to be deleted and Left Click on the Delete Button. If you don't select a layer to delete then Trainz will select the current Active Layer. |
|
If the layer being deleted is empty, then the following dialogue window will appear:-
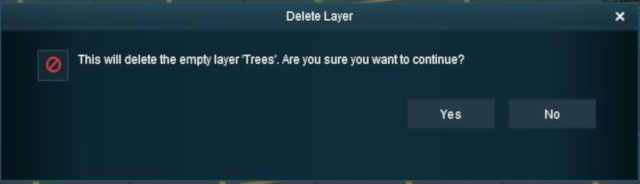 |
|
|||||||
If the layer being deleted is NOT empty, then the following dialogue window will appear:-
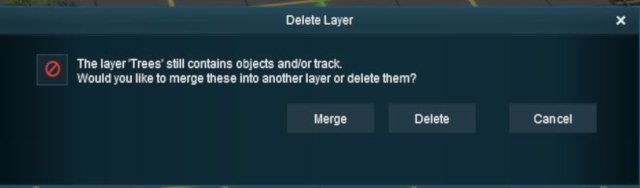 |
|
|||||||||

Merging Layers (S10) |
|
|
|
Merging a layer into another layer will move ALL the objects from the first layer into the second layer. The first layer, which is now empty, will then be deleted |
|
Once layers have been merged they cannot be separated. |
|
 |
Select the layer to be merged into another layer and Left Click the Merge button. If you don't select a layer to merge then Trainz will select the current Active Layer. |
|
The layer merge dialogue window will appear as shown below:-
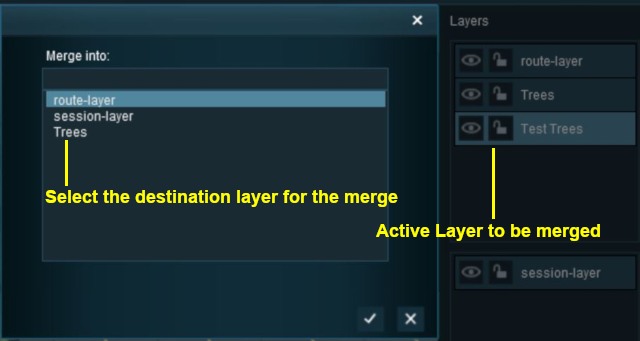 |
|
|||||||||
Locking Layers (S10) |
|
|
|
If you LOCK or UNLOCK a Route Layer while editing a Session then you will have made a change to the Route and will be asked to save both the Route and the Session when you exit Surveyor |
|
Locking Individual Layers (S10)
|
The objects in a LOCKED layer cannot be moved (around the layout) or deleted but they can be moved to other layers. |
To LOCK an individual layer, Left Click on the  Open Padlock icon next to its name. The layer being locked does not have to be the current Active Layer.
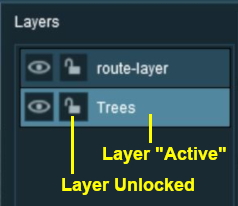 |
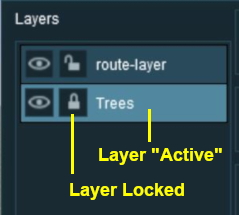 |
|

If you attempt to add a scenery object to a locked layer you will receive the following message:-
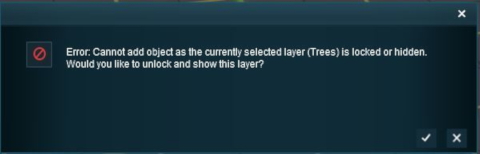 |
Left Click on the  icon to accept the change and add the object Left Click on the  icon to reject the change |
Locking ALL Route Layers (S10)
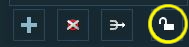 |
Left Click on the Lock Button |
This will LOCK ALL the layers in the Route Layers Group. The Session Layers Group will not be affected.
The Route Layers Group can be UNLOCKED by a Left Click on the Lock Button again.
Moving a Layer (S10) |
|
|
|
Layers can be moved up or down within the same layer group (e.g. Route or Session) or between the two groups |
|
Track Objects (signals, switches, etc) should be in the same layer as the Track or in a layer below the Track layer |
|
In the example shown below a layer created in the Route Layers Group is being moved into the Session Layers Group.
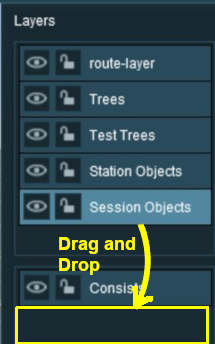 |
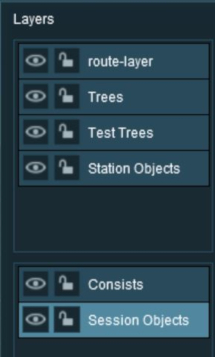 |
|
|||||||||||||||||||||

Hiding Layers (S10) |
|
|
To hide or show a layer Left Click the Eye Icon next to its name.
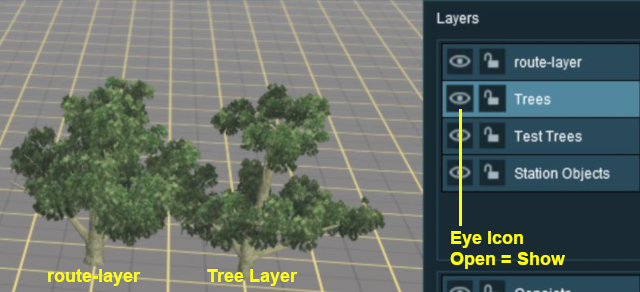 |
In the image shown left the two trees are in different Route Layers and all the layers have their  Eye icons open (set to Show) |
|||||||
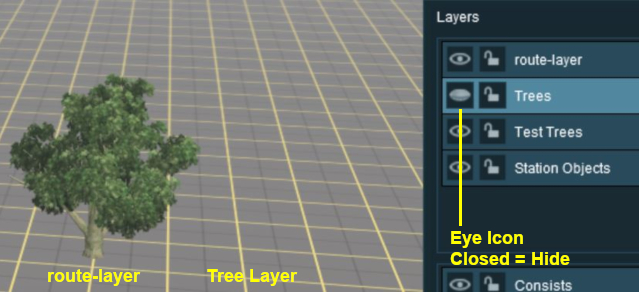 |
In the image shown left the Trees layer has its  Eye icon closed (set to Hide)
|
Adding Objects To Layers (S10) |
|
|
When an object (such as a scenery item, consist, track or track object) is added to the layout it is automatically placed in the currently Active Layer. Unfortunately, Surveyor Classic (S10) does not indicate which layer is the Active Layer unless you open the Layers Tool to look. This can lead to objects being placed into the wrong layers and while these objects can later be moved to another layer (see the section  Moving Objects To Other Layers below) it would be better to correctly set the Active Layer first. |
|
|
You cannot add objects to a layer that is LOCKED |
If you attempt to add a scenery object to a locked layer you will receive the following message:-
|
Left Click on the icon to accept the change and add the object Left Click on the icon to reject the change |
|
When adding track objects (signals, speed signs, etc) to a track, the objects being added must be in the same layer as the track or in a layer below the track layer. For more information, see the section The "route-layer" below |
|

Deleting Objects From Layers (S10) |
|
|
|
You cannot delete objects from a layer that is LOCKED |
|
Unfortunately Trainz does not give you a warning message when you attempt to delete an object from a locked layer, the object just refuses to be deleted.
|
Moving Objects To Other Layers (S10) |
|
|
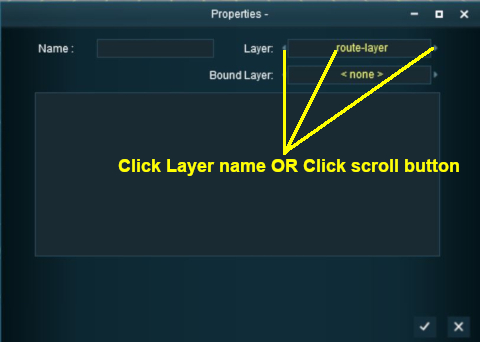
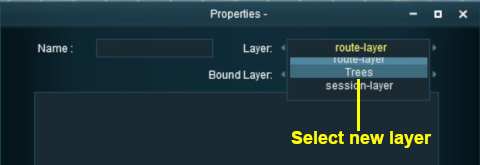
|
|
|||||||||||||||||||||

The Layers Palette in Surveyor 2.0 (S20) |
|
|
|
|
|
|
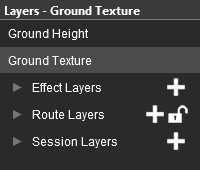
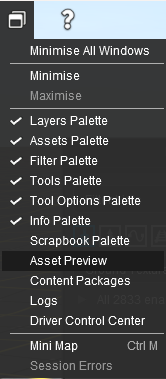
Layers are found in the Layers Palette.
|
|
|||||||||||||||||||||||||||||||||||||||||||||||||||||||


Lock the Route Layer Group (S20)
All the layers in the Route Layer Group can be locked against accidental alteration.
|
||||||
Open a Layer Group (S20)
To the left of each Layer Group name is a small arrow. Left Click on the arrow to open up the group.
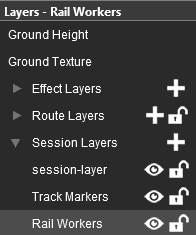 |
The image on the left shows that the Session Layers Group is open and its individual layers are now displayed. To close or minimise the group Left Click on the arrow again.
|
||||||||
Add a New Layer (S20)
| You cannot create new layer groups but you can add new layers to a existing group. Each Layer Group has a  icon next to its name. Left Click on the icon to add and name a new layer to that group. If you are adding a new Effect Layer then you will also have to identify the type of effect - TurfFX, Clutter, Water or Color (the Color effect layer is only visible in HD routes created using Trainz Plus). |
Renaming a Layer (S20)
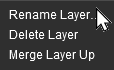 |
Right Click on a layer name and select Rename Layer.. from the popup menu. You will be asked to enter a new name for the layer. |
Deleting a Layer (S20)
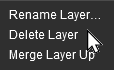 |
Right Click on a layer name and select Delete Layer from the popup menu. You will be given a warning that you are about to delete a layer.
|
Moving a Layer (S20)
Layers can be individually moved up and down within the same layer group or between the Route Layers Group and the Session Layers Group.
|
|
||||||||||
Merging a Layer (S20)
|
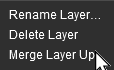 |
Right Click on a layer name and select Merge Layer Up from the popup menu.
|
Hiding Layers (S20)
|
Each individual layer has an Eye icon that controls the visible state of that layer. Left Click on the icon to toggle its state between visible and hidden. If the Eye is:-
|
Locking Layers (S20)
|
Each individual layer has a Padlock icon that controls the state (
|
|
Setting the Active Layer (S20)
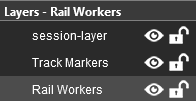 |
the Active Layer is the layer where new objects will be automatically added when using the Placement Tool and pasting or painting a Scrapbook. The active layer is shown in the palette with its name on a light grey background. In the image on the left the Rail Workers layer is the current Active Layer. The name of the current Active Layer is also shown in the Layer Palette Title Bar. To set a new Active Layer, Left Click on the layer name. |
Move an Object to Another Layer (S20)
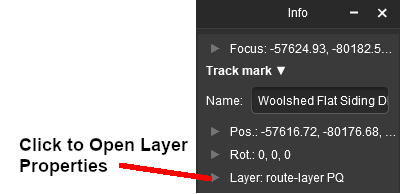
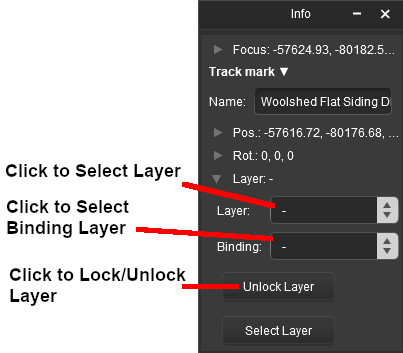
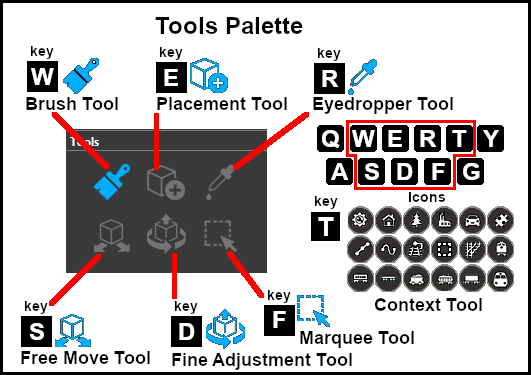
| The Info Palette will show the layer assigned to the currently selected object. An object is selected by using the Free Move Tool Error creating thumbnail: /bin/bash: line 1: /usr/bin/convert: No such file or directory Error code: 127 (the S key) or the Fine Adjustment Tool Error creating thumbnail: /bin/bash: line 1: /usr/bin/convert: No such file or directory Error code: 127 (the D key) found in the Tools Palette.
|
||
|
|
|
|
|
|||||||||||||||||||||||||
Route Layers vs Session Layers |
|
|
|
|
|
This topic has filled endless threads in the Trainz Forums with arguments raging on both sides.
|
In general, there are no "cast iron" rules that dictate what should be placed in the Route Layers Group and what should be placed in the Session Layers Group (for an exception see TRS19 Platinum Edition, Trainz Plus, TRS22 Notes below) |
| Each Route and Session will be different and different creators have different ways of working. The main question to be asked is how many different Sessions will be created using a particular Route? |
 |
Notes:
|
|
TRS19 Platinum Edition, Trainz Plus, TRS22 Notes:
|
||||||||
|
||||||||||||||||||||||||||||||||

The Route Layers Group |
|
|
|
The Route Layer Group should be used for everything that will always appear in Driver Mode regardless of which Session is playing. |
| There is nothing stopping you from placing everything in the "route-layer" of the Route Layers Group and never having to worry about dealing with layers ever again - some creators prefer to work this way. However, layers do provide you with a way of organising your scenery objects to make them more manageable, particularly in more complicated layouts.
|
|||||||||||||
|
The "route-layer"
|
To avoid any confusion over which layer is the original "route-layer", this is one layer that should not be renamed or moved from the top position |
While all layers are equal, the "route-layer" is special.
|
|
||||||||||||
The Session Layers Group |
|
|
|
The Session Layers Group should be used for everything that will only be seen in the currently loaded Session. |
If you are creating more than one Session based around a particular Route, then you will probably make use of the Session Layers.
|
|
The "session-layer"
|
|
|||||||||
The Bound Layer |
|
|
|
|
|
|
|
In Trainz Plus and TRS22 the Bound Layer is often referred to as the Binding Layer |
| This is a little used and probably little understood layer feature. It allows you to attach an object to two different layers so it can have the properties (locked/unlocked and show/hide) of both layers. The bound/binding layer was introduced as a development tool, its sole use is as a tool in the building of routes and sessions. |
|
An object will be LOCKED and cannot be deleted or moved if its layer OR its bound/binding layer is locked. |
|
An object will be HIDDEN if its layer OR its bound/binding layer is hidden. |
|
In TRS19 and TANE Rulers cannot be bound to another layer. |
|
|
|||||||||||||||||||||||||||||||||||||||||||
|
|
||||||||||
|
Setting an Object to the Bound Layer in Surveyor Classic (S10) |
|
|
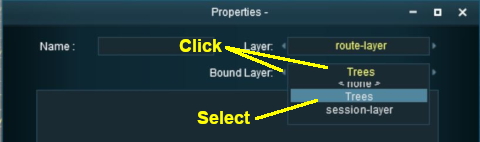 |
|
||||||||||
|
When a layer is deleted any objects bound to that layer will have their Bound Layer reset to <none> |
Setting an Object to the Bound Layer in Surveyor 2.0 (S20) |
|
|
|
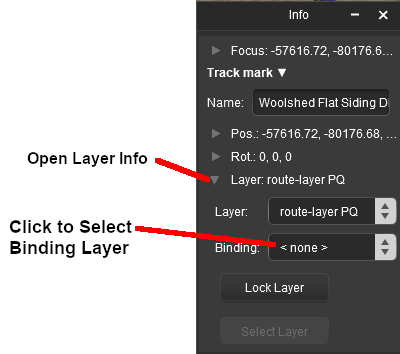 |
|
|||||||||||||
|
When a layer is deleted any objects bound to that layer will have their Bound Layer reset to <none> |
Layers in Driver Mode |
|
|
|
|
|
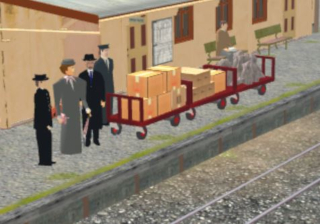
During the running of a Session in Driver Mode visible layers can be hidden and invisible layers revealled according to the events that occur during the Session.
 |
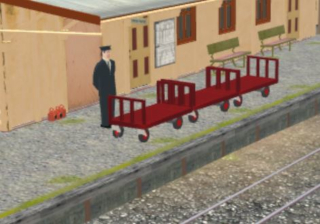 |
The two Driver Mode scenes shown on the left illustrate this feature.
|
|||||||
| This effect could be achieved in two different ways:- | |
 |
A Driver Command - specific to a particular driver, or |
 |
A Session Rule - specific to a particular driver, consist, or any driver/consist |
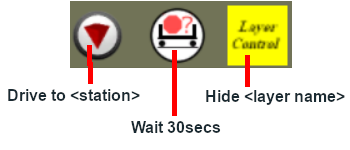
Using a Driver Command
The driver command  Layer Control hides and shows named layers.
 |
|
|||||||||
Using Session Rules
 |
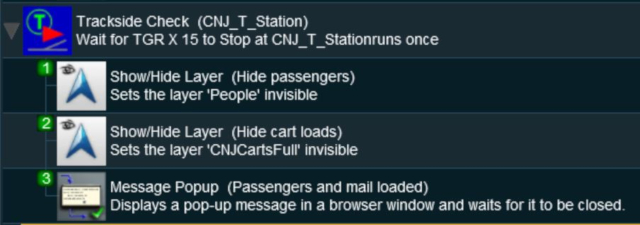
Rules Used: |
- Trackside Check Rule - to trigger the event
- Show/Hide Layer Rule - to hide layers
- Message Popup Rule - to open a browser window with a message
 |
Session Editor Screenshot: |
 |
 |
Description: |
| In this example:- | ||||||
The Trackside Check Rule is triggered when a specific train comes to a stop at a trackmark. This then executes the following rules in order:-
|
||||||
|
|
Trainz Wiki
 |
More Tutorials and Guides to Using Trainz |
This page was created by Trainz user pware in June 2018 and was last updated as shown below.


