How to Use Track Direction Markers: Difference between revisions
mNo edit summary |
|||
| (8 intermediate revisions by the same user not shown) | |||
| Line 23: | Line 23: | ||
</tr> | </tr> | ||
</table> <!-- END Nav Buttons Table --> | </table> <!-- END Nav Buttons Table --> | ||
<table width=1000> | <table width=1000> | ||
<tr valign="top"> | <tr valign="top"> | ||
<td width=450> | <td width=450> | ||
| Line 31: | Line 31: | ||
<td> | <td> | ||
<table width=550 bgcolor="lightcyan" cellpadding=2> | <table width=550 bgcolor="lightcyan" cellpadding=2> | ||
<tr valign="top"> | |||
<td colspan=2><span style="font-weight: 700; font-size: 15px;">Key Points:-</span></td> | |||
</tr> | |||
<tr valign="top"> | <tr valign="top"> | ||
<td width=10>[[image:BlueDot10x10.png|link=]]</td> | <td width=10>[[image:BlueDot10x10.png|link=]]</td> | ||
| Line 38: | Line 41: | ||
<td>[[image:BlueDot10x10.png|link=]]</td> | <td>[[image:BlueDot10x10.png|link=]]</td> | ||
<td>They are "One Way" signs that force trains under AI control to travel in a specific direction through the track section where they are placed</td> | <td>They are "One Way" signs that force trains under AI control to travel in a specific direction through the track section where they are placed</td> | ||
</tr> | |||
<tr valign="top"> | |||
<td>[[image:BlueDot10x10.png|link=]]</td> | |||
<td>The direction they are pointing is the direction of travel through the track section</td> | |||
</tr> | </tr> | ||
<tr valign="top"> | <tr valign="top"> | ||
<td>[[image:BlueDot10x10.png|link=]]</td> | <td>[[image:BlueDot10x10.png|link=]]</td> | ||
<td>They only work on AI controlled trains and have '''NO EFFECT''' on manually controlled trains</td> | <td>They only work on AI controlled trains and have '''NO EFFECT''' on manually controlled trains</td> | ||
</tr> | |||
<tr valign="top"> | |||
<td>[[image:BlueDot10x10.png|link=]]</td> | |||
<td>They can be placed in a '''Route''' or in a '''Session'''</td> | |||
</tr> | </tr> | ||
</table> | </table> | ||
<br> | <br> | ||
</td> | <table bgcolor=#000000 cellpadding=2> | ||
<tr valign="top"> | |||
<td> | |||
<table bgcolor=#ffffff cellpadding=2> | |||
<tr valign="top"> | |||
<td align="center"><span style="font-weight: 700; font-size: 15px;">Navigation Icons used in this Document</span></td> | |||
</tr> | |||
<tr valign="top"> | |||
<td> | |||
<table> | |||
<tr valign="top"> | |||
<td>[[image:BackToTop.png|link=#top|alt=Top|Top]] [[image:BackToBottom.png|link=#bottom|alt=Bottom|Bottom]]</td> | |||
<td>at '''Chapter Headings''' to jump to the top/bottom of the document</td> | |||
</tr> | </tr> | ||
<tr valign="top"> | <tr valign="top"> | ||
<td width=629><span id="stepWhat"></span> | <td>[[image:NextUp.png|link=#top|Next Up]] [[image:NextDown.png|link=#stepTools|link=|Next Down]]</td> | ||
='''What are Track Direction Markers?'''= | <td>at '''Chapter Headings''' to jump to the next or previous '''Chapter'''<br> | ||
</td> | e.g. '''1.''' to '''2.''' to '''3.''', etc</td> | ||
<td width=50> </td> <!-- Skip Down --> | </tr> | ||
<td width=50> </td> <!-- Skip Up --> | <tr valign="top"> | ||
<td width=46>[[image:BackToTop.png|link=#top|alt=Top|Top]]</td> | <td>[[image:SkipUp.png|link=#top|Next Up]] [[image:SkipDown.png|link=#stepS20vS10|Skip Down]]</td> | ||
<td>within '''Chapters''' to jump to the next or previous '''Section'''<br> | |||
e.g. '''3.1''' to '''3.2''' and back to '''3.1''', etc</td> | |||
</tr> | |||
<tr valign="top"> | |||
<td>[[image:SkipMinorUp.png|link=#top|Up]] [[image:SkipMinorDown.png|link=#stepS20vS10|Down]]</td> | |||
<td>within '''Sections''' to jump to the next or previous '''Sub-section'''<br> | |||
e.g. '''3.1.1''' to '''3.1.2''' to '''3.1.3''', etc</td> | |||
</tr> | |||
<tr valign="top"> | |||
<td>[[image:PageLink.PNG|link=]] <span style="font-weight: 700; font-size: 15px; color: blue;">Link</span></td> | |||
<td>'''Internal link''' to another section within this document</td> | |||
</tr> | |||
<tr valign="top"> | |||
<td>[[image:WikiLink.PNG|link=]] <span style="font-weight: 700; font-size: 15px; color: blue;">Link</span></td> | |||
<td>'''External link''' to another document</td> | |||
</tr> | |||
</table> | |||
</td> | |||
</tr> | |||
</table> | |||
</td> | |||
</tr> | |||
</table> | |||
</td> | |||
</tr> | |||
</table> | |||
<br> | |||
<table width=1000> <!-- BEGIN Nav Buttons Table NO SKIPS --> | |||
<tr valign="top"> | |||
<td width=629><span id="stepWhat"></span> | |||
='''What are Track Direction Markers?'''= | |||
</td> | |||
<td width=50> </td> <!-- Skip Down --> | |||
<td width=50> </td> <!-- Skip Up --> | |||
<td width=46>[[image:BackToTop.png|link=#top|alt=Top|Top]]</td> | |||
<td width=75> </td> | <td width=75> </td> | ||
<td width=75>[[image:NextDown.png|link=#stepRoute|alt=Next Down|Next Down]]</td> | <td width=75>[[image:NextDown.png|link=#stepRoute|alt=Next Down|Next Down]]</td> | ||
| Line 189: | Line 244: | ||
<tr valign="top"> | <tr valign="top"> | ||
<td width=629><span id="stepRoute"></span> | <td width=629><span id="stepRoute"></span> | ||
='''Route or Session?'''= | ='''Route or Session?'''= | ||
</td> | </td> | ||
| Line 296: | Line 350: | ||
</table> | </table> | ||
<br> | <br> | ||
<table width=1000> <!-- BEGIN Section Nav Buttons --> | |||
<tr valign="top"> | |||
<td width=629><span id="skipAddMarker10"></span> | |||
===Adding a Track Direction Marker (S10)=== | ===Adding a Track Direction Marker (S10)=== | ||
</td> | |||
<td width=50> </td> | |||
<td width=50> </td> | |||
<td width=46>[[image:SkipMinorDown.png|link=#skipSetName10]][[image:SkipMinorUp.png|link=#skipAddS10]]</td> <!-- for Top and Minor Up/Down --> | |||
<td width=75> </td> | |||
<td width=75> </td> | |||
<td width=75> </td> <!-- for Bottom --> | |||
</tr> | |||
</table> <!-- END Section Nav Buttons --> | |||
<table bgcolor=#000000 cellpadding=2> | <table bgcolor=#000000 cellpadding=2> | ||
| Line 316: | Line 382: | ||
<table bgcolor=#ffffff cellpadding=2> | <table bgcolor=#ffffff cellpadding=2> | ||
<tr valign="top"> | <tr valign="top"> | ||
<td colspan=4><span style="font-weight: 700; font-size: 15px;">Steps: | <td colspan=4><span style="font-weight: 700; font-size: 15px;">Steps: To Add a Track Direction Marker:-</span></td> | ||
</tr> | </tr> | ||
<tr valign="top"> | <tr valign="top"> | ||
| Line 402: | Line 468: | ||
<table bgcolor=#ffffff> | <table bgcolor=#ffffff> | ||
<tr valign="top"> | <tr valign="top"> | ||
<td colspan=2><span style="font-weight: 700; font-size: 15px;">Steps: | <td colspan=2><span style="font-weight: 700; font-size: 15px;">Steps: To Delete a Track Direction Marker:-</span></td> | ||
</tr> | </tr> | ||
<tr valign="top"> | <tr valign="top"> | ||
| Line 424: | Line 490: | ||
</table> | </table> | ||
<br> | <br> | ||
<table width=1000> <!-- BEGIN Section Nav Buttons --> | |||
<tr valign="top"> | |||
<td width=629><span id="skipSetName10"></span> | |||
===Set its Name and Layers (S10)=== | ===Set its Name and Layers (S10)=== | ||
</td> | |||
<td width=50> </td> | |||
<td width=50> </td> | |||
<td width=46>[[image:SkipMinorDown.png|link=#skipSetDirection10]][[image:SkipMinorUp.png|link=#skipAddMarker10]]</td> <!-- for Top and Minor Up/Down --> | |||
<td width=75> </td> | |||
<td width=75> </td> | |||
<td width=75> </td> <!-- for Bottom --> | |||
</tr> | |||
</table> <!-- END Section Nav Buttons --> | |||
<table width=1000 bgcolor="lightcyan" cellpadding=2> | <table width=1000 bgcolor="lightcyan" cellpadding=2> | ||
| Line 452: | Line 530: | ||
<table bgcolor=#ffffff cellpadding=2> | <table bgcolor=#ffffff cellpadding=2> | ||
<tr valign="top"> | <tr valign="top"> | ||
<td colspan=2><span style="font-weight: 700; font-size: 15px;">Steps: | <td colspan=2><span style="font-weight: 700; font-size: 15px;">Steps: To Open the Properties Window of a Track Direction Marker:-</span></td> | ||
</tr> | </tr> | ||
<tr valign="top"> | <tr valign="top"> | ||
| Line 528: | Line 606: | ||
</table> | </table> | ||
<br> | <br> | ||
<table width=1000> <!-- BEGIN Section Nav Buttons --> | |||
<tr valign="top"> | |||
<td width=629><span id="skipSetDirection10"></span> | |||
===Change its Direction (S10)=== | ===Change its Direction (S10)=== | ||
</td> | |||
<td width=50> </td> | |||
<td width=50> </td> | |||
<td width=46>[[image:SkipMinorDown.png|link=#skipMove10]][[image:SkipMinorUp.png|link=#skipSetName10]]</td> <!-- for Top and Minor Up/Down --> | |||
<td width=75> </td> | |||
<td width=75> </td> | |||
<td width=75> </td> <!-- for Bottom --> | |||
</tr> | |||
</table> <!-- END Section Nav Buttons --> | |||
<table width=1000 bgcolor="lightcyan" cellpadding=2> | <table width=1000 bgcolor="lightcyan" cellpadding=2> | ||
| Line 559: | Line 649: | ||
<table width=606 bgcolor=#ffffff cellpadding=2> | <table width=606 bgcolor=#ffffff cellpadding=2> | ||
<tr valign="top"> | <tr valign="top"> | ||
<td colspan=2><span style="font-weight: 700; font-size: 15px;">Steps: | <td colspan=2><span style="font-weight: 700; font-size: 15px;">Steps: To Reverse the Direction of a Track Direction Marker:-</span></td> | ||
</tr> | </tr> | ||
<tr valign="top"> | <tr valign="top"> | ||
| Line 588: | Line 678: | ||
</table> | </table> | ||
<br> | <br> | ||
<table width=1000> <!-- BEGIN Section Nav Buttons --> | |||
<tr valign="top"> | |||
<td width=629><span id="skipMove10"></span> | |||
===Move it Along the Track (S10)=== | ===Move it Along the Track (S10)=== | ||
</td> | |||
<td width=50> </td> | |||
<td width=50> </td> | |||
<td width=46>[[image:SkipMinorDown.png|link=#skipSetRadius10]][[image:SkipMinorUp.png|link=#skipSetDirection10]]</td> <!-- for Top and Minor Up/Down --> | |||
<td width=75> </td> | |||
<td width=75> </td> | |||
<td width=75> </td> <!-- for Bottom --> | |||
</tr> | |||
</table> <!-- END Section Nav Buttons --> | |||
<table width=1000 bgcolor="lightcyan" cellpadding=2> | <table width=1000 bgcolor="lightcyan" cellpadding=2> | ||
| Line 605: | Line 707: | ||
<table width=606 bgcolor=#ffffff cellpadding=2> | <table width=606 bgcolor=#ffffff cellpadding=2> | ||
<tr valign="top"> | <tr valign="top"> | ||
<td colspan=2><span style="font-weight: 700; font-size: 15px;">Steps: | <td colspan=2><span style="font-weight: 700; font-size: 15px;">Steps: To Move a Track Direction Marker to a New Position or to Another Track:-</span></td> | ||
</tr> | </tr> | ||
<tr valign="top"> | <tr valign="top"> | ||
| Line 648: | Line 750: | ||
</table> | </table> | ||
<br> | <br> | ||
<table width=1000> <!-- BEGIN Section Nav Buttons --> | |||
<tr valign="top"> | |||
<td width=629><span id="skipSetRadius10"></span> | |||
===Set its Effect Radius (S10)=== | ===Set its Effect Radius (S10)=== | ||
</td> | |||
<td width=50> </td> | |||
<td width=50> </td> | |||
<td width=46>[[image:SkipMinorDown.png|link=#skipAddingS20]][[image:SkipMinorUp.png|link=#skipMove10]]</td> <!-- for Top and Minor Up/Down --> | |||
<td width=75> </td> | |||
<td width=75> </td> | |||
<td width=75> </td> <!-- for Bottom --> | |||
</tr> | |||
</table> <!-- END Section Nav Buttons --> | |||
<table width=1000 bgcolor="lightcyan" cellpadding=2> | <table width=1000 bgcolor="lightcyan" cellpadding=2> | ||
<tr valign="top"> | <tr valign="top"> | ||
| Line 760: | Line 874: | ||
<table width=696 bgcolor=#ffffff cellpadding=2> | <table width=696 bgcolor=#ffffff cellpadding=2> | ||
<tr valign="top"> | <tr valign="top"> | ||
<td colspan=2><span style="font-weight: 700; font-size: 15px;">Steps | <td colspan=2><span style="font-weight: 700; font-size: 15px;">Steps To Open the Advanced Tools Window:-:</span></td> | ||
</tr> | </tr> | ||
<tr valign="top"> | <tr valign="top"> | ||
| Line 820: | Line 934: | ||
<table bgcolor=#ffffff cellpadding=2> | <table bgcolor=#ffffff cellpadding=2> | ||
<tr valign="top"> | <tr valign="top"> | ||
<td colspan=2><span style="font-weight: 700; font-size: 15px;">Steps: | <td colspan=2><span style="font-weight: 700; font-size: 15px;">Steps: To Set a Track Direction Marker Effect Radius:-</span></td> | ||
</tr> | </tr> | ||
<tr valign="top"> | <tr valign="top"> | ||
| Line 928: | Line 1,042: | ||
</table> | </table> | ||
<br> | <br> | ||
<table width=1000> <!-- BEGIN Nav Buttons Table SKIPS NO SECTIONS --> | |||
<tr valign="top"> | |||
<td width=629><span id="skipAddingS20"></span> | |||
=='''In Surveyor 2.0 (S20)'''== | =='''In Surveyor 2.0 (S20)'''== | ||
</td> | </td> | ||
| Line 946: | Line 1,062: | ||
</table> | </table> | ||
<br> | <br> | ||
<table width=1000> <!-- BEGIN Section Nav Buttons --> | |||
<tr valign="top"> | |||
<td width=629><span id="skipAddMarker20"></span> | |||
===Adding a Track Direction Marker (S20)=== | ===Adding a Track Direction Marker (S20)=== | ||
</td> | |||
<td width=50> </td> | |||
<td width=50> </td> | |||
<td width=46>[[image:SkipMinorDown.png|link=#skipSetName20]][[image:SkipMinorUp.png|link=#skipAddingS20]]</td> <!-- for Top and Minor Up/Down --> | |||
<td width=75> </td> | |||
<td width=75> </td> | |||
<td width=75> </td> <!-- for Bottom --> | |||
</tr> | |||
</table> <!-- END Section Nav Buttons --> | |||
<table width=1000 bgcolor=#000000 cellpadding=2> | <table width=1000 bgcolor=#000000 cellpadding=2> | ||
| Line 961: | Line 1,089: | ||
</table> | </table> | ||
<br> | <br> | ||
[[image:DotPoint1.JPG|link=]] In the | [[image:DotPoint1.JPG|link=]] In the <span style="font-weight: 700; font-size: 15px; color: white; background-color: #797979;"> Filter Palette </span> either:- | ||
<table width=1100> | <table width=1100> | ||
<tr valign="top"> | <tr valign="top"> | ||
| Line 1,004: | Line 1,132: | ||
<tr valign="top"> | <tr valign="top"> | ||
<td>[[image:DotPoint2Blue.png|link=]]</td> | <td>[[image:DotPoint2Blue.png|link=]]</td> | ||
<td>while holding down the <span style="font-weight: 700; font-size: 15px; color: white; background-color: black;"> Alt </span> key <span style="font-weight: 700; font-size: 15px; background-color: lightcyan;">Left Click</span> on the '''Track Direction Marker''' to identify it in the | <td>while holding down the <span style="font-weight: 700; font-size: 15px; color: white; background-color: black;"> Alt </span> key <span style="font-weight: 700; font-size: 15px; background-color: lightcyan;">Left Click</span> on the '''Track Direction Marker''' to identify it in the <span style="font-weight: 700; font-size: 15px; color: white; background-color: #797979;"> Assets Palette </span> and to select the '''Placement Tool'''. Release the key.</td> | ||
</tr> | </tr> | ||
<tr valign="top"> | <tr valign="top"> | ||
| Line 1,030: | Line 1,158: | ||
<tr valign="top"> | <tr valign="top"> | ||
<td colspan=2> | <td colspan=2> | ||
If the | If the <span style="font-weight: 700; font-size: 15px; color: white; background-color: #797979;"> Filter Palette </span> and the <span style="font-weight: 700; font-size: 15px; color: white; background-color: #797979;"> Assets Palette </span> are not shown on the screen, then:- | ||
<table> | <table> | ||
<tr valign="top"> | <tr valign="top"> | ||
| Line 1,037: | Line 1,165: | ||
<table bgcolor=#ffffff> | <table bgcolor=#ffffff> | ||
<tr valign="top"> | <tr valign="top"> | ||
<td colspan=2><span style="font-weight: 700; font-size: 15px;;">Steps:</span> | <td colspan=2><span style="font-weight: 700; font-size: 15px;;">Steps: To Display Palettes:-</span></td> | ||
</tr> | </tr> | ||
<tr valign="top"> | <tr valign="top"> | ||
| Line 1,079: | Line 1,207: | ||
<table width=1000> | <table width=1000> | ||
<tr valign="top"> | <tr valign="top"> | ||
<td>[[image:DotPoint2.JPG|link=]] In the | <td>[[image:DotPoint2.JPG|link=]] In the <span style="font-weight: 700; font-size: 15px; color: white; background-color: #797979;"> Assets Palette </span> to narrow down the filter list, type "direction" ('''UPPER/lower''' case does not matter) in the '''Search Text Box'''.</td> | ||
</tr> | </tr> | ||
</table> | </table> | ||
| Line 1,099: | Line 1,227: | ||
<br> | <br> | ||
If you are not sure about an asset then <span style="font-weight: 700; font-size: 15px; background-color: lightcyan;">Double Left Click</span> on the name to bring up its image and description.<br> | If you are not sure about an asset then <span style="font-weight: 700; font-size: 15px; background-color: lightcyan;">Double Left Click</span> on the name to bring up its image and description.<br> | ||
<br> | |||
<table bgcolor=#000000 cellpadding=2> | <table bgcolor=#000000 cellpadding=2> | ||
<tr valign="top"> | <tr valign="top"> | ||
| Line 1,105: | Line 1,234: | ||
<tr valign="top"> | <tr valign="top"> | ||
<td width=25>[[image:NotePad.PNG|link=]]</td> | <td width=25>[[image:NotePad.PNG|link=]]</td> | ||
<td>When you select any | <td>When you select any '''Track Object''' asset in the <span style="font-weight: 700; font-size: 15px; color: white; background-color: #797979;"> Assets Palette </span> list it will automatically select the '''Placement Tool''' so the next <span style="font-weight: 700; font-size: 15px; background-color: lightcyan;"> Left Click </span> on a track will add that asset to your '''Trainz World'''</td> | ||
</tr> | </tr> | ||
</table> | </table> | ||
| Line 1,134: | Line 1,263: | ||
<table bgcolor=#ffffff> | <table bgcolor=#ffffff> | ||
<tr valign="top"> | <tr valign="top"> | ||
<td colspan=2><span style="font-weight: 700; font-size: 15px;">Steps: | <td colspan=2><span style="font-weight: 700; font-size: 15px;">Steps: To Delete a Track Direction Marker:-</span></td> | ||
</tr> | </tr> | ||
<tr valign="top"> | <tr valign="top"> | ||
| Line 1,171: | Line 1,300: | ||
<table bgcolor=#ffffff cellpadding=2> | <table bgcolor=#ffffff cellpadding=2> | ||
<tr valign="top"> | <tr valign="top"> | ||
<td colspan=2><span style="font-weight: 700; font-size: 15px;">Steps: | <td colspan=2><span style="font-weight: 700; font-size: 15px;">Steps: To Add a Track Direction Marker:-</span></td> | ||
</tr> | </tr> | ||
<tr valign="top"> | <tr valign="top"> | ||
| Line 1,246: | Line 1,375: | ||
</table> | </table> | ||
<br> | <br> | ||
<table width=1000> <!-- BEGIN Section Nav Buttons --> | |||
<tr valign="top"> | |||
<td width=629><span id="skipSetName20"></span> | |||
===Change its Name (S20)=== | ===Change its Name (S20)=== | ||
</td> | |||
<td width=50> </td> | |||
<td width=50> </td> | |||
<td width=46>[[image:SkipMinorDown.png|link=#skipSetLayer20]][[image:SkipMinorUp.png|link=#skipAddMarker20]]</td> <!-- for Top and Minor Up/Down --> | |||
<td width=75> </td> | |||
<td width=75> </td> | |||
<td width=75> </td> <!-- for Bottom --> | |||
</tr> | |||
</table> <!-- END Section Nav Buttons --> | |||
<table width=1000 bgcolor="lightcyan" cellpadding=2> | <table width=1000 bgcolor="lightcyan" cellpadding=2> | ||
| Line 1,264: | Line 1,405: | ||
<table bgcolor=#ffffff cellpadding=2> | <table bgcolor=#ffffff cellpadding=2> | ||
<tr valign="top"> | <tr valign="top"> | ||
<td colspan=2><span style="font-weight: 700; font-size: 15px;">Steps: | <td colspan=2><span style="font-weight: 700; font-size: 15px;">Steps: To Change the Name of a Track Direction Marker:-</span></td> | ||
</tr> | </tr> | ||
<tr valign="top"> | <tr valign="top"> | ||
| Line 1,272: | Line 1,413: | ||
<tr valign="top"> | <tr valign="top"> | ||
<td>[[image:DotPoint5Blue.png|link=]]</td> | <td>[[image:DotPoint5Blue.png|link=]]</td> | ||
<td>in the | <td>in the <span style="font-weight: 700; font-size: 15px; color: white; background-color: #797979;"> Info Palette </span> (you may need to make this palette visible - see the '''Notes:''' for '''Step''' <span style="font-weight: 700; font-size: 15px; color: white; background-color: red;"> 1 </span> above) <span style="font-weight: 700; font-size: 15px; background-color: lightcyan;">Left Click</span> in the '''Name:''' entry box. Enter a name for the '''Track Direction Marker''' and press the <span style="font-weight: 700; font-size: 15px; color: white; background-color: black;"> Enter </span> key</td> | ||
</tr> | </tr> | ||
</table> | </table> | ||
| Line 1,295: | Line 1,436: | ||
</table> | </table> | ||
<br> | <br> | ||
<table width=1000> <!-- BEGIN Section Nav Buttons --> | |||
<tr valign="top"> | |||
<td width=629><span id="skipSetLayer20"></span> | |||
===Assign it to Another Layer (S20)=== | ===Assign it to Another Layer (S20)=== | ||
</td> | |||
<table width=1000 bgcolor="lightcyan" cellpadding=2> | <td width=50> </td> | ||
<tr valign="top"> | <td width=50> </td> | ||
<td width=46>[[image:SkipMinorDown.png|link=#skipSetDirection20]][[image:SkipMinorUp.png|link=#skipSetName20]]</td> <!-- for Top and Minor Up/Down --> | |||
<td width=75> </td> | |||
<td width=75> </td> | |||
<td width=75> </td> <!-- for Bottom --> | |||
</tr> | |||
</table> <!-- END Section Nav Buttons --> | |||
<table width=1000 bgcolor="lightcyan" cellpadding=2> | |||
<tr valign="top"> | |||
<td width=10>[[image:BlueDot10x10.png|link=]]</td> | <td width=10>[[image:BlueDot10x10.png|link=]]</td> | ||
<td>The layer assigned to a marker will control where it is saved, in the '''Route''' or the '''Session'''.</td> | <td>The layer assigned to a marker will control where it is saved, in the '''Route''' or the '''Session'''.</td> | ||
| Line 1,317: | Line 1,470: | ||
<table bgcolor=#ffffff cellpadding=2> | <table bgcolor=#ffffff cellpadding=2> | ||
<tr valign="top"> | <tr valign="top"> | ||
<td colspan=2><span style="font-weight: 700; font-size: 15px;">Steps: | <td colspan=2><span style="font-weight: 700; font-size: 15px;">Steps: To Assign a Track Direction Marker to a Layer:-</span></td> | ||
</tr> | </tr> | ||
<tr valign="top"> | <tr valign="top"> | ||
<td colspan=2>In the | <td colspan=2>In the <span style="font-weight: 700; font-size: 15px; color: white; background-color: #797979;"> Info Palette </span>:-</td> | ||
</tr> | </tr> | ||
<tr valign="top"> | <tr valign="top"> | ||
| Line 1,379: | Line 1,532: | ||
</table> | </table> | ||
<br> | <br> | ||
<table width=1000> <!-- BEGIN Section Nav Buttons --> | |||
<tr valign="top"> | |||
<td width=629><span id="skipSetDirection20"></span> | |||
===Change its Direction (S20)=== | ===Change its Direction (S20)=== | ||
</td> | |||
<td width=50> </td> | |||
<td width=50> </td> | |||
<td width=46>[[image:SkipMinorDown.png|link=#skipMove20]][[image:SkipMinorUp.png|link=#skipSetLayer20]]</td> <!-- for Top and Minor Up/Down --> | |||
<td width=75> </td> | |||
<td width=75> </td> | |||
<td width=75> </td> <!-- for Bottom --> | |||
</tr> | |||
</table> <!-- END Section Nav Buttons --> | |||
<table width=1000 bgcolor="lightcyan" cellpadding=2> | <table width=1000 bgcolor="lightcyan" cellpadding=2> | ||
| Line 1,411: | Line 1,576: | ||
<table bgcolor=#ffffff cellpadding=2> | <table bgcolor=#ffffff cellpadding=2> | ||
<tr valign="top"> | <tr valign="top"> | ||
<td colspan=2><span style="font-weight: 700; font-size: 15px;">Steps:</span> | <td colspan=2><span style="font-weight: 700; font-size: 15px;">Steps: To Reverse its Direction:-</span></td> | ||
</tr> | </tr> | ||
<tr valign="top"> | <tr valign="top"> | ||
| Line 1,427: | Line 1,592: | ||
</table> | </table> | ||
<br> | <br> | ||
<table width=1000> <!-- BEGIN Section Nav Buttons --> | |||
<tr valign="top"> | |||
<td width=629><span id="skipMove20"></span> | |||
===Move it Along the Track (S20)=== | ===Move it Along the Track (S20)=== | ||
</td> | |||
<td width=50> </td> | |||
<td width=50> </td> | |||
<td width=46>[[image:SkipMinorDown.png|link=#skipMoveVertically20]][[image:SkipMinorUp.png|link=#skipSetDirection20]]</td> <!-- for Top and Minor Up/Down --> | |||
<td width=75> </td> | |||
<td width=75> </td> | |||
<td width=75> </td> <!-- for Bottom --> | |||
</tr> | |||
</table> <!-- END Section Nav Buttons --> | |||
<table width=1000 bgcolor="lightcyan" cellpadding=2> | <table width=1000 bgcolor="lightcyan" cellpadding=2> | ||
| Line 1,445: | Line 1,622: | ||
<table bgcolor=#ffffff cellpadding=2> | <table bgcolor=#ffffff cellpadding=2> | ||
<tr valign="top"> | <tr valign="top"> | ||
<td colspan=2><span style="font-weight: 700; font-size: 15px;">Steps: | <td colspan=2><span style="font-weight: 700; font-size: 15px;">Steps: To Move the Track Direction Marker:-</span></td> | ||
</tr> | </tr> | ||
<tr valign="top"> | <tr valign="top"> | ||
| Line 1,500: | Line 1,677: | ||
</table> | </table> | ||
<br> | <br> | ||
<table width=1000> <!-- BEGIN Section Nav Buttons --> | |||
<tr valign="top"> | |||
<td width=629><span id="skipMoveVertically20"></span> | |||
===Move it Vertically (S20)=== | ===Move it Vertically (S20)=== | ||
</td> | |||
<td width=50> </td> | |||
<td width=50> </td> | |||
<td width=46>[[image:SkipMinorDown.png|link=#skipMoveHorizontally20]][[image:SkipMinorUp.png|link=#skipMove20]]</td> <!-- for Top and Minor Up/Down --> | |||
<td width=75> </td> | |||
<td width=75> </td> | |||
<td width=75> </td> <!-- for Bottom --> | |||
</tr> | |||
</table> <!-- END Section Nav Buttons --> | |||
<table width=1000 bgcolor="lightcyan" cellpadding=2> | <table width=1000 bgcolor="lightcyan" cellpadding=2> | ||
| Line 1,524: | Line 1,713: | ||
<table bgcolor=#ffffff cellpadding=2> | <table bgcolor=#ffffff cellpadding=2> | ||
<tr valign="top"> | <tr valign="top"> | ||
<td | <td colspan=2><span style="font-weight: 700; font-size: 15px;">Steps: To Move a Track Direction Marker Vertically</span> choose option [[image:Ablue.png|link=]] <span style="font-weight: 700; font-size: 15px;">OR</span> [[image:Bblue.png|link=]]:-</td> | ||
</tr> | </tr> | ||
<tr valign="top"> | <tr valign="top"> | ||
| Line 1,550: | Line 1,738: | ||
<table bgcolor=#ffffff cellpadding=2> | <table bgcolor=#ffffff cellpadding=2> | ||
<tr valign="top"> | <tr valign="top"> | ||
<td colspan=2><span style="font-weight: 700; font-size: 15px;">Steps: | <td colspan=2><span style="font-weight: 700; font-size: 15px;">Steps: To Correctly Reattach the Track Direction Marker to the Track:-</span></td> | ||
</tr> | </tr> | ||
<tr valign="top"> | <tr valign="top"> | ||
| Line 1,574: | Line 1,762: | ||
</table> | </table> | ||
<br> | <br> | ||
<table width=1000> <!-- BEGIN Section Nav Buttons --> | |||
<tr valign="top"> | |||
<td width=629><span id="skipMoveHorizontally20"></span> | |||
===Move it Horizontally (S20)=== | ===Move it Horizontally (S20)=== | ||
</td> | |||
<td width=50> </td> | |||
<td width=50> </td> | |||
<td width=46>[[image:SkipMinorDown.png|link=#skipSetRadius20]][[image:SkipMinorUp.png|link=#skipMoveVertically20]][[image:SkipMinorBlank.png|link=]]</td> <!-- for Top and Minor Up/Down --> | |||
<td width=75> </td> | |||
<td width=75> </td> | |||
<td width=75> </td> <!-- for Bottom --> | |||
</tr> | |||
</table> <!-- END Section Nav Buttons --> | |||
<table width=1000 bgcolor="lightcyan" cellpadding=2> | <table width=1000 bgcolor="lightcyan" cellpadding=2> | ||
| Line 1,598: | Line 1,798: | ||
<table bgcolor=#ffffff cellpadding=2> | <table bgcolor=#ffffff cellpadding=2> | ||
<tr valign="top"> | <tr valign="top"> | ||
<td colspan=2><span style="font-weight: 700; font-size: 15px;">Steps: | <td colspan=2><span style="font-weight: 700; font-size: 15px;">Steps: To Move a Track Direction Marker Horizontally:-</span></td> | ||
</tr> | </tr> | ||
<tr valign="top"> | <tr valign="top"> | ||
| Line 1,632: | Line 1,832: | ||
<table bgcolor=#ffffff cellpadding=2> | <table bgcolor=#ffffff cellpadding=2> | ||
<tr valign="top"> | <tr valign="top"> | ||
<td colspan=2><span style="font-weight: 700; font-size: 15px;">Steps: | <td colspan=2><span style="font-weight: 700; font-size: 15px;">Steps: To Correctly Reattach the Track Direction Marker to the Track:-</span></td> | ||
</tr> | </tr> | ||
<tr valign="top"> | <tr valign="top"> | ||
| Line 1,653: | Line 1,853: | ||
</table> | </table> | ||
<br> | <br> | ||
<span id="S20EffectRadius"></span> | <table width=1000> <!-- BEGIN Section Nav Buttons --> | ||
<tr valign="top"> | |||
<td width=629><span id="skipSetRadius20"></span><span id="S20EffectRadius"></span> | |||
===Set its Effect Radius (S20)=== | ===Set its Effect Radius (S20)=== | ||
</td> | |||
<td width=50> </td> | |||
<td width=50> </td> | |||
<td width=46>[[image:SkipMinorDown.png|link=#stepOperation]][[image:SkipMinorUp.png|link=#skipMoveHorizontally20]]</td> <!-- for Top and Minor Up/Down --> | |||
<td width=75> </td> | |||
<td width=75> </td> | |||
<td width=75> </td> <!-- for Bottom --> | |||
</tr> | |||
</table> <!-- END Section Nav Buttons --> | |||
<table width=1000 bgcolor="lightcyan" cellpadding=2> | <table width=1000 bgcolor="lightcyan" cellpadding=2> | ||
| Line 1,764: | Line 1,975: | ||
<table bgcolor=#ffffff cellpadding=2> | <table bgcolor=#ffffff cellpadding=2> | ||
<tr valign="top"> | <tr valign="top"> | ||
<td colspan=2><span style="font-weight: 700; font-size: 15px;">Steps: | <td colspan=2><span style="font-weight: 700; font-size: 15px;">Steps: To Adjust the Effect Radius of a Track Direction Marker:-</span></td> | ||
</tr> | </tr> | ||
<tr valign="top"> | <tr valign="top"> | ||
| Line 1,813: | Line 2,024: | ||
</table> | </table> | ||
<br> | <br> | ||
<table width=1000> <!-- BEGIN Nav Buttons Table SECTION w SKIPS --> | |||
<tr valign="top"> | |||
<td width=629><span id="stepOperation"></span> | |||
='''Track Direction Marker Operation'''= | ='''Track Direction Marker Operation'''= | ||
</td> | </td> | ||
| Line 1,912: | Line 2,125: | ||
<td> | <td> | ||
<span style="font-size: 17px;">'''More Tutorials and Guides to Using Trainz'''</span><br> | <span style="font-size: 17px;">'''More Tutorials and Guides to Using Trainz'''</span><br> | ||
*'''<span class="plain; | *'''<span class="plain;">[http://online.ts2009.com/mediaWiki/index.php/HowTo How to Guides]</span>''' | ||
*'''[[Driver Commands List]]''' | *'''[[Driver Commands List]]''' | ||
*'''[[Session Rule List with Parameters|Session Rules List (Alphabetical) with Parameters]]''' | *'''[[Session Rule List with Parameters|Session Rules List (Alphabetical) with Parameters]]''' | ||
| Line 1,936: | Line 2,149: | ||
</table> | </table> | ||
---- | ---- | ||
This page was created by Trainz user '''<span class="plain; | This page was created by Trainz user '''<span class="plain;">[http://online.ts2009.com/mediaWiki/index.php/User:Pware pware]</span>''' in September 2019 and was last updated as shown below. | ||
---- | ---- | ||
[[Category:How-to guides]] | [[Category:How-to guides]] | ||
Latest revision as of 10:09, 5 September 2026
|
 |
 |
|
||||||||||||||||||||||||||||

What are Track Direction Markers? |
 |
|
|
|
Error creating thumbnail: /bin/bash: line 1: /usr/bin/convert: No such file or directory Error code: 127 |

| For Example: a Track Direction Marker placed on the track between a junction on one side and an industry track on the other side will set the AI controlled train direction for ALL the track segments between the two, not just the one it is attached to. |
| When an AI driver plans a path it will query if it can enter a TGL. If the TGL contains a Track Direction Marker that is pointing against the planned path then that path will be rejected. |
|

Route or Session? |
|
 |
|
|
 |
Track Direction Markers can be placed in a Route Layer or in a Session Layer |
|
 |
Information on Route Layers and Session Layers can be found at:- |
Adding a Track Direction Marker |
 |
|
|
|
|
|
In Surveyor Classic (S10) |
|
 |
| Surveyor Classic (or S10) is the original Surveyor interface supplied with every version of Trainz and is available as an option in TRS22PE and Trainz Plus. |
| The Surveyor Classic interface used here is the one found in Trainz Plus and TRS22PE. There are some differences from the Surveyor Classic interface found in older versions of Trainz. |
Adding a Track Direction Marker (S10) |
  |
|
|
|||||||||||||||||||||||||||||||||||
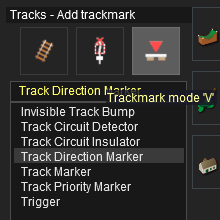

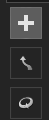


|
||||||||||

Set its Name and Layers (S10) |
|
|
The name of a Track Direction Marker is only needed to locate it in a route or session. It is not used in any Session Rules or Driver Commands |
|
The Layer it is assigned to will decide if will be saved in a Route or in a Session |
| The Name and Layer Settings for a Track Direction Marker are in its Properties Window. | ||||||||||||||
| Error creating thumbnail: /bin/bash: line 1: /usr/bin/convert: No such file or directory Error code: 127 | To open the Properties Window of a Track Direction Marker:- | |||||||||||||
|
||||||||||||||

 |
|


Change its Direction (S10) |
|
|
The direction the marker is pointing is the direction AI trains will be forced to take. |
|
|
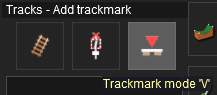 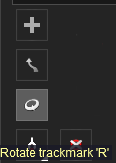 |
||||||||||
Move it Along the Track (S10) |
|
|
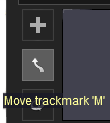
Track Direction Markers can be dragged along the track and moved to other tracks. |
If you need to move a Track Direction Marker then:-
|
 |
||||||||||
|
Set its Effect Radius (S10) |
|
|
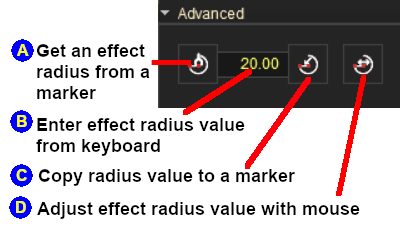
The Effect Radius sets the size of green "effect wings" attached to both ends of the Track Direction Marker. |
|
Its default value is 20m. Changing it has NO EFFECT on its operation. |
| A Track Direction Marker will set the allowed direction of travel for ALL AI controlled trains travelling along a section of single line track. It has NO EFFECT on manually controlled trains. Placing a Track Direction Marker on a track segment will affect all connected track segments... |
|
|
||||||||||||||||||||||||
| For Example: a Track Direction Marker placed on the track between a junction on one side and an industry track on the other side will set the AI controlled train direction for ALL the track segments between the two, not just the one it is attached to. So its Effect Radius is actually the distance between those two points regardless of the number track segments. |
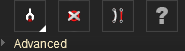
| The Effect Radius controls for a Track Direction Marker are in the Tools Menu Advanced Window. |
|
|||||||||
|
|
||||||||||||||||||||||||||||||||||||||||||||||||

|
In Surveyor 2.0 (S20) |
|
|
| Surveyor 2.0 (or S20) is the latest Surveyor interface and is supplied with TRS22PE and Trainz Plus. |
Adding a Track Direction Marker (S20) |
|
|
 In the Filter Palette either:-
|
|
||||||||||||||||||||||||||||||||||||
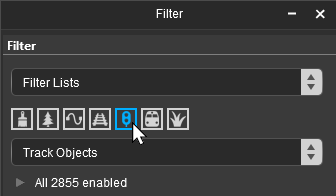
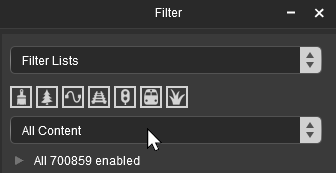
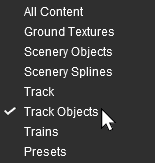


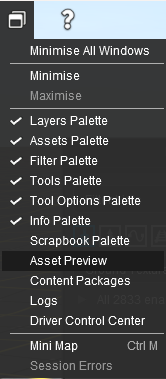


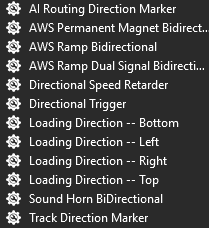
 In the Assets Palette to narrow down the filter list, type "direction" (UPPER/lower case does not matter) in the Search Text Box. |
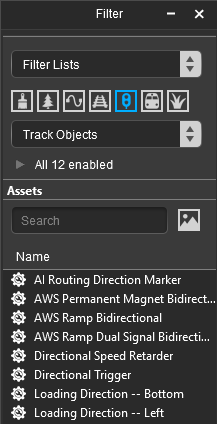 Both pallets shown docked |
|
 Place the selected Track Direction Marker on the track.
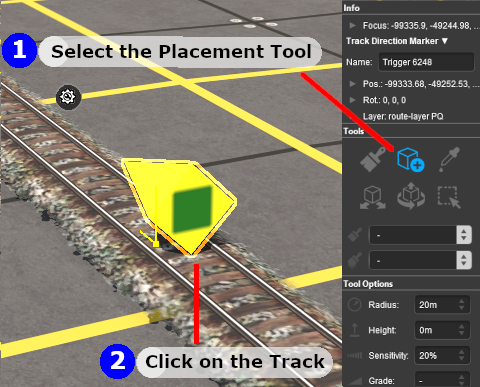
|
|
||||||||||||||||||||||||||||||||||||||||
Once you have added a Track Priority Marker and set its properties it can be quickly duplicated (Cloned) in Surveyor 2.0 with those properties and moved to a new location. You can then easily edit the name and properties of the clone at the new location. See  How to Use S20 Tools - Cloning Objects for the details. |
Change its Name (S20) |
|
|
The name of the Track Direction Marker is only useful for finding it in the route. It is not needed for any operational purpose. |
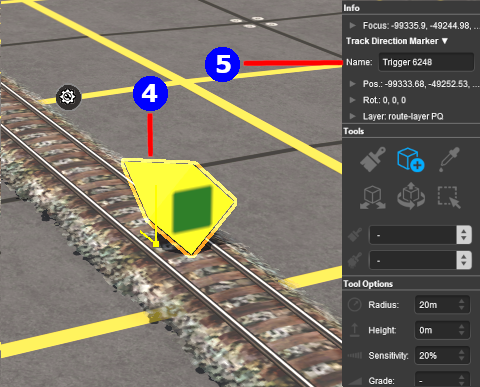 |
|
||||||||||


Assign it to Another Layer (S20) |
|
|
The layer assigned to a marker will control where it is saved, in the Route or the Session. |
| The Info Palette will show the layer assigned to the currently selected object. To the left of the layer name is a small arrowhead object. | |||||||||||||||||||||||
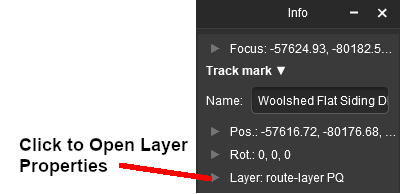 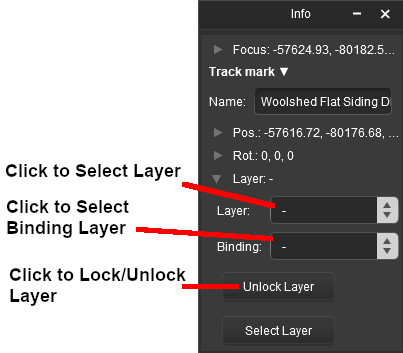 |
|
||||||||||||||||||||||
Change its Direction (S20) |
|
|
The direction the marker is pointing is the direction AI controlled trains will be forced to take. |
|
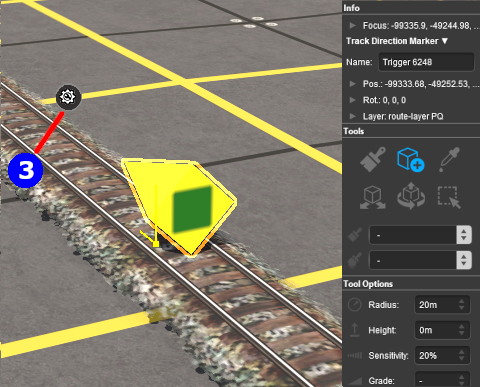 |
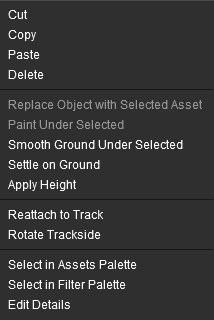 |
|||||


Move it Along the Track (S20) |
|
|
Markers can be moved along the track or moved to other tracks. |
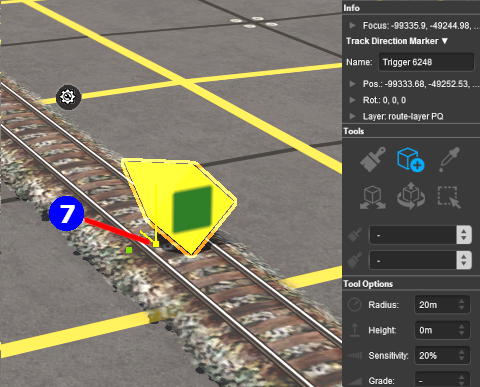 |
|
||||||||||||||

|
Move it Vertically (S20) |
|
|
Markers can be physically placed above or below the track. |
| This feature allow a marker to be placed, for example, above the track so that it will not be hidden in Surveyor if a consist is parked on the marker. A change in height will have NO EFFECT on its operation. |
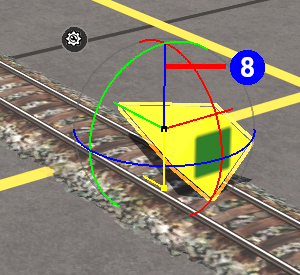 |
|
|||||||||||||||||||

Move it Horizontally (S20) |
 |
|
Markers can be physically placed left or right of the track. |
| This feature allows markers to be placed, for example, beside the track so that they will not be hidden in Surveyor if a consist is parked on the Track Direction Marker. |
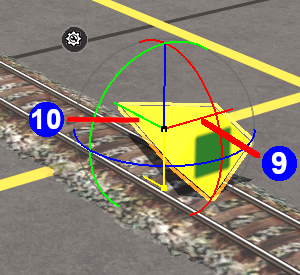 |
|
||||||||||||||||||||


Set its Effect Radius (S20) |
|
|
The Effect Radius sets the size of green "effect wings" attached to both ends of the Track Direction Marker. |
|
Its default value is 20m. Changing it has NO EFFECT on its operation. |
| A Track Direction Marker will set the allowed direction of travel for ALL AI controlled trains travelling along a section of single line track. It has NO EFFECT on manually controlled trains. Placing a Track Direction Marker on a track segment will affect all connected track segments... |
|
|
||||||||||||||||||||||||
| For Example: a Track Direction Marker placed on the track between a junction on one side and an industry track on the other side will set the AI controlled train direction for ALL the track segments between the two, not just the one it is attached to. So its Effect Radius is actually the distance between those two points regardless of the number track segments. |
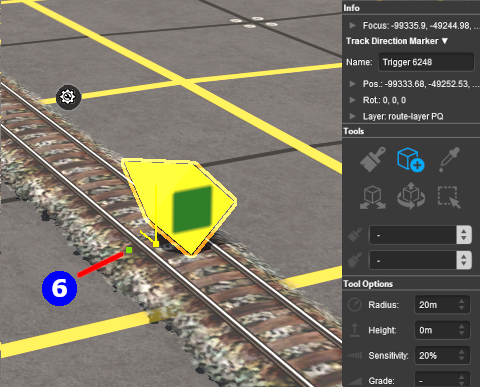 |
|
||||||||||||||||

Track Direction Marker Operation |
|
|
|
|
|
Track Direction Markers only work on AI controlled trains. They have NO EFFECT on manually controlled trains |
|
If the set path is blocked, then the AI will NOT attempt to find another path |
|
A set path will be ignored if a shorter path is available |
| Consider the situation represented in the diagrams below. An AI controlled train is moving left to right towards a junction and a loop line. A Track Direction Marker (yellow triangle) has been set on the main line which only allows AI trains traveling right-to-left to pass along that section of track. |
| In Figure 1 below, The train approaches the junction at the start of the one way section. |

Figure 1
| In Figure 2 below, the train has been forced to take the loop line to avoid the section controlled by the Track Direction Markers. |

Figure 2
| In Figure 3 below, the loop line has been blocked by another train. The moving train will attempt to use the loop line but it will be halted and will not attempt to find another path. |

Figure 3
| Track Direction Markers can be ignored by the AI In Figure 4 below, the Track Direction Marker has been placed on the loop line and is pointing in the same direction as the moving train. However, the mainline path represents the shorter route for the consist so the "preferred" direction, as indicated by the Track Direction Markers, is ignored. Placing a Track Direction Marker is no guarantee that the path will be followed if more suitable paths are available. |

Figure 4
Trainz Wiki |
|
|
|
|

This page was created by Trainz user pware in September 2019 and was last updated as shown below.


