SAR Yangya Switches: Difference between revisions
From TrainzOnline
Jump to navigationJump to search
mNo edit summary |
mNo edit summary |
||
| (4 intermediate revisions by the same user not shown) | |||
| Line 8: | Line 8: | ||
</tr> | </tr> | ||
<tr valign="top"> | <tr valign="top"> | ||
<td align="center">[[image:Tab_HM_Grey.png|link=SAR_Yangya]] [[image:Tab_IN_Grey.png|link=SAR_Yangya_Industry]] [[image:Tab_TM_Grey.png|link=SAR_Yangya_TrackMarks]] [[image: | <td align="center">[[image:Tab_HM_Grey.png|link=SAR_Yangya]] [[image:Tab_IN_Grey.png|link=SAR_Yangya_Industry]] [[image:Tab_TM_Grey.png|link=SAR_Yangya_TrackMarks]] [[image:Tab_SW_White.png|link=]] [[image:Tab_Blank_Grey.png|link=]]</td> | ||
</tr> | </tr> | ||
<tr valign="top"> | <tr valign="top"> | ||
| Line 20: | Line 20: | ||
<td width=220 align="right">[[Image:SAR_PortPirie-BrokenHill_Line.png|link=SAR_Port_Pirie-Broken_Hill|alt=PortPirie-BrokenHill|Show Port Pirie-Broken Hill]]</td> | <td width=220 align="right">[[Image:SAR_PortPirie-BrokenHill_Line.png|link=SAR_Port_Pirie-Broken_Hill|alt=PortPirie-BrokenHill|Show Port Pirie-Broken Hill]]</td> | ||
<td width=110 align="center">[[Image:Next Left.png|link=|alt=]]<br>[[Image:SAR_Gladstone_W_Name.png|link=SAR Gladstone|alt=Gladstone|Next Up Location]]</td> | <td width=110 align="center">[[Image:Next Left.png|link=|alt=]]<br>[[Image:SAR_Gladstone_W_Name.png|link=SAR Gladstone|alt=Gladstone|Next Up Location]]</td> | ||
<td width=90 align="center">[[Image:Location Index.png|link=SAR Index|alt=Location Index|Location Index]]</td> | <td width=90 align="center">[[Image:Location Index.png|link=SAR Index|alt=Location Index|Location Index]]<br>[[image:Scenario Index.png|link=SAR Peterborough Base Session|alt=Scenarios]]</td> | ||
<td width=110 align="center">[[Image:Next Right.png|link=|alt=]]<br>[[Image:SAR_Caltowie_Name.png|link=SAR Caltowie|alt=Caltowie|Next Down Location]]</td> | <td width=110 align="center">[[Image:Next Right.png|link=|alt=]]<br>[[Image:SAR_Caltowie_Name.png|link=SAR Caltowie|alt=Caltowie|Next Down Location]]</td> | ||
<td width=220 align="left">[[Image:SAR_PortPirie-BrokenHill_Line.png|link=SAR_Port_Pirie-Broken_Hill|alt=PortPirie-BrokenHill|Show Port Pirie-Broken Hill]]</td> | <td width=220 align="left">[[Image:SAR_PortPirie-BrokenHill_Line.png|link=SAR_Port_Pirie-Broken_Hill|alt=PortPirie-BrokenHill|Show Port Pirie-Broken Hill]]</td> | ||
| Line 58: | Line 58: | ||
<td align="center">[[Image:No_3.png|20px|link=]]</td> | <td align="center">[[Image:No_3.png|20px|link=]]</td> | ||
<td>'''YY 3'''</td> | <td>'''YY 3'''</td> | ||
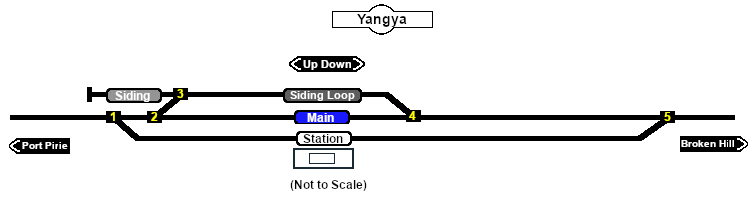
<td><span style="background-color: cyan; font-weight: 700;">Up</span> '''(R) Siding, (L) Main'''</td> | <td><span style="background-color: cyan; font-weight: 700;">Up</span> '''(R) Siding <span style="background-color: red; color: white;"> DE </span>, (L) Main'''</td> | ||
<td align="center">[[Image:No_4.png|20px|link=]]</td> | <td align="center">[[Image:No_4.png|20px|link=]]</td> | ||
<td>'''YY 4'''</td> | <td>'''YY 4'''</td> | ||
| Line 95: | Line 95: | ||
<tr valign="top"> | <tr valign="top"> | ||
<td width=150><span style="font-weight: 700;"><span style="background-color: black; color: white;"> Port Pirie - </span><span style="background-color: #949494; color: white;"> Siding </span></span></td> | <td width=150><span style="font-weight: 700;"><span style="background-color: black; color: white;"> Port Pirie - </span><span style="background-color: #949494; color: white;"> Siding Loop </span></span></td> | ||
<td width=225><span style="font-weight: 700;"><span style="background-color: black; color: yellow;"> 1 </span>-L <span style="background-color: black; color: yellow;"> 2 </span>-L <span style="background-color: black; color: yellow;"> 3 </span>-L </span></td> | <td width=225><span style="font-weight: 700;"><span style="background-color: black; color: yellow;"> 1 </span>-L <span style="background-color: black; color: yellow;"> 2 </span>-L <span style="background-color: black; color: yellow;"> 3 </span>-L </span></td> | ||
<td width=150><span style="font-weight: 700;"><span style="background-color: black; color: white;"> Broken Hill - </span><span style="background-color: #949494; color: white;"> Siding </span></span></td> | <td width=150><span style="font-weight: 700;"><span style="background-color: black; color: white;"> Broken Hill - </span><span style="background-color: #949494; color: white;"> Siding Loop </span></span></td> | ||
<td width=225><span style="font-weight: 700;"><span style="background-color: black; color: yellow;"> 5 </span>-R <span style="background-color: black; color: yellow;"> 4 </span>-R </span></td> | <td width=225><span style="font-weight: 700;"><span style="background-color: black; color: yellow;"> 5 </span>-R <span style="background-color: black; color: yellow;"> 4 </span>-R </span></td> | ||
Latest revision as of 02:27, 17 April 2021
|
 |
||||||||||||||||||||||||||||||||||||||||||||||||||||||||||||||||||||||||||||||||||||||