SAR Yongala Switches V1: Difference between revisions

From TrainzOnline
Jump to navigationJump to search
Pware (talk | contribs)
mNo edit summary
Pware (talk | contribs)
mNo edit summary
 
(One intermediate revision by the same user not shown)
Line 9: Line 9:
</tr>
</tr>
<tr valign="top">
<tr valign="top">
<td align="center">[[image:Tab_HM_Grey.png|link=SAR_Yongala]]&#160;[[image:Tab_IN_Grey.png|link=SAR_Yongala_Industry_V1]]&#160;[[image:Tab_TM_Grey.png|link=SAR_Yongala_TrackMarks_V1]]&#160;[[image:Tab_SW_White.png|link=]]&#160;[[image:Tab_Blank_Grey.png|link=]]</td>
<td align="center">[[image:Tab_HM_Grey.png|link=SAR_Yongala_V1]]&#160;[[image:Tab_IN_Grey.png|link=SAR_Yongala_Industry_V1]]&#160;[[image:Tab_TM_Grey.png|link=SAR_Yongala_TrackMarks_V1]]&#160;[[image:Tab_SW_White.png|link=]]&#160;[[image:Tab_Blank_Grey.png|link=]]</td>
</tr>
</tr>
<tr valign="top">
<tr valign="top">
Line 33: Line 33:
</tr>
</tr>
<tr valign="top">
<tr valign="top">
<td align="center"><span style="font-weight: 700;">This is the original <span style="color: blue;">v1.0 Jamestown Map and description</span>. For the latest <span style="color: blue;">SAR Peterborough Narrow Gauge Division v2.0</span> version click <span style="background-color: yellow;">[[SAR_Yongala_Switches_V2|here]]</span></span>. The '''v2.0''' version of the route and sessions requires '''Trainz Plus''' or '''TRS22'''</td>
<td align="center"><span style="font-weight: 700;">For <span style="color: blue;">SAR Peterborough Narrow Gauge Division v1.0</span>. For the latest <span style="color: blue;">V2.0</span> click <span style="background-color: yellow;">[[SAR_Yongala_Switches_V2|here]]</span></span></td>
</tr>
</tr>
</table>
</table>

Latest revision as of 11:10, 30 April 2024

    
PortPirie-BrokenHill
Belalie North
Location Index
Scenarios

Peterborough
PortPirie-BrokenHill
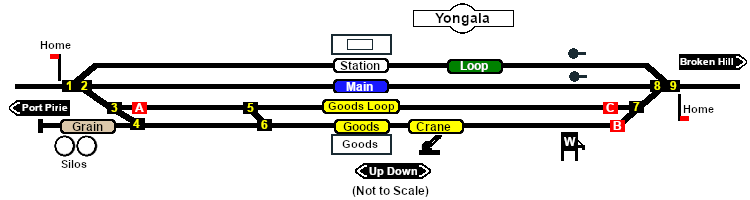
Yongala Switches map
For SAR Peterborough Narrow Gauge Division v1.0. For the latest V2.0 click here
  Switches  
No. Name Facing and L/R Directions
(default direction first)
No. Name Facing and L/R Directions
(default direction first)
YN 1 Down (R) Main, (L) Station Loop YN 2 Down (L) Main, (R) Goods Loop/Goods
YN 3 Down (L) Goods Loop, (R) Goods Shed  YNCP A  Up  (L) Catchpoint , (R) Port Pirie
YN 4 Up (L) Grain Siding  DE , (R) Port Pirie YN 5 Down (L) Goods Loop, (R) Goods Shed
YN 6 Up (L) Goods Yard, (R) Goods Loop Yard  YNCP B  Down  (R) Catchpoint , (L) Broken Hill
 YNCP C  Down  (R) Catchpoint , (L) Broken Hill YN 7 Up (R) Goods Loop, (L) Goods Shed
YN 8 Up (R) Main, (L) Goods Loop/Goods YN 9 Up (L) Main, (R) Station Loop
 Switch Sets 
 Port Pirie -  Station  Loop   1 -L  Broken Hill -  Station  Loop   9 -R
 Port Pirie -  Main   1 -R  2 -L  Broken Hill -  Main   9 -L  8 -R
 Port Pirie -  Goods Loop   1 -R  2 -R  3 -L  A -R  5 -L  Broken Hill -  Goods Loop   9 -L  8 -L  7 -R  C -L
 Port Pirie -  Goods   1 -R  2 -R  3 -R  4 -R  6 -L  Broken Hill -  Goods   9 -L  8 -L  7 -L  B -L

PortPirie-BrokenHill

Gladstone-Paratoo Strip Map