How to Merge Routes: Difference between revisions
| (10 intermediate revisions by the same user not shown) | |||
| Line 1: | Line 1: | ||
The information in this Wiki Page | <table width=1000 bgcolor=#000000 cellpadding=2> | ||
<tr valign="top"> | |||
<td> | |||
<table width=996 bgcolor=#ffffff cellpadding=2> | |||
<tr valign="middle"> | |||
<td width=35>[[image:Information.png|35px|link=]]</td> | |||
<td><span style="font-size: 15px;">The information in this Wiki Page explains the process of merging two routes in '''T:ANE''', '''TRS19''', '''TRS22''' and '''Trainz Plus'''.</span></td> | |||
</tr> | |||
</table> | |||
</td> | |||
</tr> | |||
</table> | |||
<br> | |||
<table width=1000> | <table width=1000> | ||
<tr valign="top"> | <tr valign="top"> | ||
| Line 7: | Line 19: | ||
<td> | <td> | ||
<table width=600 bgcolor="lightcyan" cellpadding=2> | <table width=600 bgcolor="lightcyan" cellpadding=2> | ||
<tr valign="top"> | |||
<td colspan=2><span style="font-weight: 700; font-size: 15px;">Key Points:-</span></td> | |||
</tr> | |||
<tr valign="top"> | <tr valign="top"> | ||
<td width=10>[[image:BlueDot10x10.png|link=]]</td> | <td width=10>[[image:BlueDot10x10.png|link=]]</td> | ||
| Line 21: | Line 36: | ||
<tr valign="top"> | <tr valign="top"> | ||
<td>[[image:BlueDot10x10.png|link=]]</td> | <td>[[image:BlueDot10x10.png|link=]]</td> | ||
<td>A Payware (DLC) route '''cannot''' be selected | <td>A Payware (DLC) route '''cannot''' be one of the selected routes</td> | ||
</tr> | </tr> | ||
</table> | </table> | ||
| Line 61: | Line 76: | ||
<tr valign="top"> | <tr valign="top"> | ||
<td>[[image:PencilTips.PNG|link=]]</td> | <td>[[image:PencilTips.PNG|link=]]</td> | ||
<td><span style="font-size: | <td><span style="font-size: 15px;">'''Identify...'''</span> | ||
<table> | <table> | ||
<tr valign="top"> | <tr valign="top"> | ||
| Line 69: | Line 84: | ||
<tr valign="top"> | <tr valign="top"> | ||
<td>[[image:DotPoint.JPG|10px|link=]]</td> | <td>[[image:DotPoint.JPG|10px|link=]]</td> | ||
<td> | <td>if you need to keep the '''Session Data''' (station and industry settings, weather, driver commands, etc) of one of the routes in the merge. You can only keep keep the data from one session, not both. This route and its session '''MUST''' be the first selected for the merge</td> | ||
</tr> | </tr> | ||
<tr valign="top"> | <tr valign="top"> | ||
<td>[[image:DotPoint.JPG|10px|link=]]</td> | <td>[[image:DotPoint.JPG|10px|link=]]</td> | ||
<td>the route that will be the ''' | <td>the first or starting route, the one that will be the '''Base Route'''. This route will form the ''backbone'' of the merged routes. It will usually be the larger route or the one that has a session that contains data that you want to keep in the merge</td> | ||
</tr> | |||
<tr valign="top"> | |||
<td>[[image:DotPoint.JPG|10px|link=]]</td> | |||
<td>the second or joining route, the one that will be merged with the '''Base Route'''. If this route has a session then you cannot include that session in the merge</td> | |||
</tr> | </tr> | ||
<tr valign="top"> | <tr valign="top"> | ||
| Line 133: | Line 152: | ||
<tr valign="top"> | <tr valign="top"> | ||
<td>The merging process occurs within your computers on-board memory (RAM). If this is not large enough then your system will also use virtual RAM, i.e. your disk storage space as temporary memory, which is significantly slower. If your system does not have enough memory, both on-board and virtual, then merging large routes will become a problem (i.e. impossible or will take a very long time).<br> | <td>The merging process occurs within your computers on-board memory (RAM). If this is not large enough then your system will also use virtual RAM, i.e. your disk storage space as temporary memory, which is significantly slower. If your system does not have enough memory, both on-board and virtual, then merging large routes will become a problem (i.e. impossible or will take a very long time).<br> | ||
<br> | |||
The Trainz | The Trainz forum contains several threads where attempts to merge '''very large routes''' (Gigabytes in size) have taken '''"days"''' to complete or failed to complete at all. In many of these cases the users did not have enough RAM (on-board and virtual) installed in their system. In one documented case, doubling the available on-board RAM from 16GB to 32GB and increasing the Windows virtual memory page size (disk based or virtual RAM) reduced the merge time for two extremely large routes from failing to complete in over 50 hours to successfully completing in 10 hours.</td> | ||
</tr> | </tr> | ||
</table> | </table> | ||
| Line 161: | Line 180: | ||
<tr valign="top"> | <tr valign="top"> | ||
<td>[[image:DotPoint.JPG|10px|link=]]</td> | <td>[[image:DotPoint.JPG|10px|link=]]</td> | ||
<td>Sometimes textures from the ''' | <td>Sometimes textures from the '''Base Route''' will bleed into the second route, particularly if the latter route is not textured. The solution to this can be found in the Trainz Wiki [[image:WikiLink.PNG|link=]] '''[[How to Use Bulk Asset Update/Replace Tool]]'''</td> | ||
</tr> | </tr> | ||
<tr valign="top"> | <tr valign="top"> | ||
| Line 190: | Line 209: | ||
<tr valign="top"> | <tr valign="top"> | ||
<td width=10>[[image:DotPoint.JPG|10px|link=]]</td> | <td width=10>[[image:DotPoint.JPG|10px|link=]]</td> | ||
<td>Another fixable problem can occur if a layer containing track from the | <td>Another fixable problem can occur if a layer containing track from the second route ends up below the layer that also contains track in the '''Base Route'''. This can be fixed by merging the lower track layer into the higher track layer either during the merging process or afterwards using the [[image:WikiLink.PNG|link=]] '''[[How to Use Layers|Layer Tools]]''' in Surveyor. | ||
</td> | </td> | ||
</tr> | </tr> | ||
| Line 220: | Line 239: | ||
<tr valign="top"> | <tr valign="top"> | ||
<td>[[image:PencilTips.PNG|link=]]</td> | <td>[[image:PencilTips.PNG|link=]]</td> | ||
<td>A handy tip for merging two routes with different heights is to create a new route that only contains the extra "in-between" or '''bridging''' baseboards - no scenery, textures or track are needed. The baseboards on one end will have heights that match those of the ''' | <td>A handy tip for merging two routes with different heights is to create a new route that only contains the extra "in-between" or '''bridging''' baseboards - no scenery, textures or track are needed. The baseboards on one end will have heights that match those of the '''Base Route''' and the baseboards on the other end will have heights that match those of the second route. The distance between these two end baseboards will determine the grade that your trains will have to climb. The merge is performed in two stages:- | ||
<table bgcolor=#ffffff cellpadding=2> | <table bgcolor=#ffffff cellpadding=2> | ||
<tr valign="top"> | <tr valign="top"> | ||
<td colspan=2><span style="font-weight: 700; font-size: 15px;">Steps: | <td colspan=2><span style="font-weight: 700; font-size: 15px;">Steps: To Merge Two Routes Using a Bridging Route:-</span></td> | ||
</tr> | </tr> | ||
<tr valign="top"> | <tr valign="top"> | ||
<td width=25>[[image:DotPoint1.JPG|link=]]</td> | <td width=25>[[image:DotPoint1.JPG|link=]]</td> | ||
<td>the '''new bridging route''' is merged with the ''' | <td>the '''new bridging route''' is merged with the '''Base Route''' and saved (backups are important)</td> | ||
</tr> | </tr> | ||
<tr valign="top"> | <tr valign="top"> | ||
<td>[[image:DotPoint2.JPG|link=]]</td> | <td>[[image:DotPoint2.JPG|link=]]</td> | ||
<td>the selected | <td>the selected second route is merged with the '''Base + bridging route'''</td> | ||
</tr> | </tr> | ||
</table> | </table> | ||
| Line 245: | Line 264: | ||
<tr valign="top"> | <tr valign="top"> | ||
<td width=629><span id="stepSelecting"></span> | <td width=629><span id="stepSelecting"></span> | ||
='''Selecting and Loading the Routes to Merge'''= | ='''Selecting and Loading the Routes to Merge'''= | ||
</td> | </td> | ||
| Line 258: | Line 278: | ||
<table width=1000 cellpadding=2 bgcolor=#ffffff> <!-- BEGIN Step table --> | <table width=1000 cellpadding=2 bgcolor=#ffffff> <!-- BEGIN Step table --> | ||
<tr valign="top"> | <tr valign="top"> | ||
<td colspan=2><span style="font-size: | <td colspan=2><span style="font-size: 15px; font-weight: 700;">Steps</span></td> | ||
</tr> | </tr> | ||
<tr valign="top"> | <tr valign="top"> | ||
| Line 265: | Line 285: | ||
<tr valign="top"> | <tr valign="top"> | ||
<td width=25>[[image:DotPoint1.JPG|link=]]</td> | <td width=25>[[image:DotPoint1.JPG|link=]]</td> | ||
<td><span style="font-size: | <td><span style="font-size: 15px; font-weight: 700;">Load the <span style="text-decoration: underline;">Base Route</span> Into Surveyor:</span> | ||
<table bgcolor=#000000 cellpadding=2> | <table bgcolor=#000000 cellpadding=2> | ||
<tr valign="top"> | <tr valign="top"> | ||
| Line 287: | Line 307: | ||
The answer depends on whether or not the '''Session''' contains assets (scenery, consists) and settings (rules, driver commands, industry and wagon loads, weather, time of day, etc) that you want to continue to use in the new merged '''Route''' and its '''Session'''. If this is the case then load the '''Session'''. If the '''Session''' contains nothing that you need, then only load the '''Route'''. | The answer depends on whether or not the '''Session''' contains assets (scenery, consists) and settings (rules, driver commands, industry and wagon loads, weather, time of day, etc) that you want to continue to use in the new merged '''Route''' and its '''Session'''. If this is the case then load the '''Session'''. If the '''Session''' contains nothing that you need, then only load the '''Route'''. | ||
<br><br> | <br><br> | ||
'''Note:''' When you add the | '''Note:''' When you add the second route its '''Route''' assets and data will be loaded but not any '''Session''' assets or data so this decision is the only opportunity you will have to load anything from a Session. If the '''Session''' attached to the '''Base Route''' contains nothing that you need then load the '''Route''' only into Surveyor.</td> | ||
</tr> | </tr> | ||
</table> <!-- END Step 1 table --> | </table> <!-- END Step 1 table --> | ||
| Line 300: | Line 320: | ||
<tr valign="top"> | <tr valign="top"> | ||
<td width=25>[[image:DotPoint2.JPG|link=]]</td> | <td width=25>[[image:DotPoint2.JPG|link=]]</td> | ||
<td><span style="font-size: | <td><span style="font-size: 15px; font-weight: 700;">Start the <span style="text-decoration: underline;">Merge Route Tool</span> and load the '''Base Route''':</span> | ||
<table> <!-- BEGIN Step 2 table --> | <table> <!-- BEGIN Step 2 table --> | ||
<tr valign="top"> | <tr valign="top"> | ||
| Line 321: | Line 341: | ||
<tr valign="top"> | <tr valign="top"> | ||
<td width=25>[[image:DotPoint2Blue.png|link=]]</td> | <td width=25>[[image:DotPoint2Blue.png|link=]]</td> | ||
<td>Select the route | <td>Select the second route. Only the '''Route Data''' (terrain, textures, effect layers) and '''Route Layers''' (assets) will be loaded from this route</td> | ||
</tr> | </tr> | ||
</table> | </table> | ||
| Line 341: | Line 361: | ||
<tr valign="top"> | <tr valign="top"> | ||
<td width=629><span id="stepMergeMap"></span> | <td width=629><span id="stepMergeMap"></span> | ||
='''The Merge Map'''= | ='''The Merge Map'''= | ||
</td> | </td> | ||
| Line 363: | Line 382: | ||
<tr valign="top"> | <tr valign="top"> | ||
<td width=10>[[image:DotPoint.JPG|10px|link=]]</td> | <td width=10>[[image:DotPoint.JPG|10px|link=]]</td> | ||
<td> | <td><span style="font-weight: 700; font-size: 15px;">Terrain Tab</span> - this shows the baseboards of the second route superimposed on the baseboards of the '''Base Route'''. A red <span style="font-weight: 700; font-size: 15px; color: red;">!</span> symbol on this tab, as shown in the figure on the left, indicates that the two routes have baseboards that are in conflict - they are overlapping. The overlapping baseboards are shown in red on the MiniMap</td> | ||
</tr> | </tr> | ||
<tr valign="top"> | <tr valign="top"> | ||
<td>[[image:DotPoint.JPG|10px|link=]]</td> | <td>[[image:DotPoint.JPG|10px|link=]]</td> | ||
<td><span style="font-weight: 700; font-size: 15px;">Layers Tab</span> - this | <td><span style="font-weight: 700; font-size: 15px;">Layers Tab</span> - this identifies the layers that have been copied from both routes. A red background colour on this tab indicates that the two routes have layers that are in conflict</td> | ||
</tr> | </tr> | ||
</table> | </table> | ||
| Line 377: | Line 396: | ||
<tr valign="top"> | <tr valign="top"> | ||
<td>[[image:NotePad.PNG|link=]]</td> | <td>[[image:NotePad.PNG|link=]]</td> | ||
<td><span style="font-size: | <td><span style="font-size: 15px;">'''Notes:'''</span><br> | ||
---- | ---- | ||
</td> | </td> | ||
| Line 391: | Line 410: | ||
<tr valign="top"> | <tr valign="top"> | ||
<td>[[image:DotPoint.JPG|10px|link=]]</td> | <td>[[image:DotPoint.JPG|10px|link=]]</td> | ||
<td>The four arrows shown at the top, bottom and both sides of the map display will move the | <td>The four arrows shown at the top, bottom and both sides of the map display will move the second route in the direction shown on each arrow by a <span style="font-weight: 700; font-size: 15px; background-color: lightcyan;">Left Click</span>.</td> | ||
</tr> | </tr> | ||
</table> | </table> | ||
| Line 401: | Line 420: | ||
</table> | </table> | ||
<br> | <br> | ||
==Move the | ==Move the Second Route into its New Position== | ||
<table width=1000> | <table width=1000> | ||
| Line 412: | Line 431: | ||
<table bgcolor=#ffffff cellpadding=2> | <table bgcolor=#ffffff cellpadding=2> | ||
<tr valign="top"> | <tr valign="top"> | ||
<td colspan=2><span style="font-weight: 700; font-size: 15px;">Steps: | <td colspan=2><span style="font-weight: 700; font-size: 15px;">Steps: To Move the Second Route Map:-</span></td> | ||
</tr> | </tr> | ||
<tr valign="top"> | <tr valign="top"> | ||
<td>[[image:DotPoint1.JPG|link=]]</td> | <td>[[image:DotPoint1.JPG|link=]]</td> | ||
<td><span style="font-weight: 700; font-size: 15px; background-color: lightcyan;">Left Click</span> on the direction arrows shown at the top, bottom and sides of the MiniMap window to move the | <td><span style="font-weight: 700; font-size: 15px; background-color: lightcyan;">Left Click</span> on the direction arrows shown at the top, bottom and sides of the MiniMap window to move the second route into its correct position | ||
<table bgcolor=#ffffe0 cellpadding=2> | <table bgcolor=#ffffe0 cellpadding=2> | ||
<tr valign="top"> | <tr valign="top"> | ||
| Line 427: | Line 446: | ||
<tr valign="top"> | <tr valign="top"> | ||
<td>[[image:DotPoint2.JPG|link=]]</td> | <td>[[image:DotPoint2.JPG|link=]]</td> | ||
<td>Each <span style="font-weight: 700; font-size: 15px; background-color: lightcyan;">Left Click</span> will move the | <td>Each <span style="font-weight: 700; font-size: 15px; background-color: lightcyan;">Left Click</span> will move the second route one baseboard in the selected direction</td> | ||
</tr> | </tr> | ||
</table> | </table> | ||
| Line 434: | Line 453: | ||
</table> | </table> | ||
<br> | <br> | ||
In the example shown on the left, a <span style="font-weight: 700; font-size: 15px; background-color: lightcyan;">Left Click</span> 5 times on the '''Left''' arrow moved the | In the example shown on the left, a <span style="font-weight: 700; font-size: 15px; background-color: lightcyan;">Left Click</span> 5 times on the '''Left''' arrow moved the second route 5 baseboards to the left to a position where there were no overlapping baseboards and all terrain conflicts were resolved (the '''Terrain Tab''' has lost its red <span style="font-weight: 700; font-size: 15px; color: red;">!</span> symbol). | ||
<br> | <br> | ||
<table bgcolor=#000000 cellpadding=2> | <table bgcolor=#000000 cellpadding=2> | ||
| Line 492: | Line 511: | ||
</tr> | </tr> | ||
</table> | </table> | ||
</td> | |||
</tr> | </tr> | ||
</table> | </table> | ||
| Line 498: | Line 517: | ||
</tr> | </tr> | ||
</table> | </table> | ||
</td> | <br> | ||
There are three simple options for solving this problem:-<br><br></td> | |||
<td> | <td> | ||
<table bgcolor=#000000 cellpadding=2> | <table bgcolor=#000000 cellpadding=2> | ||
| Line 532: | Line 552: | ||
<table width=506 bgcolor=#ffffff cellpadding=2> | <table width=506 bgcolor=#ffffff cellpadding=2> | ||
<tr valign="top"> | <tr valign="top"> | ||
<td colspan=2><span style="font-weight: 700; font-size: 15px;">Steps:</span> | <td colspan=2><span style="font-weight: 700; font-size: 15px;">Steps: To Rename a Layer:-</span></td> | ||
</tr> | </tr> | ||
<tr valign="top"> | <tr valign="top"> | ||
| Line 578: | Line 598: | ||
<table bgcolor=#ffffff cellpadding=2> | <table bgcolor=#ffffff cellpadding=2> | ||
<tr valign="top"> | <tr valign="top"> | ||
<td colspan=2><span style="font-weight: 700; font-size: 15px;">Steps:</span> | <td colspan=2><span style="font-weight: 700; font-size: 15px;">Steps: To Delete a Layer:-</span></td> | ||
</tr> | </tr> | ||
<tr valign="top"> | <tr valign="top"> | ||
| Line 670: | Line 690: | ||
<table width=506 bgcolor=#ffffff cellpadding=2> | <table width=506 bgcolor=#ffffff cellpadding=2> | ||
<tr valign="top"> | <tr valign="top"> | ||
<td colspan=2><span style="font-weight: 700; font-size: 15px;">Steps:</span> | <td colspan=2><span style="font-weight: 700; font-size: 15px;">Steps: To Merge Two Layers:-</span></td> | ||
</tr> | </tr> | ||
<tr valign="top"> | <tr valign="top"> | ||
| Line 700: | Line 720: | ||
</table> | </table> | ||
<br> | <br> | ||
='''Accept or Reject'''= | ='''Accept or Reject'''= | ||
| Line 732: | Line 753: | ||
<tr valign="top"> | <tr valign="top"> | ||
<td width=10>[[image:BlueDot10x10.png|link=]]</td> | <td width=10>[[image:BlueDot10x10.png|link=]]</td> | ||
<td>Most of these issues occur when using the earlier versions of Trainz - '''T:ANE''' and '''TRS19'''. They are less common or have not been reported in the more recent versions</td> | |||
</tr> | |||
<tr valign="top"> | |||
<td>[[image:BlueDot10x10.png|link=]]</td> | |||
<td>All of these problems occur along baseboard boundaries after the merge but not just on the merge boundary - they can appear many baseboards away and can take a lot of searching to find</td> | <td>All of these problems occur along baseboard boundaries after the merge but not just on the merge boundary - they can appear many baseboards away and can take a lot of searching to find</td> | ||
</tr> | </tr> | ||
| Line 771: | Line 796: | ||
<tr valign="top"> | <tr valign="top"> | ||
<td width=25>[[image:NotePad.PNG|link=]]</td> | <td width=25>[[image:NotePad.PNG|link=]]</td> | ||
<td><span style="font-size: | <td><span style="font-size: 15px;">'''Notes:'''</span><br> | ||
---- | ---- | ||
</td> | </td> | ||
| Line 790: | Line 815: | ||
<table width=1000 cellpadding=2 bgcolor=#ffffff> <!-- BEGIN Step table --> | <table width=1000 cellpadding=2 bgcolor=#ffffff> <!-- BEGIN Step table --> | ||
<tr valign="top"> | <tr valign="top"> | ||
<td><span style="font-size: | <td><span style="font-size: 15px; font-weight: 700;">Steps:</span></td> | ||
</tr> | </tr> | ||
</table> | </table> | ||
| Line 797: | Line 822: | ||
<tr valign="top"> | <tr valign="top"> | ||
<td width=25>[[image:DotPoint1.JPG|link=]]</td> | <td width=25>[[image:DotPoint1.JPG|link=]]</td> | ||
<td><span style="font-size: | <td><span style="font-size: 15px; font-weight: 700;">Create a Small Dummy Route:</span> | ||
<table> <!-- BEGIN Step 1 table --> | <table> <!-- BEGIN Step 1 table --> | ||
<tr valign="top"> | <tr valign="top"> | ||
| Line 834: | Line 859: | ||
<tr valign="top"> | <tr valign="top"> | ||
<td>[[image:DotPoint2.JPG|link=]]</td> | <td>[[image:DotPoint2.JPG|link=]]</td> | ||
<td><span style="font-size: | <td><span style="font-size: 15px; font-weight: 700;">Load the First Route:</span><br> | ||
<table> <!-- BEGIN Step 2 table --> | <table> <!-- BEGIN Step 2 table --> | ||
<tr valign="top"> | <tr valign="top"> | ||
<td>Load the ''' | <td>Load the '''Base Route''' into Surveyor - see the section [[image:PageLink.PNG|link=]] '''[[#Selecting and Loading the Routes to Merge|Selecting and Loading the Routes to Merge]]'''. | ||
</td> | </td> | ||
</tr> | </tr> | ||
| Line 848: | Line 873: | ||
<tr valign="top"> | <tr valign="top"> | ||
<td>[[image:DotPoint3.JPG|link=]]</td> | <td>[[image:DotPoint3.JPG|link=]]</td> | ||
<td><span style="font-size: | <td><span style="font-size: 15px; font-weight: 700;">Load and Position the Merge Dummy Route:</span><br> | ||
<table> <!-- BEGIN Step 3 table --> | <table> <!-- BEGIN Step 3 table --> | ||
<tr valign="top"> | <tr valign="top"> | ||
| Line 888: | Line 913: | ||
<tr valign="top"> | <tr valign="top"> | ||
<td>[[image:DotPoint4.JPG|link=]]</td> | <td>[[image:DotPoint4.JPG|link=]]</td> | ||
<td><span style="font-size: | <td><span style="font-size: 15px; font-weight: 700;">Load and Position the Second Route:'''</span><br> | ||
<table> <!-- BEGIN Step 4 table --> | <table> <!-- BEGIN Step 4 table --> | ||
<tr valign="top"> | <tr valign="top"> | ||
| Line 937: | Line 962: | ||
<tr valign="top"> | <tr valign="top"> | ||
<td>[[image:DotPoint5.JPG|link=]]</td> | <td>[[image:DotPoint5.JPG|link=]]</td> | ||
<td><span style="font-size: | <td><span style="font-size: 15px; font-weight: 700;">Delete the Merge Dummy Route'''</span><br> | ||
<table> <!-- BEGIN Step 5 table --> | <table> <!-- BEGIN Step 5 table --> | ||
<tr valign="top"> | <tr valign="top"> | ||
| Line 971: | Line 996: | ||
<td>[[image:TrainzWiki.png|link=]]</td> | <td>[[image:TrainzWiki.png|link=]]</td> | ||
<td> | <td> | ||
<span style="font-size: | <span style="font-size: 15px;">'''More Tutorials and Guides to Using Trainz'''</span><br> | ||
*'''<span class=" | *'''<span class="plain;">[http://online.ts2009.com/mediaWiki/index.php/HowTo How to Guides]</span>''' | ||
*'''[[Driver Commands List]]''' | *'''[[Driver Commands List]]''' | ||
*'''[[Session Rule List with Parameters|Session Rules List (Alphabetical) with Parameters]]''' | *'''[[Session Rule List with Parameters|Session Rules List (Alphabetical) with Parameters]]''' | ||
| Line 980: | Line 1,005: | ||
</table> | </table> | ||
---- | ---- | ||
This page was created by Trainz user '''<span class=" | This page was created by Trainz user '''<span class="plain;">[http://online.ts2009.com/mediaWiki/index.php/User:Pware pware]</span>''' in July 2018 and was last updated as shown below. | ||
---- | ---- | ||
[[Category:How-to guides]] | [[Category:How-to guides]] | ||
Latest revision as of 06:37, 1 September 2026
|
|
|||||||||||
Before You Start Merging |
 |
 |
 |
 |
You are strongly advised to make backup copies of any routes that you are going to merge |
|
In most cases there should be no technical problems in merging routes (and completing the task in minutes) on systems that meet the recommended specs |
Before you start merging there are some important points you will need to consider and there may be some preparation work that will have to be performed.
|

Latitude, Longitude and Altitude
|
A common misconception is that the Latitude and Longitude of the routes being merged plays a part in the merging process |
| The Latitude and Longitude of a route has absolutely no effect on the route itself apart from setting, along with the date entered into the Environment Tools, the season of the year. Even then it is only the North/South component of the entered Latitude, not the value, that is important. A route with its geographic coordinates set in Northern Alaska will happily merge with a route set in outback Australia - but what you do with all the snow and dust is another problem 😀 |
Route File Sizes
|
The success of the merging process will depend on the size of the two routes being merged and the size of your systems available memory |
| The merging process occurs within your computers on-board memory (RAM). If this is not large enough then your system will also use virtual RAM, i.e. your disk storage space as temporary memory, which is significantly slower. If your system does not have enough memory, both on-board and virtual, then merging large routes will become a problem (i.e. impossible or will take a very long time).
|
Common Problems (and Their Solutions)
|
Most route mergers will have problems but most of these problems can be easily fixed |
| Some problems will require you to do a bit (or a lot) of extra work before you can merge two routes into one. But for some problems, the best solution may be to select other routes to merge. | |||||||||||||
 |
|
||||||||||||

| Error creating thumbnail: /bin/bash: line 1: /usr/bin/convert: No such file or directory Error code: 127 | Another fixable problem can occur if a layer containing track from the second route ends up below the layer that also contains track in the Base Route. This can be fixed by merging the lower track layer into the higher track layer either during the merging process or afterwards using the  Layer Tools in Surveyor. |
|

For the solutions to other problems that have been known to occur, but less frequently than those described above, jump to the section  Uncommon Problems (and Their Solutions) found at the end of this page. |
|
||||||||
Selecting and Loading the Routes to Merge |
|
 |
|
|
| Steps | |||||||
|
|||||||

 |
Start the Merge Route Tool and load the Base Route:
|


T:ANE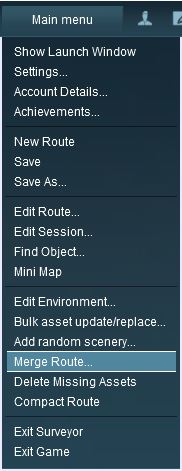 |
TRS19 and later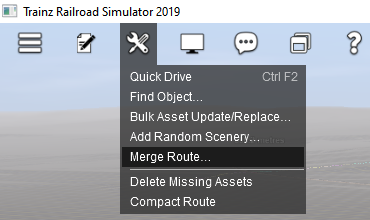 |
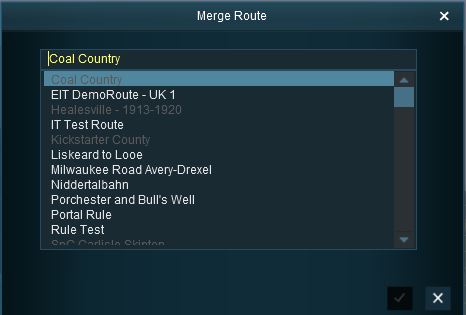 |
This will display a "minimap" of the proposed merger (nothing will be merged until after the final step) with some control options.
The Merge Map |
|
|
|
|
| Error creating thumbnail: /bin/bash: line 1: /usr/bin/convert: No such file or directory Error code: 127 |
|
|||||||||||||||
Move the Second Route into its New Position
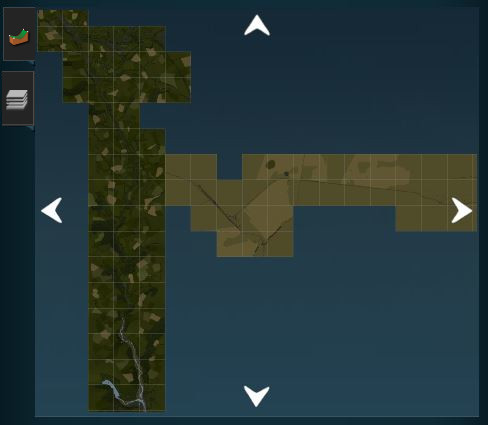 |
|
||||||||||||
The Layers Map |
|
|
|
|
|
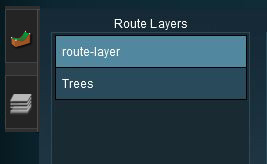
The most common merging issue in the Layers Tab is having layers from each route with the same name |
|
|
 |
Rename one of the conflicting layers |
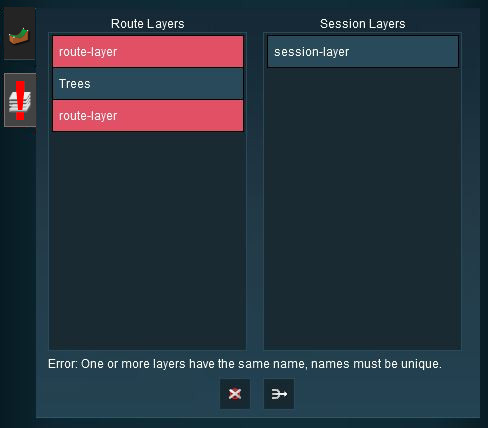 |
|
|||||||||||||
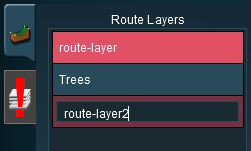
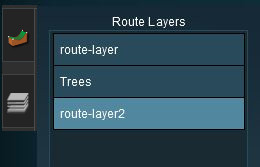
 |
Delete one of the conflicting layers |
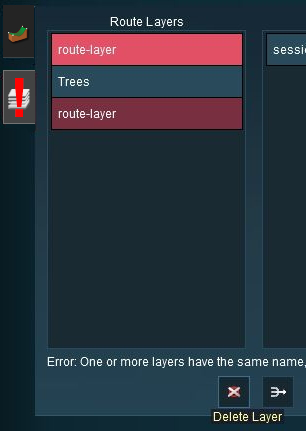 |
|
|||||||||||||||||||

 |
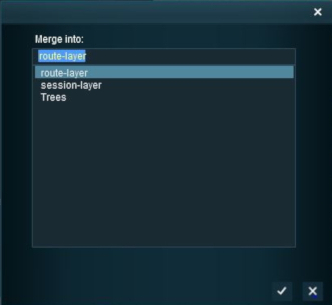
Merge the conflicting layers |
|
|
|||||||||||||

Accept or Reject
Once all the conflicts have been resolved, the final step in the merging process can take place.
 |
ACCEPT: Left Click to accept the merge. This icon will not be clickable unless ALL conflicts have been resolved. If you have problems after clicking Accept, see the sections at the top of this wiki page on File Sizes and Common Problems |
 |
REJECT: Left Click to reject the merge. The merging will be cancelled, no routes will be lost or altered. |
Uncommon Problems (and Their Solutions) |
|
|
|
|
Most of these issues occur when using the earlier versions of Trainz - T:ANE and TRS19. They are less common or have not been reported in the more recent versions |
|
All of these problems occur along baseboard boundaries after the merge but not just on the merge boundary - they can appear many baseboards away and can take a lot of searching to find |
These problems include:-
|
|
| Steps: |
 |
Create a Small Dummy Route:
|
||||||||||
|
Load the First Route:
|
 |
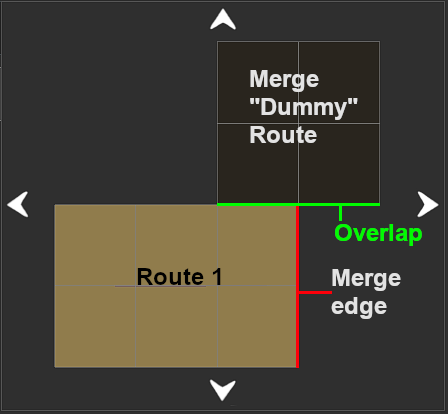
Load and Position the Merge Dummy Route:
|


 |
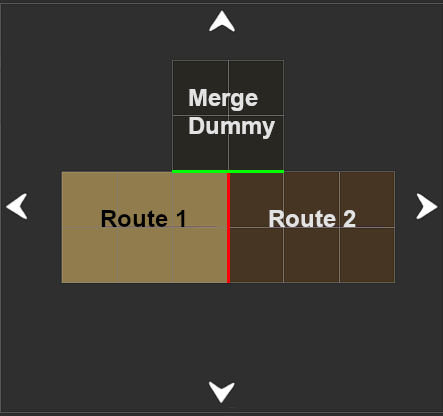
Load and Position the Second Route:
|
|||||||||||||||
 |
Delete the Merge Dummy Route
|
|
|
Trainz Wiki
 |
More Tutorials and Guides to Using Trainz |
This page was created by Trainz user pware in July 2018 and was last updated as shown below.


