How to Use Track Priority Markers: Difference between revisions
mNo edit summary |
|||
| (2 intermediate revisions by the same user not shown) | |||
| Line 4: | Line 4: | ||
<table width=996 bgcolor=#ffffff cellpadding=2> | <table width=996 bgcolor=#ffffff cellpadding=2> | ||
<tr valign="middle"> | <tr valign="middle"> | ||
<td width=35>[[image: | <td width=35>[[image:Information35.png|link=]]</td> | ||
<td><span style="font-size: 15px;">The information in this Wiki Page describes how to install, configure and use '''Track Priority Markers''' in '''TRS22''' and '''Trainz Plus''' using both '''Surveyor 2.0 (S20)''' and '''Surveyor Classic (S10)'''. The '''Surveyor Classic''' sections provide a basic guide only for '''TRS19''' and '''T:ANE'''.</span></td> | <td><span style="font-size: 15px;">The information in this Wiki Page describes how to install, configure and use '''Track Priority Markers''' in '''TRS22''' and '''Trainz Plus''' using both '''Surveyor 2.0 (S20)''' and '''Surveyor Classic (S10)'''. The '''Surveyor Classic''' sections provide a basic guide only for '''TRS19''' and '''T:ANE'''.</span></td> | ||
</tr> | </tr> | ||
| Line 145: | Line 145: | ||
<table> | <table> | ||
<tr valign="top"> | <tr valign="top"> | ||
<td width=10>[[image: | <td width=10>[[image:DotPoint10x10.JPG|link=]]</td> | ||
<td>the same '''Priority Level''' to the track will, under normal conditions'''‡''', be directed along that track reardless of its actual length</td> | <td>the same '''Priority Level''' to the track will, under normal conditions'''‡''', be directed along that track reardless of its actual length</td> | ||
</tr> | </tr> | ||
<tr valign="top"> | <tr valign="top"> | ||
<td>[[image: | <td>[[image:DotPoint10x10.JPG|link=]]</td> | ||
<td>a different '''Priority Level''' to the track will, under normal conditions'''‡''', follow the normal rules for deciding which is the shortest path to take which may result in that track being selected anyway</td> | <td>a different '''Priority Level''' to the track will, under normal conditions'''‡''', follow the normal rules for deciding which is the shortest path to take which may result in that track being selected anyway</td> | ||
</tr> | </tr> | ||
| Line 177: | Line 177: | ||
</table> | </table> | ||
</td> | </td> | ||
<td width= | <td width=395>[[image:PriorityMarkImage.png|link=]]</td> | ||
</tr> | </tr> | ||
</table> | </table> | ||
| Line 203: | Line 203: | ||
</tr> | </tr> | ||
<tr valign="top"> | <tr valign="top"> | ||
<td width=10>[[image: | <td width=10>[[image:DotPoint10x10.JPG|link=]]</td> | ||
<td>a '''Junction'''</td> | <td>a '''Junction'''</td> | ||
</tr> | </tr> | ||
<tr valign="top"> | <tr valign="top"> | ||
<td>[[image: | <td>[[image:DotPoint10x10.JPG|link=]]</td> | ||
<td>an '''Industry Owned Track'''</td> | <td>an '''Industry Owned Track'''</td> | ||
</tr> | </tr> | ||
<tr valign="top"> | <tr valign="top"> | ||
<td>[[image: | <td>[[image:DotPoint10x10.JPG|link=]]</td> | ||
<td>a '''Crossing'''</td> | <td>a '''Crossing'''</td> | ||
</tr> | </tr> | ||
| Line 229: | Line 229: | ||
</tr> | </tr> | ||
<tr valign="top"> | <tr valign="top"> | ||
<td width=10>[[image: | <td width=10>[[image:DotPoint10x10.JPG|link=]]</td> | ||
<td>the next '''Junction'''</td> | <td>the next '''Junction'''</td> | ||
</tr> | </tr> | ||
<tr valign="top"> | <tr valign="top"> | ||
<td>[[image: | <td>[[image:DotPoint10x10.JPG|link=]]</td> | ||
<td>the next '''Industry Owned Track'''</td> | <td>the next '''Industry Owned Track'''</td> | ||
</tr> | </tr> | ||
<tr valign="top"> | <tr valign="top"> | ||
<td>[[image: | <td>[[image:DotPoint10x10.JPG|link=]]</td> | ||
<td>the next '''Crossing'''</td> | <td>the next '''Crossing'''</td> | ||
</tr> | </tr> | ||
| Line 285: | Line 285: | ||
<table cellpadding=4> | <table cellpadding=4> | ||
<tr valign="top"> | <tr valign="top"> | ||
<td width=10>[[image: | <td width=10>[[image:DotPoint10x10.JPG|link=]]</td> | ||
<td>Placing '''Track Priority Markers''' in a '''Route layer''' (e.g. in the same layer as the track) will save them with the '''Route''' and they will be available in '''all Sessions''' created using that particular '''Route'''</td> | <td>Placing '''Track Priority Markers''' in a '''Route layer''' (e.g. in the same layer as the track) will save them with the '''Route''' and they will be available in '''all Sessions''' created using that particular '''Route'''</td> | ||
</tr> | </tr> | ||
<tr valign="top"> | <tr valign="top"> | ||
<td>[[image: | <td>[[image:DotPoint10x10.JPG|link=]]</td> | ||
<td>Placing '''Track Priority Markers''' in a '''Session layer''' will save them with the current '''Session''' and they will only be available in that particular '''Session'''. This can be useful if two or more '''Sessions''' are being created and you do not want to use the same '''Track Priority Markers''' in each '''Session'''. | <td>Placing '''Track Priority Markers''' in a '''Session layer''' will save them with the current '''Session''' and they will only be available in that particular '''Session'''. This can be useful if two or more '''Sessions''' are being created and you do not want to use the same '''Track Priority Markers''' in each '''Session'''. | ||
</td> | </td> | ||
| Line 335: | Line 335: | ||
<table> | <table> | ||
<tr valign="top"> | <tr valign="top"> | ||
<td width=10>[[image: | <td width=10>[[image:DotPoint10x10.JPG|link=]]</td> | ||
<td>its '''Priority Level''' which will only have an effect on '''AI controlled''' trains that have the same '''Priority Level'''.</td> | <td>its '''Priority Level''' which will only have an effect on '''AI controlled''' trains that have the same '''Priority Level'''.</td> | ||
</tr> | </tr> | ||
| Line 446: | Line 446: | ||
</tr> | </tr> | ||
<tr valign="top"> | <tr valign="top"> | ||
<td width=10>[[image: | <td width=10>[[image:DotPoint10x10.JPG|link=]]</td> | ||
<td>You can edit its '''Name'''. <span style="font-weight: 700; font-size: 15px;">This does NOT affect its operation</span>. See the section [[image:PageLink.PNG|link=]] '''[[#Set its Name and Layers (S10)|Set its Name and Layers (S10)]]''' below.</td> | <td>You can edit its '''Name'''. <span style="font-weight: 700; font-size: 15px;">This does NOT affect its operation</span>. See the section [[image:PageLink.PNG|link=]] '''[[#Set its Name and Layers (S10)|Set its Name and Layers (S10)]]''' below.</td> | ||
</tr> | </tr> | ||
<tr valign="top"> | <tr valign="top"> | ||
<td>[[image: | <td>[[image:DotPoint10x10.JPG|link=]]</td> | ||
<td> | <td> | ||
<table> | <table> | ||
| Line 469: | Line 469: | ||
</tr> | </tr> | ||
<tr valign="top"> | <tr valign="top"> | ||
<td>[[image: | <td>[[image:DotPoint10x10.JPG|link=]]</td> | ||
<td>You can edit its '''Priority Level'''. <span style="font-weight: 700; font-size: 15px;">This <span style="color: red;">WILL</span> affect its operation</span>. See the section [[image:PageLink.PNG|link=]] '''[[#Set its Priority Level (S10)|Set its Priority Level (S10)]]''' below.</td> | <td>You can edit its '''Priority Level'''. <span style="font-weight: 700; font-size: 15px;">This <span style="color: red;">WILL</span> affect its operation</span>. See the section [[image:PageLink.PNG|link=]] '''[[#Set its Priority Level (S10)|Set its Priority Level (S10)]]''' below.</td> | ||
</tr> | </tr> | ||
<tr valign="top"> | <tr valign="top"> | ||
<td>[[image: | <td>[[image:DotPoint10x10.JPG|link=]]</td> | ||
<td>You can reverse the direction it points. <span style="font-weight: 700; font-size: 15px;">This does NOT affect its operation</span>. See the section [[image:PageLink.PNG|link=]] '''[[#Change its Direction (S10)|Change its Direction (S10)]]''' below.</td> | <td>You can reverse the direction it points. <span style="font-weight: 700; font-size: 15px;">This does NOT affect its operation</span>. See the section [[image:PageLink.PNG|link=]] '''[[#Change its Direction (S10)|Change its Direction (S10)]]''' below.</td> | ||
</tr> | </tr> | ||
<tr valign="top"> | <tr valign="top"> | ||
<td>[[image: | <td>[[image:DotPoint10x10.JPG|link=]]</td> | ||
<td>You can adjust its position on the track by dragging it along the track or to another track. See the section [[image:PageLink.PNG|link=]] '''[[#Move it Along the Track (S10)|Move it Along the Track (S10)]]''' below.</td> | <td>You can adjust its position on the track by dragging it along the track or to another track. See the section [[image:PageLink.PNG|link=]] '''[[#Move it Along the Track (S10)|Move it Along the Track (S10)]]''' below.</td> | ||
</tr> | </tr> | ||
<tr valign="top"> | <tr valign="top"> | ||
<td>[[image: | <td>[[image:DotPoint10x10.JPG|link=]]</td> | ||
<td>You can adjust its '''Effect Radius'''. <span style="font-weight: 700; font-size: 15px;">This does NOT affect its operation</span>. See the section [[image:PageLink.PNG|link=]] '''[[#Set its Effect Radius (S10)|Set its Effect Radius (S10)]]''' below.</td> | <td>You can adjust its '''Effect Radius'''. <span style="font-weight: 700; font-size: 15px;">This does NOT affect its operation</span>. See the section [[image:PageLink.PNG|link=]] '''[[#Set its Effect Radius (S10)|Set its Effect Radius (S10)]]''' below.</td> | ||
</tr> | </tr> | ||
| Line 554: | Line 554: | ||
</tr> | </tr> | ||
<tr valign="top"> | <tr valign="top"> | ||
<td width=10>[[image: | <td width=10>[[image:DotPoint10x10.JPG|link=]]</td> | ||
<td>The '''Properties Window''' will open as soon as a new '''Track Priority Marker''' has been added to a track segment.</td> | <td>The '''Properties Window''' will open as soon as a new '''Track Priority Marker''' has been added to a track segment.</td> | ||
</tr> | </tr> | ||
<tr valign="top"> | <tr valign="top"> | ||
<td width=10>[[image: | <td width=10>[[image:DotPoint10x10.JPG|link=]]</td> | ||
<td>To open the '''Properties Window''' for an existing '''Track Priority Marker''':-</td> | <td>To open the '''Properties Window''' for an existing '''Track Priority Marker''':-</td> | ||
</tr> | </tr> | ||
| Line 685: | Line 685: | ||
</tr> | </tr> | ||
<tr valign="top"> | <tr valign="top"> | ||
<td width=10>[[image: | <td width=10>[[image:DotPoint10x10.JPG|link=]]</td> | ||
<td>a '''Junction'''</td> | <td>a '''Junction'''</td> | ||
</tr> | </tr> | ||
<tr valign="top"> | <tr valign="top"> | ||
<td>[[image: | <td>[[image:DotPoint10x10.JPG|link=]]</td> | ||
<td>an '''Industry Owned Track'''</td> | <td>an '''Industry Owned Track'''</td> | ||
</tr> | </tr> | ||
<tr valign="top"> | <tr valign="top"> | ||
<td>[[image: | <td>[[image:DotPoint10x10.JPG|link=]]</td> | ||
<td>a '''Crossing'''</td> | <td>a '''Crossing'''</td> | ||
</tr> | </tr> | ||
| Line 711: | Line 711: | ||
</tr> | </tr> | ||
<tr valign="top"> | <tr valign="top"> | ||
<td width=10>[[image: | <td width=10>[[image:DotPoint10x10.JPG|link=]]</td> | ||
<td>the next '''Junction'''</td> | <td>the next '''Junction'''</td> | ||
</tr> | </tr> | ||
<tr valign="top"> | <tr valign="top"> | ||
<td>[[image: | <td>[[image:DotPoint10x10.JPG|link=]]</td> | ||
<td>the next '''Industry Owned Track'''</td> | <td>the next '''Industry Owned Track'''</td> | ||
</tr> | </tr> | ||
<tr valign="top"> | <tr valign="top"> | ||
<td>[[image: | <td>[[image:DotPoint10x10.JPG|link=]]</td> | ||
<td>the next '''Crossing'''</td> | <td>the next '''Crossing'''</td> | ||
</tr> | </tr> | ||
| Line 1,015: | Line 1,015: | ||
<table> | <table> | ||
<tr valign="top"> | <tr valign="top"> | ||
<td width=10>[[image: | <td width=10>[[image:DotPoint10x10.JPG|link=]]</td> | ||
<td>[[image:WikiLink.PNG|link=]] '''[[How_to_Use_Track_Triggers|Track Triggers]]'''</td> | <td>[[image:WikiLink.PNG|link=]] '''[[How_to_Use_Track_Triggers|Track Triggers]]'''</td> | ||
</tr> | </tr> | ||
<tr valign="top"> | <tr valign="top"> | ||
<td>[[image: | <td>[[image:DotPoint10x10.JPG|link=]]</td> | ||
<td>[[image:WikiLink.PNG|link=]] '''[[How_to_Use_Track_Markers|Track Markers]]'''</td> | <td>[[image:WikiLink.PNG|link=]] '''[[How_to_Use_Track_Markers|Track Markers]]'''</td> | ||
</tr> | </tr> | ||
<tr valign="top"> | <tr valign="top"> | ||
<td>[[image: | <td>[[image:DotPoint10x10.JPG|link=]]</td> | ||
<td>[[image:WikiLink.PNG|link=]] '''[[How_to_Use_Track_Direction_Markers|Track Direction Markers]]'''</td> | <td>[[image:WikiLink.PNG|link=]] '''[[How_to_Use_Track_Direction_Markers|Track Direction Markers]]'''</td> | ||
</tr> | </tr> | ||
| Line 1,367: | Line 1,367: | ||
<table> | <table> | ||
<tr valign="top"> | <tr valign="top"> | ||
<td>[[image:S20_FreeMoveToolIcon.png|link= | <td>[[image:S20_FreeMoveToolIcon.png|link=]] '''Free Move Tool''' (or press the <span style="font-weight: 700; font-size: 17px; color: white; background-color: black;"> S </span> key) <span style="font-weight: 700; font-size: 15px;">OR</span></td> | ||
</tr> | </tr> | ||
<tr valign="top"> | <tr valign="top"> | ||
<td>the [[image:S20_FineAdjustmentToolIcon.png|link= | <td>the [[image:S20_FineAdjustmentToolIcon.png|link=]] '''Fine Adjustment Tool''' (or press the <span style="font-weight: 700; font-size: 17px; color: white; background-color: black;"> D </span> key)</td> | ||
</tr> | </tr> | ||
</table> | </table> | ||
| Line 1,421: | Line 1,421: | ||
</tr> | </tr> | ||
<tr valign="top"> | <tr valign="top"> | ||
<td width=10>[[image: | <td width=10>[[image:DotPoint10x10.JPG|link=]]</td> | ||
<td>You can edit its '''Name'''. <span style="font-weight: 700; font-size: 15px;">This does NOT affect its operation</span>. See the section [[image:PageLink.PNG|link=]] '''[[#Change its Name (S20)|Change its Name (S20)]]'''.</td> | <td>You can edit its '''Name'''. <span style="font-weight: 700; font-size: 15px;">This does NOT affect its operation</span>. See the section [[image:PageLink.PNG|link=]] '''[[#Change its Name (S20)|Change its Name (S20)]]'''.</td> | ||
</tr> | </tr> | ||
<tr valign="top"> | <tr valign="top"> | ||
<td>[[image: | <td>[[image:DotPoint10x10.JPG|link=]]</td> | ||
<td> | <td> | ||
<table> | <table> | ||
| Line 1,444: | Line 1,444: | ||
</tr> | </tr> | ||
<tr valign="top"> | <tr valign="top"> | ||
<td>[[image: | <td>[[image:DotPoint10x10.JPG|link=]]</td> | ||
<td>You can edit its '''Priority Level'''. <span style="font-weight: 700; font-size: 15px;">This <span style="color: red;">WILL</span> affect its operation</span>. See the section [[image:PageLink.PNG|link=]] '''[[#Set its Priority Level (S20)|Set its Priority Level (S20)]]''' below.</td> | <td>You can edit its '''Priority Level'''. <span style="font-weight: 700; font-size: 15px;">This <span style="color: red;">WILL</span> affect its operation</span>. See the section [[image:PageLink.PNG|link=]] '''[[#Set its Priority Level (S20)|Set its Priority Level (S20)]]''' below.</td> | ||
</tr> | </tr> | ||
<tr valign="top"> | <tr valign="top"> | ||
<td>[[image: | <td>[[image:DotPoint10x10.JPG|link=]]</td> | ||
<td>You can reverse the direction it points. <span style="font-weight: 700; font-size: 15px;">This does NOT affect its operation</span>. See the section [[image:PageLink.PNG|link=]] '''[[#Change its Direction (S20)|Change its Direction (S20)]]''' below.</td> | <td>You can reverse the direction it points. <span style="font-weight: 700; font-size: 15px;">This does NOT affect its operation</span>. See the section [[image:PageLink.PNG|link=]] '''[[#Change its Direction (S20)|Change its Direction (S20)]]''' below.</td> | ||
</tr> | </tr> | ||
<tr valign="top"> | <tr valign="top"> | ||
<td>[[image: | <td>[[image:DotPoint10x10.JPG|link=]]</td> | ||
<td>You can adjust its position on the track by dragging it along the track or to another track. See the section [[image:PageLink.PNG|link=]] '''[[#Move it Along the Track (S20)|Move it Along the Track (S20)]]''' below.</td> | <td>You can adjust its position on the track by dragging it along the track or to another track. See the section [[image:PageLink.PNG|link=]] '''[[#Move it Along the Track (S20)|Move it Along the Track (S20)]]''' below.</td> | ||
</tr> | </tr> | ||
<tr valign="top"> | <tr valign="top"> | ||
<td>[[image: | <td>[[image:DotPoint10x10.JPG|link=]]</td> | ||
<td>You can adjust its '''Effect Radius'''. <span style="font-weight: 700; font-size: 15px;">This does NOT affect its operation</span>. See the section [[image:PageLink.PNG|link=]] '''[[#Set its Effect Radius (S20)|Set its Effect Radius (S20)]]''' below.</td> | <td>You can adjust its '''Effect Radius'''. <span style="font-weight: 700; font-size: 15px;">This does NOT affect its operation</span>. See the section [[image:PageLink.PNG|link=]] '''[[#Set its Effect Radius (S20)|Set its Effect Radius (S20)]]''' below.</td> | ||
</tr> | </tr> | ||
| Line 1,606: | Line 1,606: | ||
<table> | <table> | ||
<tr valign="top"> | <tr valign="top"> | ||
<td width=10>[[image: | <td width=10>[[image:DotPoint10x10.JPG|link=]]</td> | ||
<td>You will not be allowed to place a track object in a layer that is higher up the list than the layer containing the track</td> | <td>You will not be allowed to place a track object in a layer that is higher up the list than the layer containing the track</td> | ||
</tr> | </tr> | ||
<tr valign="top"> | <tr valign="top"> | ||
<td>[[image: | <td>[[image:DotPoint10x10.JPG|link=]]</td> | ||
<td>Moving an object from one layer group to another (e.g. from the '''Route Layer Group''' to the '''Session Layer Group''') will change where the object is saved (in the Route or in the Session)</td> | <td>Moving an object from one layer group to another (e.g. from the '''Route Layer Group''' to the '''Session Layer Group''') will change where the object is saved (in the Route or in the Session)</td> | ||
</tr> | </tr> | ||
| Line 1,820: | Line 1,820: | ||
<table> | <table> | ||
<tr valign="top"> | <tr valign="top"> | ||
<td width=10>[[image: | <td width=10>[[image:DotPoint10x10.JPG|link=]]</td> | ||
<td>If you drag the object itself and not its '''Attachment Point''' then it will stay at its original height as it is moved along the track. If the track is on a grade then the object will rise above or fall below the track as it is moved. To return the object to its correct height on the track see the next section [[image:PageLink.PNG|link=]] '''[[#Move it Vertically (S20)|Move it Vertically (S20)]]''' below.</td> | <td>If you drag the object itself and not its '''Attachment Point''' then it will stay at its original height as it is moved along the track. If the track is on a grade then the object will rise above or fall below the track as it is moved. To return the object to its correct height on the track see the next section [[image:PageLink.PNG|link=]] '''[[#Move it Vertically (S20)|Move it Vertically (S20)]]''' below.</td> | ||
</tr> | </tr> | ||
<tr valign="top"> | <tr valign="top"> | ||
<td>[[image: | <td>[[image:DotPoint10x10.JPG|link=]]</td> | ||
<td>Dragging it by the attachment point will force it to stay at the height of the track as it is moved.</td> | <td>Dragging it by the attachment point will force it to stay at the height of the track as it is moved.</td> | ||
</tr> | </tr> | ||
| Line 2,111: | Line 2,111: | ||
<table> | <table> | ||
<tr valign="top"> | <tr valign="top"> | ||
<td width=10>[[image: | <td width=10>[[image:DotPoint10x10.JPG|link=]]</td> | ||
<td>Drag it '''Left''' or '''Right''' (at 90° to the direction of the track) to change its '''Effect Radius'''.</td> | <td>Drag it '''Left''' or '''Right''' (at 90° to the direction of the track) to change its '''Effect Radius'''.</td> | ||
</tr> | </tr> | ||
<tr valign="top"> | <tr valign="top"> | ||
<td width=10>[[image: | <td width=10>[[image:DotPoint10x10.JPG|link=]]</td> | ||
<td>The speed at which you drag it will set the speed at which the radius setting will change - faster movements will give larger setting changes.</td> | <td>The speed at which you drag it will set the speed at which the radius setting will change - faster movements will give larger setting changes.</td> | ||
</tr> | </tr> | ||
| Line 2,142: | Line 2,142: | ||
<table> | <table> | ||
<tr valign="top"> | <tr valign="top"> | ||
<td width=10>[[image: | <td width=10>[[image:DotPoint10x10.JPG|link=]]</td> | ||
<td>[[image:WikiLink.PNG|link=]] '''[[How_to_Use_Track_Triggers|Track Triggers]]'''</td> | <td>[[image:WikiLink.PNG|link=]] '''[[How_to_Use_Track_Triggers|Track Triggers]]'''</td> | ||
</tr> | </tr> | ||
<tr valign="top"> | <tr valign="top"> | ||
<td>[[image: | <td>[[image:DotPoint10x10.JPG|link=]]</td> | ||
<td>[[image:WikiLink.PNG|link=]] '''[[How_to_Use_Track_Markers|Track Markers]]'''</td> | <td>[[image:WikiLink.PNG|link=]] '''[[How_to_Use_Track_Markers|Track Markers]]'''</td> | ||
</tr> | </tr> | ||
<tr valign="top"> | <tr valign="top"> | ||
<td>[[image: | <td>[[image:DotPoint10x10.JPG|link=]]</td> | ||
<td>[[image:WikiLink.PNG|link=]] '''[[How_to_Use_Track_Direction_Markers|Track Direction Markers]]'''</td> | <td>[[image:WikiLink.PNG|link=]] '''[[How_to_Use_Track_Direction_Markers|Track Direction Markers]]'''</td> | ||
</tr> | </tr> | ||
| Line 2,192: | Line 2,192: | ||
</tr> | </tr> | ||
<tr valign="top"> | <tr valign="top"> | ||
<td width=10>[[image: | <td width=10>[[image:DotPoint10x10.JPG|link=]]</td> | ||
<td>Every locomotive (and its consist) '''must have a Priority Level''' of <span style="text-decoration: underline; font-weight: 700;">1</span>, <span style="text-decoration: underline; font-weight: 700;">2</span> or <span style="text-decoration: underline; font-weight: 700;">3</span>. The '''default priority level''' of every locomotive is '''2'''. You cannot assign '''NO''' Priority to a locomotive</td> | <td>Every locomotive (and its consist) '''must have a Priority Level''' of <span style="text-decoration: underline; font-weight: 700;">1</span>, <span style="text-decoration: underline; font-weight: 700;">2</span> or <span style="text-decoration: underline; font-weight: 700;">3</span>. The '''default priority level''' of every locomotive is '''2'''. You cannot assign '''NO''' Priority to a locomotive</td> | ||
</tr> | </tr> | ||
<tr valign="top"> | <tr valign="top"> | ||
<td>[[image: | <td>[[image:DotPoint10x10.JPG|link=]]</td> | ||
<td>Setting the priority level of any wagon in a consist will set the priority level of '''ALL''' the wagons (including the loco) to the same setting</td> | <td>Setting the priority level of any wagon in a consist will set the priority level of '''ALL''' the wagons (including the loco) to the same setting</td> | ||
</tr> | </tr> | ||
| Line 2,294: | Line 2,294: | ||
<tr valign="top"> | <tr valign="top"> | ||
<td width=629><span id="skipAssignS20"></span> | <td width=629><span id="skipAssignS20"></span> | ||
=='''Surveyor 2.0 (S20)'''== | =='''Surveyor 2.0 (S20)'''== | ||
</td> | </td> | ||
| Line 2,311: | Line 2,310: | ||
<table width=996 bgcolor=#ffffff cellpadding=2> | <table width=996 bgcolor=#ffffff cellpadding=2> | ||
<tr valign="middle"> | <tr valign="middle"> | ||
<td width=35>[[image: | <td width=35>[[image:Information35.png|link=]]</td> | ||
<td><span style="font-size: 15px;">'''Surveyor 2.0''' is currently only available for '''Trainz Plus''' and '''TRS22 Platinum'''.</span></td> | <td><span style="font-size: 15px;">'''Surveyor 2.0''' is currently only available for '''Trainz Plus''' and '''TRS22 Platinum'''.</span></td> | ||
</tr> | </tr> | ||
| Line 2,389: | Line 2,388: | ||
<tr valign="top"> | <tr valign="top"> | ||
<td width=629><span id="stepOperation"></span> | <td width=629><span id="stepOperation"></span> | ||
='''Track Priority Marker Operation'''= | ='''Track Priority Marker Operation'''= | ||
</td> | </td> | ||
| Line 2,466: | Line 2,464: | ||
<table> | <table> | ||
<tr valign="top"> | <tr valign="top"> | ||
<td width=10>[[image: | <td width=10>[[image:DotPoint10x10.JPG|link=]]</td> | ||
<td>the <span style="text-decoration: underline; font-weight: 700;">Drive To</span> driver command is used, <span style="text-decoration: underline; font-weight: 700;">and</span></td> | <td>the <span style="text-decoration: underline; font-weight: 700;">Drive To</span> driver command is used, <span style="text-decoration: underline; font-weight: 700;">and</span></td> | ||
</tr> | </tr> | ||
<tr valign="top"> | <tr valign="top"> | ||
<td>[[image: | <td>[[image:DotPoint10x10.JPG|link=]]</td> | ||
<td>the blocked path is the shortest path and has the same priority setting as the consist</td> | <td>the blocked path is the shortest path and has the same priority setting as the consist</td> | ||
</tr> | </tr> | ||
| Line 2,568: | Line 2,566: | ||
<table> | <table> | ||
<tr valign="top"> | <tr valign="top"> | ||
<td width=10>[[image: | <td width=10>[[image:DotPoint10x10.JPG|link=]]</td> | ||
<td><span style="font-weight: 700; font-size: 15px; background-color: lightcyan;"> Left Click </span> on the '''Train Priority''' setting - each click will cycle through the values <span style="text-decoration: underline; font-weight: 700;">1</span>, <span style="text-decoration: underline; font-weight: 700;">2</span>, <span style="text-decoration: underline; font-weight: 700;">3</span>. The '''default''' priority level for all consists is <span style="text-decoration: underline; font-weight: 700;">2</span></td> | <td><span style="font-weight: 700; font-size: 15px; background-color: lightcyan;"> Left Click </span> on the '''Train Priority''' setting - each click will cycle through the values <span style="text-decoration: underline; font-weight: 700;">1</span>, <span style="text-decoration: underline; font-weight: 700;">2</span>, <span style="text-decoration: underline; font-weight: 700;">3</span>. The '''default''' priority level for all consists is <span style="text-decoration: underline; font-weight: 700;">2</span></td> | ||
</tr> | </tr> | ||
<tr valign="top"> | <tr valign="top"> | ||
<td>[[image: | <td>[[image:DotPoint10x10.JPG|link=]]</td> | ||
<td><span style="font-weight: 700; font-size: 15px; background-color: lightcyan;"> Left Click </span> the [[image:Tick.PNG|link=]] icon to accept the change</td> | <td><span style="font-weight: 700; font-size: 15px; background-color: lightcyan;"> Left Click </span> the [[image:Tick.PNG|link=]] icon to accept the change</td> | ||
</tr> | </tr> | ||
| Line 2,583: | Line 2,581: | ||
<table> | <table> | ||
<tr valign="top"> | <tr valign="top"> | ||
<td width=10>[[image: | <td width=10>[[image:DotPoint10x10.JPG|link=]]</td> | ||
<td><span style="font-weight: 700; font-size: 15px; background-color: lightcyan;"> Left Click </span> on the '''<u>Priority</u>''' setting to open a drop down menu. Select the required '''Priority Level''' of '''1''', '''2''' or '''3'''</td> | <td><span style="font-weight: 700; font-size: 15px; background-color: lightcyan;"> Left Click </span> on the '''<u>Priority</u>''' setting to open a drop down menu. Select the required '''Priority Level''' of '''1''', '''2''' or '''3'''</td> | ||
</tr> | </tr> | ||
<tr valign="top"> | <tr valign="top"> | ||
<td>[[image: | <td>[[image:DotPoint10x10.JPG|link=]]</td> | ||
<td><span style="font-weight: 700; font-size: 15px; background-color: lightcyan;"> Left Click </span> the <span style="font-weight: 700; font-size: 15px; color: white; background-color: black;"> Save Changes </span> button to accept the change</td> | <td><span style="font-weight: 700; font-size: 15px; background-color: lightcyan;"> Left Click </span> the <span style="font-weight: 700; font-size: 15px; color: white; background-color: black;"> Save Changes </span> button to accept the change</td> | ||
</tr> | </tr> | ||
| Line 2,670: | Line 2,668: | ||
<table width=996 bgcolor=#ffffff cellpadding=2> | <table width=996 bgcolor=#ffffff cellpadding=2> | ||
<tr valign="middle"> | <tr valign="middle"> | ||
<td width=35>[[image: | <td width=35>[[image:Information35.png|link=]]</td> | ||
<td><span style="font-weight: 700; font-size: 15px;">This applies to Surveyor Classic (S10) Only. It is not implemented in Surveyor 2.0</span></td> | <td><span style="font-weight: 700; font-size: 15px;">This applies to Surveyor Classic (S10) Only. It is not implemented in Surveyor 2.0</span></td> | ||
</tr> | </tr> | ||
| Line 2,700: | Line 2,698: | ||
---- | ---- | ||
---- | ---- | ||
='''Trainz Wiki'''= | ='''Trainz Wiki'''= | ||
<table width=1000> | <table width=1000> | ||
Latest revision as of 09:29, 8 November 2026
|

 |
 |
|
||||||||||||||||||||||||||||||
What are Track Priority Markers? |
 |
|
|
 |
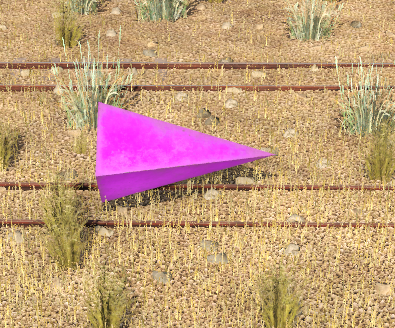
Track Priority Markers are track markers that are invisible in Driver but visible in Surveyor |
|
They match the Priority Level assigned to AI consists with the level assigned to the marker on the track to decide if the consist is allowed to use that section of track |
|
Priority Levels have no set meanings but can be assigned to specific AI trains to force them through selected sections of track (the sections are defined as the track between consecutive junctions, industries or crossings) |
|
 |
|||||||||||

| How Do They Work?
There are some exceptions - see |
|
AND |
|
||||||||||||||||||
| For Example: a Track Priority Marker placed on the track between a junction on one side and an industry track on the other side will set the Priority Level for ALL the track segments between the two, not just the one it is attached to. |
Route or Session? |
|
 |
|
|
|
Track Priority Markers can be placed in a Route or in a Session |
|

 |
Information on Route Layers and Session Layers can be found at:- |
Adding a Track Priority Marker |
 |
|
|
|
|
|
In Surveyor Classic (S10) |
|
 |
| Surveyor Classic (or S10) is the original Surveyor interface supplied with every version of Trainz and is available as an option in TRS22PE and Trainz Plus. |
| The Surveyor Classic interface used here is the one found in Trainz Plus and TRS22PE. There are some differences from the Surveyor Classic interface found in older versions of Trainz. |
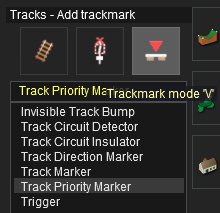
Adding a Track Priority Marker (S10) |
  |
|
|
||||||||||||||||||||||||||||||||||||||||




|
||||||||||

Set its Name and Layers (S10) |
|
|
The name of a Track Priority Marker is only important if you need to locate it in the route. |
|
The Layer it is assigned to will decide if will be saved in a Route or in a Session |
| The Name and Layer Settings for a Track Priority Marker are in its Properties Window. | ||||||||||||||
 |
The Properties Window will open as soon as a new Track Priority Marker has been added to a track segment. | |||||||||||||
|
To open the Properties Window for an existing Track Priority Marker:- | |||||||||||||
|
||||||||||||||

 |
|


Set its Priority Level (S10) |
|
|
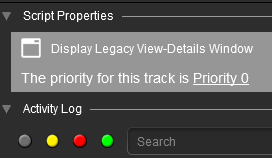
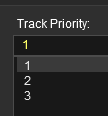
The Priority Level is the ONLY important property of a Track Priority Marker. Its possible values are 1, 2 and 3. |
A Track Priority Marker sets the Preferred Path for AI controlled trains that have the same Priority Level (see  Modifying Train Priority Levels below). It has NO EFFECT on manually controlled trains or on AI controlled trains with a different Priority Level. |
| The Priority Level will affect ALL track segments... |
|
AND |
|
||||||||||||||||||
| For Example: a Track Priority Marker placed on the track between a junction on one side and an industry track on the other side will set the Priority Level for ALL the track segments between the two. | ||||||||||||||||||||
|
|||||||||||||||||||||||||||||


Change its Direction (S10) |
|
|
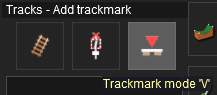
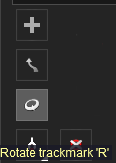
The direction a Track Priority Marker is pointing has NO EFFECT on its operation. |
If you need to change the direction of a Track Priority Marker then:-
|
  |
||||||||||
Move it Along the Track (S10) |
|
|
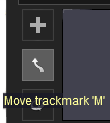
Track Priority Markers can be dragged along the track and moved to other tracks. |
If you need to move a Track Priority Marker then:-
|
 |
||||||||||
|
Set its Effect Radius (S10) |
|
|
The Effect Radius sets the size of green "effect wings" attached to both ends of the Track Priority Marker. |
|
Its default value is 20m. Changing it has NO EFFECT on its operation. |
|
| The Effect Radius controls for a Track Priority Marker are in the Tools Menu Advanced Window. |
|
|||||||||
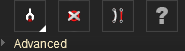
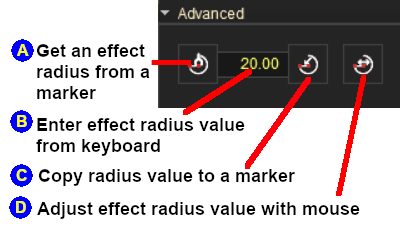
|
|
||||||||||||||||||||||||||||||||||||||||||||||||

|
In Surveyor 2.0 (S20) |
|
|
| Surveyor 2.0 (or S20) is the latest Surveyor interface and is supplied with TRS22PE and Trainz Plus. |
Adding a Track Priority Marker (S20) |
|
|
 In the Filter Palette either:-
|
|
||||||||||||||||||||||||||||||||||||
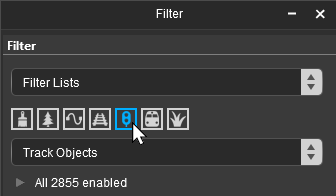
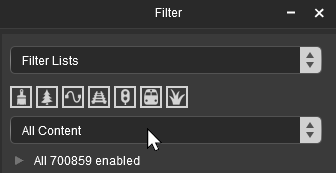
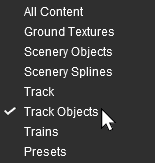


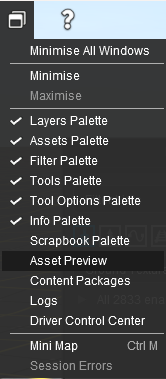


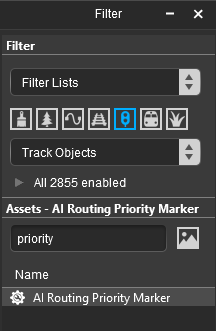
 In the Assets Palette to narrow down the filter list, type "priority" (UPPER/lower case does not matter) in the Search Text Box
 Both pallets shown docked |
|
 Place the Track Priority Marker on the track.
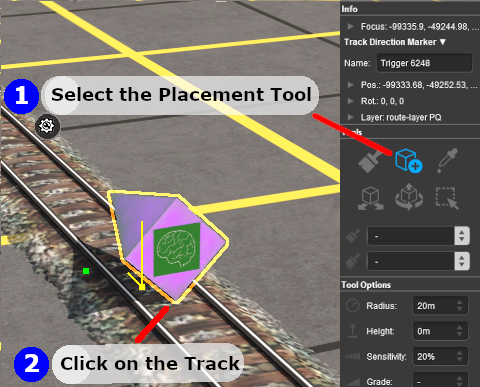
|
|
||||||||||||||||||||||||||||||||||||||||||


Once you have added a Track Priority Marker and set its properties it can be quickly duplicated (Cloned) in Surveyor 2.0 with those properties and moved to a new location. You can then easily edit the name and properties of the clone at the new location. See  How to Use S20 Tools - Cloning Objects for the details. |
Change Its Name (S20) |
|
|
The name of the marker is only useful for finding it in the route. It is not used for any operational purpose. |
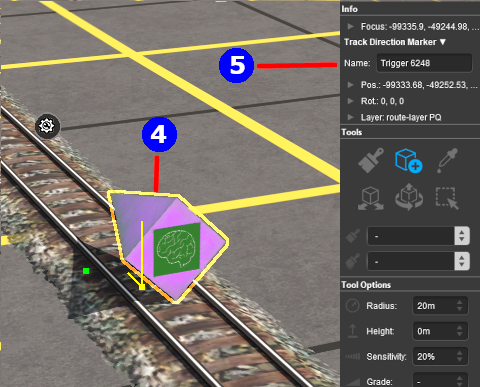 |
|
||||||||||


Assign it to Another Layer (S20) |
|
|
The layer assigned to a marker will control where it is saved, in the Route or the Session. |
| The Info Palette will show the layer assigned to the currently selected object. To the left of the layer name is a small arrowhead object. | |||||||||||||||||||||||
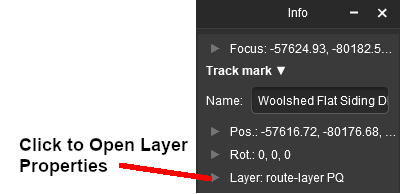 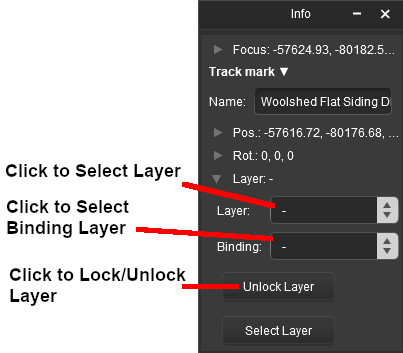 |
|
||||||||||||||||||||||
Change its Direction (S20) |
|
|
The direction that the Track Priority Marker points has NO effect on its operation. |
| If you need to reverse its direction then:- |
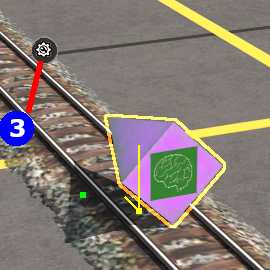 |
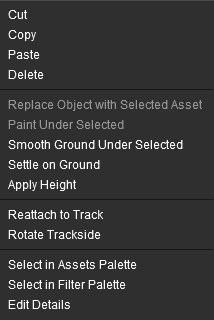 |
|
|||||||


Set its Priority Level (S20) |
|
|
The Priority Level is the ONLY important property of a Track Priority Marker. Its possible values are 1, 2 and 3. |
| A Track Priority Marker sets the Preferred Path for AI controlled trains that have the same Priority Level (see Modifying Train Priority Levels below). It has NO EFFECT on manually controlled trains or on AI controlled trains with a different Priority Level. |
|
|
|
|||||||||||||||||
Move it Along the Track (S20) |
|
|
Markers can be moved along the track or moved to other tracks. |
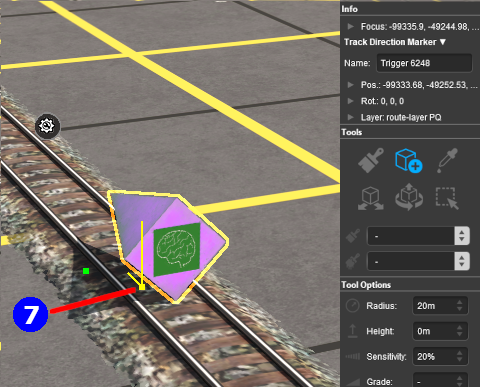 |
|
||||||||||||||

|
Move it Vertically (S20) |
|
|
Markers can be physically placed above or below the track. |
| Track Priority Markers can be physically placed above (or below) the track. This feature allows them to be placed, for example, above the track so that they will not be hidden in Surveyor if a consist is parked on a marker. |
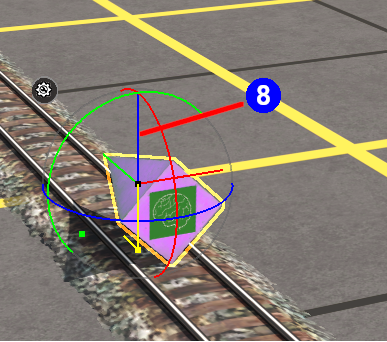 |
|
|||||||||||||||||||||

Move it Horizontally (S20) |
|
|
Markers can be physically placed left or right of the track. |
| This feature allow a marker to be placed so that it will not be hidden in Surveyor if a consist is parked on the marker. A change in position left or right will have NO EFFECT on its operation. |
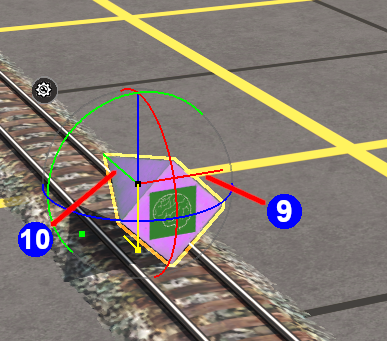 |
|
|||||||||||||||||||||||||


|

Set its Effect Radius (S20) |
|
|
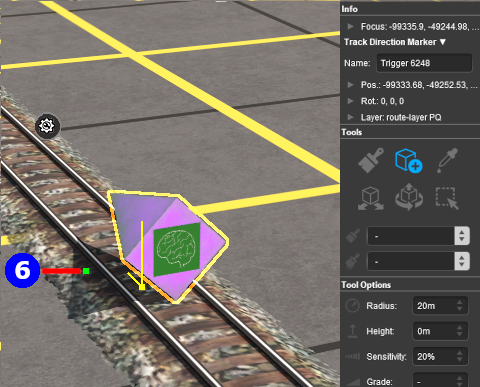
The Effect Radius sets the size of green "effect wings" attached to both ends of the Track Priority Marker. |
|
Its default value is 20m. Changing it has NO EFFECT on its operation. |
|
 |
|
|||||||||||||||||||||

Assigning Priority Levels to Trains |
|
|
|
|
|
|
|
A higher priority level does not mean that one consist is more important than another. A priority 1 consist will not be given first access to a junction, for example, or be the first one to depart. The priority levels have no set meaning beyond what you decide they will mean. |
|
| For example you could assign priority 1 to express trains and 3 to slow general "all stops" freight trains, or you could assign priority 3 to express trains and 1 to slow general "all stops" freight trains, it is up to you. These values will not alter the speed or importance of these trains but will only decide which paths they should take. |
Surveyor Classic (S10) |
|
|
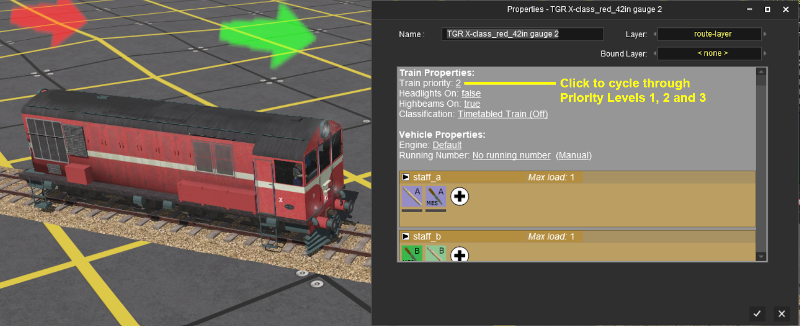
To assign a priority level to a consist.
|
||||||||||||||||||||||||||


Surveyor 2.0 (S20) |
|
|
|
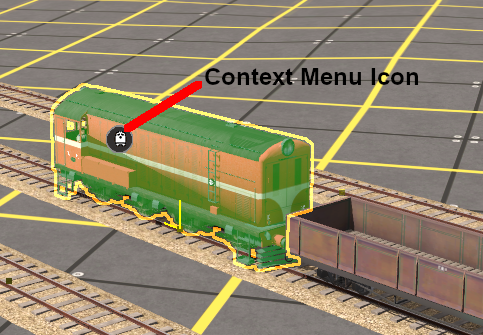
| To assign a priority level to a consist. |
 |
|
|||||||||||||||||||||
Track Priority Marker Operation |
|
|
|
|
|
|
Track Priority Markers only work on AI controlled trains. They have NO EFFECT on manually controlled trains |
|
Track Priority Markers force a AI trains that with the same priority level into taking the path containing the marker |
|
AI trains will ignore a path containing a Track Priority Marker that does not match its own priority level unless that path is also the shortest available |
|
If the specified path is blocked, then the AI will ignore the Track Priority Marker and find another path |
|
The direction that the Track Priority Marker is pointing has NO EFFECT on its operation |
| Consider the situations represented in the diagrams below. Three trains - Red, Green, Yellow - have been given priority levels of 1, 2 and 3 as shown. Each is given the driver command Drive to Trackmark or Navigate to Trackmark. The destination trackmark is shown on the right. In Figure 1 below, no Track Priority Markers have been set. All three trains will take the shortest path, assuming there are no blockages.
In Figure 2 below, a Track Priority Marker has been placed on the top loop line and has been given a priority level of 1. The red train (priority level 1) will now take the priority 1 path because it will "see" that as being the shortest of the three possible paths. The green and yellow trains (priority levels 2 and 3) will still "see" the middle path as the shortest.
In Figure 3 below, a Track Priority Marker has been placed on the lower loop line and has been given a priority level of 3. For the same reasons as explained above, the yellow train (priority level 3) will now take the priority 3 path because it now sees that as the shortest.
In Figure 4 below, Track Priority Markers have been placed on the upper and lower loop lines and set as shown. The red and yellow trains will take their respective loop paths while the green train is unaffected.
An exception, shown in Figure 5 below, will occur when a Track Priority Marker path has been blocked, for example by another train under AI or manual control. In the figure the lower loop path has been blocked. The red train will take its assigned path, the green train takes its shortest path and yellow train will be forced to take what it "sees" as the next shortest path.
|





|
| Another exception, shown in Figure 6 below, will occur when a driver command overrides a Track Priority Marker. In the figure the yellow train (priority level 3) has been given the driver command Drive To Station followed by Drive to Trackmark. As the station is not on the priority 3 path, that path will be ignored to reach the station and then the trackmark. After stopping at the station the train will not reverse back onto the main line to then use the priority 3 track.
The Special Case of Priority 2 Track Priority Markers can also be used to direct trains away from specific paths. Figure 8 below shows how this can be done. A Track Priority Marker set to priority level 1 has been positioned on the shortest physical path. This will block all trains of priority level 2 and 3 from using that path - they will see it as the longest available path. A second Track Priority Marker set to priority level 3 has been positioned on the 2nd shortest physical path. This will block all trains of priority level 1 and 2 from using that path. The end result is that the green train (priority level 2) has only one path available - the longest physical path.
The situation shown in Figure 8 above only works up to a point. Figure 9 below shows what will happen when ALL paths are set to a blocking priority level. The green train (priority level 2) will ignore all the Track Priority Markers and choose its own shortest path. Track Priority Markers will only make a path *look* longer or shorter. When all paths have conflicting priorities to an AI train, then the AI will go back to selecting the actual shortest physical path.
|




Modifying Train Priority Levels |
|
|
|
|
|
The Priority Level of a consist in Driver can be altered manually or automatically |
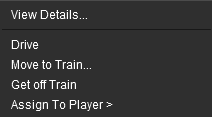
 Manually in Driver
This can be done "on the fly" using the mouse.
|
 |
|||||||||||||||||||||||
OR
 Using the Session Editor
This can be done in Surveyor in the Session Editor Driver Setup Rule
|
||||||||||
|
Information on adding driver commands can be found on the Trainz Wiki Page at:- |
Track Priority in Map View |
|
|
|
|
|
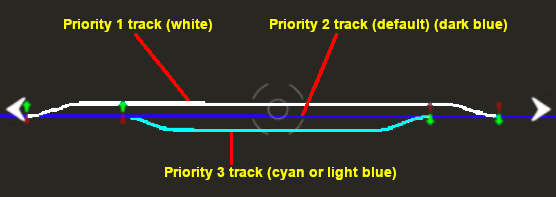
In Surveyor when using Map View or zooming the camera right out, the tracks will be shown colour coded according to their assigned track priority level. If the track layout shown in Figure 4 above, with the Track Priority Markers as used in that figure, was shown in Map View then this would be the result.
|
|
|
Trainz Wiki
|
|

This page was created by Trainz user pware in September 2019 and was last updated as shown below.
