SAR Booleroo Centre South: Difference between revisions
From TrainzOnline
Jump to navigationJump to search
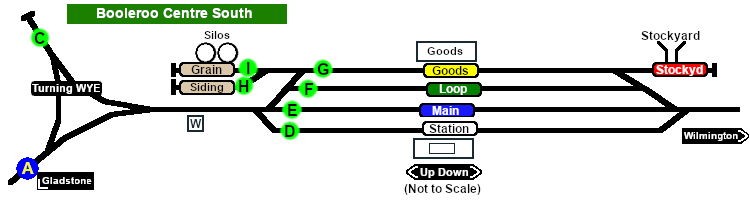
Created page with "<table> <tr valign="bottom" height=150> <td rowspan=2>link=|alt=Booleroo Centre South</td> <td> </td> </tr> <tr> <td height=80 ali..." |
mNo edit summary |
||
| Line 64: | Line 64: | ||
<td align="center">[[Image:Ablue.png|link=]]</td> | <td align="center">[[Image:Ablue.png|link=]]</td> | ||
<td align="center">[[Image:Fgreen.png|link=]]</td> | <td align="center">[[Image:Fgreen.png|link=]]</td> | ||
<td bgcolor="green"><font color="white">'''Approach | <td bgcolor="green"><font color="white">'''Approach Dn to Loop'''</font></td> | ||
<td align="center">[[Image:Fgreen.png|link=]]</td> | <td align="center">[[Image:Fgreen.png|link=]]</td> | ||
<td align="center">[[Image:Ablue.png|link=]]</td> | <td align="center">[[Image:Ablue.png|link=]]</td> | ||
Revision as of 19:04, 9 May 2019
 |
|
   |
|
 |
|||||||||||||||||||||||||||||||||||||||||||||||||||||||||||||||||||||||||||||||||||||||||||||||||||||||||







