SAR Booleroo Centre South: Difference between revisions
From TrainzOnline
Jump to navigationJump to search
No edit summary |
mNo edit summary |
||
| Line 131: | Line 131: | ||
<table bgcolor="LightCyan"> | <table bgcolor="LightCyan"> | ||
<tr valign="top"> | <tr valign="top"> | ||
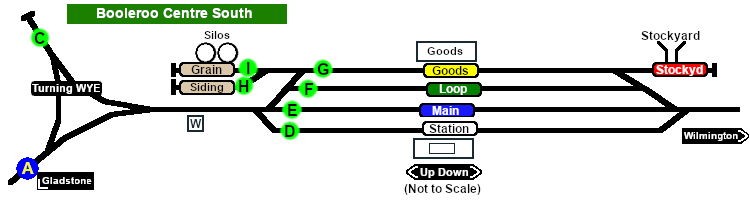
<td align="Center" colspan=2>'''Shunt Locations | <td align="Center" colspan=2>'''Shunt Locations'''</td> | ||
</tr> | </tr> | ||
<tr> | <tr> | ||
| Line 138: | Line 138: | ||
<tr valign="top"> | <tr valign="top"> | ||
<td align="center" width=100>[[Image:1green.png|link=]]</td> | <td align="center" width=100>[[Image:1green.png|link=]]</td> | ||
<td>'''Main Yard | <td>'''Main Yard Up'''</td> | ||
</tr> | </tr> | ||
<tr> | <tr> | ||
| Line 144: | Line 144: | ||
</tr> | </tr> | ||
<tr valign="top"> | <tr valign="top"> | ||
<td colspan=2 align="right">''' | <td colspan=2 align="right">'''Shunt locations may not be signalled'''</td> | ||
</tr> | </tr> | ||
</table></td> | </table></td> | ||
Revision as of 23:45, 29 June 2019
 |
|
   |
|
 |
|||||||||||||||||||||||||||||||||||||||||||||||||||||||||||||||||||||||||||||||||||||||||||||||||||||||







