SAR Stone Hut (Basic): Difference between revisions
From TrainzOnline
Jump to navigationJump to search
mNo edit summary |
mNo edit summary |
||
| Line 3: | Line 3: | ||
<td width=750> | <td width=750> | ||
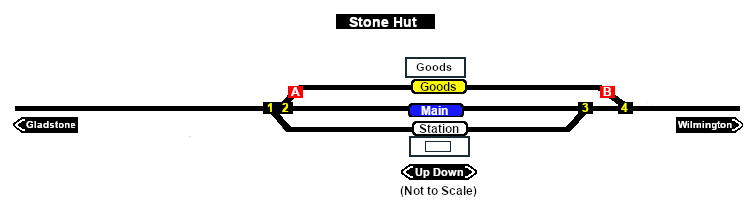
[[Image:SAR_Stone_Hut_Basic.png|link=|alt=Stone Hut]]<br> | [[Image:SAR_Stone_Hut_Basic.png|link=|alt=Stone Hut]]<br> | ||
<table> | |||
<tr valign="top"> | |||
<td width=600> | |||
Main Line with a Station and a Goods Loop. Unmanned station on the '''Gladstone to Wilmington line'''. The Wilmington line is unsignalled. | Main Line with a Station and a Goods Loop. Unmanned station on the '''Gladstone to Wilmington line'''. The Wilmington line is unsignalled. | ||
</td> | |||
<td width=150> | |||
[[image:SwitchToPaths.png|link=SAR Stone Hut|alt=To Paths|Show Path Diagram]] | |||
</td> | |||
</tr> | |||
</table> | |||
<table bgcolor="lightgrey" bordercolor="lightgrey"> | <table bgcolor="lightgrey" bordercolor="lightgrey"> | ||
Revision as of 05:54, 8 April 2020
|
|
 |
||||||||||||||||||||||||||||||||||||||||||||||||||||||||||||||