SAR Nantabibbie (Basic): Difference between revisions
From TrainzOnline
Jump to navigationJump to search
renumbered switches |
removed link to path map/info, reorganised switch sets |
||
| Line 1: | Line 1: | ||
<table> | <table> <!-- BEGIN TOP TABLE --> | ||
<tr valign="top"> | <tr valign="top"> | ||
<td width=750> | <td width=750> | ||
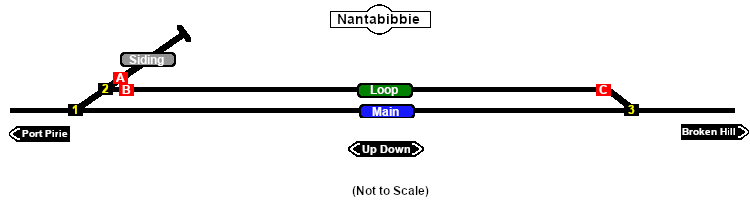
[[Image:SAR_Nantabibbie_Basic.png|link=|alt=Nantabibbie]]<br> | [[Image:SAR_Nantabibbie_Basic.png|link=|alt=Nantabibbie]]<br> | ||
<table> | <table> <!-- BEGIN Track Diagram Table --> | ||
<tr valign="top"> | <tr valign="top"> | ||
<td width=600> | <!-- <td width=600> --> | ||
<td width=750> | |||
Passing loop and a works siding. Unmanned location on the <span style="font-weight: 700; color: white; background-color: black;"> Port Pirie-Broken Hill Line </span>. This location was bypassed when the line was converted to standard gauge in 1969. | Passing loop and a works siding. Unmanned location on the <span style="font-weight: 700; color: white; background-color: black;"> Port Pirie-Broken Hill Line </span>. This location was bypassed when the line was converted to standard gauge in 1969. | ||
</td> | </td> | ||
<td width=150> | <!-- <td width=150> | ||
[[image:SwitchToPaths.png|link=SAR | [[image:SwitchToPaths.png|link=SAR Oodla Wirra|alt=To Paths|Show Path Diagram]] | ||
</td> | </td> --> | ||
</tr> | </tr> | ||
</table> | </table> <!-- END Track Diagram Table --> | ||
<table bgcolor="lightgrey" bordercolor="lightgrey"> | <table bgcolor="lightgrey" bordercolor="lightgrey" width=750> <!-- BEGIN Location details table --> | ||
<tr valign="middle"> | <tr valign="middle"> | ||
<td width=220 align="right">[[Image:SAR_PortPirie-BrokenHill_Line.png|link=SAR_Port_Pirie-Broken_Hill|alt=PortPirie-BrokenHill|Show Port Pirie-Broken Hill]]</td> | <td width=220 align="right">[[Image:SAR_PortPirie-BrokenHill_Line.png|link=SAR_Port_Pirie-Broken_Hill|alt=PortPirie-BrokenHill|Show Port Pirie-Broken Hill]]</td> | ||
| Line 25: | Line 26: | ||
<td colspan=3> </td> | <td colspan=3> </td> | ||
<td colspan=2>'''Facilities:''' | <td colspan=2>'''Facilities:''' | ||
<table> | <table> <!-- BEGIN Facilities Table --> | ||
<tr valign="top"> | <tr valign="top"> | ||
<td align="center">[[Image:Loop_Icon.png|link=|alt=Loop]]<br><span style="font-size: 10px; font-weight: 700;">Loop</span></td> | <td align="center">[[Image:Loop_Icon.png|link=|alt=Loop]]<br><span style="font-size: 10px; font-weight: 700;">Loop</span></td> | ||
</tr> | </tr> | ||
</table></td> | </table></td> <!-- END Facilities Table --> | ||
</tr> | </tr> | ||
</table> | </table> <!-- END Location details table --> | ||
<table bgcolor="LightYellow"> | <table bgcolor="LightYellow" width=750> <!-- BEGIN Switches table --> | ||
<tr valign="top"> | <tr valign="top"> | ||
<td colspan=6 align="center">[[Image:line740.png|link=]]</td> | <td colspan=6 align="center">[[Image:line740.png|link=]]</td> | ||
| Line 81: | Line 82: | ||
</tr> | </tr> | ||
<tr valign="top"> | <tr valign="top"> | ||
<td colspan= | <td colspan=6> | ||
<table> | <table> <!-- BEGIN Switch Mainline table --> | ||
<tr valign="top"> | <tr valign="top"> | ||
< | <td width=150><span style="font-weight: 700; background-color: black; color: white;"> Port Pirie - </span><span style="font-weight: 700; background-color: #1919fe; color: white;"> Main </span> </td> | ||
<td width=225><span style="font-weight: 700;"><span style="background-color: black; color: yellow;"> 1 </span>-R </span></td> | |||
<td><span style="font-weight: 700; background-color: black; color: white;"> | <td width=150><span style="font-weight: 700; background-color: black; color: white;"> Broken Hill - </span><span style="font-weight: 700; background-color: #1919fe; color: white;"> Main </span> </td> | ||
<td><span style="font-weight: 700;"><span style="background-color: black; color: yellow;"> | <td width=225><span style="font-weight: 700;"><span style="background-color: black; color: yellow;"> 3 </span>-L </span></td> | ||
</tr> | </tr> | ||
</table> <!-- END Switch Sets Mainline table --> | |||
<table> <!-- BEGIN Switch Sets Loop table --> | |||
<tr valign="top"> | <tr valign="top"> | ||
<td><span style="font-weight: 700; background-color: black; color: white;"> Port Pirie - </span><span style="font-weight: 700; background-color: #008100; color: white;"> Loop </span> </td> | <td width=150><span style="font-weight: 700; background-color: black; color: white;"> Port Pirie - </span><span style="font-weight: 700; background-color: #008100; color: white;"> Loop </span> </td> | ||
<td><span style="font-weight: 700;"><span style="background-color: black; color: yellow;"> 1 </span>-L <span style="background-color: black; color: yellow;"> 2 </span>-R </span></td> | <td width=225><span style="font-weight: 700;"><span style="background-color: black; color: yellow;"> 1 </span>-L <span style="background-color: black; color: yellow;"> 2 </span>-R <span style="background-color: red; color: white;"> B </span>-L </span></td> | ||
</ | <td width=150><span style="font-weight: 700;"><span style="background-color: black; color: white;"> Broken Hill - </span><span style="background-color: #008100; color: white;"> Loop </span></span></td> | ||
</ | <td width=225><span style="font-weight: 700;"><span style="background-color: black; color: yellow;"> 3 </span>-R <span style="background-color: red; color: white;"> C </span>-L </span></td> | ||
< | |||
< | |||
<tr | </tr> | ||
</table> <!-- END Switch Sets Loop table --> | |||
<table> <!-- BEGIN Switch MOW table --> | |||
<tr valign="top"> | <tr valign="top"> | ||
<td><span style="font-weight: 700; background-color: black; color: white;"> | <td width=150><span style="font-weight: 700; background-color: black; color: white;"> Port Pirie - MOW Siding </span> </td> | ||
<td><span style="font-weight: 700; background-color: black; color: | <td width=225><span style="font-weight: 700;"><span style="background-color: black; color: yellow;"> 1 </span>-L <span style="background-color: black; color: yellow;"> 2 </span>-L <span style="background-color: red; color: white;"> A </span>-L </span></td> | ||
<td | <td width=375> </td> <!-- blank entry --> | ||
</tr> | </tr> | ||
</table></td> | </table></td> <!-- END Switch MOW table --> | ||
</tr> | </tr> | ||
<tr valign="top"> | <tr valign="top"> | ||
<td colspan=6 align="center">[[Image:line740.png|link=]]</td> | <td colspan=6 align="center">[[Image:line740.png|link=]]</td> | ||
</tr> | </tr> | ||
</table></td> | </table></td> <!-- END Switches table --> | ||
<td> | <td> | ||
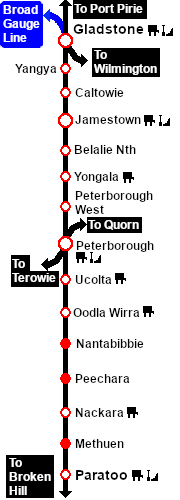
[[Image:SAR_Gladstone-Paratoo Strip Map.png|link=|alt=Gladstone-Paratoo Strip Map]]</td> | [[Image:SAR_Gladstone-Paratoo Strip Map.png|link=|alt=Gladstone-Paratoo Strip Map]]</td> | ||
</tr> | </tr> | ||
Revision as of 06:44, 6 October 2020
|
|
 |
|||||||||||||||||||||||||||||||||||||||||||||||||||||||||||||||||||||||||||||||||||||||||