SAR Nantabibbie (Basic): Difference between revisions
From TrainzOnline
Jump to navigationJump to search
mNo edit summary |
mNo edit summary |
||
| Line 87: | Line 87: | ||
<tr valign="top"> | <tr valign="top"> | ||
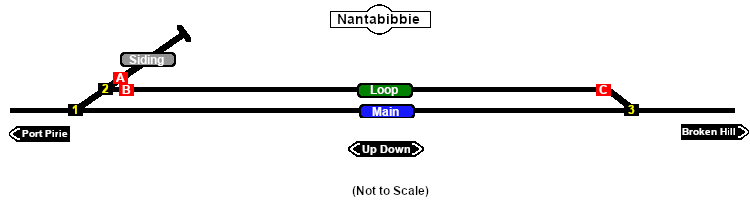
<td width=150><span style="font-weight: 700; background-color: black; color: white;"> Port Pirie - </span><span style=" | <td width=150><span style="font-weight: 700;"><span style="background-color: black; color: white;"> Port Pirie - </span><span style="background-color: #1919fe; color: white;"> Main </span></span></td> | ||
<td width=225><span style="font-weight: 700;"><span style="background-color: black; color: yellow;"> 1 </span>-R </span></td> | <td width=225><span style="font-weight: 700;"><span style="background-color: black; color: yellow;"> 1 </span>-R </span></td> | ||
<td width=150><span style="font-weight: 700; background-color: black; color: white;"> Broken Hill - </span><span style=" | <td width=150><span style="font-weight: 700;"><span style="background-color: black; color: white;"> Broken Hill - </span><span style="background-color: #1919fe; color: white;"> Main </span></span></td> | ||
<td width=225><span style="font-weight: 700;"><span style="background-color: black; color: yellow;"> 3 </span>-L </span></td> | <td width=225><span style="font-weight: 700;"><span style="background-color: black; color: yellow;"> 3 </span>-L </span></td> | ||
| Line 101: | Line 101: | ||
<tr valign="top"> | <tr valign="top"> | ||
<td width=150><span style="font-weight: 700; background-color: black; color: white;"> Port Pirie - </span><span style=" | <td width=150><span style="font-weight: 700;"><span style="background-color: black; color: white;"> Port Pirie - </span><span style="background-color: #008100; color: white;"> Loop </span></span></td> | ||
<td width=225><span style="font-weight: 700;"><span style="background-color: black; color: yellow;"> 1 </span>-L <span style="background-color: black; color: yellow;"> 2 </span>-R <span style="background-color: red; color: white;"> B </span>-L </span></td> | <td width=225><span style="font-weight: 700;"><span style="background-color: black; color: yellow;"> 1 </span>-L <span style="background-color: black; color: yellow;"> 2 </span>-R <span style="background-color: red; color: white;"> B </span>-L </span></td> | ||
| Line 115: | Line 115: | ||
<tr valign="top"> | <tr valign="top"> | ||
<td width=150><span style="font-weight: 700; background-color: black; color: white;"> Port Pirie - MOW Siding </span> | <td width=150><span style="font-weight: 700;"><span style="background-color: black; color: white;"> Port Pirie - MOW Siding </span></span></td> | ||
<td width=225><span style="font-weight: 700;"><span style="background-color: black; color: yellow;"> 1 </span>-L <span style="background-color: black; color: yellow;"> 2 </span>-L <span style="background-color: red; color: white;"> A </span>-L </span></td> | <td width=225><span style="font-weight: 700;"><span style="background-color: black; color: yellow;"> 1 </span>-L <span style="background-color: black; color: yellow;"> 2 </span>-L <span style="background-color: red; color: white;"> A </span>-L </span></td> | ||
Revision as of 09:10, 6 October 2020
|
|
 |
|||||||||||||||||||||||||||||||||||||||||||||||||||||||||||||||||||||||||||||||||||||||||