SAR Yandiah Switches: Difference between revisions
From TrainzOnline
Jump to navigationJump to search
mNo edit summary |
mNo edit summary |
||
| Line 63: | Line 63: | ||
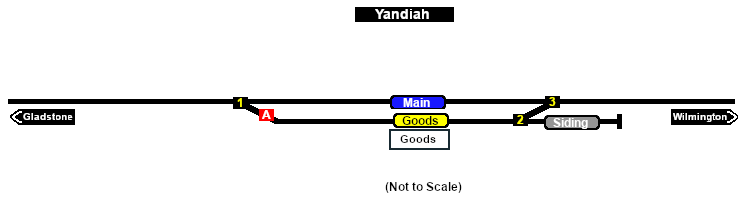
<td align="center">[[Image:No_2.png|20px|link=]]</td> | <td align="center">[[Image:No_2.png|20px|link=]]</td> | ||
<td>'''YD 2'''</td> | <td>'''YD 2'''</td> | ||
<td><span style="background-color: yellow; font-weight: 700;">Down</span> '''(R) | <td><span style="background-color: yellow; font-weight: 700;">Down</span> '''(R) Siding <span style="background-color: red; color: white;"> DE </span>, (L) Wilmington'''</td> | ||
<td align="center">[[Image:No_3.png|20px|link=]]</td> | <td align="center">[[Image:No_3.png|20px|link=]]</td> | ||
<td>'''YD 3'''</td> | <td>'''YD 3'''</td> | ||
Revision as of 22:08, 15 January 2021
|
|
||||||||||||||||||||||||||||||||||||||||||||||||||||||||||||||||||||||||||||