SAR Scenarios Tutorial: Difference between revisions
mNo edit summary |
mNo edit summary |
||
| Line 33: | Line 33: | ||
</table> <!-- END Dot Point --> | </table> <!-- END Dot Point --> | ||
<br> | <br> | ||
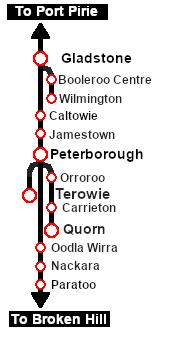
EITs are setup at the following locations:- | '''EITs''' are setup at the following locations:- | ||
*'''Gladstone Down''' - to provide paths out of '''Gladstone''' in the directions of '''Jamestown''' and the '''Wilmington Line'''. | *'''Gladstone Down''' - to provide paths '''out of''' '''Gladstone''' in the directions of '''Jamestown''' and the '''Wilmington Line'''. | ||
*'''Gladstone Up''' - to provide paths into '''Gladstone''' from the directions of '''Jamestown''' and the '''Wilmington Line'''. | *'''Gladstone Up''' - to provide paths '''into''' '''Gladstone''' from the directions of '''Jamestown''' and the '''Wilmington Line'''. | ||
*'''Caltowie''' - to provide paths into, out of and through '''Caltowie''' from the directions of '''Gladstone''' and '''Peterborough'''. | *'''Caltowie''' - to provide paths '''into, out of and through''' '''Caltowie''' from the directions of '''Gladstone''' and '''Peterborough'''. | ||
*'''Jamestown''' - to provide paths into, out of and through '''Jamestown''' from the directions of '''Gladstone''' and '''Peterborough'''. | *'''Jamestown''' - to provide paths '''into, out of and through''' '''Jamestown''' from the directions of '''Gladstone''' and '''Peterborough'''. | ||
*'''Peterborough West''' - to provide paths into and out of '''Peterborough''' from the directions of '''Gladstone''' and '''Quorn'''. | *'''Peterborough West''' - to provide paths '''into and out''' of '''Peterborough''' from the directions of '''Gladstone''' and '''Quorn'''. | ||
*'''Peterborough East''' - to provide paths into and out of '''Peterborough''' from the directions of '''Terowie''' and '''Paratoo'''. | *'''Peterborough East''' - to provide paths '''into and out''' of '''Peterborough''' from the directions of '''Terowie''' and '''Paratoo'''. | ||
*'''Paratoo''' - to provide paths into and out of '''Paratoo''' from the direction of '''Peterborough'''. | *'''Paratoo''' - to provide paths '''into and out of''' '''Paratoo''' from the direction of '''Peterborough'''. | ||
*'''Terowie''' - to provide paths into and out of '''Terowie''' from the direction of '''Peterborough'''. | *'''Terowie''' - to provide paths '''into and out of''' '''Terowie''' from the direction of '''Peterborough'''. | ||
*'''Orroroo''' - to provide paths into, out of and through '''Orroroo''' from the directions of '''Peterborough''' and '''Quorn'''. | *'''Orroroo''' - to provide paths '''into, out of and through''' '''Orroroo''' from the directions of '''Peterborough''' and '''Quorn'''. | ||
*'''Carrieton''' - to provide paths into, out of and through '''Carrieton''' from the directions of '''Peterborough''' and '''Quorn'''. | *'''Carrieton''' - to provide paths '''into, out of and through''' '''Carrieton''' from the directions of '''Peterborough''' and '''Quorn'''. | ||
*'''Quorn''' - to provide paths into and out of '''Quorn''' from the direction of '''Peterborough'''. | *'''Quorn''' - to provide paths '''into and out of''' '''Quorn''' from the direction of '''Peterborough'''. | ||
'''Gladstone''' and '''Peterborough''' have each been split into two '''EITs''' because of the large number of paths at each location. | '''Gladstone''' and '''Peterborough''' have each been split into two '''EITs''' because of the large number of paths at each location. | ||
</td> | </td> | ||
| Line 340: | Line 340: | ||
<span style="font-weight: 700; font-size: 19px; background-color: black; color: white;"> Using the Caltowie EIT </span><br> | <span style="font-weight: 700; font-size: 19px; background-color: black; color: white;"> Using the Caltowie EIT </span><br> | ||
You can set an EIT path without having to be directly in front of a '''Starting Signal'''. For example, you can set all the EIT paths for the train through '''Caltowie''' and into '''Jamestown''' before you even leave '''Gladstone'''. < | <table> <!-- BEGIN Bullet A --> | ||
<tr valign-"top"> | |||
<td>[[image:Ablue.png|link=|alt=]] </td> | |||
<td>You can set an EIT path without having to be directly in front of a '''Starting Signal'''. For example, you can set all the EIT paths for the train through '''Caltowie''' and into '''Jamestown''' before you even leave '''Gladstone'''. | |||
</td> | |||
</tr> | |||
</table> <!-- END Bullet A --> | |||
To set a path for a distant EIT, | <table cellpadding="4" bgcolor=#ffffb0> <!-- BEGIN Tip Table --> | ||
<tr valign="top"> | |||
<td>[[file:PencilTips.PNG|link=]]</td> | |||
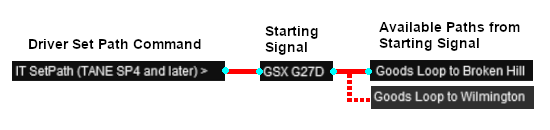
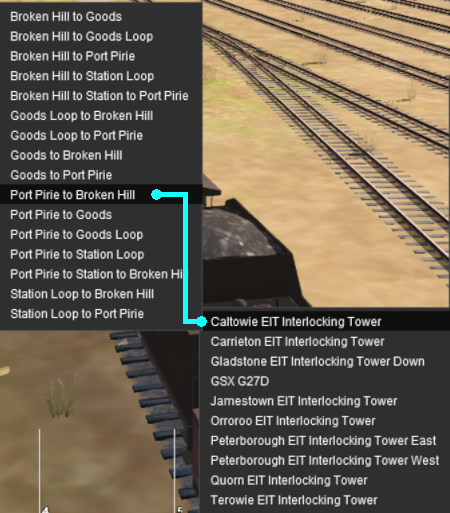
<td>To set a path for a distant EIT, open the '''Driver Command Menu''' and select the <span style="font-weight: 700;"><span style="color: white; background-color: black;"> IT SetPath (TANE SP4 and later) </span></span> option. Then select the required '''EIT''' and path from the lists. This can be repeated for as many '''EITs''' as needed along the path of the train.</td> | |||
</tr> | |||
</table> <!-- END Tip Table --> | |||
<br> | |||
<table> <!-- BEGIN Caltowie EIT paths 1 selection --> | <table> <!-- BEGIN Caltowie EIT paths 1 selection --> | ||
| Line 348: | Line 360: | ||
<td width=450>[[image:Caltowie EIT and Paths.png|link=|alt=Caltowie EIT]]</td> | <td width=450>[[image:Caltowie EIT and Paths.png|link=|alt=Caltowie EIT]]</td> | ||
<td> | <td> | ||
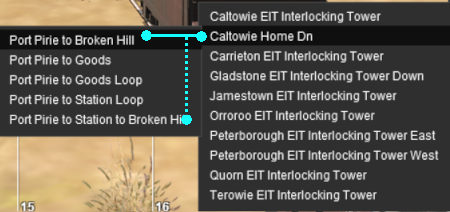
Open the '''Driver Command Menu''' and select the <span style="font-weight: 700;"><span style="color: white; background-color: black;"> IT SetPath (TANE SP4 and later) </span></span> option. Then select the <span style="font-weight: 700; background-color: black; color: white;"> Caltowie EIT Interlocking Tower </span>. This will open a list of '''ALL''' the '''EIT paths''' controlled by the '''Caltowie EIT''', including any paths that will not be directly accessable to your consist.<br> | |||
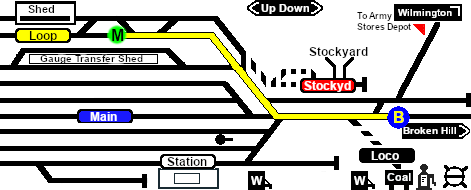
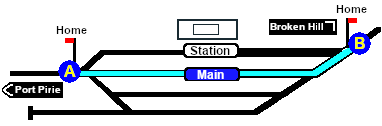
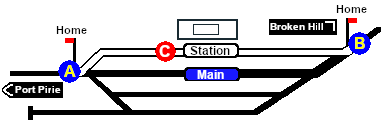
On the '''Caltowie''' [[image:Tab_PH_Grey.png|link=|75px]] page (link via [[image:Line_Index_Label.png|link=SAR_Index|Location Index]] - link will open in this window) the path we will select is identified as:-<br><br> | |||
[[image:CT Path AtoB.png|link=|alt=A to B Path]]<br><br> | [[image:CT Path AtoB.png|link=|alt=A to B Path]]<br><br> | ||
This will set a direct path, via the <span style="font-weight: 700;"><span style="color: white; background-color: blue;"> Main </span> Line</span>, through '''Caltowie Yard''' towards '''Broken Hill'''.<br> | Select the path <span style="font-weight: 700; background-color: black; color: white;"> Port Pirie to Broken Hill </span>. This will set a direct path, via the <span style="font-weight: 700;"><span style="color: white; background-color: blue;"> Main </span> Line</span>, through '''Caltowie Yard''' and out towards '''Broken Hill'''.<br> | ||
[[image:Caltowie AtoB Path.png|link=|alt=Caltowie AB]]<br> | [[image:Caltowie AtoB Path.png|link=|alt=Caltowie AB]]<br> | ||
| Line 364: | Line 376: | ||
<br> | <br> | ||
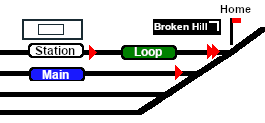
If you have manually driven to the '''Caltowie Home Dn''' signal (or used the '''AI Drive To Trackmark Caltowie Main Approach Dn''' command) then open the '''Driver Command Menu'''. The name of the '''Start Signal''' <span style="font-weight: 700; background-color: black; color: white;"> Caltowie Home Dn </span> will appear in the '''EIT''' list. | <table> <!-- BEGIN Bullet A --> | ||
<tr valign-"top"> | |||
<td>[[image:Bblue.png|link=|alt=]] </td> | |||
<td>If you have manually driven to the '''Caltowie Home Dn''' signal (or used the '''AI Drive To Trackmark Caltowie Main Approach Dn''' command) then open the '''Driver Command Menu'''. The name of the '''Start Signal''' <span style="font-weight: 700; background-color: black; color: white;"> Caltowie Home Dn </span> will appear in the '''EIT''' list.</td> | |||
</tr> | |||
</table> <!-- END Bullet A --> | |||
<table> <!-- BEGIN Caltowie EIT paths 2 selection --> | <table> <!-- BEGIN Caltowie EIT paths 2 selection --> | ||
| Line 418: | Line 435: | ||
<td width=465>[[image:Caltowie Map Switches.png|link=|alt=Caltowie Switches]]</td> | <td width=465>[[image:Caltowie Map Switches.png|link=|alt=Caltowie Switches]]</td> | ||
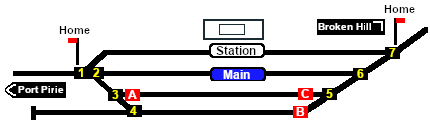
<td>Because '''Caltowie''' is a fairly simple yard, the switch sets are not complex. | <td>Because '''Caltowie''' is a fairly simple yard, the switch sets are not complex. | ||
* | *<span style="font-weight: 700; background-color: black; color: white;"> Port Pirie to Broken Hill </span> via <span style="font-weight: 700; color: white; background-color: blue;"> Main </span> - <span style="font-weight: 700;"><span style="font-size: 16px; background-color: black; color: yellow;"> 1 </span>-R <span style="font-size: 16px; background-color: black; color: yellow;"> 2 </span>-L <span style="font-size: 16px; background-color: black; color: yellow;"> 6 </span>-R <span style="font-size: 16px; background-color: black; color: yellow;"> 7 </span>-L</span> | ||
* | *<span style="font-weight: 700; background-color: black; color: white;"> Port Pirie to Broken Hill </span> via '''Station''' - <span style="font-weight: 700;"><span style="font-size: 16px; background-color: black; color: yellow;"> 1 </span>-L <span style="font-size: 16px; background-color: black; color: yellow;"> 7 </span>-R</span> | ||
Notice that the '''Switch Track Diagram''' shows three switches in red with letters as IDs - <span style="font-weight: 700; font-size: 16px;"><span style="background-color: red; color: white;"> A </span> <span style="background-color: red; color: white;"> B </span> <span style="background-color: red; color: white;"> C </span></span>. | Notice that the '''Switch Track Diagram''' shows three switches in red with letters as IDs - <span style="font-weight: 700; font-size: 16px;"><span style="background-color: red; color: white;"> A </span> <span style="background-color: red; color: white;"> B </span> <span style="background-color: red; color: white;"> C </span></span>. | ||
Revision as of 10:12, 11 March 2021
 SAR Peterborough Scenarios EIT, AI and Manual Driving Tutorial |
| A part of the SAR Peterborough Base Session |
The Tutorial Scenario The scenario used in this tutorial is
|
|||||||||||||||||||||||||||||||||||||||||||||||||||||||||||||||||||||||||||||||||||||||||||||||||||||||||||||||||||||||||||||||||||||||||||||||||||||||||||||||||||||||||||||||||||
| |||||||||||||||||||||||||||||||||||||||||||||||||||||||||||||||||||||||||||||||||||||||||||||||||||||||||||||||||||||||||||||||||||||||||||||||||||||||||||||||||||||||||||||||||||
Step |
Driving into Jamestown
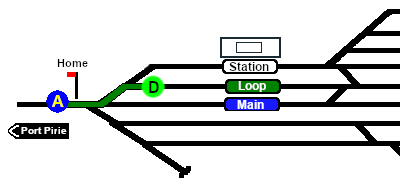
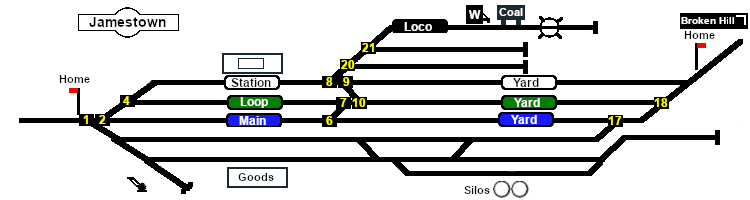
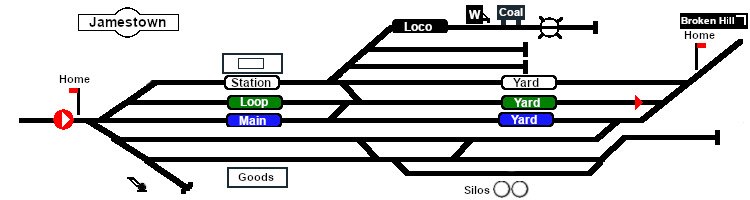
Jamestown is the final destination of this tutorial but the Gladstone-Peterborough Depot Fuel Scenario continues on to Peterborough. In this tutorial scenario, we will be using the Loop road. The Jamestown Error creating thumbnail: /bin/bash: line 1: /usr/bin/convert: No such file or directory Error code: 127 page (link via The required Switch Set is identified on the Jamestown Error creating thumbnail: /bin/bash: line 1: /usr/bin/convert: No such file or directory Error code: 127 page as
Jamestown is the final destination of this tutorial but the Gladstone-Peterborough Depot Fuel Scenario continues on to Peterborough. In this tutorial scenario, we will be using the Loop road. The Jamestown Error creating thumbnail: /bin/bash: line 1: /usr/bin/convert: No such file or directory Error code: 127 page (link via The important Track Marks for this tutorial scenario are identified on the Jamestown Error creating thumbnail: /bin/bash: line 1: /usr/bin/convert: No such file or directory Error code: 127 page as
|
||||||||||||||||||||||||||||||||||||||||||||||||||||||||||||||||||||||||||||||||||||||||||||||||||||||||||||||||||||||||||||||||||||||||||||||||||||||||||||||||||||||||||||||||||




















| Links: All links will open in this window | ||||
 Session Scenarios List |
 Location List |
 Rolling Stock |
 Active Industries |
 |
This page was created by Trainz user pware in March 2021 and was last updated as shown below.


