SAR Scenarios Tutorial: Difference between revisions
mNo edit summary |
mNo edit summary |
||
| Line 13: | Line 13: | ||
<td width=46> </td> | <td width=46> </td> | ||
<td width=75> </td> | <td width=75> </td> | ||
<td width=75>[[file:NextDown.png|link=# | <td width=75>[[file:NextDown.png|link=#step1|alt=Next Down|Next Down]]</td> | ||
<td width=75>[[file:BackToBottom.png|link=#bottom|alt=Bottom|Bottom]]</td> | <td width=75>[[file:BackToBottom.png|link=#bottom|alt=Bottom|Bottom]]</td> | ||
</tr> | </tr> | ||
| Line 19: | Line 19: | ||
----- | ----- | ||
<table width=1000> <!-- BEGIN Combined Intro Table --> | <table width=1000> <!-- BEGIN Combined Intro Table --> | ||
<tr valign="top"> | <tr valign="top"> | ||
| Line 83: | Line 24: | ||
<span style="font-weight: 700; font-size: 19px; background-color: black; color: white;"> The Tutorial Scenario </span><br> | <span style="font-weight: 700; font-size: 19px; background-color: black; color: white;"> The Tutorial Scenario </span><br> | ||
The scenario used in this tutorial is [[image:No_1.png|link=|alt=1]] '''[[SAR Scenario Depot Fuel Run|Gladstone-Peterborough Depot Fuel]]''' which has the consist already fully assembled with its locomotive ('''T 258''') | The scenario used in this tutorial is [[image:No_1.png|link=|alt=1]] '''[[SAR Scenario Depot Fuel Run|Gladstone-Peterborough Depot Fuel]]''' which has the consist already fully assembled with its locomotive ('''T 258''') on the <span style="font-weight: 700;"><span style="color: black; background-color: yellow;"> Goods Loop </span></span>. This tutorial will follow the scenario until the consist arrives at '''Jamestown'''.<br> | ||
</td> | </td> | ||
</tr> | </tr> | ||
| Line 143: | Line 84: | ||
<td width=729><span id="step1"></span> </td> | <td width=729><span id="step1"></span> </td> | ||
<td width=46>[[file:BackToTop.png|link=#top|alt=Top|Top]]</td> | <td width=46>[[file:BackToTop.png|link=#top|alt=Top|Top]]</td> | ||
<td width=75> | <td width=75> </td> | ||
<td width=75>[[file:NextDown.png|link=#step2|alt=Next Down|Next Down]]</td> | <td width=75>[[file:NextDown.png|link=#step2|alt=Next Down|Next Down]]</td> | ||
<td width=75>[[file:BackToBottom.png|link=#bottom|alt=Bottom|Bottom]]</td> | <td width=75>[[file:BackToBottom.png|link=#bottom|alt=Bottom|Bottom]]</td> | ||
| Line 152: | Line 93: | ||
</tr> | </tr> | ||
<tr valign="top"> | <tr valign="top"> | ||
<td colspan=3 bgcolor="lightcyan"> | <td colspan=3 bgcolor="lightcyan"> </td> | ||
</td> | |||
</tr> | </tr> | ||
<tr valign="top"> | <tr valign="top"> | ||
| Line 265: | Line 199: | ||
<tr valign="top"> | <tr valign="top"> | ||
<td>[[file:DotPoint.JPG|link=]]</td> | <td>[[file:DotPoint.JPG|link=]]</td> | ||
<td>There is a minor location, '''Yangya''', between '''Gladstone''' and '''Caltowie''' but it has | <td>There is a minor location, '''Yangya''', between '''Gladstone''' and '''Caltowie''' but it has minimal yard infrastructure, no visible signals and its switches are set for the main line through to '''Caltowie'''</td> | ||
</tr> | </tr> | ||
</table> <!-- END Dot Point --> | </table> <!-- END Dot Point --> | ||
<br> | <br> | ||
You have two options for driving to '''Caltowie''' | You have two options for driving to '''Caltowie''' - '''Manual''' and '''AI control'''.<br> | ||
[[image:DotPoint1.JPG|link=]] <span style="font-weight: 700; font-size: 17px; background-color: black; color: white;"> Manual Control </span><br> | [[image:DotPoint1.JPG|link=]] <span style="font-weight: 700; font-size: 17px; background-color: black; color: white;"> Manual Control </span><br> | ||
You can manually drive the train through to '''Caltowie''' without using the ''' | You can manually drive the train through to '''Caltowie''' without using the '''AI Driver Commands'''. This requires that all the switches along the path are correctly set. You can do this by manually using the information on the '''Gladstone''' [[image:Tab_SW_Grey.png|link=|75px]] page (link via [[image:Line_Index_Label.png|link=SAR_Index|Location Index]] - link will open in this window). | ||
<table> <!-- BEGIN Switch Maps Table --> | <table> <!-- BEGIN Switch Maps Table --> | ||
| Line 289: | Line 223: | ||
<br> | <br> | ||
You can now use the '''Driver Speed Dial''' or the keyboard controls ('''W''', '''S''', '''X''') to drive the train out of '''Gladstone Yard''' to '''Caltowie'''. Alternatively, for those with advanced steam loco driving skills, you can take control of the throttle, brake and other various devices in the loco cab.<br><br> | You can now use the '''Driver Speed Dial''' or the keyboard controls ('''W''', '''S''', '''X''') to drive the train out of '''Gladstone Yard''' to '''Caltowie'''. Alternatively, for those with advanced steam loco driving skills, you can take control of the throttle, brake and other various devices in the loco cab.<br><br> | ||
<table cellpadding="4" bgcolor=#c1e7e7> <!-- BEGIN Dot Point --> | |||
<tr valign="top"> | |||
<td>[[file:DotPoint.JPG|link=]]</td> | |||
<td>Locations that do not have visible '''Home''' signals (and many of the locations do not) then a visible '''Caution''' track sign has been placed alongside the track at the position of the '''Approach Track Mark''' (see [[image:DotPoint2.JPG|link=]] <span style="font-weight: 700; background-color: black; color: white;"> AI Control </span> below) as a stopping guide when you are driving manually</td> | |||
</tr> | |||
</table> <!-- END Dot Point --> | |||
<br> | |||
<table cellpadding="4" bgcolor=#ffffb0> <!-- BEGIN Tip Table --> | <table cellpadding="4" bgcolor=#ffffb0> <!-- BEGIN Tip Table --> | ||
| Line 300: | Line 242: | ||
[[image:DotPoint2.JPG|link=]] <span style="font-weight: 700; font-size: 17px; background-color: black; color: white;"> AI Control </span><br> | [[image:DotPoint2.JPG|link=]] <span style="font-weight: 700; font-size: 17px; background-color: black; color: white;"> AI Control </span><br> | ||
You can also drive by adding '''Driver Commands''' directly into the '''Driver Command Bar''' on the bottom right of the screen. The | You can also drive by adding '''AI Driver Commands''' directly into the '''Driver Command Bar''' on the bottom right of the screen. The commands will automatically set all the switches along your path in the route. A large number of track marks and some industies have been added to provide destinations for these commands.<br> | ||
The approach to every location in the route has [[image:Trackmark_Right.png|link=|alt=TM|8px]] '''Track Marks''' added to allow you to let the '''AI''' do most of the driving work. | The approach to every location in the route has [[image:Trackmark_Right.png|link=|alt=TM|8px]] '''Track Marks''' added to allow you to let the '''AI''' do most of the driving work. <br> | ||
Apart from the standard commands ('''Drive To''', '''Load''', '''Unload''', '''Couple''', '''Wait For''', etc), additional commands have been added to the session. Specifically:- | |||
*'''Instant Load Command''' - to instantly load all wagons (except locos) with the first item in their product queues | |||
*'''InstantLoadLocos''' - to instantly load all locos (or their tenders) with '''water''' and either '''coal''' or '''bunker c oil''' | |||
*'''InstantUnload''' - to instantly unload all wagons (except locos) | |||
The '''Track Marks''' are shown on the '''Caltowie''' [[image:Tab_TM_Grey.png|link=|75px]] page (link via [[image:Line_Index_Label.png|link=SAR_Index|Location Index]] - link will open in this window).<br> | |||
<table cellpadding="4" bgcolor=#c1e7e7> <!-- BEGIN Dot Point --> | <table cellpadding="4" bgcolor=#c1e7e7> <!-- BEGIN Dot Point --> | ||
| Line 308: | Line 257: | ||
<td>[[file:DotPoint.JPG|link=]]</td> | <td>[[file:DotPoint.JPG|link=]]</td> | ||
<td>All locations in the route have '''Approach Track Marks''' placed a short distance ahead of the approach or '''Home''' signals, both visible and invisible, that protect the yard entry point</td> | <td>All locations in the route have '''Approach Track Marks''' placed a short distance ahead of the approach or '''Home''' signals, both visible and invisible, that protect the yard entry point</td> | ||
</tr> | </tr> | ||
</table> <!-- END Dot Point --> | </table> <!-- END Dot Point --> | ||
<br> | <br> | ||
<table> <!-- BEGIN TM Table --> | <table> <!-- BEGIN TM Table --> | ||
<tr valign="top"> | <tr valign="top"> | ||
| Line 331: | Line 273: | ||
</tr> | </tr> | ||
</table> <!-- END TM Table --> | </table> <!-- END TM Table --> | ||
</td> | </td> | ||
<td width=30 bgcolor="lightcyan"> </td> | <td width=30 bgcolor="lightcyan"> </td> | ||
| Line 364: | Line 298: | ||
<br> | <br> | ||
</tr> | </tr> | ||
<tr valign="top"> | <tr valign="top"> | ||
<td | <td colspan=3 bgcolor="lightcyan"> </td> | ||
</tr> | </tr> | ||
<tr valign="top"> | <tr valign="top"> | ||
<td align="center" bgcolor="lightcyan">'''Step'''<br>[[image:DotPoint3Blue.JPG|link=]]</td> | <td align="center" bgcolor="lightcyan">'''Step'''<br>[[image:DotPoint3Blue.JPG|link=]]</td> | ||
| Line 472: | Line 401: | ||
[[image:DotPoint1.JPG|link=]] <span style="font-weight: 700; font-size: 17px; background-color: black; color: white;"> Manual Control </span><br> | [[image:DotPoint1.JPG|link=]] <span style="font-weight: 700; font-size: 17px; background-color: black; color: white;"> Manual Control </span><br> | ||
To manually drive the train through '''Caltowie''' to '''Jamestown | To manually drive the train through '''Caltowie''' to '''Jamestown''' you will have to manually set all the switches yourself using the information on the '''Caltowie''' [[image:Tab_SW_Grey.png|link=|75px]] page (link via [[image:Line_Index_Label.png|link=SAR_Index|Location Index]] - link will open in this window). | ||
<table> <!-- BEGIN Switch Maps Table --> | <table> <!-- BEGIN Switch Maps Table --> | ||
| Line 503: | Line 432: | ||
<tr valign="top"> | <tr valign="top"> | ||
<td>[[file:DotPoint.JPG|link=]]</td> | <td>[[file:DotPoint.JPG|link=]]</td> | ||
<td>If you are using | <td>If you are using the '''AI Drive''' commands to navigate through a yard, then any <span style="font-weight: 700; background-color: red; color: white;"> Catchpoints </span> along the path of your train will be automatically set to allow the train to safely pass.</td> | ||
</tr> | </tr> | ||
</table> <!-- END Dot Point --> | </table> <!-- END Dot Point --> | ||
| Line 577: | Line 506: | ||
<br> | <br> | ||
</tr> | </tr> | ||
<tr valign="top"> | <tr valign="top"> | ||
<td | <td colspan=3 bgcolor="lightcyan"> </td> | ||
</tr> | </tr> | ||
<tr valign="top"> | <tr valign="top"> | ||
<td align="center" bgcolor="lightcyan">'''Step'''<br>[[image:DotPoint5Blue.JPG|link=]]</td> | <td align="center" bgcolor="lightcyan">'''Step'''<br>[[image:DotPoint5Blue.JPG|link=]]</td> | ||
Revision as of 01:52, 16 March 2021
 SAR Peterborough Narrow Gauge Scenarios Tutorial |
| A part of the SAR Peterborough Base Session |
 |
 |
|
The Tutorial Scenario The scenario used in this tutorial is |
||||||||||||||||||||||||
|
|
|||||||||||||||||||||||



| ||||||||||
Step |
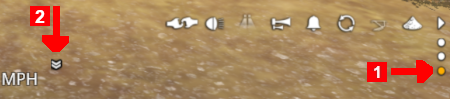
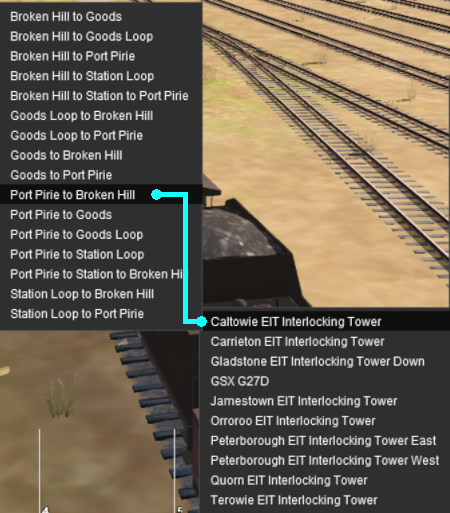
Using the Gladstone EIT
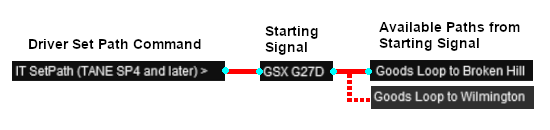
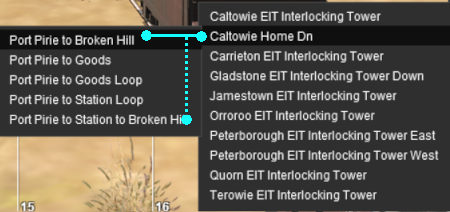
From the open Driver Command Menu, select the IT SetPath (TANE SP4 and later) option. This will open a list of all the EITs that have been placed in the Session. Because an EIT Starting Signal, in this case invisible signal GSX G27D, is directly in front of the loco, the signal will be included in the EIT list.
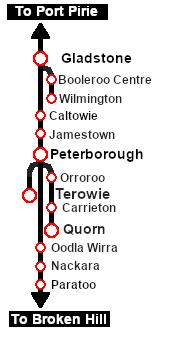
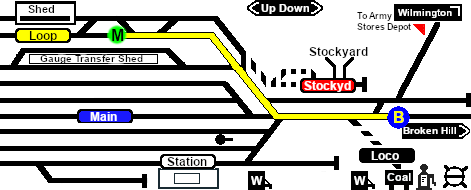
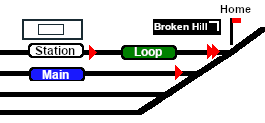
Select the path Goods Loop to Broken Hill . Every path is named according to its starting point (one of six "outside" locations or a track in the local yard) and its destination (one of six "outside" locations or a track in the local yard). The six "outside" locations are Port Pirie, Broken Hill, Terowie, Quorn, Wilmington and Peterborough. Those locations may not be the destination or starting point of the consist and they indicate the direction of travel only.
Cancelling a Set EIT Path Paths that have been set can be cancelled so that their signals and junction switches will be returned to their previous states. Set paths are automatically returned to their initial states after the consist has cleared the Exit Signal, but if you change your mind and decide to take a different path or not use the EITs then a set path can be cancelled. From the Driver Command Menu select the IT CancelEnhancedPath command.
You will have the option of cancelling ALL PATHS or selecting a particular EIT and path to cancel. |
|||||||||






| ||||||||||||||
Step |
Driving From Gladstone to Caltowie
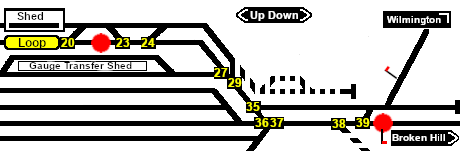
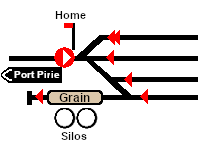
You can manually drive the train through to Caltowie without using the AI Driver Commands. This requires that all the switches along the path are correctly set. You can do this by manually using the information on the Gladstone Error creating thumbnail: /bin/bash: line 1: /usr/bin/convert: No such file or directory Error code: 127 page (link via
You can also drive by adding AI Driver Commands directly into the Driver Command Bar on the bottom right of the screen. The commands will automatically set all the switches along your path in the route. A large number of track marks and some industies have been added to provide destinations for these commands. The approach to every location in the route has Error creating thumbnail: /bin/bash: line 1: /usr/bin/convert: No such file or directory Error code: 127 Track Marks added to allow you to let the AI do most of the driving work. Apart from the standard commands (Drive To, Load, Unload, Couple, Wait For, etc), additional commands have been added to the session. Specifically:-
The Track Marks are shown on the Caltowie Error creating thumbnail: /bin/bash: line 1: /usr/bin/convert: No such file or directory Error code: 127 page (link via
|
|||||||||||||



| ||||||||||||
Step |
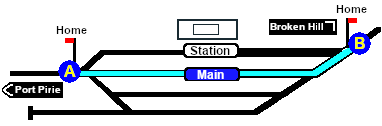
Using the Caltowie EIT Caltowie does not have a coal stage or a fuel oil store in need of a refill so the consist will not be stopping here. A through path is the best option.
Once the path has been set, use the Driver Speed Dial, the keyboard controls (W, S, X), advanced on screen controls, or the AI to drive the train through Caltowie Yard to Jamestown. |
|||||||||||



| ||||||||||||||||||||||||
Step |
Driving Through Caltowie to Jamestown Caltowie does not have a coal stage or a fuel oil store in need of a refill so the consist will not be stopping here. A through path is the best option.
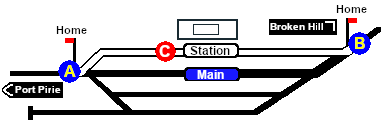
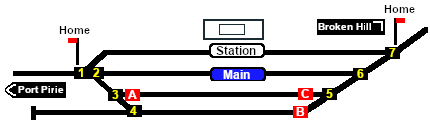
To manually drive the train through Caltowie to Jamestown you will have to manually set all the switches yourself using the information on the Caltowie Error creating thumbnail: /bin/bash: line 1: /usr/bin/convert: No such file or directory Error code: 127 page (link via
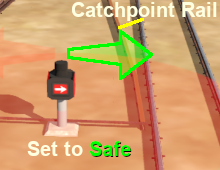
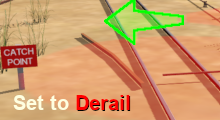
Notice that the Switch Track Diagram above shows three switches in red with letters as IDs - A B C .
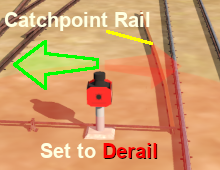
The information above shows that the default position of the Catch Points, the first direction setting shown as an (L) or an (R), is set to Catchpoint which is the Derail position.
After reaching Caltowie you can use the Track Marks placed in the yard to navigate your way through. The track marks are shown on the Caltowie Error creating thumbnail: /bin/bash: line 1: /usr/bin/convert: No such file or directory Error code: 127 page (link via All stations on the route have track marks, including the passenger enabled stations. This allows you to use the Drive To Trackmark command to reach any passenger station. The track marks are named using the name of the station (e.g. Caltowie), the word Station and the direction of travel, Up or Dn. So Caltowie has the station track marks Caltowie Station Dn and Caltowie Station Up (not shown above).
You have a number of options for using the AI to navigate through the yard to the other side:-
|
|||||||||||||||||||||||

| |||||||
Step |
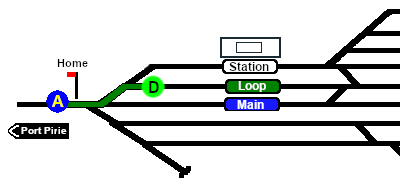
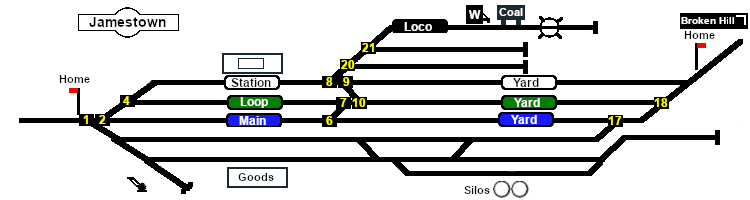
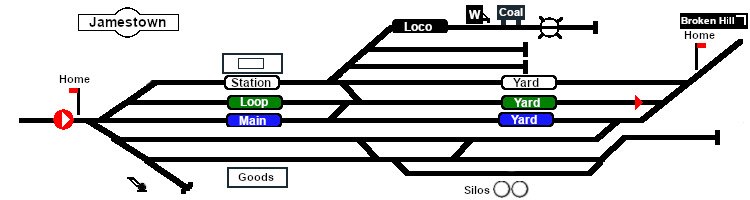
Using the Jamestown EIT Jamestown is the final destination of this tutorial but the Gladstone-Peterborough Depot Fuel Scenario continues on to Peterborough. In this tutorial scenario, we will be using the path into the Loop road. The Jamestown Error creating thumbnail: /bin/bash: line 1: /usr/bin/convert: No such file or directory Error code: 127 page (link via The Jamestown Error creating thumbnail: /bin/bash: line 1: /usr/bin/convert: No such file or directory Error code: 127 page identifies the path as
|
||||||

| |||||||
Step |
Driving into Jamestown Jamestown is the final destination of this tutorial but the Gladstone-Peterborough Depot Fuel Scenario continues on to Peterborough. We will be using the Loop road as the destination in Jamestown. As at Gladstone and Caltowie, all the switches will have to be set manually. The Jamestown Error creating thumbnail: /bin/bash: line 1: /usr/bin/convert: No such file or directory Error code: 127 page (link via
The Jamestown Error creating thumbnail: /bin/bash: line 1: /usr/bin/convert: No such file or directory Error code: 127 page (link via
This ends the tutorial but you can continue the Gladstone-Peterborough Depot Fuel Scenario. |
||||||


| Links: All links will open in this window | ||||
 Session Scenarios List |
 Location List |
 Rolling Stock |
 Active Industries |
 |
This page was created by Trainz user pware in March 2021 and was last updated as shown below.


