How to Create a HTML Asset: Difference between revisions

From TrainzOnline
Jump to navigationJump to search
Pware (talk | contribs)
m corrections
Line 5: Line 5:
<tr valign="top">
<tr valign="top">
<td width=729><span id="stepHTML"></span>&nbsp;</td>
<td width=46>[[file:BackToTop.png|link=#top|alt=Top|Top]]</td>
<td width=46>[[image:BackToTop.png|link=#top|alt=Top|Top]]</td>
<td width=75>&nbsp;</td>
<td width=75>[[file:NextDown.png|link=#stepCreate|alt=Next Down|Next Down]]</td>
<td width=75>[[image:NextDown.png|link=#stepCreate|alt=Next Down|Next Down]]</td>
<td width=75>[[file:BackToBottom.png|link=#bottom|alt=Bottom|Bottom]]</td>
<td width=75>[[image:BackToBottom.png|link=#bottom|alt=Bottom|Bottom]]</td>
</tr>
</tr>
</table> <!-- END Nav Buttons Table -->
Line 17: Line 17:
</tr>
</tr>
<tr valign="top">
<tr valign="top">
<td>[[file:DotPoint.JPG|link=]]</td>
<td>[[image:DotPoint.JPG|link=]]</td>
<td>'''HTML assets contain the text information, graphic images and sounds (those that are not built into locos and other assets) that can be displayed and played during a session''' in  
*a large browser window at the start of a Session (a session introduction page) or,
Line 23: Line 23:
</tr>
</tr>
<tr valign="top">
<tr valign="top">
<td>[[file:DotPoint.JPG|link=]]</td>
<td>[[image:DotPoint.JPG|link=]]</td>
<td>'''A single HTML asset can provide all the text, graphic and sound data for an entire session and for multiple sessions.'''<td>
</tr>
</tr>
<tr valign="top">
<tr valign="top">
<td>[[file:DotPoint.JPG|link=]]</td>
<td>[[image:DotPoint.JPG|link=]]</td>
<td>'''At the most basic level you do not have to create a HTML asset for your session.''' You can use existing resources (graphics and sounds) and add your own text to simple on-screen '''Popup Messages''' using '''Session Rules'''. See the section [[file:PageLink.PNG|link=]] '''[[#Adding a Message Popup to a Session|Adding a Message Popup to a Session]]''' below.<td>
<td>'''At the most basic level you do not have to create a HTML asset for your session.''' You can use existing resources (graphics and sounds) and add your own text to simple on-screen '''Popup Messages''' using '''Session Rules'''. See the section [[image:PageLink.PNG|link=]] '''[[#Adding a Message Popup to a Session|Adding a Message Popup to a Session]]''' below.<td>
</tr>
</tr>
</table> <!-- END Summary table -->
Line 35: Line 35:
<table cellpadding="4" bgcolor=#ffffb0> <!-- BEGIN Notes table -->
<tr valign="top">
<tr valign="top">
<td>[[file:NotePad.PNG|link=]]</td>
<td>[[image:NotePad.PNG|link=]]</td>
<td><span style="font-size: 17px;">'''Notes:'''</span><br>
HTML assets in '''Trainz''' consist of:-
Line 50: Line 50:
<tr valign="top">
<tr valign="top">
<td width=729><span id="stepCreate"></span>&nbsp;</td>
<td width=46>[[file:BackToTop.png|link=#top|alt=Top|Top]]</td>
<td width=46>[[image:BackToTop.png|link=#top|alt=Top|Top]]</td>
<td width=75>[[file:NextUp.png|link=#stepHTML|alt=Next Up|Top]]</td>
<td width=75>[[image:NextUp.png|link=#stepHTML|alt=Next Up|Top]]</td>
<td width=75>[[file:NextDown.png|link=#stepConfig|alt=Next Down|Next Down]]</td>
<td width=75>[[image:NextDown.png|link=#stepConfig|alt=Next Down|Next Down]]</td>
<td width=75>[[file:BackToBottom.png|link=#bottom|alt=Bottom|Bottom]]</td>
<td width=75>[[image:BackToBottom.png|link=#bottom|alt=Bottom|Bottom]]</td>
</tr>
</tr>
</table> <!-- END Nav Buttons Table -->
Line 67: Line 67:
</tr>
</tr>
<tr valign="top">
<tr valign="top">
<td>[[file:Steps.PNG|link=]]<br><br>
<td>[[image:Steps.PNG|link=]]<br><br>
<span style="font-size: 17px; font-weight: 700;">Steps</span></td>
<td>[[file:DotPoint1.JPG|link=]]&nbsp;<span style="font-size: 17px; font-weight: 700;">Create the Asset:</span><br>
<td>[[image:DotPoint1.JPG|link=]]&nbsp;<span style="font-size: 17px; font-weight: 700;">Create the Asset:</span><br>
<table> <!-- BEGIN Step 1 table -->
<tr valign="top">
<tr valign="top">
<td>[[file:NewAsset.PNG|link=]]<br><br>
<td>[[image:NewAsset.PNG|link=]]<br><br>
[[file:NewAssetCreated.PNG|link=]]</td>
[[image:NewAssetCreated.PNG|link=]]</td>
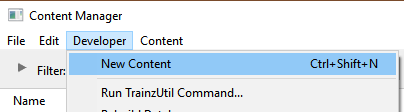
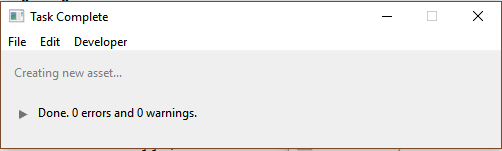
<td>From the '''Trainz''' Launcher
#select <span style="color: white; background-color: black; font-weight: 700; font-size: 15px;">&nbsp;Manage Content&nbsp;</span>
Line 93: Line 93:
<tr valign="top">
<tr valign="top">
<td>&nbsp;</td>
<td>&nbsp;</td>
<td>[[file:DotPoint2.JPG|link=]]&nbsp;<span style="font-size: 17px; font-weight: 700;">Find the New Asset:</span><br>
<td>[[image:DotPoint2.JPG|link=]]&nbsp;<span style="font-size: 17px; font-weight: 700;">Find the New Asset:</span><br>
<table> <!-- BEGIN Step 2 table -->
<tr valign="top">
<tr valign="top">
<td>[[file:NewAssetSelectOpen.PNG|link=]]</td>
<td>[[image:NewAssetSelectOpen.PNG|link=]]</td>
<td>
<td>
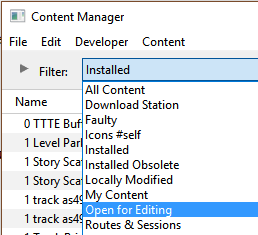
*Set the CM Search Filter to '''Open for Editing'''
Line 111: Line 111:
<tr valign="top">
<tr valign="top">
<td>&nbsp;</td>
<td>&nbsp;</td>
<td>[[file:DotPoint3.JPG|link=]]&nbsp;<span style="font-size: 17px; font-weight: 700;">Open the Asset in Windows File Explorer:</span><br>
<td>[[image:DotPoint3.JPG|link=]]&nbsp;<span style="font-size: 17px; font-weight: 700;">Open the Asset in Windows File Explorer:</span><br>
<table> <!-- BEGIN Step 3 table -->
<tr valign="top">
<tr valign="top">
<td>[[file:NewAssetShowExplorer.PNG|link=]]</td>
<td>[[image:NewAssetShowExplorer.PNG|link=]]</td>
<td>
<td>
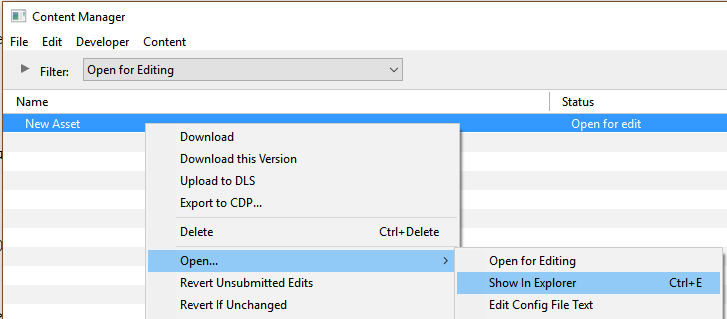
#Right mouse click on the entry '''New Asset'''
Line 130: Line 130:
<tr valign="top">
<tr valign="top">
<td>&nbsp;</td>
<td>&nbsp;</td>
<td>[[file:DotPoint4.JPG|link=]]&nbsp;<span style="font-size: 17px; font-weight: 700;">Open Config.txt File in Notepad:</span><br>
<td>[[image:DotPoint4.JPG|link=]]&nbsp;<span style="font-size: 17px; font-weight: 700;">Open Config.txt File in Notepad:</span><br>
<table> <!-- BEGIN Step 4 table -->
<tr valign="top">
<tr valign="top">
<td>[[file:NewAssetOpenExplorer.PNG|link=]]</td>
<td>[[image:NewAssetOpenExplorer.PNG|link=]]</td>
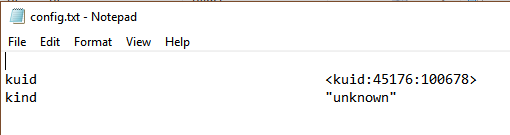
<td>There will only be a single item in the asset, its config.txt file
*Double click on the file to open it in Notepad</td>
Line 146: Line 146:
<tr valign="top">
<tr valign="top">
<td>&nbsp;</td>
<td>&nbsp;</td>
<td>[[file:DotPoint5.JPG|link=]]&nbsp;<span style="font-size: 17px; font-weight: 700;">Edit the Config.txt File:</span><br>
<td>[[image:DotPoint5.JPG|link=]]&nbsp;<span style="font-size: 17px; font-weight: 700;">Edit the Config.txt File:</span><br>
<table> <!-- BEGIN Step 5 table -->
<tr valign="top">
<tr valign="top">
<td>[[file:NewAssetOpenNotepad.PNG|link=]]</td>
<td>[[image:NewAssetOpenNotepad.PNG|link=]]</td>
<td>You will need to edit the contents of this file.  
*The next section, [[file:PageLink.PNG|link=]] '''[[#The Config.txt File|The Config.txt File]]''', identifies the changes you will need to make.  
*The next section, [[image:PageLink.PNG|link=]] '''[[#The Config.txt File|The Config.txt File]]''', identifies the changes you will need to make.  
*The new name you give to the asset will not take effect until after it has been committed.  
*After editing, save the changes and exit Notepad.</td>
Line 162: Line 162:
</tr>
</tr>
<tr valign="top">
<tr valign="top">
<td>[[file:Stop.PNG|link=]]</td>
<td>[[image:Stop.PNG|link=]]</td>
<td>Unless you know '''exactly''' what you are doing'''*''',&nbsp;<span style="color: white; background-color: red; font-weight: 700; font-size: 17px;">&nbsp;DO NOT ALTER THE KUID NUMBER&nbsp;</span>&nbsp;that has been added to the file<br>
'''*''' but even if you do, think <span style="font-weight: 700; text-decoration: underline">twice</span> before you change it !</td>
Line 175: Line 175:
<tr valign="top">
<tr valign="top">
<td>&nbsp;</td>
<td>&nbsp;</td>
<td>[[file:DotPoint6.JPG|link=]]&nbsp;<span style="font-size: 17px; font-weight: 700;">Add Any Extras:</span><br>
<td>[[image:DotPoint6.JPG|link=]]&nbsp;<span style="font-size: 17px; font-weight: 700;">Add Any Extras:</span><br>
<table> <!-- BEGIN Step 6 table -->
<tr valign="top">
<tr valign="top">
<td colspan=2>
<td colspan=2>
*You will need to add at least one file to the asset folder, a thumbnail image as described in the section [[file:PageLink.PNG|link=]] '''[[#Graphic Files|Graphic Files]]''' below.
*You will need to add at least one file to the asset folder, a thumbnail image as described in the section [[image:PageLink.PNG|link=]] '''[[#Graphic Files|Graphic Files]]''' below.
*Other files, such as additional images, sound (wav) files and HTML files may need to be added depending on the type of HTML asset that is being created. These topics are covered in the sections [[file:PageLink.PNG|link=]] '''[[#Graphic Files|Graphic Files]]''', [[file:PageLink.PNG|link=]] '''[[#Audio Files|Audio Files]]''' and [[file:PageLink.PNG|link=]] '''[[#HTML Files|HTML Files]]''' below.
*Other files, such as additional images, sound (wav) files and HTML files may need to be added depending on the type of HTML asset that is being created. These topics are covered in the sections [[image:PageLink.PNG|link=]] '''[[#Graphic Files|Graphic Files]]''', [[image:PageLink.PNG|link=]] '''[[#Audio Files|Audio Files]]''' and [[image:PageLink.PNG|link=]] '''[[#HTML Files|HTML Files]]''' below.
<br>
<br>
These files do not have to be added immediately but must be present before the new asset can be used. You can reopen the asset for editing later to add the files before it is committed.<br><br><span style="font-size: 17px;">'''THIS IS AN EXAMPLE ONLY'''</span><br></td>
</tr>
</tr>
<tr>
<tr>
<td>[[file:HTMLfileview.JPG|link=]]</td>
<td>[[image:HTMLfileview.JPG|link=]]</td>
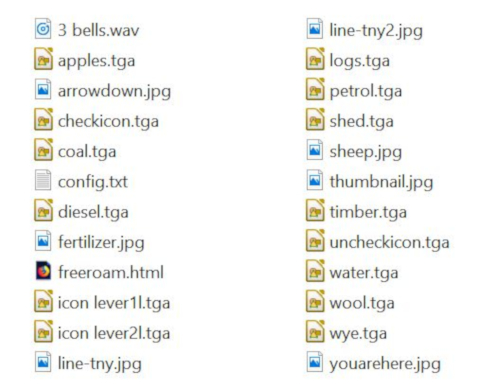
<td>The '''minimum''' number of files needed in a '''HTML asset''' is 2 - the '''config.txt''' file and a '''thumbnail image''' (a .jpg file).<br>
[[file:HTMLFolderView4.JPG|link=]]</td>
[[image:HTMLFolderView4.JPG|link=]]</td>
</tr>
</tr>
</table> <!-- END Step 6 table -->
Line 198: Line 198:
<tr valign="top">
<tr valign="top">
<td>&nbsp;</td>
<td>&nbsp;</td>
<td>[[file:DotPoint7.JPG|link=]]&nbsp;<span style="font-size: 17px; font-weight: 700;">Finish Up:</span>
<td>[[image:DotPoint7.JPG|link=]]&nbsp;<span style="font-size: 17px; font-weight: 700;">Finish Up:</span>
<table> <!-- BEGIN Step 7 table -->
<tr valign="top">
<tr valign="top">
<td>[[file:NewAssetSubmit.PNG|link=]]</td>
<td>[[image:NewAssetSubmit.PNG|link=]]</td>
<td>
<td>
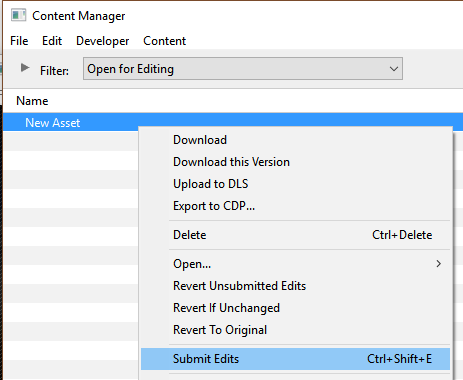
*Close the Asset window
Line 210: Line 210:
<table cellpadding="4" bgcolor=#ffffb0> <!-- BEGIN Step 7 Notes table -->
<tr valign="top">
<tr valign="top">
<td>[[file:NotePad.PNG|link=]]</td>
<td>[[image:NotePad.PNG|link=]]</td>
<td><span style="font-size: 17px;">'''Notes:'''</span><br>
Because you still have the Filter '''Open for Editing''' in operation, the now closed and committed asset will vanish from the window display. To check that your asset has been correctly created and renamed, set the CM Search Filter to "Today".</td>
Line 221: Line 221:
<table cellpading="4" bgcolor=#ffffff> <!-- BEGIN Step 7 errors-bugs table -->
<tr valign="top">
<tr valign="top">
<td>[[file:Bug.png|link=]]</td>
<td>[[image:Bug.png|link=]]</td>
<td>Some of the most common errors that can occur when creating and committing a new asset are:-
*no '''''thumbnail image''''' in the asset
Line 244: Line 244:
<tr valign="top">
<tr valign="top">
<td width=729><span id="stepConfig"></span>&nbsp;</td>
<td width=46>[[file:BackToTop.png|link=#top|alt=Top|Top]]</td>
<td width=46>[[image:BackToTop.png|link=#top|alt=Top|Top]]</td>
<td width=75>[[file:NextUp.png|link=#stepCreate|alt=Next Up|Top]]</td>
<td width=75>[[image:NextUp.png|link=#stepCreate|alt=Next Up|Top]]</td>
<td width=75>[[file:NextDown.png|link=#stepGraphic|alt=Next Down|Next Down]]</td>
<td width=75>[[image:NextDown.png|link=#stepGraphic|alt=Next Down|Next Down]]</td>
<td width=75>[[file:BackToBottom.png|link=#bottom|alt=Bottom|Bottom]]</td>
<td width=75>[[image:BackToBottom.png|link=#bottom|alt=Bottom|Bottom]]</td>
</tr>
</tr>
</table> <!-- END Nav Buttons Table -->
Line 254: Line 254:
<table cellpadding="4" bgcolor=#c1e7e7> <!-- BEGIN Dot point table -->
<tr valign="top">
<tr valign="top">
<td>[[file:DotPoint.JPG|link=]]</td>
<td>[[image:DotPoint.JPG|link=]]</td>
<td>'''All assets must have a config.txt file'''</td>
</tr>
</tr>
Line 265: Line 265:
</tr>
</tr>
<tr valign="top">
<tr valign="top">
<td>[[file:Gears.PNG|link=]]</td>
<td>[[image:Gears.PNG|link=]]</td>
<td><span style="font-size: 17px;">'''Settings:'''</span><br>
The HTML asset must have a '''config.txt''' text file that '''must''' include the following tags:-
Line 310: Line 310:
</tr>
</tr>
<tr valign="top">
<tr valign="top">
<td>[[file:Gears.PNG|link=]]</td>
<td>[[image:Gears.PNG|link=]]</td>
<td><span style="font-size: 17px;">'''Settings:'''</span><br>
'''For the above example:'''<br>
*The&nbsp;<span style="background-color: black; color: white; font-weight: 700;"> kuid </span>&nbsp;is unique to every asset so it is&nbsp;<span style="background-color: red; color: white; font-weight: 700;">&nbsp;not a good idea to choose your own&nbsp;</span>&nbsp;. This will be automatically generated by the '''Content Manager''' program when a new asset is created
*The&nbsp;<span style="background-color: black; color: white; font-weight: 700;"> username </span>&nbsp;is your name for the asset and the name that other users will see. It is a good idea to make it short and meaningful.
*The&nbsp;<span style="background-color: black; color: white; font-weight: 700;"> trainz-build </span>&nbsp;identifies the ''minimum'' Trainz version needed for this asset. A list of asset trainz-build numbers and their corresponding Trainz versions can be found at [[file:WikiLink.PNG|link=]] '''[["Trainz-build"_number]]'''
*The&nbsp;<span style="background-color: black; color: white; font-weight: 700;"> trainz-build </span>&nbsp;identifies the ''minimum'' Trainz version needed for this asset. A list of asset trainz-build numbers and their corresponding Trainz versions can be found at [[image:WikiLink.PNG|link=]] '''[["Trainz-build"_number]]'''
*The&nbsp;<span style="background-color: black; color: white; font-weight: 700;"> kind </span>&nbsp;identifies the ''type'' of asset and the types of files that '''Trainz''' will expect to find in the asset. It also tells '''Trainz''' how to render and error check the asset. A list of asset kinds can be found at [[file:WikiLink.PNG|link=]] '''[[KIND_TrainzBaseSpec#KIND_Hierarchy|KIND Hierarchy]]'''
*The&nbsp;<span style="background-color: black; color: white; font-weight: 700;"> kind </span>&nbsp;identifies the ''type'' of asset and the types of files that '''Trainz''' will expect to find in the asset. It also tells '''Trainz''' how to render and error check the asset. A list of asset kinds can be found at [[image:WikiLink.PNG|link=]] '''[[KIND_TrainzBaseSpec#KIND_Hierarchy|KIND Hierarchy]]'''
*The&nbsp;'''<span style="background-color: black; color: white; font-weight: 700;"> description </span>'''&nbsp;provides more details for users than the '''username'''.
*The&nbsp;<span style="background-color: black; color: white; font-weight: 700;"> category-class </span>&nbsp;identifies the ''intent'' of the asset and is important in classifying it for filtering and searching. For a HTML-Asset the category-class is "<span style="background-color: red; color: white; font-weight: 700;">YH</span>". A list of category classes can be found at [[file:WikiLink.PNG|link=]] '''[[Category-class]]'''
*The&nbsp;<span style="background-color: black; color: white; font-weight: 700;"> category-class </span>&nbsp;identifies the ''intent'' of the asset and is important in classifying it for filtering and searching. For a HTML-Asset the category-class is "<span style="background-color: red; color: white; font-weight: 700;">YH</span>". A list of category classes can be found at [[image:WikiLink.PNG|link=]] '''[[Category-class]]'''
*The&nbsp;<span style="background-color: black; color: white; font-weight: 700;"> thumbnails </span>&nbsp;container holds the ''preview'' images of the asset shown by the '''Content Manager''' program, the Web version of the ''DLS'' and, for '''some assets''', the Surveyor main menu image(s) and asset textures. Information on thumbnails can be found at [[file:WikiLink.PNG|link=]] '''[[Thumbnails]]'''
*The&nbsp;<span style="background-color: black; color: white; font-weight: 700;"> thumbnails </span>&nbsp;container holds the ''preview'' images of the asset shown by the '''Content Manager''' program, the Web version of the ''DLS'' and, for '''some assets''', the Surveyor main menu image(s) and asset textures. Information on thumbnails can be found at [[image:WikiLink.PNG|link=]] '''[[Thumbnails]]'''
**The&nbsp;<span style="background-color: black; color: white; font-weight: 700;">&nbsp;Default&nbsp;</span>&nbsp;is the '''container ID''' or '''placeholder''' for the thumbnail (some types of assets can have several thumbnails) and its ''exact label'' (or number - eg. "Default", "00", "01", etc) is not important but each thumbnail if there are more than one must have a different label. '''Default''' and '''0''' are commonly used placeholder labels for the 240 x 180 thumbnail image
**The '''image''' is the name of the thumbnail image. It does not have to be called '''<span style="color: black;">thumbnail.jpg</span>''' but it '''must''' be a JPG format image
Line 334: Line 334:
<table cellpadding="4" bgcolor=#ffffb0>
<tr valign="top">
<tr valign="top">
<td>[[file:PencilTips.PNG|link=]]</td>
<td>[[image:PencilTips.PNG|link=]]</td>
<td><span style="font-weight: 700; font-size: 17px;">Language Options:</span></td>
</tr>
</tr>
<tr valign="top">
<tr valign="top">
<td></td>
<td></td>
<td>All Trainz assets have a language facility built into their config.txt files that allows other language translations to be added for certain tags, such as the '''username''' and '''description''' tags. A full description of the process can be found on the Trainz Wiki at [[file:WikiLink.PNG|link=]]&nbsp;'''[[HowTo/Localize_an_Asset|Localize an Asset]]''' and a list of all the supported languages with their two character codes at [[file:WikiLink.PNG|link=]]&nbsp;'''[[Localization_code|Localization (country) Codes]]'''.<br>
<td>All Trainz assets have a language facility built into their config.txt files that allows other language translations to be added for certain tags, such as the '''username''' and '''description''' tags. A full description of the process can be found on the Trainz Wiki at [[image:WikiLink.PNG|link=]]&nbsp;'''[[HowTo/Localize_an_Asset|Localize an Asset]]''' and a list of all the supported languages with their two character codes at [[image:WikiLink.PNG|link=]]&nbsp;'''[[Localization_code|Localization (country) Codes]]'''.<br>


At the very basic level any creator can easily provide other language translations for the '''username''' and '''description''' tags in the assets they create. Examples are shown below.</td>
Line 373: Line 373:
The "tags", '''warning_message_stop''' and '''warning_message_speed''' in the example shown above, are called "String Table Tokens" and are used to identify which message is to be displayed.


For more details of string-tables, see the section [[file:PageLink.PNG|link=]] '''[[#Option 3: A String Table|Option 3: A String Table]]''' below.
For more details of string-tables, see the section [[image:PageLink.PNG|link=]] '''[[#Option 3: A String Table|Option 3: A String Table]]''' below.


<table> <!-- BEGIN Nav Buttons Table -->
<tr valign="top">
<tr valign="top">
<td width=729><span id="stepGraphic"></span>&nbsp;</td>
<td width=46>[[file:BackToTop.png|link=#top|alt=Top|Top]]</td>
<td width=46>[[image:BackToTop.png|link=#top|alt=Top|Top]]</td>
<td width=75>[[file:NextUp.png|link=#stepConfig|alt=Next Up|Top]]</td>
<td width=75>[[image:NextUp.png|link=#stepConfig|alt=Next Up|Top]]</td>
<td width=75>[[file:NextDown.png|link=#stepHTML2|alt=Next Down|Next Down]]</td>
<td width=75>[[image:NextDown.png|link=#stepHTML2|alt=Next Down|Next Down]]</td>
<td width=75>[[file:BackToBottom.png|link=#bottom|alt=Bottom|Bottom]]</td>
<td width=75>[[image:BackToBottom.png|link=#bottom|alt=Bottom|Bottom]]</td>
</tr>
</tr>
</table> <!-- END Nav Buttons Table -->
Line 458: Line 458:
<table cellpadding="4" bgcolor=#c1e7e7>
<tr valign="top">
<tr valign="top">
<td>[[file:DotPoint.JPG|link=]]</td>
<td>[[image:DotPoint.JPG|link=]]</td>
<td>'''A thumbnail image MUST be present in the asset.''' You can create a HTML asset without any other images but there must be a thumbnail image.</td>
</tr>
</tr>
Line 465: Line 465:
<table cellpadding="4" bgcolor=#ffffb0>
<tr valign="top">
<tr valign="top">
<td>[[file:NotePad.PNG|link=]]</td>
<td>[[image:NotePad.PNG|link=]]</td>
<td><span style="font-size: 17px;">'''Notes:'''</span><br>
The thumbnail image:-
Line 478: Line 478:
<table cellpadding="4" bgcolor=#c1e7e7>
<tr valign="top">
<tr valign="top">
<td>[[file:DotPoint.JPG|link=]]</td>
<td>[[image:DotPoint.JPG|link=]]</td>
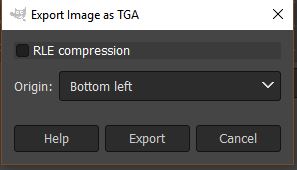
<td>While '''Trainz''' supports compressed TGA format files, the current advice is '''NOT to use compression when saving images in this format'''.</td>
</tr>
</tr>
Line 485: Line 485:
<table>
<table>
<tr valign="top">
<tr valign="top">
<td>[[file:ExportTGA.JPG|link=]]</td>
<td>[[image:ExportTGA.JPG|link=]]</td>
<td>
<td>
When exporting an image as a '''TGA''' file uncheck the image compression setting (example shown left for '''GIMP 2.10''')</td>
Line 497: Line 497:
<table cellpadding="4" bgcolor=#ffffb0>
<tr valign="top">
<tr valign="top">
<td>[[file:PencilTips.PNG|link=]]</td>
<td>[[image:PencilTips.PNG|link=]]</td>
<td>The best way to use JPGs is to:-
*keep the original image in a lossless format such as '''PNG''' or '''TGA'''
Line 509: Line 509:
<table cellpadding="4" bgcolor=#c1e7e7>
<tr valign="top">
<tr valign="top">
<td>[[file:DotPoint.JPG|link=]]</td>
<td>[[image:DotPoint.JPG|link=]]</td>
<td>'''Texture''' files are text files that act as a '''container''' for an image and control how that image is to be displayed in '''Trainz'''</td>
</tr>
</tr>
<tr valign="top">
<tr valign="top">
<td>[[file:DotPoint.JPG|link=]]</td>
<td>[[image:DotPoint.JPG|link=]]</td>
<td>Texture files are '''NOT''' graphic files as they were in earlier versions of '''Trainz''' and can still be found in '''built-in''' and '''base''' assets</td>
</tr>
</tr>
Line 531: Line 531:
<table cellpadding="4" bgcolor=#ffffb0>
<tr valign="top">
<tr valign="top">
<td>[[file:NotePad.PNG|link=]]</td>
<td>[[image:NotePad.PNG|link=]]</td>
<td><span style="font-size: 17px;">'''Notes:'''</span><br>
This format ''does not'' replace the other supported image formats ('''BMP''', '''JPG''', '''PNG''' or '''TGA''') but simply provides additional options for controlling how those image files are used, particularly their '''alpha channels'''.</td>
Line 539: Line 539:
<table cellpadding="4" bgcolor="Aquamarine">
<tr valign="top">
<tr valign="top">
<td>[[file:LinkWiki.PNG|link=]]</td>
<td>[[image:LinkWiki.PNG|link=]]</td>
<td>A detailed description of the '''.texture''' file format can be found on the '''Trainz Wiki Page''' at:-<br>
* '''[[Texture_file|Texture File]]'''</td>
Line 550: Line 550:
<table cellpadding="4" bgcolor=#c1e7e7>
<tr valign="top">
<tr valign="top">
<td>[[file:DotPoint.JPG|link=]]</td>
<td>[[image:DotPoint.JPG|link=]]</td>
<td>Transparencies are also called '''Alpha Channels'''.</td>
</tr>
</tr>
Line 561: Line 561:
<table>
<table>
<tr>
<tr>
<td>[[file:TransparencyDemo.JPG|link=]]</td>
<td>[[image:TransparencyDemo.JPG|link=]]</td>
</tr>
</tr>
</table>
</table>
Line 574: Line 574:
<table cellpadding="4" bgcolor=#ffffb0>
<tr valign="top">
<tr valign="top">
<td>[[file:NotePad.PNG|link=]]</td>
<td>[[image:NotePad.PNG|link=]]</td>
<td><span style="font-size: 17px;">'''Notes:'''</span><br>
The minimum requirements for a suitable graphics package for use in creating '''Trainz HTML''' assets would be:-
Line 589: Line 589:
<tr valign="top">
<tr valign="top">
<td width=729><span id="stepHTML2"></span>&nbsp;</td>
<td width=46>[[file:BackToTop.png|link=#top|alt=Top|Top]]</td>
<td width=46>[[image:BackToTop.png|link=#top|alt=Top|Top]]</td>
<td width=75>[[file:NextUp.png|link=#stepGraphic|alt=Next Up|Top]]</td>
<td width=75>[[image:NextUp.png|link=#stepGraphic|alt=Next Up|Top]]</td>
<td width=75>[[file:NextDown.png|link=#stepAudio|alt=Next Down|Next Down]]</td>
<td width=75>[[image:NextDown.png|link=#stepAudio|alt=Next Down|Next Down]]</td>
<td width=75>[[file:BackToBottom.png|link=#bottom|alt=Bottom|Bottom]]</td>
<td width=75>[[image:BackToBottom.png|link=#bottom|alt=Bottom|Bottom]]</td>
</tr>
</tr>
</table> <!-- END Nav Buttons Table -->
Line 602: Line 602:
<table cellpadding="4" bgcolor=#c1e7e7>
<tr valign="top">
<tr valign="top">
<td>[[file:DotPoint.JPG|link=]]</td>
<td>[[image:DotPoint.JPG|link=]]</td>
<td>If adding HTML files looks too difficult then '''Trainz''' does provide an option that allows you to place simple message windows onto the screen without having to create any HTML files or images. See the section [[file:PageLink.PNG|link=]] '''[[#Adding a Message Popup to a Session|Adding a Message Popup to a Session]]''' below.</td>
<td>If adding HTML files looks too difficult then '''Trainz''' does provide an option that allows you to place simple message windows onto the screen without having to create any HTML files or images. See the section [[image:PageLink.PNG|link=]] '''[[#Adding a Message Popup to a Session|Adding a Message Popup to a Session]]''' below.</td>
</tr>
</tr>
</table>
</table>
Line 615: Line 615:
<table>
<table>
<tr>
<tr>
<td>[[file:HTMLSampleMSNotepadA.JPG|link=]]</td>
<td>[[image:HTMLSampleMSNotepadA.JPG|link=]]</td>
</tr>
</tr>
</table>
</table>
Line 625: Line 625:
<table>
<table>
<tr>
<tr>
<td>[[file:HTMLSampleEdge.JPG|link=]]</td>
<td>[[image:HTMLSampleEdge.JPG|link=]]</td>
</tr>
</tr>
</table>
</table>
Line 646: Line 646:
</tr>
</tr>
<tr valign="top">
<tr valign="top">
<td>[[file:Stop.PNG|link=]]</td>
<td>[[image:Stop.PNG|link=]]</td>
<td>'''HTML is extremely unforgiving when it comes to errors and "typos" in the tags.''' Simple syntax and spelling errors can lead to hours of frustration while you attempt to find the error. If you don't have the patience or any "bug hunting skills" then perhaps HTML coding is not for you.</td>
</tr>
</tr>
Line 660: Line 660:
<table>
<table>
<tr>
<tr>
<td>[[file:HTMLSampleTANE.JPG|link=]]</td>
<td>[[image:HTMLSampleTANE.JPG|link=]]</td>
</tr>
</tr>
</table>
</table>
Line 666: Line 666:
<table cellpadding="4" bgcolor=#ffffb0>
<tr valign="top">
<tr valign="top">
<td>[[file:NotePad.PNG|link=]]</td>
<td>[[image:NotePad.PNG|link=]]</td>
<td><span style="font-size: 17px;">'''Notes:'''</span><br>
In the '''Trainz Minibrowser''':-
Line 678: Line 678:
<table cellpadding="4" bgcolor=#c1e7e7>
<tr valign="top">
<tr valign="top">
<td>[[file:DotPoint.JPG|link=]]</td>
<td>[[image:DotPoint.JPG|link=]]</td>
<td>'''Trainz HTML is NOT the same as standard HTML.''' There are similarities and there are a lot of differences. In general, '''Trainz HTML''' is a much smaller and simplier subset of standard HTML. A detailed reference on the version of HTML used in the '''Trainz Minibrowser''' can be found at [[file:WikiLink.PNG|link=]] '''[[MiniBrowser]]'''</td>
<td>'''Trainz HTML is NOT the same as standard HTML.''' There are similarities and there are a lot of differences. In general, '''Trainz HTML''' is a much smaller and simplier subset of standard HTML. A detailed reference on the version of HTML used in the '''Trainz Minibrowser''' can be found at [[image:WikiLink.PNG|link=]] '''[[MiniBrowser]]'''</td>
</tr>
</tr>
</table>
</table>
Line 694: Line 694:
</tr>
</tr>
<tr valign="top">
<tr valign="top">
<td>[[file:Stop.PNG|link=]]</td>
<td>[[image:Stop.PNG|link=]]</td>
<td>'''Because Trainz does not use standard HTML, avoid dedicated HTML applications and Web design packages.'''</td>
</tr>
</tr>
Line 701: Line 701:
<table cellpadding="4" bgcolor=#ffffb0>
<tr valign="top">
<tr valign="top">
<td>[[file:PencilTips.PNG|link=]]</td>
<td>[[image:PencilTips.PNG|link=]]</td>
<td>Particularly avoid:-
*HTML editors and applications that use a graphical interface to move objects such as images and blocks of text around the screen
Line 711: Line 711:
<table>
<table>
<tr valign="top">
<tr valign="top">
<td>[[file:HTMLSampleNotepadPlusPlus.JPG|link=]]</td>
<td>[[image:HTMLSampleNotepadPlusPlus.JPG|link=]]</td>
<td>
<td>
<table cellpadding="4" bgcolor=#ffffb0>
<tr valign="top">
<tr valign="top">
<td>[[file:PencilTips.PNG|link=]]</td>
<td>[[image:PencilTips.PNG|link=]]</td>
<td>
<td>
*Simple text editors, such as '''MS Notepad''' supplied with '''MS Windows''' or '''TextEdit''' on '''MacOS''', will work well but will require you to do a lot of typing and they will not perform any error checking
Line 730: Line 730:
</table>
</table>


The information in this Wiki Page applies to '''TANE''', '''TRS19''' and '''Trainz Plus'''.<br>
==Adding Links to a Web Page==


__TOC__
<table cellpadding="4" bgcolor=#c1e7e7>
<table> <!-- BEGIN Nav Buttons Table -->
<tr valign="top">
<td width=729><span id="stepHTML"></span>&nbsp;</td>
<td width=46>[[image:BackToTop.png|link=#top|alt=Top|Top]]</td>
<td width=75>&nbsp;</td>
<td width=75>[[image:NextDown.png|link=#stepCreate|alt=Next Down|Next Down]]</td>
<td width=75>[[image:BackToBottom.png|link=#bottom|alt=Bottom|Bottom]]</td>
</tr>
</table> <!-- END Nav Buttons Table -->
='''HTML Assets'''=
<table cellpadding="4" bgcolor=#c1e7e7> <!-- BEGIN Summary table -->
<tr valign="top">
<td colspan=2><span style="font-size: 17px;"><b>In Summary:</b></span></td>
</tr>
<tr valign="top">
<td>[[image:DotPoint.JPG|link=]]</td>
<td>'''HTML assets contain the text information, graphic images and sounds (those that are not built into locos and other assets) that can be displayed and played during a session''' in
*a large browser window at the start of a Session (a session introduction page) or,
*large browser windows during the running of a session<td>
</tr>
<tr valign="top">
<tr valign="top">
<td>[[image:DotPoint.JPG|link=]]</td>
<td>'''A single HTML asset can provide all the text, graphic and sound data for an entire session and for multiple sessions.'''<td>
<td>The '''MiniBrowser''' in '''Trainz''' allows you to add Web links to external HTML documents <span style="font-weight: 700;"><span style="font_size: 15px; background-color: red; color: white;">&nbsp;BUT&nbsp;</span> the links are limited to pages on the Trainz Wiki or threads in the Trainz Forums only.</span> You cannot add a link to your social media account or favourite railway page.</td>
</tr>
</tr>
<tr valign="top">
</table>
<td>[[image:DotPoint.JPG|link=]]</td>
<td>'''At the most basic level you do not have to create a HTML asset for your session.''' You can use existing resources (graphics and sounds) and add your own text to simple on-screen '''Popup Messages''' using '''Session Rules'''. See the section [[image:PageLink.PNG|link=]] '''[[#Adding a Message Popup to a Session|Adding a Message Popup to a Session]]''' below.<td>
</tr>
</table> <!-- END Summary table -->


<br>
The '''Anchor Tag''' is unquestionably the most powerful tool you can use in a web page. It provides a one-click link to another web page. The link can be a text link (shown as underlined) or it can be a graphic image.<br>
<table cellpadding="4" bgcolor=#ffffb0> <!-- BEGIN Notes table -->
<tr valign="top">
<td>[[image:NotePad.PNG|link=]]</td>
<td><span style="font-size: 17px;">'''Notes:'''</span><br>
HTML assets in '''Trainz''' consist of:-
*a '''config.txt file''' which is mandatory
*one or more '''graphic files''' of type .jpg, .tga, .png, .bmp. One of these '''must be the asset thumbnail'''.
and as '''options only''' (not compulsory):-
:*one or more '''HTML formatted text files''' of type .htm or .html
:*one or more '''sound files''' of type .wav
</td>
</tr>
</table> <!-- END Notes table -->


<table> <!-- BEGIN Nav Buttons Table -->
The link is '''restricted''' to a page on the '''Trainz Wiki''' or a thread in the '''Trainz Forums'''. You can set up a page, or a series of linked pages, on the Wiki describing your route or session. Some possibilities:-
<tr valign="top">
*a driving tutorial of your route
<td width=729><span id="stepCreate"></span>&nbsp;</td>
*loco rosters
<td width=46>[[image:BackToTop.png|link=#top|alt=Top|Top]]</td>
*train schedules
<td width=75>[[image:NextUp.png|link=#stepHTML|alt=Next Up|Top]]</td>
*list of industries and their commodities
<td width=75>[[image:NextDown.png|link=#stepConfig|alt=Next Down|Next Down]]</td>
*tasks to be completed in each session
<td width=75>[[image:BackToBottom.png|link=#bottom|alt=Bottom|Bottom]]</td>
<br>
</tr>
Some actual examples from the '''Trainz Wiki''' that are accessed from '''HTML Message Pages''' in Sessions include:-
</table> <!-- END Nav Buttons Table -->
*'''[[TRS19_TheInnterKohnNecktionRailroadSessions]]'''
*'''[[SAR_Peterborough_Base_Session]]'''
<br>
The '''Anchor Tag''' begins with ...
 
<span style="font-size: 15px; font-weight: 700;">&lt;<span style="color: red;">a href=</span>"add link address here..."&gt;</span><br>
 
... and ends with ...
 
<span style="font-size: 15px; font-weight: 700;">&lt;<span style="color: red;">/a</span>&gt;</span><br>
 
In between the starting and ending parts of the tag you place the image or text that will become the link as shown in the text example below.<br>
 
[[image:Anchor_HTML.png|link=|alt=Anchor Tag]]<br>
 
This will display the link in the '''MiniBrowser''' as [[image:Anchor_Link.png|link=|alt=Link]]<br>


='''How to Create a New HTML Asset'''=
Clicking the link will open the web page in your default web browser program.<br>


If you decide that you will need to create a HTML asset for your Session or Sessions, then these are the basic steps you will need to perform (if you have never done this before).
The '''Trainz Wiki''' has a page giving more information about the '''MiniBrowser''' at [[image:WikiLink.PNG|link=]] '''[[MiniBrowser]]'''. You may be interested in the image tag ('''<<span style="color: red;">img src=</span>"name of image file">''') for using images instead of text for the links, and adding tool tips (the '''<span style="color: red;">tooltip=</span>"place tool tip text here"''') parameter in the '''Anchor tag'''.<br>


<table cellpadding="4" bgcolor=#ffffff> <!-- BEGIN Step table -->
<table> <!-- BEGIN Nav Buttons Table -->
<tr>
<td colspan="2">
----</td>
</tr>
<tr valign="top">
<tr valign="top">
<td>[[image:Steps.PNG|link=]]<br><br>
<td width=729><span id="stepAudio"></span>&nbsp;</td>
<span style="font-size: 17px; font-weight: 700;">Steps</span></td>
<td width=46>[[image:BackToTop.png|link=#top|alt=Top|Top]]</td>
<td>[[image:DotPoint1.JPG|link=]]&nbsp;<span style="font-size: 17px; font-weight: 700;">Create the Asset:</span><br>
<td width=75>[[image:NextUp.png|link=#stepHTML2|alt=Next Up|Top]]</td>
<table> <!-- BEGIN Step 1 table -->
<td width=75>[[image:NextDown.png|link=#stepPopup|alt=Next Down|Next Down]]</td>
<tr valign="top">
<td width=75>[[image:BackToBottom.png|link=#bottom|alt=Bottom|Bottom]]</td>
<td>[[image:NewAsset.PNG|link=]]<br><br>
[[image:NewAssetCreated.PNG|link=]]</td>
<td>From the '''Trainz''' Launcher
#select <span style="color: white; background-color: black; font-weight: 700; font-size: 15px;">&nbsp;Manage Content&nbsp;</span>
#in '''Content Manager''' open the '''Developer''' menu
#select '''New Content'''
This will create a new asset and open it for editing.
<br><br>
A message window will appear that will (hopefully) report on the successful creation of a new asset.
*Close the message window
</td>
</tr>
</table> <!-- END Step 1 table -->
</td>
</tr>
</tr>
</table> <!-- END Nav Buttons Table -->
='''Audio Files'''=
Audio files can be added into HTML assets to play sounds when the HTML page is displayed on the screen. Examples would include conductor whistles and "all aboard" calls, etc. The sound is stored as a separate file in the HTML asset.
==Audio Specifications==
<table cellpadding="4" bgcolor=#eeeeee>
<tr>
<tr>
<td colspan="2">
<td colspan="2">
Line 823: Line 792:
</tr>
</tr>
<tr valign="top">
<tr valign="top">
<td>&nbsp;</td>
<td>[[image:Gears.PNG|link=]]</td>
<td>[[image:DotPoint2.JPG|link=]]&nbsp;<span style="font-size: 17px; font-weight: 700;">Find the New Asset:</span><br>
<td><span style="font-size: 17px;">'''Settings:'''</span><br>
<table> <!-- BEGIN Step 2 table -->
Audio files must be recorded using, or converted to:-
<tr valign="top">
*'''8 or 16 bit''' sample sizes
<td>[[image:NewAssetSelectOpen.PNG|link=]]</td>
*'''22kHz (22,050Hz) or 44kHz (44,100Hz)''' sample rate
<td>
*'''Mono, stereo or surround''' format ("surround" is not fully tested)
*Set the CM Search Filter to '''Open for Editing'''
...and saved using
This will display only those assets that have been opened for editing (hopefully only your new and as yet unnamed asset will be shown)
*Uncompressed '''WAV''' format PCM (Pulse Coded Modulation)
</td>
</tr>
</table> <!-- END Step 2 table -->
</td>
</td>
</tr>
</tr>
Line 840: Line 806:
----</td>
----</td>
</tr>
</tr>
</table>
<br>
<table cellpadding="4" bgcolor=#fcbcbc width="740">
<tr valign="top">
<tr valign="top">
<td>&nbsp;</td>
<td colspan=2><span style="font-size: 17px;"><b>Warning:</b></span></td>
<td>[[image:DotPoint3.JPG|link=]]&nbsp;<span style="font-size: 17px; font-weight: 700;">Open the Asset in Windows File Explorer:</span><br>
</tr>
<table> <!-- BEGIN Step 3 table -->
<tr valign="top">
<tr valign="top">
<td>[[image:NewAssetShowExplorer.PNG|link=]]</td>
<td>[[image:Stop.PNG|link=]]</td>
<td>
<td>'''Take care when deciding which settings (bit rate, sample rate, number of channels) are to be used for a sound.'''  
#Right mouse click on the entry '''New Asset'''
High settings will produce significantly larger file sizes and often for no noticeable improvements in sound quality</td>
#Select '''Open'''
#Select '''Show in Explorer'''
</td>
</tr>
</tr>
</table> <!-- END Step 3 table -->
</table>
</td>
<br>
</tr>
<table cellpadding="4" bgcolor=#ffffb0>
<tr>
<tr valign="top">
<td colspan="2">
<td>[[image:PencilTips.PNG|link=]]</td>
----</td>
<td>For a short simple sound, such as a telegraph bell or a conductors whistle, lower settings (e.g. 8 bit, 22kHz, mono) would probably be more suitable</td>
</tr>
<tr valign="top">
<td>&nbsp;</td>
<td>[[image:DotPoint4.JPG|link=]]&nbsp;<span style="font-size: 17px; font-weight: 700;">Open Config.txt File in Notepad:</span><br>
<table> <!-- BEGIN Step 4 table -->
<tr valign="top">
<td>[[image:NewAssetOpenExplorer.PNG|link=]]</td>
<td>There will only be a single item in the asset, its config.txt file
*Double click on the file to open it in Notepad</td>
</tr>
</table> <!-- END Step 4 table -->
</td>
</tr>
</tr>
</table>
<br>
==Audio Software==
The main requirement for audio editing software is that it must be able to save sound files in the '''WAV''' file format and meet the specifications listed above.
A suitable freeware audio editing software would be:-
*'''Audacity''' for both MacOSX and Windows
<table>
<tr>
<tr>
<td colspan="2">
<td>[[image:3BellsWave.JPG|link=]]</td>
----</td>
</tr>
</tr>
</table>
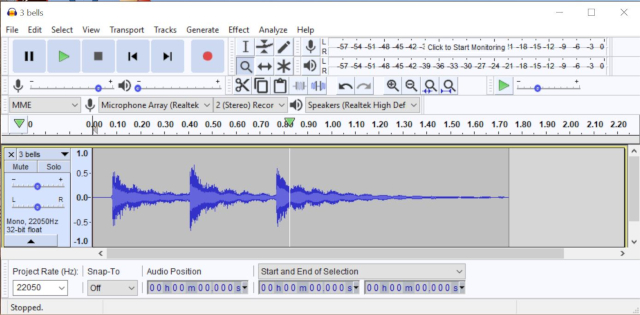
'''Audacity''' audio file recording and editing software (shown above).
<table> <!-- BEGIN Nav Buttons Table -->
<tr valign="top">
<tr valign="top">
<td>&nbsp;</td>
<td width=729><span id="stepPopup"></span>&nbsp;</td>
<td>[[image:DotPoint5.JPG|link=]]&nbsp;<span style="font-size: 17px; font-weight: 700;">Edit the Config.txt File:</span><br>
<td width=46>[[image:BackToTop.png|link=#top|alt=Top|Top]]</td>
<table> <!-- BEGIN Step 5 table -->
<td width=75>[[image:NextUp.png|link=#stepAudio|alt=Next Up|Top]]</td>
<td width=75>[[image:NextDown.png|link=#bottom|alt=Next Down|Next Down]]</td>
<td width=75>[[image:BackToBottom.png|link=#bottom|alt=Bottom|Bottom]]</td>
</tr>
</table> <!-- END Nav Buttons Table -->
 
='''Adding a Message Popup to a Session'''=
 
The built-in '''Message Popup''' rule is used to create the message windows that appear on the screen during the running of a session.
 
<table cellpadding="4" bgcolor=#c1e7e7>
<tr valign="top">
<tr valign="top">
<td>[[image:NewAssetOpenNotepad.PNG|link=]]</td>
<td>[[image:DotPoint.JPG|link=]]</td>
<td>You will need to edit the contents of this file.
<td>The [[image:WikiLink.PNG|link=]] '''[[Session_Rule_List_with_Parameters#Message_Popup_Rule|Message Popup Rule]]''' has to be added to the session rule list in the [[image:WikiLink.PNG|link=]] '''[[How to Use Session Editor|Session Editor]]''' in Surveyor which you access from the '''Surveyor Main Menu''' in '''TANE''' or from the '''Surveyor Edit Menu''' in '''TRS19''' and '''Trainz Plus'''. Each message will need its own '''Message Popup''' rule in the session rule list.</td>
*The next section, [[image:PageLink.PNG|link=]] '''[[#The Config.txt File|The Config.txt File]]''', identifies the changes you will need to make.
*The new name you give to the asset will not take effect until after it has been committed.
*After editing, save the changes and exit Notepad.</td>
</tr>
</table> <!-- END Step 5 table -->
<br>
<table cellpadding="4" bgcolor=#fcbcbc> <!-- BEGIN Step 5 warning table -->
<tr valign="top"> <!-- warning -->
<td colspan=2><span style="font-size: 17px;"><b>Warning:</b></span></td>
</tr>
</tr>
</table>
The '''Message Popup''' rule provides three different methods of creating the messages, and adding graphics and sound if needed. These methods are:-
:[[image:DotPoint1Blue.png|link=]]&nbsp;from a simple text message typed into the rule with an optional graphic. If needed a sound can be added from an existing HTML asset.
:[[image:DotPoint2Blue.png|link=]]&nbsp;from a HTML page stored as a file in a HTML asset. This HTML page can have many graphic images, each stored in the HTML asset, and many lines of text. If needed a sound can be added from the same or another HTML asset.
:[[image:DotPoint3Blue.png|link=]]&nbsp;from a "string-table" in the '''config.txt''' file of a HTML asset. If needed a sound can be added from the same or another HTML asset.
==Option 1: A Simple Custom Text Message==
The simplest and easiest method of adding message windows to a '''Trainz''' Session is to use the '''Message Popup''' rule with the '''Custom Text''' option for all your Session messages.
<table cellpadding="4" bgcolor=#ffffb0>
<tr valign="top">
<tr valign="top">
<td>[[image:Stop.PNG|link=]]</td>
<td>[[image:NotePad.PNG|link=]]</td>
<td>Unless you know '''exactly''' what you are doing'''*''',&nbsp;<span style="color: white; background-color: red; font-weight: 700; font-size: 17px;">&nbsp;DO NOT ALTER THE KUID NUMBER&nbsp;</span>&nbsp;that has been added to the file<br>
<td><span style="font-size: 17px;">'''Notes:'''</span><br>
'''*''' but even if you do, think <span style="font-weight: 700; text-decoration: underline">twice</span> before you change it !</td>
[[image:checkicon.png|link=|alt=Tick]] This option has a number of advantages:-
</tr>
*'''No knowledge of HTML''' is required.
</table> <!-- END Step 5 warning table -->
*You can use a '''built in graphic''' (with more available on the '''DLS''')
*You can use '''sounds from existing HTML assets'''
*There is no need to create a HTML asset
[[image:uncheckicon.png|link=|alt=Cross]] There are also some disadvantages. For each message window:-
*You can only use '''one graphic''' which has to be selected from a list of special "texture" graphics
</td>
</td>
</tr>
</tr>
<tr>
</table>
<br>
<table cellpadding="4" bgcolor=#c1e7e7>
<tr valign="top">
<td>[[image:DotPoint.JPG|link=]]</td>
<td>If you are happy using '''Option 1''', installed graphics and sounds or no graphics and sounds at all, then you '''do not have to create a HTML asset''' for your session.</td>
</tr>
</table>
<br>
For example:
<table>
<tr valign="top">
<td>[[image:MessagePopup2.JPG|link=]]</td>
<td>
<table cellpadding="4" bgcolor=#eeeeee>
<tr>
<td colspan="2">
<td colspan="2">
----</td>
----</td>
</tr>
</tr>
<tr valign="top">
<tr valign="top">
<td>&nbsp;</td>
<td>[[image:Gears.PNG|link=]]</td>
<td>[[image:DotPoint6.JPG|link=]]&nbsp;<span style="font-size: 17px; font-weight: 700;">Add Any Extras:</span><br>
<td><span style="font-size: 17px;">'''Settings:'''</span><br>
<table> <!-- BEGIN Step 6 table -->
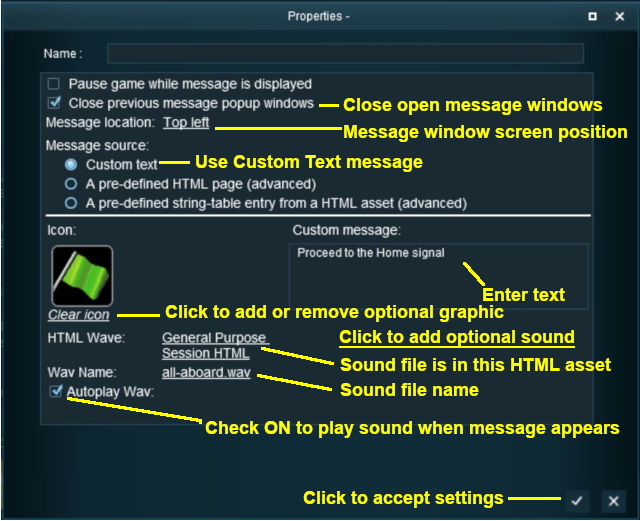
[[image:PortalOptionButtonFilled.PNG|link=]] '''Custom text'''<br>
<tr valign="top">
'''In This Example:'''
<td colspan=2>
:[[image:CheckBoxOff.PNG|link=]] '''Pause game while message is displayed''' - game play will not be paused
*You will need to add at least one file to the asset folder, a thumbnail image as described in the section [[image:PageLink.PNG|link=]] '''[[#Graphic Files|Graphic Files]]''' below.
:[[image:CheckBox.PNG|link=]] '''Close previous message popup windows''' - this is usually a good idea unless you want multiple message windows open
*Other files, such as additional images, sound (wav) files and HTML files may need to be added depending on the type of HTML asset that is being created. These topics are covered in the sections [[image:PageLink.PNG|link=]] '''[[#Graphic Files|Graphic Files]]''', [[image:PageLink.PNG|link=]] '''[[#Audio Files|Audio Files]]''' and [[image:PageLink.PNG|link=]] '''[[#HTML Files|HTML Files]]''' below.
:'''Message location:''' '''<span style="text-decoration: underline;">Top left</span>''' of the screen has been chosen as the location for the message window. Other positions are '''Top right''', '''Bottom left''' and '''Bottom right'''
<br>
:'''Custom Message''' - the message entered into the text box will be displayed
These files do not have to be added immediately but must be present before the new asset can be used. You can reopen the asset for editing later to add the files before it is committed.<br><br><span style="font-size: 17px;">'''THIS IS AN EXAMPLE ONLY'''</span><br></td>
:'''Icon''' - the selected ''optional'' icon will be displayed
</tr>
:'''HTML Wave:''' '''<span style="text-decoration: underline;">General Purpose Session HTML</span>''' HTML asset contains the ''optional'' sound file to be played
<tr>
:'''Wav Name:''' '''<span style="text-decoration: underline;">all-aboard.wav</span>''' is the ''optional'' sound file to be played
<td>[[image:HTMLfileview.JPG|link=]]</td>
:[[image:CheckBox.PNG|link=]] '''Autoplay Wav''' - the sound will be played when the page is displayed</td>
<td>The '''minimum''' number of files needed in a '''HTML asset''' is 2 - the '''config.txt''' file and a '''thumbnail image''' (a .jpg file).<br>
[[image:HTMLFolderView4.JPG|link=]]</td>
</tr>
</table> <!-- END Step 6 table -->
</td>
</tr>
</tr>
<tr>
<tr>
Line 927: Line 921:
----</td>
----</td>
</tr>
</tr>
</table></td>
</tr>
</table>
<table cellpadding="4" bgcolor=#c1e7e7>
<tr valign="top">
<tr valign="top">
<td>&nbsp;</td>
<td>[[image:DotPoint.JPG|link=]]</td>
<td>[[image:DotPoint7.JPG|link=]]&nbsp;<span style="font-size: 17px; font-weight: 700;">Finish Up:</span>
<td>'''If all your Session messages use this option then there is no need to create a HTML asset'''</td>
<table> <!-- BEGIN Step 7 table -->
</tr>
<tr valign="top">
</table>
<td>[[image:NewAssetSubmit.PNG|link=]]</td>
 
<td>
<table cellpadding="4" bgcolor=#ffffb0>
*Close the Asset window
*Commit the asset in Content manager
**Right mouse click on the asset
**Select '''Submit Edits'''
Hopefully there will be no errors.<br><br>
<table cellpadding="4" bgcolor=#ffffb0> <!-- BEGIN Step 7 Notes table -->
<tr valign="top">
<tr valign="top">
<td>[[image:NotePad.PNG|link=]]</td>
<td>[[image:PencilTips.PNG|link=]]</td>
<td><span style="font-size: 17px;">'''Notes:'''</span><br>
<td>To find additional graphic icons that can be added to the '''Message Popup''' window, use '''Content Manager''' and set a '''Custom Filter''' to search for:-
Because you still have the Filter '''Open for Editing''' in operation, the now closed and committed asset will vanish from the window display. To check that your asset has been correctly created and renamed, set the CM Search Filter to "Today".</td>
*'''Category''' select '''Texture- Not Environmental'''
*'''Name''' type '''icon'''
*'''On Download Station''' select '''True'''
Not all those shown will be suitable. Double click a possible icon to display its details before downloading.</td>
</tr>
</tr>
</table>
</table>
<br> <!-- END Step 7 Notes table -->
<br>
<table cellpadding="4" bgcolor=#ff0000> <!-- BEGIN Step 7 errors table -->
<table cellpadding="4" bgcolor="Aquamarine">
<tr valign="top">
<tr valign="top">
<td>[[image:LinkWiki.PNG|link=]]</td>
<td>
<td>
<table cellpading="4" bgcolor=#ffffff> <!-- BEGIN Step 7 errors-bugs table -->
To find information on how to create your own '''Message Popup Icons''', see the '''Trainz Wiki Page''':-<br>
<tr valign="top">
* '''[[How to Create a Message Popup Icon]]'''</td>
<td>[[image:Bug.png|link=]]</td>
<td>Some of the most common errors that can occur when creating and committing a new asset are:-
*no '''''thumbnail image''''' in the asset
*typing errors in the config.txt file
*poorly formatted tags in the config.txt file
*incorrect file types added to the asset folder
*files missing from the asset folder
*incorrect '''kuid''' value (despite the warning you changed it in '''Step 5''')</td>
</tr>
</tr>
</table> <!-- END Step 7 errors-bugs table -->
</table>
</td>
 
==Option 2: A HTML Page==
 
To use a HTML file use the '''Message Popup''' rule with the '''A pre-defined HTML page''' option selected.
 
===Use an Existing HTML Asset===
 
<table cellpadding="4" bgcolor=#c1e7e7>
<tr valign="top">
<td>[[image:DotPoint.JPG|link=]]</td>
<td>'''You can use HTML files and graphics from HTML assets that are already installed on your system.'''</td>
</tr>
</tr>
</table> <!-- END Step 7 errors table -->
<tr valign="top">
</td>
<td>[[image:DotPoint.JPG|link=]]</td>
<td>There is a '''General Purpose Session HTML''' asset that is built into '''Trainz''' that contains a series of "basic" HTML message pages and audio files that can be used in a session. An example is shown below.</td>
</tr>
</tr>
</table> <!-- END Step 7 table -->
</table>
</td>
</tr>
</table> <!-- END Steps table -->


<table> <!-- BEGIN Nav Buttons Table -->
<table cellpadding="4" bgcolor=#ffffb0>
<tr valign="top">
<tr valign="top">
<td width=729><span id="stepConfig"></span>&nbsp;</td>
<td>[[image:PencilTips.PNG|link=]]</td>
<td width=46>[[image:BackToTop.png|link=#top|alt=Top|Top]]</td>
<td>
<td width=75>[[image:NextUp.png|link=#stepCreate|alt=Next Up|Top]]</td>
*This option has the advantage of not needing to create any new HTML files and assets.  
<td width=75>[[image:NextDown.png|link=#stepGraphic|alt=Next Down|Next Down]]</td>
*But you will need to explore the existing assets, by opening them in '''Content Manager''', to see what is available and if they are suitable for your purposes.</td>
<td width=75>[[image:BackToBottom.png|link=#bottom|alt=Bottom|Bottom]]</td>
</tr>
</tr>
</table> <!-- END Nav Buttons Table -->
</table>
 
<table>
='''The Config.txt File'''=
<table cellpadding="4" bgcolor=#c1e7e7> <!-- BEGIN Dot point table -->
<tr valign="top">
<tr valign="top">
<td>[[image:DotPoint.JPG|link=]]</td>
<td>[[image:MessagePopup1.JPG|link=]]</td>
<td>'''All assets must have a config.txt file'''</td>
<td>
</tr>
<table cellpadding="4" bgcolor=#eeeeee>
</table> <!-- END Dot point table -->
<tr>
<br>
<table cellpadding="4" bgcolor=#eeeeee> <!-- BEGIN Settings table -->
<tr>
<td colspan="2">
<td colspan="2">
----</td>
----</td>
Line 998: Line 989:
<td>[[image:Gears.PNG|link=]]</td>
<td><span style="font-size: 17px;">'''Settings:'''</span><br>
The HTML asset must have a '''config.txt''' text file that '''must''' include the following tags:-
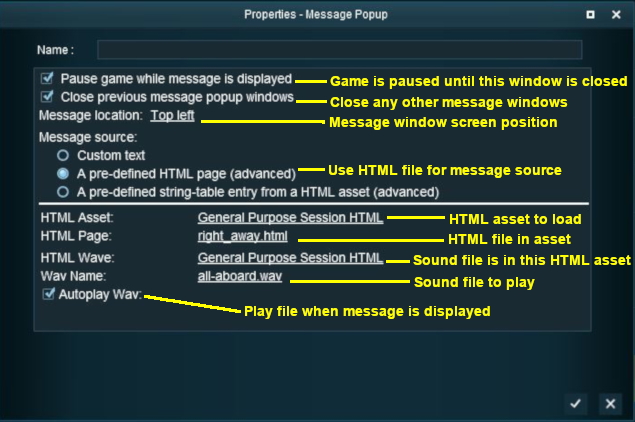
[[image:PortalOptionButtonFilled.PNG|link=]] '''A pre-defined HTML page (advanced)'''<br>
*'''kind''' set to "html-asset"
'''In This Example:'''<br>
*'''username''' set to the asset title or name
:[[image:CheckBox.PNG|link=]] '''Pause game while message is displayed''' - this will halt the game play until the window is closed. This may be needed if you have a long introductory HTML information page, otherwise leave unchecked
*'''kuid''' a unique ID code
:[[image:CheckBox.PNG|link=]] '''Close previous message popup windows''' - this is usually a good idea unless you want multiple message windows open.
*'''thumbnails''' set to a 240 by 180 pixel JPG image
:'''Message location:''' '''<span style="text-decoration: underline;">Top left</span>''' of the screen has been chosen as the location for the message window. Other positions are '''Top right''', '''Bottom left''' and '''Bottom right'''
While not mandatory, the following tag is useful:-
:'''HTML Asset:''' '''<span style="text-decoration: underline;">General Purpose Session HTML</span>''' one of the HTML assets installed with '''Trainz'''
*'''category-class''' set to "YH"'''
:'''HTML Page:''' '''<span style="text-decoration: underline;">right_away.html</span>''' which is a HTML file inside the '''<span style="text-decoration: underline;">General Purpose Session HTML</span>''' asset
</td>
:'''HTML Wave:''' '''<span style="text-decoration: underline;">General Purpose Session HTML</span>''' HTML asset contains the ''optional'' sound file to be played
:'''Wav Name:''' '''<span style="text-decoration: underline;">all-aboard.wav</span>''' is the ''optional'' sound file to be played
:[[image:CheckBox.PNG|link=]] '''Autoplay Wav''' - the sound will be played when the page is displayed</td>
</tr>
</tr>
<tr>
<tr>
Line 1,011: Line 1,004:
----</td>
----</td>
</tr>
</tr>
</table> <!-- END Settings table -->
</table>
<br>
<td>
This file should follow the same (or a similar) format as the example below.<br>
</tr>
*entries in&nbsp;<span style="background-color: red; color: white; font-weight: 700;">&nbsp;red&nbsp;</span>&nbsp;must not be changed
</table>
*the indenting of the lines and the spacing ("tabbing") between the "tags" on the left and their contents on the right are purely to make it easier for humans to read
 
*the use of the '''{}''' braces is to group tags into common "containers". These containers must not be broken up and the number of '''{''' characters must match the number of '''}''' characters
===Create Your own HTML Asset===
*the order of the "tags" is not important


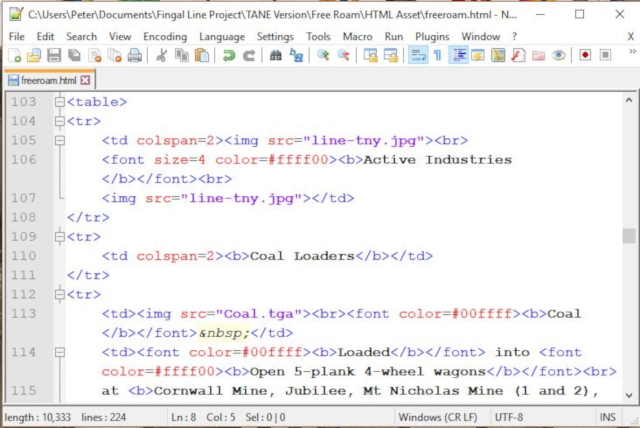
'''kuid'''                                    <span style="background-color: red; color: white; font-weight: 700;"><kuid: this is an auto-generated number ></span>
Creating your own HTML assets allows you to add session information and instructions that are perfectly tailored to each session. This does require creative effort and time, will need more testing and will probably generate a lot of frustration. But the end result can be worth it.
'''username                                "HTML assets for Steamville Session 1"'''
'''trainz-build                            4.5'''
'''kind'''                                    "<span style="background-color: red; color: white; font-weight: 700;">html-asset</span>'''"'''
'''description                            "All the images, web pages and sounds for the Steamville 1st Session"'''
'''category-class'''                          "<span style="background-color: red; color: white; font-weight: 700;">YH</span>"
'''thumbnails'''
{
  '''Default'''
  {
    '''image                              "SteamV1HTML'''<span style="background-color: red; color: white; font-weight: 700;">.jpg</span>'''"'''
    '''width'''                              <span style="background-color: red; color: white; font-weight: 700;">240</span>
    '''height'''                              <span style="background-color: red; color: white; font-weight: 700;">180</span>
  }
}


<table cellpadding="4" bgcolor=#eeeeee> <!-- BEGIN Settings table -->
<table cellpadding="4" bgcolor=#c1e7e7>
<tr>
<tr valign="top">
<td colspan="2">
<td>[[image:DotPoint.JPG|link=]]</td>
----</td>
<td>'''If you have created your own HTML asset it must be committed in Content Manager before it can be used in a Message Popup'''</td>
</tr>
</table>
<br>
All the files (HTML, graphics, audio and the config.txt) are saved in the asset folder as shown in the example below. This example includes a single '''.html''' file which references all the '''.jpg''' and '''.tga''' graphic files. You can add as many HTML files as you need.
 
<table>
<tr>
<td>[[image:HTMLfileview.JPG|400px]]</td>
<td><span style="font-size: 17px;">'''THIS IS AN EXAMPLE ONLY'''</span><br><br>
The '''minimum''' number of files needed in a '''HTML asset''' is 2 - the '''config.txt''' file and a '''thumbnail image''' (a .jpg file).<br>
[[image:HTMLFolderView4.JPG|link=]]</td>
</tr>
</tr>
</table>
<table cellpadding="4" bgcolor=#c1e7e7>
<tr valign="top">
<tr valign="top">
<td>[[image:Gears.PNG|link=]]</td>
<td>[[image:DotPoint.JPG|link=]]</td>
<td><span style="font-size: 17px;">'''Settings:'''</span><br>
<td>A useful time saving technique is to '''view the HTML files in a normal web browser before committing the asset'''. However, if TGA image files have been used then they will not appear in the browser.</td>
'''For the above example:'''<br>
</tr>
*The&nbsp;<span style="background-color: black; color: white; font-weight: 700;"> kuid </span>&nbsp;is unique to every asset so it is&nbsp;<span style="background-color: red; color: white; font-weight: 700;">&nbsp;not a good idea to choose your own&nbsp;</span>&nbsp;. This will be automatically generated by the '''Content Manager''' program when a new asset is created
</table>
*The&nbsp;<span style="background-color: black; color: white; font-weight: 700;"> username </span>&nbsp;is your name for the asset and the name that other users will see. It is a good idea to make it short and meaningful.
<br>
*The&nbsp;<span style="background-color: black; color: white; font-weight: 700;"> trainz-build </span>&nbsp;identifies the ''minimum'' Trainz version needed for this asset. A list of asset trainz-build numbers and their corresponding Trainz versions can be found at [[image:WikiLink.PNG|link=]] '''[["Trainz-build"_number]]'''
*The&nbsp;<span style="background-color: black; color: white; font-weight: 700;"> kind </span>&nbsp;identifies the ''type'' of asset and the types of files that '''Trainz''' will expect to find in the asset. It also tells '''Trainz''' how to render and error check the asset. A list of asset kinds can be found at [[image:WikiLink.PNG|link=]] '''[[KIND_TrainzBaseSpec#KIND_Hierarchy|KIND Hierarchy]]'''
*The&nbsp;'''<span style="background-color: black; color: white; font-weight: 700;"> description </span>'''&nbsp;provides more details for users than the '''username'''.
*The&nbsp;<span style="background-color: black; color: white; font-weight: 700;"> category-class </span>&nbsp;identifies the ''intent'' of the asset and is important in classifying it for filtering and searching. For a HTML-Asset the category-class is "<span style="background-color: red; color: white; font-weight: 700;">YH</span>". A list of category classes can be found at [[image:WikiLink.PNG|link=]] '''[[Category-class]]'''
*The&nbsp;<span style="background-color: black; color: white; font-weight: 700;"> thumbnails </span>&nbsp;container holds the ''preview'' images of the asset shown by the '''Content Manager''' program, the Web version of the ''DLS'' and, for '''some assets''', the Surveyor main menu image(s) and asset textures. Information on thumbnails can be found at [[image:WikiLink.PNG|link=]] '''[[Thumbnails]]'''
**The&nbsp;<span style="background-color: black; color: white; font-weight: 700;">&nbsp;Default&nbsp;</span>&nbsp;is the '''container ID''' or '''placeholder''' for the thumbnail (some types of assets can have several thumbnails) and its ''exact label'' (or number - eg. "Default", "00", "01", etc) is not important but each thumbnail if there are more than one must have a different label. '''Default''' and '''0''' are commonly used placeholder labels for the 240 x 180 thumbnail image
**The '''image''' is the name of the thumbnail image. It does not have to be called '''<span style="color: black;">thumbnail.jpg</span>''' but it '''must''' be a JPG format image
**The '''width''' of the image in pixels must be <span style="background-color: red; color: white; font-weight: 700;">240</span>
**The '''height''' of the image in pixels must be <span style="background-color: red; color: white; font-weight: 700;">180</span>
</td>
</tr>
<tr>
<td colspan="2">
----</td>
</tr>
</table> <!-- END Settings table -->
 
<table cellpadding="4" bgcolor=#ffffb0>
<tr valign="top">
<tr valign="top">
<td>[[image:PencilTips.PNG|link=]]</td>
<td><span style="font-weight: 700; font-size: 17px;">Language Options:</span></td>
<td>You can edit HTML files so that the pages will be displayed in a normal web browser with white text and a background that approximates the one used in the '''Trainz''' MiniBrowser. This makes it easier to test the pages without having to constantly open, edit, update and then commit the HTML assets in '''Content Manager'''.
</tr>
 
<tr valign="top">
To do this, edit the '''&lt;body&gt;''' tag at  the top of each HTML page to read ...
<td></td>
 
<td>All Trainz assets have a language facility built into their config.txt files that allows other language translations to be added for certain tags, such as the '''username''' and '''description''' tags. A full description of the process can be found on the Trainz Wiki at [[image:WikiLink.PNG|link=]]&nbsp;'''[[HowTo/Localize_an_Asset|Localize an Asset]]''' and a list of all the supported languages with their two character codes at [[image:WikiLink.PNG|link=]]&nbsp;'''[[Localization_code|Localization (country) Codes]]'''.<br>
'''<nowiki><body bgcolor=#192a32 text=#ffffff></nowiki>'''


At the very basic level any creator can easily provide other language translations for the '''username''' and '''description''' tags in the assets they create. Examples are shown below.</td>
This will have no effect on the appearance of the pages in '''Trainz'''.
</td>
</tr>
</tr>
</table>
<br>
==Option 3: A String Table==
To use a string-table for the message text, use the '''"A predefined string-table entry from a HTML asset"''' option.
<table cellpadding="4" bgcolor=#c1e7e7>
<tr valign="top">
<tr valign="top">
<td colspan=2>
<td>[[image:DotPoint.JPG|link=]]</td>
username                    "HTML assets for Steam Ride session"
<td>The text to be displayed in the message must be added to the '''config.txt''' file of the HTML asset. A series of text messages for different message windows can be placed in this file.</td>
username-c2                "Steam会话的HTML资产"
username-es                "Recursos HTML para la sesión de Steam Ride"
username-fr                "Éléments HTML pour la session Steam Ride"
username-gr                "HTML-Assets für die Steam-Ride-Sitzung"
username-nl                "HTML-middelen voor stoomrit sessie"
username-ru                "HTML-ресурсы для сессии Steam Ride"
</td>
</tr>
</tr>
</table>
<table cellpadding="4" bgcolor=#ffffb0>
<tr valign="top">
<tr valign="top">
<td></td>
<td>[[image:PencilTips.PNG|link=]]</td>
<td>Translations to Chinese (simplified), Spanish, French, German, Dutch and Russian, perfect or not, were provided by Google Translate.
<td>The disadvantage of this option compared to option 1 above is that the '''config.txt''' file of the HTML asset has to be edited and the asset re-committed every time a message is added or changed.</td>
</td>
</tr>
</tr>
</table>
</table>


==String Table Option==
For example, the '''config.txt''' file of a HTML asset may have a string-table container as shown below:-
 
If you are going to use the '''String Table''' method of adding HTML message windows, then the '''config.txt''' file will need a '''string-table''' container. For example:-


  '''string-table'''
  '''string-table'''
     '''{'''
     '''{'''
       '''warning_message_stop                          "You have passed a stop signal. Apply your brakes immediately"'''
       '''html_warning_late                            "You are running behind schedule."'''
       '''warning_message_speed                        "You are speeding. Slow down"'''
       '''html_warning_early                            "You are running ahead of schedule."'''
      '''html_finished_title                          "Session completed!"'''
     '''}'''
     '''}'''


The "tags", '''warning_message_stop''' and '''warning_message_speed''' in the example shown above, are called "String Table Tokens" and are used to identify which message is to be displayed.
The label '''html_warning_late''' is a "string-table token" that identifies the message "You are running behind schedule". The '''Message Popup''' rule uses this token to identify the message.


For more details of string-tables, see the section [[image:PageLink.PNG|link=]] '''[[#Option 3: A String Table|Option 3: A String Table]]''' below.
For example:-


<table> <!-- BEGIN Nav Buttons Table -->
<table>
<tr valign="top">
<tr valign="top">
<td width=729><span id="stepGraphic"></span>&nbsp;</td>
<td>[[image:MessagePopup4.JPG|link=]]</td>
<td width=46>[[image:BackToTop.png|link=#top|alt=Top|Top]]</td>
<td>
<td width=75>[[image:NextUp.png|link=#stepConfig|alt=Next Up|Top]]</td>
<table cellpadding="4" bgcolor=#eeeeee>
<td width=75>[[image:NextDown.png|link=#stepHTML2|alt=Next Down|Next Down]]</td>
<tr>
<td width=75>[[image:BackToBottom.png|link=#bottom|alt=Bottom|Bottom]]</td>
<td colspan="2">
----</td>
</tr>
</tr>
</table> <!-- END Nav Buttons Table -->
<tr valign="top">
='''Graphic Files'''=
<td>[[image:Gears.PNG|link=]]</td>
 
<td><span style="font-size: 17px;">'''Settings:'''</span><br>
==Supported Image Formats==
[[image:PortalOptionButtonFilled.PNG|link=]] '''A pre-defined string-table entry from a HTML asset (advanced)'''<br>
 
'''In This Example:'''
There are some differences in the graphic files supported between '''Trainz HTML''' and '''Web HTML'''.
:[[image:CheckBoxOff.PNG|link=]] '''Pause game while message is displayed''' - game play will not be paused
 
:[[image:CheckBox.PNG|link=]] '''Close previous message popup windows''' - this is usually a good idea unless you want multiple message windows open
<table border="1" cellpadding="5" bgcolor=#c1e7e7>
:'''Message location:''' '''<span style="text-decoration: underline;">Top left</span>''' of the screen has been chosen as the location for the message window. Other positions are '''Top right''', '''Bottom left''' and '''Bottom right'''
<tr valign="top" align="center">
:'''HTML Asset:''' '''<span style="text-decoration: underline;">General Purpose Session HTML</span>''' one of the HTML assets installed with '''Trainz'''
<td>'''Graphic Format'''</td>
:'''String Table Token:''' '''<span style="text-decoration: underline;">html_warning_late</span>''' the string table '''token''' in the config.txt file of the '''<span style="text-decoration: underline;">General Purpose Session HTML</span>''' asset contains the message to be displayed
<td>'''Trainz'''</td>
:'''HTML Wave:''' '''<span style="text-decoration: underline;">General Purpose Session HTML</span>''' HTML asset contains the ''optional'' sound file to be played
<td>'''Web'''</td>
:'''Wav Name:''' '''<span style="text-decoration: underline;">all-aboard.wav</span>''' is the ''optional'' sound file to be played
<td>'''Main Points'''</td>
:[[image:CheckBox.PNG|link=]] '''Autoplay Wav''' - the sound will be played when the page is displayed</td>
<td>'''Recommendation'''</td>
</tr>
</tr>
<tr valign="top">
<tr>
<td>'''GIF'''</td>
<td colspan="2">
<td><span style="color: red; font-weight: 700;">not supported</span></td>
----</td>
<td>supported</td>
<td></td>
<td><span style="color: red; font-weight: 700;">Do not use</span></td>
</tr>
</tr>
</table>
<br>
<table cellpadding="4" bgcolor=#ffffb0>
<tr valign="top">
<tr valign="top">
<td>'''JPG'''</td>
<td>[[image:PencilTips.PNG|link=]]</td>
<td>supported</td>
<td>The disadvantage of this Option compared to Option 1 above is that the '''config.txt''' file of the HTML asset has to be edited and the asset re-committed every time a message is added or changed.</td>
<td>supported</td>
<td>
*lossy compression
*no transparency</td>
<td>Needed for the main thumbnail image but avoid unless you can take the steps recommended for using JPG images below</td>
</tr>
</tr>
<tr valign="top">
</table></td>
<td>'''BMP'''</td>
<td>supported</td>
<td>supported</td>
<td>
*lossless but no compression
*limited transparency</td>
<td>'''Avoid'''</td>
</tr>
</tr>
<tr valign="top">
</table>
<td>'''PNG'''</td>
 
<td>supported</td>
===A String Table With HTML===
<td>supported</td>
 
<td>
You can include some simple HTML codes in the text message. If the string-table token and message shown below is included in the '''config.txt''' file...
*lossless compression
 
*transparency</td>
<nowiki>warning_message_stop                "You have passed a stop signal.<br><br><font color=#ffff00><b>Apply your brakes immediately</b></font>"</nowiki>
<td>Use if compatibility with older Trainz versions is NOT needed</td>
 
...and if this token and its HTML asset is used in the '''Message Popup''' rule, then the following message will appear on the screen.
 
<table>
<tr>
<td>[[image:MessagePopup5a.JPG|link=]]</td>
</tr>
</tr>
</table>
==Alternatives to the Message Popup Rule==
<table cellpadding="4" bgcolor=#ffffff>
<tr valign="top">
<tr valign="top">
<td>'''TGA'''</td>
<td width="58">[[image:RulesWiki.PNG|link=]]</td>
<td>supported</td>
<td width="640">
<td><span style="color: red; font-weight: 700;">not supported</span></td>
There are other HTML message window rules that are alternatives to the '''Message Popup''' rule. A few possibilities are:-</td>
<td>
*lossless with optional compression
*optional transparency</td>
<td>Use if compatibility with older Trainz versions is needed</td>
</tr>
<tr valign="top">
<td>'''.texture'''</td>
<td>supported</td>
<td><span style="color: red; font-weight: 700;">not supported</span></td>
<td>
*a text file containing the names of image files
*controls how the images are displayed</td>
<td>Recommended method for all images except thumbnails</td>
</tr>
</table>
The above are not the only image file formats supported by '''Trainz''' but those unlisted formats are not common and are not usually recommended.
 
For '''Trainz HTML''' pages displayed on the screen during gameplay, the most commonly used image formats seem to be '''JPG''' and '''TGA'''. If you are going to test your pages on a standard web browser before testing them in '''Trainz''' (a technique that will save both time and frustration) be aware that '''TGA''' format files will not be visible in any web browser.
 
==Thumbnails==
<table cellpadding="4" bgcolor=#c1e7e7>
<tr valign="top">
<td>[[image:DotPoint.JPG|link=]]</td>
<td>'''A thumbnail image MUST be present in the asset.''' You can create a HTML asset without any other images but there must be a thumbnail image.</td>
</tr>
</table>
<br>
<table cellpadding="4" bgcolor=#ffffb0>
<tr valign="top">
<td>[[image:NotePad.PNG|link=]]</td>
<td><span style="font-size: 17px;">'''Notes:'''</span><br>
The thumbnail image:-
*must be in '''JPG''' format.
*must be 240 pixels wide by 180 pixels tall.
*'''does not''' have to be named ''thumbnail.jpg'' as long as the name used is in the '''Thumbnails''' container in the '''config.txt''' file.
</td>
</tr>
</table>
 
==TGA File Compression==
<table cellpadding="4" bgcolor=#c1e7e7>
<tr valign="top">
<td>[[image:DotPoint.JPG|link=]]</td>
<td>While '''Trainz''' supports compressed TGA format files, the current advice is '''NOT to use compression when saving images in this format'''.</td>
</tr>
</table>
<br>
<table>
<tr valign="top">
<td>[[image:ExportTGA.JPG|link=]]</td>
<td>
When exporting an image as a '''TGA''' file uncheck the image compression setting (example shown left for '''GIMP 2.10''')</td>
</tr>
</table>
 
==JPG Files==
 
JPGs are still the most widely used image format for web pages and all Trainz versions support this format. The main problem with JPG is that it uses a "lossy" compression method - image data is thrown away or deleted every time a JPG image is saved. If you are constantly loading, editing and then saving the same JPG image, then the quality of the image will noticeably decline over time.
<br><br>
<table cellpadding="4" bgcolor=#ffffb0>
<tr valign="top">
<td>[[image:PencilTips.PNG|link=]]</td>
<td>The best way to use JPGs is to:-
*keep the original image in a lossless format such as '''PNG''' or '''TGA'''
*when editing the image, ''always'' save the edited image in a lossless format
*only when all the editing has been completed, export the image as a '''JPG'''</td>
</tr>
</table>
 
==Texture Files==
 
<table cellpadding="4" bgcolor=#c1e7e7>
<tr valign="top">
<td>[[image:DotPoint.JPG|link=]]</td>
<td>'''Texture''' files are text files that act as a '''container''' for an image and control how that image is to be displayed in '''Trainz'''</td>
</tr>
<tr valign="top">
<td>[[image:DotPoint.JPG|link=]]</td>
<td>Texture files are '''NOT''' graphic files as they were in earlier versions of '''Trainz''' and can still be found in '''built-in''' and '''base''' assets</td>
</tr>
</table>
 
<table cellpadding=5>
<tr>
<td>
primary=ashpit.jpg
alpha=ashpit.bmp
tile=st
</td>
<td>'''Texture files''' (actually '''.texture.txt''' files) are standard text files that contain the name of 1 or 2 image files and instructions on how they are to be displayed in '''Trainz''', as shown in the example on the left. This is the&nbsp;<span style="font-weight: 700; text-decoration: underline;">recommended</span>&nbsp;format for all image files in '''Trainz''' except thumbnails.</td>
</tr>
</table>
 
<table cellpadding="4" bgcolor=#ffffb0>
<tr valign="top">
<td>[[image:NotePad.PNG|link=]]</td>
<td><span style="font-size: 17px;">'''Notes:'''</span><br>
This format ''does not'' replace the other supported image formats ('''BMP''', '''JPG''', '''PNG''' or '''TGA''') but simply provides additional options for controlling how those image files are used, particularly their '''alpha channels'''.</td>
</tr>
</table>
<br>
<table cellpadding="4" bgcolor="Aquamarine">
<tr valign="top">
<td>[[image:LinkWiki.PNG|link=]]</td>
<td>A detailed description of the '''.texture''' file format can be found on the '''Trainz Wiki Page''' at:-<br>
* '''[[Texture_file|Texture File]]'''</td>
</tr>
</table>
<br>
 
==Transparency (Alpha Channel)==
 
<table cellpadding="4" bgcolor=#c1e7e7>
<tr valign="top">
<td>[[image:DotPoint.JPG|link=]]</td>
<td>Transparencies are also called '''Alpha Channels'''.</td>
</tr>
</table>
 
Transparencies in images are essentially colours or ''layers'' that are rendered invisible when the image is displayed. This makes parts of the image transparent so the colours or patterns behind the image, such as the background page, can be seen.
 
Shown below is the '''Message Popup''' browser window from a '''Trainz Session'''. The two images it contains are from the same original image but displayed in two different image formats.
 
<table>
<tr>
<td>[[image:TransparencyDemo.JPG|link=]]</td>
</tr>
</table>
*The STOP sign on the left has been exported as a '''JPG''' which has no transparency (or alpha channel) so the image background is shown as a colour, in this case white.
*The STOP sign on the right has been exported as a '''TGA''' with its background layer saved as an '''Alpha Channel''' which is rendered transparent so the background colour of the browser window shows through.
 
Image file formats with transparencies or alpha channels that are supported by '''Trainz''' are '''BMP''', '''PNG''' and '''TGA'''.
 
==Graphics Editing Software==
 
There is a wide variety of graphical software applications available that would be suitable for creating '''Trainz''' ready images, both commercial and freeware.
<table cellpadding="4" bgcolor=#ffffb0>
<tr valign="top">
<td>[[image:NotePad.PNG|link=]]</td>
<td><span style="font-size: 17px;">'''Notes:'''</span><br>
The minimum requirements for a suitable graphics package for use in creating '''Trainz HTML''' assets would be:-
*load and save (or export) images in '''JPG''' and either '''TGA''' or '''PNG''' formats
*support for an alpha channel
"Nice to have" features would include:-
*support for layers
*text editing
</td>
</tr>
</table>
 
<table> <!-- BEGIN Nav Buttons Table -->
<tr valign="top">
<td width=729><span id="stepHTML2"></span>&nbsp;</td>
<td width=46>[[image:BackToTop.png|link=#top|alt=Top|Top]]</td>
<td width=75>[[image:NextUp.png|link=#stepGraphic|alt=Next Up|Top]]</td>
<td width=75>[[image:NextDown.png|link=#stepAudio|alt=Next Down|Next Down]]</td>
<td width=75>[[image:BackToBottom.png|link=#bottom|alt=Bottom|Bottom]]</td>
</tr>
</table> <!-- END Nav Buttons Table -->
 
='''HTML Files'''=
 
'''HTML''' (Hyper Text Markup Language) is the "language" that creates web pages. Creating HTML files (or web pages) is not a simple process. If you have never worked with HTML before then there will be a learning curve. Fortunately it is possible to start at a very basic level and progress as you learn.
 
<table cellpadding="4" bgcolor=#c1e7e7>
<tr valign="top">
<td>[[image:DotPoint.JPG|link=]]</td>
<td>If adding HTML files looks too difficult then '''Trainz''' does provide an option that allows you to place simple message windows onto the screen without having to create any HTML files or images. See the section [[image:PageLink.PNG|link=]] '''[[#Adding a Message Popup to a Session|Adding a Message Popup to a Session]]''' below.</td>
</tr>
</table>
 
You can have multiple web pages in a session. Each page will be a separate '''.html''' or '''.htm''' file in the HTML asset.
 
==Some Things You Should Know About HTML==
 
The image below shows a simple HTML page typed into a basic text editor.
 
<table>
<tr>
<td>[[image:HTMLSampleMSNotepadA.JPG|link=]]</td>
</tr>
</table>
 
A HTML page is constructed by "tags", words and codes enclosed by '''"&lt;"''' and '''"&gt;"''' symbols. These tags control the layout of the page and how the text and images are displayed.
 
If the above page is loaded into a normal web browser, this is what you would see.
 
<table>
<tr>
<td>[[image:HTMLSampleEdge.JPG|link=]]</td>
</tr>
</table>
'''The problems:'''
What happened to the:-
*blank line between the heading and the first line of text?
*'''Return Key''' codes (or '''end-of-line''' characters) at the ends of each line?
*extra spaces placed between the sentences in the first line of text?
 
'''The causes:'''
When displaying a page, HTML '''ignores''':-
*blank lines,
*the end-of-line character (and other special characters), and
*extra spaces between characters
<br>
 
<table cellpadding="4" bgcolor=#fcbcbc>
<tr valign="top">
<td colspan=2><span style="font-size: 17px;"><b>Warning:</b></span></td>
</tr>
<tr valign="top">
<td>[[image:Stop.PNG|link=]]</td>
<td>'''HTML is extremely unforgiving when it comes to errors and "typos" in the tags.''' Simple syntax and spelling errors can lead to hours of frustration while you attempt to find the error. If you don't have the patience or any "bug hunting skills" then perhaps HTML coding is not for you.</td>
</tr>
</table>
 
<br>
...and that is the easy part.
 
==Some Things You Should Know About Trainz HTML==
 
If the page shown above is loaded into a '''Trainz MiniBrowser''', this is what you would see.
 
<table>
<tr>
<td>[[image:HTMLSampleTANE.JPG|link=]]</td>
</tr>
</table>
<br>
<table cellpadding="4" bgcolor=#ffffb0>
<tr valign="top">
<td>[[image:NotePad.PNG|link=]]</td>
<td><span style="font-size: 17px;">'''Notes:'''</span><br>
In the '''Trainz Minibrowser''':-
*All browser windows have the same "greenish" gradient background colour (darker on the outer edges and lighter in the middle) and this cannot be changed
*The default text colour is white (it used to be black which was impossible to read on the background)
*Extra spaces between characters are NOT ignored
But blank lines and the end-of-line character, amongst others, are still ignored.</td>
</tr>
</table>
<br>
<table cellpadding="4" bgcolor=#c1e7e7>
<tr valign="top">
<td>[[image:DotPoint.JPG|link=]]</td>
<td>'''Trainz HTML is NOT the same as standard HTML.''' There are similarities and there are a lot of differences. In general, '''Trainz HTML''' is a much smaller and simplier subset of standard HTML. A detailed reference on the version of HTML used in the '''Trainz Minibrowser''' can be found at [[image:WikiLink.PNG|link=]] '''[[MiniBrowser]]'''</td>
</tr>
</table>
<br>
If you are experienced with standard HTML you will have to adjust your thinking to use '''Trainz HTML'''.
 
==HTML Editors==
 
'''HTML editors''' allow you to create HTML files with a minimum of fuss. Most provide tools that can automate much of the repetitive typing work and many provide some error checking features.<br>
 
<table cellpadding="4" bgcolor=#fcbcbc>
<tr valign="top">
<td colspan=2><span style="font-size: 17px;"><b>Warning:</b></span></td>
</tr>
<tr valign="top">
<td>[[image:Stop.PNG|link=]]</td>
<td>'''Because Trainz does not use standard HTML, avoid dedicated HTML applications and Web design packages.'''</td>
</tr>
</table>
<br>
<table cellpadding="4" bgcolor=#ffffb0>
<tr valign="top">
<td>[[image:PencilTips.PNG|link=]]</td>
<td>Particularly avoid:-
*HTML editors and applications that use a graphical interface to move objects such as images and blocks of text around the screen
*applications programs such as word processors and desktop publishers that can create web pages
... they will create HTML code that will be far too complex for '''Trainz''' to handle.</td>
</tr>
</table>
<br>
<table>
<tr valign="top">
<td>[[image:HTMLSampleNotepadPlusPlus.JPG|link=]]</td>
<td>
<table cellpadding="4" bgcolor=#ffffb0>
<tr valign="top">
<td>[[image:PencilTips.PNG|link=]]</td>
<td>
*Simple text editors, such as '''MS Notepad''' supplied with '''MS Windows''' or '''TextEdit''' on '''MacOS''', will work well but will require you to do a lot of typing and they will not perform any error checking
*More advanced text editors are available that are "HTML aware" and will recognise HTML "tags" making it easier to enter the tags and to check for their completeness</td>
</tr>
</table><br>
Shown on the left is the '''Notepad++''' text editor which recognises HTML coding and provides some tools to assist in entering and correcting HTML code. The software has coloured the text segments that it has identifed as HTML tags or parts of tags.
<br><br>
Suitable freeware HTML editing software would include:-
*'''Notepad++''' (Windows only)
*'''Atom''' (MacOSX and Windows)
</td>
</tr>
</table>
 
==Adding Links to a Web Page==
 
<table cellpadding="4" bgcolor=#c1e7e7>
<tr valign="top">
<td>[[image:DotPoint.JPG|link=]]</td>
<td>The '''MiniBrowser''' in '''Trainz''' allows you to add Web links to external HTML documents <span style="font-weight: 700;"><span style="font_size: 15px; background-color: red; color: white;">&nbsp;BUT&nbsp;</span> the links are limited to pages on the Trainz Wiki only.</span> You cannot add a link to your social media account or favourite railway page.</td>
</tr>
</table>
 
The '''Anchor Tag''' is unquestionably the most powerful tool you can use in a web page. It provides a one-click link to another web page. The link can be a text link (shown as underlined) or it can be a graphic image.<br>
 
The link is restricted to a page on the '''Trainz Wiki''' only. You can set up a page, or a series of linked pages, on the Wiki describing your route or session. Some possibilities:-
*a driving tutorial of your route
*loco rosters
*train schedules
*list of industries and their commodities
*tasks to be completed in each session
<br>
Some actual examples from the '''Trainz Wiki''' that are accessed from '''HTML Message Pages''' in Sessions include:-
*'''[[TRS19_TheInnterKohnNecktionRailroadSessions]]'''
*'''[[SAR_Peterborough_Base_Session]]'''
<br>
The '''Anchor Tag''' begins with ...
 
<span style="font-size: 15px; font-weight: 700;">&lt;<span style="color: red;">a href=</span>"add link address here..."&gt;</span><br>
 
... and ends with ...
 
<span style="font-size: 15px; font-weight: 700;">&lt;<span style="color: red;">/a</span>&gt;</span><br>
 
In between the starting and ending parts of the tag you place the image or text that will become the link as shown in the text example below.<br>
 
[[image:Anchor_HTML.png|link=|alt=Anchor Tag]]<br>
 
This will display the link in the '''MiniBrowser''' as [[image:Anchor_Link.png|link=|alt=Link]]<br>
 
Clicking the link will open the web page in your default web browser program.<br>
 
The '''Trainz Wiki''' has a page giving more information about the '''MiniBrowser''' at [[image:WikiLink.PNG|link=]] '''[[MiniBrowser]]'''. You may be interested in the image tag ('''<<span style="color: red;">img src=</span>"name of image file">''') for using images instead of text for the links, and adding tool tips (the '''<span style="color: red;">tooltip=</span>"place tool tip text here"''') parameter in the '''Anchor tag'''.<br>
 
<table> <!-- BEGIN Nav Buttons Table -->
<tr valign="top">
<td width=729><span id="stepAudio"></span>&nbsp;</td>
<td width=46>[[image:BackToTop.png|link=#top|alt=Top|Top]]</td>
<td width=75>[[image:NextUp.png|link=#stepHTML2|alt=Next Up|Top]]</td>
<td width=75>[[image:NextDown.png|link=#stepPopup|alt=Next Down|Next Down]]</td>
<td width=75>[[image:BackToBottom.png|link=#bottom|alt=Bottom|Bottom]]</td>
</tr>
</table> <!-- END Nav Buttons Table -->
 
='''Audio Files'''=
 
Audio files can be added into HTML assets to play sounds when the HTML page is displayed on the screen. Examples would include conductor whistles and "all aboard" calls, etc. The sound is stored as a separate file in the HTML asset.
 
==Audio Specifications==
 
<table cellpadding="4" bgcolor=#eeeeee>
<tr>
<td colspan="2">
----</td>
</tr>
<tr valign="top">
<td>[[image:Gears.PNG|link=]]</td>
<td><span style="font-size: 17px;">'''Settings:'''</span><br>
Audio files must be recorded using, or converted to:-
*'''8 or 16 bit''' sample sizes
*'''22kHz (22,050Hz) or 44kHz (44,100Hz)''' sample rate
*'''Mono, stereo or surround''' format ("surround" is not fully tested)
...and saved using
*Uncompressed '''WAV''' format PCM (Pulse Coded Modulation)
</td>
</tr>
<tr>
<td colspan="2">
----</td>
</tr>
</table>
<br>
<table cellpadding="4" bgcolor=#fcbcbc width="740">
<tr valign="top">
<td colspan=2><span style="font-size: 17px;"><b>Warning:</b></span></td>
</tr>
<tr valign="top">
<td>[[image:Stop.PNG|link=]]</td>
<td>'''Take care when deciding which settings (bit rate, sample rate, number of channels) are to be used for a sound.'''
High settings will produce significantly larger file sizes and often for no noticeable improvements in sound quality</td>
</tr>
</table>
<br>
<table cellpadding="4" bgcolor=#ffffb0>
<tr valign="top">
<td>[[image:PencilTips.PNG|link=]]</td>
<td>For a short simple sound, such as a telegraph bell or a conductors whistle, lower settings (e.g. 8 bit, 22kHz, mono) would probably be more suitable</td>
</tr>
</table>
<br>
 
==Audio Software==
 
The main requirement for audio editing software is that it must be able to save sound files in the '''WAV''' file format and meet the specifications listed above.
 
A suitable freeware audio editing software would be:-
 
*'''Audacity''' for both MacOSX and Windows
 
<table>
<tr>
<td>[[image:3BellsWave.JPG|link=]]</td>
</tr>
</table>
'''Audacity''' audio file recording and editing software (shown above).
 
<table> <!-- BEGIN Nav Buttons Table -->
<tr valign="top">
<td width=729><span id="stepPopup"></span>&nbsp;</td>
<td width=46>[[image:BackToTop.png|link=#top|alt=Top|Top]]</td>
<td width=75>[[image:NextUp.png|link=#stepAudio|alt=Next Up|Top]]</td>
<td width=75>[[image:NextDown.png|link=#bottom|alt=Next Down|Next Down]]</td>
<td width=75>[[image:BackToBottom.png|link=#bottom|alt=Bottom|Bottom]]</td>
</tr>
</table> <!-- END Nav Buttons Table -->
 
='''Adding a Message Popup to a Session'''=
 
The built-in '''Message Popup''' rule is used to create the message windows that appear on the screen during the running of a session.
 
<table cellpadding="4" bgcolor=#c1e7e7>
<tr valign="top">
<td>[[image:DotPoint.JPG|link=]]</td>
<td>The [[image:WikiLink.PNG|link=]] '''[[Session_Rule_List_with_Parameters#Message_Popup_Rule|Message Popup Rule]]''' has to be added to the session rule list in the [[image:WikiLink.PNG|link=]] '''[[How to Use Session Editor|Session Editor]]''' in Surveyor which you access from the '''Surveyor Main Menu''' in '''TANE''' or from the '''Surveyor Edit Menu''' in '''TRS19''' and '''Trainz Plus'''. Each message will need its own '''Message Popup''' rule in the session rule list.</td>
</tr>
</table>
 
The '''Message Popup''' rule provides three different methods of creating the messages, and adding graphics and sound if needed. These methods are:-
:[[image:DotPoint1Blue.png|link=]]&nbsp;from a simple text message typed into the rule with an optional graphic. If needed a sound can be added from an existing HTML asset.
:[[image:DotPoint2Blue.png|link=]]&nbsp;from a HTML page stored as a file in a HTML asset. This HTML page can have many graphic images, each stored in the HTML asset, and many lines of text. If needed a sound can be added from the same or another HTML asset.
:[[image:DotPoint3Blue.png|link=]]&nbsp;from a "string-table" in the '''config.txt''' file of a HTML asset. If needed a sound can be added from the same or another HTML asset.
 
==Option 1: A Simple Custom Text Message==
 
The simplest and easiest method of adding message windows to a '''Trainz''' Session is to use the '''Message Popup''' rule with the '''Custom Text''' option for all your Session messages.
<table cellpadding="4" bgcolor=#ffffb0>
<tr valign="top">
<td>[[image:NotePad.PNG|link=]]</td>
<td><span style="font-size: 17px;">'''Notes:'''</span><br>
[[image:checkicon.png|link=|alt=Tick]] This option has a number of advantages:-
*'''No knowledge of HTML''' is required.
*You can use a '''built in graphic''' (with more available on the '''DLS''')
*You can use '''sounds from existing HTML assets'''
*There is no need to create a HTML asset
[[image:uncheckicon.png|link=|alt=Cross]] There are also some disadvantages. For each message window:-
*You can only use '''one graphic''' which has to be selected from a list of special "texture" graphics
</td>
</tr>
</table>
<br>
<table cellpadding="4" bgcolor=#c1e7e7>
<tr valign="top">
<td>[[image:DotPoint.JPG|link=]]</td>
<td>If you are happy using '''Option 1''', installed graphics and sounds or no graphics and sounds at all, then you '''do not have to create a HTML asset''' for your session.</td>
</tr>
</table>
<br>
For example:
<table>
<tr valign="top">
<td>[[image:MessagePopup2.JPG|link=]]</td>
<td>
<table cellpadding="4" bgcolor=#eeeeee>
<tr>
<td colspan="2">
----</td>
</tr>
<tr valign="top">
<td>[[image:Gears.PNG|link=]]</td>
<td><span style="font-size: 17px;">'''Settings:'''</span><br>
[[image:PortalOptionButtonFilled.PNG|link=]] '''Custom text'''<br>
'''In This Example:'''
:[[image:CheckBoxOff.PNG|link=]] '''Pause game while message is displayed''' - game play will not be paused
:[[image:CheckBox.PNG|link=]] '''Close previous message popup windows''' - this is usually a good idea unless you want multiple message windows open
:'''Message location:''' '''<span style="text-decoration: underline;">Top left</span>''' of the screen has been chosen as the location for the message window. Other positions are '''Top right''', '''Bottom left''' and '''Bottom right'''
:'''Custom Message''' - the message entered into the text box will be displayed
:'''Icon''' - the selected ''optional'' icon will be displayed
:'''HTML Wave:''' '''<span style="text-decoration: underline;">General Purpose Session HTML</span>''' HTML asset contains the ''optional'' sound file to be played
:'''Wav Name:''' '''<span style="text-decoration: underline;">all-aboard.wav</span>''' is the ''optional'' sound file to be played
:[[image:CheckBox.PNG|link=]] '''Autoplay Wav''' - the sound will be played when the page is displayed</td>
</tr>
<tr>
<td colspan="2">
----</td>
</tr>
</table></td>
</tr>
</table>
 
<table cellpadding="4" bgcolor=#c1e7e7>
<tr valign="top">
<td>[[image:DotPoint.JPG|link=]]</td>
<td>'''If all your Session messages use this option then there is no need to create a HTML asset'''</td>
</tr>
</table>
 
<table cellpadding="4" bgcolor=#ffffb0>
<tr valign="top">
<td>[[image:PencilTips.PNG|link=]]</td>
<td>To find additional graphic icons that can be added to the '''Message Popup''' window, use '''Content Manager''' and set a '''Custom Filter''' to search for:-
*'''Category''' select '''Texture- Not Environmental'''
*'''Name''' type '''icon'''
*'''On Download Station''' select '''True'''
Not all those shown will be suitable. Double click a possible icon to display its details before downloading.</td>
</tr>
</table>
<br>
<table cellpadding="4" bgcolor="Aquamarine">
<tr valign="top">
<td>[[image:LinkWiki.PNG|link=]]</td>
<td>
To find information on how to create your own '''Message Popup Icons''', see the '''Trainz Wiki Page''':-<br>
* '''[[How to Create a Message Popup Icon]]'''</td>
</tr>
</table>
 
==Option 2: A HTML Page==
 
To use a HTML file use the '''Message Popup''' rule with the '''A pre-defined HTML page''' option selected.
 
===Use an Existing HTML Asset===
 
<table cellpadding="4" bgcolor=#c1e7e7>
<tr valign="top">
<td>[[image:DotPoint.JPG|link=]]</td>
<td>'''You can use HTML files and graphics from HTML assets that are already installed on your system.'''</td>
</tr>
<tr valign="top">
<td>[[image:DotPoint.JPG|link=]]</td>
<td>There is a '''General Purpose Session HTML''' asset that is built into '''Trainz''' that contains a series of "basic" HTML message pages and audio files that can be used in a session. An example is shown below.</td>
</tr>
</table>
 
<table cellpadding="4" bgcolor=#ffffb0>
<tr valign="top">
<td>[[image:PencilTips.PNG|link=]]</td>
<td>
*This option has the advantage of not needing to create any new HTML files and assets.
*But you will need to explore the existing assets, by opening them in '''Content Manager''', to see what is available and if they are suitable for your purposes.</td>
</tr>
</table>
<table>
<tr valign="top">
<td>[[image:MessagePopup1.JPG|link=]]</td>
<td>
<table cellpadding="4" bgcolor=#eeeeee>
<tr>
<td colspan="2">
----</td>
</tr>
<tr valign="top">
<td>[[image:Gears.PNG|link=]]</td>
<td><span style="font-size: 17px;">'''Settings:'''</span><br>
[[image:PortalOptionButtonFilled.PNG|link=]] '''A pre-defined HTML page (advanced)'''<br>
'''In This Example:'''<br>
:[[image:CheckBox.PNG|link=]] '''Pause game while message is displayed''' - this will halt the game play until the window is closed. This may be needed if you have a long introductory HTML information page, otherwise leave unchecked
:[[image:CheckBox.PNG|link=]] '''Close previous message popup windows''' - this is usually a good idea unless you want multiple message windows open.
:'''Message location:''' '''<span style="text-decoration: underline;">Top left</span>''' of the screen has been chosen as the location for the message window. Other positions are '''Top right''', '''Bottom left''' and '''Bottom right'''
:'''HTML Asset:''' '''<span style="text-decoration: underline;">General Purpose Session HTML</span>''' one of the HTML assets installed with '''Trainz'''
:'''HTML Page:''' '''<span style="text-decoration: underline;">right_away.html</span>''' which is a HTML file inside the '''<span style="text-decoration: underline;">General Purpose Session HTML</span>''' asset
:'''HTML Wave:''' '''<span style="text-decoration: underline;">General Purpose Session HTML</span>''' HTML asset contains the ''optional'' sound file to be played
:'''Wav Name:''' '''<span style="text-decoration: underline;">all-aboard.wav</span>''' is the ''optional'' sound file to be played
:[[image:CheckBox.PNG|link=]] '''Autoplay Wav''' - the sound will be played when the page is displayed</td>
</tr>
<tr>
<td colspan="2">
----</td>
</tr>
</table>
<td>
</tr>
</table>
 
===Create Your own HTML Asset===
 
Creating your own HTML assets allows you to add session information and instructions that are perfectly tailored to each session. This does require creative effort and time, will need more testing and will probably generate a lot of frustration. But the end result can be worth it.
 
<table cellpadding="4" bgcolor=#c1e7e7>
<tr valign="top">
<td>[[image:DotPoint.JPG|link=]]</td>
<td>'''If you have created your own HTML asset it must be committed in Content Manager before it can be used in a Message Popup'''</td>
</tr>
</table>
<br>
All the files (HTML, graphics, audio and the config.txt) are saved in the asset folder as shown in the example below. This example includes a single '''.html''' file which references all the '''.jpg''' and '''.tga''' graphic files. You can add as many HTML files as you need.
 
<table>
<tr>
<td>[[image:HTMLfileview.JPG|400px]]</td>
<td><span style="font-size: 17px;">'''THIS IS AN EXAMPLE ONLY'''</span><br><br>
The '''minimum''' number of files needed in a '''HTML asset''' is 2 - the '''config.txt''' file and a '''thumbnail image''' (a .jpg file).<br>
[[image:HTMLFolderView4.JPG|link=]]</td>
</tr>
</table>
 
<table cellpadding="4" bgcolor=#c1e7e7>
<tr valign="top">
<td>[[image:DotPoint.JPG|link=]]</td>
<td>A useful time saving technique is to '''view the HTML files in a normal web browser before committing the asset'''. However, if TGA image files have been used then they will not appear in the browser.</td>
</tr>
</table>
<br>
<table cellpadding="4" bgcolor=#ffffb0>
<tr valign="top">
<td>[[image:PencilTips.PNG|link=]]</td>
<td>You can edit HTML files so that the pages will be displayed in a normal web browser with white text and a background that approximates the one used in the '''Trainz''' MiniBrowser. This makes it easier to test the pages without having to constantly open, edit, update and then commit the HTML assets in '''Content Manager'''.
 
To do this, edit the '''&lt;body&gt;''' tag at  the top of each HTML page to read ...
 
'''<nowiki><body bgcolor=#192a32 text=#ffffff></nowiki>'''
 
This will have no effect on the appearance of the pages in '''Trainz'''.
</td>
</tr>
</table>
<br>
 
==Option 3: A String Table==
 
To use a string-table for the message text, use the '''"A predefined string-table entry from a HTML asset"''' option.
 
<table cellpadding="4" bgcolor=#c1e7e7>
<tr valign="top">
<td>[[image:DotPoint.JPG|link=]]</td>
<td>The text to be displayed in the message must be added to the '''config.txt''' file of the HTML asset. A series of text messages for different message windows can be placed in this file.</td>
</tr>
</table>
 
<table cellpadding="4" bgcolor=#ffffb0>
<tr valign="top">
<td>[[image:PencilTips.PNG|link=]]</td>
<td>The disadvantage of this option compared to option 1 above is that the '''config.txt''' file of the HTML asset has to be edited and the asset re-committed every time a message is added or changed.</td>
</tr>
</table>
 
For example, the '''config.txt''' file of a HTML asset may have a string-table container as shown below:-
 
'''string-table'''
    '''{'''
      '''html_warning_late                            "You are running behind schedule."'''
      '''html_warning_early                            "You are running ahead of schedule."'''
      '''html_finished_title                          "Session completed!"'''
    '''}'''
 
The label '''html_warning_late''' is a "string-table token" that identifies the message "You are running behind schedule". The '''Message Popup''' rule uses this token to identify the message.
 
For example:-
 
<table>
<tr valign="top">
<td>[[image:MessagePopup4.JPG|link=]]</td>
<td>
<table cellpadding="4" bgcolor=#eeeeee>
<tr>
<td colspan="2">
----</td>
</tr>
<tr valign="top">
<td>[[image:Gears.PNG|link=]]</td>
<td><span style="font-size: 17px;">'''Settings:'''</span><br>
[[image:PortalOptionButtonFilled.PNG|link=]] '''A pre-defined string-table entry from a HTML asset (advanced)'''<br>
'''In This Example:'''
:[[image:CheckBoxOff.PNG|link=]] '''Pause game while message is displayed''' - game play will not be paused
:[[image:CheckBox.PNG|link=]] '''Close previous message popup windows''' - this is usually a good idea unless you want multiple message windows open
:'''Message location:''' '''<span style="text-decoration: underline;">Top left</span>''' of the screen has been chosen as the location for the message window. Other positions are '''Top right''', '''Bottom left''' and '''Bottom right'''
:'''HTML Asset:''' '''<span style="text-decoration: underline;">General Purpose Session HTML</span>''' one of the HTML assets installed with '''Trainz'''
:'''String Table Token:''' '''<span style="text-decoration: underline;">html_warning_late</span>''' the string table '''token''' in the config.txt file of the '''<span style="text-decoration: underline;">General Purpose Session HTML</span>''' asset contains the message to be displayed
:'''HTML Wave:''' '''<span style="text-decoration: underline;">General Purpose Session HTML</span>''' HTML asset contains the ''optional'' sound file to be played
:'''Wav Name:''' '''<span style="text-decoration: underline;">all-aboard.wav</span>''' is the ''optional'' sound file to be played
:[[image:CheckBox.PNG|link=]] '''Autoplay Wav''' - the sound will be played when the page is displayed</td>
</tr>
<tr>
<td colspan="2">
----</td>
</tr>
</table>
<br>
<table cellpadding="4" bgcolor=#ffffb0>
<tr valign="top">
<td>[[image:PencilTips.PNG|link=]]</td>
<td>The disadvantage of this Option compared to Option 1 above is that the '''config.txt''' file of the HTML asset has to be edited and the asset re-committed every time a message is added or changed.</td>
</tr>
</table></td>
</tr>
</table>
 
===A String Table With HTML===
 
You can include some simple HTML codes in the text message. If the string-table token and message shown below is included in the '''config.txt''' file...
 
<nowiki>warning_message_stop                "You have passed a stop signal.<br><br><font color=#ffff00><b>Apply your brakes immediately</b></font>"</nowiki>
 
...and if this token and its HTML asset is used in the '''Message Popup''' rule, then the following message will appear on the screen.
 
<table>
<tr>
<td>[[image:MessagePopup5a.JPG|link=]]</td>
</tr>
</table>
 
==Alternatives to the Message Popup Rule==
<table cellpadding="4" bgcolor=#ffffff>
<tr valign="top">
<td width="58">[[image:RulesWiki.PNG|link=]]</td>
<td width="640">
There are other HTML message window rules that are alternatives to the '''Message Popup''' rule. A few possibilities are:-</td>
</tr>
</table>
*'''[[Session_Rule_List_with_Parameters#Display_HTML_Pages_Rule|Display HTML Pages Rule]]'''
*'''[[Session_Rule_List_with_Parameters#Timed_Limited_Display_HTML_Rule_(SP2_and_later)|Timed Limited Display HTML Rule (SP2 and later)]]'''
 
<table> <!-- BEGIN Nav Buttons Table -->
<tr valign="top">
<td width=729><span id="bottom"></span>&nbsp;</td>
<td width=46>[[image:BackToTop.png|link=#top|alt=Top|Top]]</td>
<td width=75>[[image:NextUp.png|link=#stepPopup|alt=Next Up|Top]]</td>
<td width=75>&nbsp;</td>
</tr>
</table> <!-- END Nav Buttons Table -->
----
----
='''Trainz Wiki'''=
<table cellpadding="4" bgcolor=#ffffff>
<tr valign="top">
<td>[[image:TrainzWiki.png|link=]]</td>
<td>
<span style="font-size: 17px;">'''More Tutorials and Guides to Using Trainz'''</span><br>
*'''<span class="plainlinks">[http://online.ts2009.com/mediaWiki/index.php/HowTo How to Guides]</span>'''
*'''[[Driver Commands List]]'''
*'''[[Session Rule List with Parameters|Session Rules List (Alphabetical) with Parameters]]'''
*'''[[Session Rules By Categories With Properties|Session Rules List (Categories) With Parameters]]'''
</td>
</tr>
</table>
----
This page was created by Trainz user '''<span class="plainlinks">[http://online.ts2009.com/mediaWiki/index.php/User:Pware pware]</span>''' in May 2018 and was last updated as shown below.
----
[[Category:How-to guides]]
 
='''Audio Files'''=
 
Audio files can be added into HTML assets to play sounds when the HTML page is displayed on the screen. Examples would include conductor whistles and "all aboard" calls, etc. The sound is stored as a separate file in the HTML asset.
 
==Audio Specifications==
 
<table cellpadding="4" bgcolor=#eeeeee>
<tr>
<td colspan="2">
----</td>
</tr>
<tr valign="top">
<td>[[file:Gears.PNG|link=]]</td>
<td><span style="font-size: 17px;">'''Settings:'''</span><br>
Audio files must be recorded using, or converted to:-
*'''8 or 16 bit''' sample sizes
*'''22kHz (22,050Hz) or 44kHz (44,100Hz)''' sample rate
*'''Mono, stereo or surround''' format ("surround" is not fully tested)
...and saved using
*Uncompressed '''WAV''' format PCM (Pulse Coded Modulation)
</td>
</tr>
<tr>
<td colspan="2">
----</td>
</tr>
</table>
<br>
<table cellpadding="4" bgcolor=#fcbcbc width="740">
<tr valign="top">
<td colspan=2><span style="font-size: 17px;"><b>Warning:</b></span></td>
</tr>
<tr valign="top">
<td>[[file:Stop.PNG|link=]]</td>
<td>'''Take care when deciding which settings (bit rate, sample rate, number of channels) are to be used for a sound.'''
High settings will produce significantly larger file sizes and often for no noticeable improvements in sound quality</td>
</tr>
</table>
<br>
<table cellpadding="4" bgcolor=#ffffb0>
<tr valign="top">
<td>[[file:PencilTips.PNG|link=]]</td>
<td>For a short simple sound, such as a telegraph bell or a conductors whistle, lower settings (e.g. 8 bit, 22kHz, mono) would probably be more suitable</td>
</tr>
</table>
<br>
 
==Audio Software==
 
The main requirement for audio editing software is that it must be able to save sound files in the '''WAV''' file format and meet the specifications listed above.
 
A suitable freeware audio editing software would be:-
 
*'''Audacity''' for both MacOSX and Windows
 
<table>
<tr>
<td>[[file:3BellsWave.JPG|link=]]</td>
</tr>
</table>
'''Audacity''' audio file recording and editing software (shown above).
 
<table> <!-- BEGIN Nav Buttons Table -->
<tr valign="top">
<td width=729><span id="stepPopup"></span>&nbsp;</td>
<td width=46>[[file:BackToTop.png|link=#top|alt=Top|Top]]</td>
<td width=75>[[file:NextUp.png|link=#stepAudio|alt=Next Up|Top]]</td>
<td width=75>[[file:NextDown.png|link=#bottom|alt=Next Down|Next Down]]</td>
<td width=75>[[file:BackToBottom.png|link=#bottom|alt=Bottom|Bottom]]</td>
</tr>
</table> <!-- END Nav Buttons Table -->
 
='''Adding a Message Popup to a Session'''=
 
The built-in '''Message Popup''' rule is used to create the message windows that appear on the screen during the running of a session.
 
<table cellpadding="4" bgcolor=#c1e7e7>
<tr valign="top">
<td>[[file:DotPoint.JPG|link=]]</td>
<td>The [[file:WikiLink.PNG|link=]] '''[[Session_Rule_List_with_Parameters#Message_Popup_Rule|Message Popup Rule]]''' has to be added to the session rule list in the [[file:WikiLink.PNG|link=]] '''[[How to Use Session Editor|Session Editor]]''' in Surveyor which you access from the '''Surveyor Main Menu''' in '''TANE''' or from the '''Surveyor Edit Menu''' in '''TRS19''' and '''Trainz Plus'''. Each message will need its own '''Message Popup''' rule in the session rule list.</td>
</tr>
</table>
 
The '''Message Popup''' rule provides three different methods of creating the messages, and adding graphics and sound if needed. These methods are:-
:[[file:DotPoint1Blue.png|link=]]&nbsp;from a simple text message typed into the rule with an optional graphic. If needed a sound can be added from an existing HTML asset.
:[[file:DotPoint2Blue.png|link=]]&nbsp;from a HTML page stored as a file in a HTML asset. This HTML page can have many graphic images, each stored in the HTML asset, and many lines of text. If needed a sound can be added from the same or another HTML asset.
:[[file:DotPoint3Blue.png|link=]]&nbsp;from a "string-table" in the '''config.txt''' file of a HTML asset. If needed a sound can be added from the same or another HTML asset.
 
==Option 1: A Simple Custom Text Message==
 
The simplest and easiest method of adding message windows to a '''Trainz''' Session is to use the '''Message Popup''' rule with the '''Custom Text''' option for all your Session messages.
<table cellpadding="4" bgcolor=#ffffb0>
<tr valign="top">
<td>[[file:NotePad.PNG|link=]]</td>
<td><span style="font-size: 17px;">'''Notes:'''</span><br>
[[file:checkicon.png|link=|alt=Tick]] This option has a number of advantages:-
*'''No knowledge of HTML''' is required.
*You can use a '''built in graphic''' (with more available on the '''DLS''')
*You can use '''sounds from existing HTML assets'''
*There is no need to create a HTML asset
[[file:uncheckicon.png|link=|alt=Cross]] There are also some disadvantages. For each message window:-
*You can only use '''one graphic''' which has to be selected from a list of special "texture" graphics
</td>
</tr>
</table>
<br>
<table cellpadding="4" bgcolor=#c1e7e7>
<tr valign="top">
<td>[[file:DotPoint.JPG|link=]]</td>
<td>If you are happy using '''Option 1''', installed graphics and sounds or no graphics and sounds at all, then you '''do not have to create a HTML asset''' for your session.</td>
</tr>
</table>
<br>
For example:
<table>
<tr valign="top">
<td>[[file:MessagePopup2.JPG|link=]]</td>
<td>
<table cellpadding="4" bgcolor=#eeeeee>
<tr>
<td colspan="2">
----</td>
</tr>
<tr valign="top">
<td>[[file:Gears.PNG|link=]]</td>
<td><span style="font-size: 17px;">'''Settings:'''</span><br>
[[file:PortalOptionButtonFilled.PNG|link=]] '''Custom text'''<br>
'''In This Example:'''
:[[file:CheckBoxOff.PNG|link=]] '''Pause game while message is displayed''' - game play will not be paused
:[[file:CheckBox.PNG|link=]] '''Close previous message popup windows''' - this is usually a good idea unless you want multiple message windows open
:'''Message location:''' '''<span style="text-decoration: underline;">Top left</span>''' of the screen has been chosen as the location for the message window. Other positions are '''Top right''', '''Bottom left''' and '''Bottom right'''
:'''Custom Message''' - the message entered into the text box will be displayed
:'''Icon''' - the selected ''optional'' icon will be displayed
:'''HTML Wave:''' '''<span style="text-decoration: underline;">General Purpose Session HTML</span>''' HTML asset contains the ''optional'' sound file to be played
:'''Wav Name:''' '''<span style="text-decoration: underline;">all-aboard.wav</span>''' is the ''optional'' sound file to be played
:[[file:CheckBox.PNG|link=]] '''Autoplay Wav''' - the sound will be played when the page is displayed</td>
</tr>
<tr>
<td colspan="2">
----</td>
</tr>
</table></td>
</tr>
</table>
 
<table cellpadding="4" bgcolor=#c1e7e7>
<tr valign="top">
<td>[[file:DotPoint.JPG|link=]]</td>
<td>'''If all your Session messages use this option then there is no need to create a HTML asset'''</td>
</tr>
</table>
 
<table cellpadding="4" bgcolor=#ffffb0>
<tr valign="top">
<td>[[file:PencilTips.PNG|link=]]</td>
<td>To find additional graphic icons that can be added to the '''Message Popup''' window, use '''Content Manager''' and set a '''Custom Filter''' to search for:-
*'''Category''' select '''Texture- Not Environmental'''
*'''Name''' type '''icon'''
*'''On Download Station''' select '''True'''
Not all those shown will be suitable. Double click a possible icon to display its details before downloading.</td>
</tr>
</table>
<br>
<table cellpadding="4" bgcolor="Aquamarine">
<tr valign="top">
<td>[[file:LinkWiki.PNG|link=]]</td>
<td>
To find information on how to create your own '''Message Popup Icons''', see the '''Trainz Wiki Page''':-<br>
* '''[[How to Create a Message Popup Icon]]'''</td>
</tr>
</table>
 
==Option 2: A HTML Page==
 
To use a HTML file use the '''Message Popup''' rule with the '''A pre-defined HTML page''' option selected.
 
===Use an Existing HTML Asset===
 
<table cellpadding="4" bgcolor=#c1e7e7>
<tr valign="top">
<td>[[file:DotPoint.JPG|link=]]</td>
<td>'''You can use HTML files and graphics from HTML assets that are already installed on your system.'''</td>
</tr>
<tr valign="top">
<td>[[file:DotPoint.JPG|link=]]</td>
<td>There is a '''General Purpose Session HTML''' asset that is built into '''Trainz''' that contains a series of "basic" HTML message pages and audio files that can be used in a session. An example is shown below.</td>
</tr>
</table>
 
<table cellpadding="4" bgcolor=#ffffb0>
<tr valign="top">
<td>[[file:PencilTips.PNG|link=]]</td>
<td>
*This option has the advantage of not needing to create any new HTML files and assets.
*But you will need to explore the existing assets, by opening them in '''Content Manager''', to see what is available and if they are suitable for your purposes.</td>
</tr>
</table>
<table>
<tr valign="top">
<td>[[file:MessagePopup1.JPG|link=]]</td>
<td>
<table cellpadding="4" bgcolor=#eeeeee>
<tr>
<td colspan="2">
----</td>
</tr>
<tr valign="top">
<td>[[file:Gears.PNG|link=]]</td>
<td><span style="font-size: 17px;">'''Settings:'''</span><br>
[[file:PortalOptionButtonFilled.PNG|link=]] '''A pre-defined HTML page (advanced)'''<br>
'''In This Example:'''<br>
:[[file:CheckBox.PNG|link=]] '''Pause game while message is displayed''' - this will halt the game play until the window is closed. This may be needed if you have a long introductory HTML information page, otherwise leave unchecked
:[[file:CheckBox.PNG|link=]] '''Close previous message popup windows''' - this is usually a good idea unless you want multiple message windows open.
:'''Message location:''' '''<span style="text-decoration: underline;">Top left</span>''' of the screen has been chosen as the location for the message window. Other positions are '''Top right''', '''Bottom left''' and '''Bottom right'''
:'''HTML Asset:''' '''<span style="text-decoration: underline;">General Purpose Session HTML</span>''' one of the HTML assets installed with '''Trainz'''
:'''HTML Page:''' '''<span style="text-decoration: underline;">right_away.html</span>''' which is a HTML file inside the '''<span style="text-decoration: underline;">General Purpose Session HTML</span>''' asset
:'''HTML Wave:''' '''<span style="text-decoration: underline;">General Purpose Session HTML</span>''' HTML asset contains the ''optional'' sound file to be played
:'''Wav Name:''' '''<span style="text-decoration: underline;">all-aboard.wav</span>''' is the ''optional'' sound file to be played
:[[file:CheckBox.PNG|link=]] '''Autoplay Wav''' - the sound will be played when the page is displayed</td>
</tr>
<tr>
<td colspan="2">
----</td>
</tr>
</table>
<td>
</tr>
</table>
 
===Create Your own HTML Asset===
 
Creating your own HTML assets allows you to add session information and instructions that are perfectly tailored to each session. This does require creative effort and time, will need more testing and will probably generate a lot of frustration. But the end result can be worth it.
 
<table cellpadding="4" bgcolor=#c1e7e7>
<tr valign="top">
<td>[[file:DotPoint.JPG|link=]]</td>
<td>'''If you have created your own HTML asset it must be committed in Content Manager before it can be used in a Message Popup'''</td>
</tr>
</table>
<br>
All the files (HTML, graphics, audio and the config.txt) are saved in the asset folder as shown in the example below. This example includes a single '''.html''' file which references all the '''.jpg''' and '''.tga''' graphic files. You can add as many HTML files as you need.
 
<table>
<tr>
<td>[[file:HTMLfileview.JPG|400px]]</td>
<td><span style="font-size: 17px;">'''THIS IS AN EXAMPLE ONLY'''</span><br><br>
The '''minimum''' number of files needed in a '''HTML asset''' is 2 - the '''config.txt''' file and a '''thumbnail image''' (a .jpg file).<br>
[[file:HTMLFolderView4.JPG|link=]]</td>
</tr>
</table>
 
<table cellpadding="4" bgcolor=#c1e7e7>
<tr valign="top">
<td>[[file:DotPoint.JPG|link=]]</td>
<td>A useful time saving technique is to '''view the HTML files in a normal web browser before committing the asset'''. However, if TGA image files have been used then they will not appear in the browser.</td>
</tr>
</table>
<br>
<table cellpadding="4" bgcolor=#ffffb0>
<tr valign="top">
<td>[[file:PencilTips.PNG|link=]]</td>
<td>You can edit HTML files so that the pages will be displayed in a normal web browser with white text and a background that approximates the one used in the '''Trainz''' MiniBrowser. This makes it easier to test the pages without having to constantly open, edit, update and then commit the HTML assets in '''Content Manager'''.
 
To do this, edit the '''&lt;body&gt;''' tag at  the top of each HTML page to read ...
 
'''<nowiki><body bgcolor=#192a32 text=#ffffff></nowiki>'''
 
This will have no effect on the appearance of the pages in '''Trainz'''.
</td>
</tr>
</table>
<br>
 
==Option 3: A String Table==
 
To use a string-table for the message text, use the '''"A predefined string-table entry from a HTML asset"''' option.
 
<table cellpadding="4" bgcolor=#c1e7e7>
<tr valign="top">
<td>[[file:DotPoint.JPG|link=]]</td>
<td>The text to be displayed in the message must be added to the '''config.txt''' file of the HTML asset. A series of text messages for different message windows can be placed in this file.</td>
</tr>
</table>
 
<table cellpadding="4" bgcolor=#ffffb0>
<tr valign="top">
<td>[[file:PencilTips.PNG|link=]]</td>
<td>The disadvantage of this option compared to option 1 above is that the '''config.txt''' file of the HTML asset has to be edited and the asset re-committed every time a message is added or changed.</td>
</tr>
</table>
 
For example, the '''config.txt''' file of a HTML asset may have a string-table container as shown below:-
 
'''string-table'''
    '''{'''
      '''html_warning_late                            "You are running behind schedule."'''
      '''html_warning_early                            "You are running ahead of schedule."'''
      '''html_finished_title                          "Session completed!"'''
    '''}'''
 
The label '''html_warning_late''' is a "string-table token" that identifies the message "You are running behind schedule". The '''Message Popup''' rule uses this token to identify the message.
 
For example:-
 
<table>
<tr valign="top">
<td>[[file:MessagePopup4.JPG|link=]]</td>
<td>
<table cellpadding="4" bgcolor=#eeeeee>
<tr>
<td colspan="2">
----</td>
</tr>
<tr valign="top">
<td>[[file:Gears.PNG|link=]]</td>
<td><span style="font-size: 17px;">'''Settings:'''</span><br>
[[file:PortalOptionButtonFilled.PNG|link=]] '''A pre-defined string-table entry from a HTML asset (advanced)'''<br>
'''In This Example:'''
:[[file:CheckBoxOff.PNG|link=]] '''Pause game while message is displayed''' - game play will not be paused
:[[file:CheckBox.PNG|link=]] '''Close previous message popup windows''' - this is usually a good idea unless you want multiple message windows open
:'''Message location:''' '''<span style="text-decoration: underline;">Top left</span>''' of the screen has been chosen as the location for the message window. Other positions are '''Top right''', '''Bottom left''' and '''Bottom right'''
:'''HTML Asset:''' '''<span style="text-decoration: underline;">General Purpose Session HTML</span>''' one of the HTML assets installed with '''Trainz'''
:'''String Table Token:''' '''<span style="text-decoration: underline;">html_warning_late</span>''' the string table '''token''' in the config.txt file of the '''<span style="text-decoration: underline;">General Purpose Session HTML</span>''' asset contains the message to be displayed
:'''HTML Wave:''' '''<span style="text-decoration: underline;">General Purpose Session HTML</span>''' HTML asset contains the ''optional'' sound file to be played
:'''Wav Name:''' '''<span style="text-decoration: underline;">all-aboard.wav</span>''' is the ''optional'' sound file to be played
:[[file:CheckBox.PNG|link=]] '''Autoplay Wav''' - the sound will be played when the page is displayed</td>
</tr>
<tr>
<td colspan="2">
----</td>
</tr>
</table>
<br>
<table cellpadding="4" bgcolor=#ffffb0>
<tr valign="top">
<td>[[file:PencilTips.PNG|link=]]</td>
<td>The disadvantage of this Option compared to Option 1 above is that the '''config.txt''' file of the HTML asset has to be edited and the asset re-committed every time a message is added or changed.</td>
</tr>
</table></td>
</tr>
</table>
 
===A String Table With HTML===
 
You can include some simple HTML codes in the text message. If the string-table token and message shown below is included in the '''config.txt''' file...
 
<nowiki>warning_message_stop                "You have passed a stop signal.<br><br><font color=#ffff00><b>Apply your brakes immediately</b></font>"</nowiki>
 
...and if this token and its HTML asset is used in the '''Message Popup''' rule, then the following message will appear on the screen.
 
<table>
<tr>
<td>[[file:MessagePopup5a.JPG|link=]]</td>
</tr>
</table>
 
==Alternatives to the Message Popup Rule==
<table cellpadding="4" bgcolor=#ffffff>
<tr valign="top">
<td width="58">[[file:RulesWiki.PNG|link=]]</td>
<td width="640">
There are other HTML message window rules that are alternatives to the '''Message Popup''' rule. A few possibilities are:-</td>
</tr>
</tr>
</table>
</table>
Line 2,277: Line 1,150:
<tr valign="top">
<tr valign="top">
<td width=729><span id="bottom"></span>&nbsp;</td>
<td width=46>[[file:BackToTop.png|link=#top|alt=Top|Top]]</td>
<td width=46>[[image:BackToTop.png|link=#top|alt=Top|Top]]</td>
<td width=75>[[file:NextUp.png|link=#stepPopup|alt=Next Up|Top]]</td>
<td width=75>[[image:NextUp.png|link=#stepPopup|alt=Next Up|Top]]</td>
<td width=75>&nbsp;</td>
Line 2,288: Line 1,161:
<table cellpadding="4" bgcolor=#ffffff>
<tr valign="top">
<tr valign="top">
<td>[[file:TrainzWiki.png|link=]]</td>
<td>[[image:TrainzWiki.png|link=]]</td>
<td>
<td>
<span style="font-size: 17px;">'''More Tutorials and Guides to Using Trainz'''</span><br>

Revision as of 09:41, 5 November 2021

The information in this Wiki Page applies to TANE, TRS19 and Trainz Plus.

  Top   Next Down Bottom

HTML Assets

In Summary:
HTML assets contain the text information, graphic images and sounds (those that are not built into locos and other assets) that can be displayed and played during a session in
  • a large browser window at the start of a Session (a session introduction page) or,
  • large browser windows during the running of a session
A single HTML asset can provide all the text, graphic and sound data for an entire session and for multiple sessions.
At the most basic level you do not have to create a HTML asset for your session. You can use existing resources (graphics and sounds) and add your own text to simple on-screen Popup Messages using Session Rules. See the section Adding a Message Popup to a Session below.


Notes:

HTML assets in Trainz consist of:-

  • a config.txt file which is mandatory
  • one or more graphic files of type .jpg, .tga, .png, .bmp. One of these must be the asset thumbnail.

and as options only (not compulsory):-

  • one or more HTML formatted text files of type .htm or .html
  • one or more sound files of type .wav
  Top Next Up Next Down Bottom

How to Create a New HTML Asset

If you decide that you will need to create a HTML asset for your Session or Sessions, then these are the basic steps you will need to perform (if you have never done this before).


Steps
 Create the Asset:


From the Trainz Launcher
  1. select  Manage Content 
  2. in Content Manager open the Developer menu
  3. select New Content

This will create a new asset and open it for editing.

A message window will appear that will (hopefully) report on the successful creation of a new asset.

  • Close the message window

   Find the New Asset:
  • Set the CM Search Filter to Open for Editing

This will display only those assets that have been opened for editing (hopefully only your new and as yet unnamed asset will be shown)


   Open the Asset in Windows File Explorer:
  1. Right mouse click on the entry New Asset
  2. Select Open
  3. Select Show in Explorer

   Open Config.txt File in Notepad:
There will only be a single item in the asset, its config.txt file
  • Double click on the file to open it in Notepad

   Edit the Config.txt File:
You will need to edit the contents of this file.
  • The next section, The Config.txt File, identifies the changes you will need to make.
  • The new name you give to the asset will not take effect until after it has been committed.
  • After editing, save the changes and exit Notepad.


Warning:
Unless you know exactly what you are doing*,  DO NOT ALTER THE KUID NUMBER  that has been added to the file
* but even if you do, think twice before you change it !

   Add Any Extras:
  • You will need to add at least one file to the asset folder, a thumbnail image as described in the section Graphic Files below.
  • Other files, such as additional images, sound (wav) files and HTML files may need to be added depending on the type of HTML asset that is being created. These topics are covered in the sections Graphic Files, Audio Files and HTML Files below.


These files do not have to be added immediately but must be present before the new asset can be used. You can reopen the asset for editing later to add the files before it is committed.

THIS IS AN EXAMPLE ONLY
The minimum number of files needed in a HTML asset is 2 - the config.txt file and a thumbnail image (a .jpg file).

   Finish Up:
  • Close the Asset window
  • Commit the asset in Content manager
    • Right mouse click on the asset
    • Select Submit Edits

Hopefully there will be no errors.

Notes:
Because you still have the Filter Open for Editing in operation, the now closed and committed asset will vanish from the window display. To check that your asset has been correctly created and renamed, set the CM Search Filter to "Today".


Some of the most common errors that can occur when creating and committing a new asset are:-
  • no thumbnail image in the asset
  • typing errors in the config.txt file
  • poorly formatted tags in the config.txt file
  • incorrect file types added to the asset folder
  • files missing from the asset folder
  • incorrect kuid value (despite the warning you changed it in Step 5)
  Top Next Up Next Down Bottom

The Config.txt File

All assets must have a config.txt file


Settings:

The HTML asset must have a config.txt text file that must include the following tags:-

  • kind set to "html-asset"
  • username set to the asset title or name
  • kuid a unique ID code
  • thumbnails set to a 240 by 180 pixel JPG image

While not mandatory, the following tag is useful:-

  • category-class set to "YH"


This file should follow the same (or a similar) format as the example below.

  • entries in  red  must not be changed
  • the indenting of the lines and the spacing ("tabbing") between the "tags" on the left and their contents on the right are purely to make it easier for humans to read
  • the use of the {} braces is to group tags into common "containers". These containers must not be broken up and the number of { characters must match the number of } characters
  • the order of the "tags" is not important
kuid                                    <kuid: this is an auto-generated number >
username                                "HTML assets for Steamville Session 1"
trainz-build                            4.5
kind                                    "html-asset"
description                             "All the images, web pages and sounds for the Steamville 1st Session"
category-class                          "YH"
thumbnails
{
  Default
  {
    image                               "SteamV1HTML.jpg"
    width                               240
    height                              180
  }
}

Settings:

For the above example:

  • The  kuid  is unique to every asset so it is  not a good idea to choose your own  . This will be automatically generated by the Content Manager program when a new asset is created
  • The  username  is your name for the asset and the name that other users will see. It is a good idea to make it short and meaningful.
  • The  trainz-build  identifies the minimum Trainz version needed for this asset. A list of asset trainz-build numbers and their corresponding Trainz versions can be found at "Trainz-build"_number
  • The  kind  identifies the type of asset and the types of files that Trainz will expect to find in the asset. It also tells Trainz how to render and error check the asset. A list of asset kinds can be found at KIND Hierarchy
  • The  description  provides more details for users than the username.
  • The  category-class  identifies the intent of the asset and is important in classifying it for filtering and searching. For a HTML-Asset the category-class is "YH". A list of category classes can be found at Category-class
  • The  thumbnails  container holds the preview images of the asset shown by the Content Manager program, the Web version of the DLS and, for some assets, the Surveyor main menu image(s) and asset textures. Information on thumbnails can be found at Thumbnails
    • The  Default  is the container ID or placeholder for the thumbnail (some types of assets can have several thumbnails) and its exact label (or number - eg. "Default", "00", "01", etc) is not important but each thumbnail if there are more than one must have a different label. Default and 0 are commonly used placeholder labels for the 240 x 180 thumbnail image
    • The image is the name of the thumbnail image. It does not have to be called thumbnail.jpg but it must be a JPG format image
    • The width of the image in pixels must be 240
    • The height of the image in pixels must be 180

Language Options:
All Trainz assets have a language facility built into their config.txt files that allows other language translations to be added for certain tags, such as the username and description tags. A full description of the process can be found on the Trainz Wiki at  Localize an Asset and a list of all the supported languages with their two character codes at  Localization (country) Codes.
At the very basic level any creator can easily provide other language translations for the username and description tags in the assets they create. Examples are shown below.
username                    "HTML assets for Steam Ride session"
username-c2                 "Steam会话的HTML资产"
username-es                 "Recursos HTML para la sesión de Steam Ride"
username-fr                 "Éléments HTML pour la session Steam Ride"
username-gr                 "HTML-Assets für die Steam-Ride-Sitzung"
username-nl                 "HTML-middelen voor stoomrit sessie"
username-ru                 "HTML-ресурсы для сессии Steam Ride"
Translations to Chinese (simplified), Spanish, French, German, Dutch and Russian, perfect or not, were provided by Google Translate.

String Table Option

If you are going to use the String Table method of adding HTML message windows, then the config.txt file will need a string-table container. For example:-

string-table
   {
      warning_message_stop                          "You have passed a stop signal. Apply your brakes immediately"
      warning_message_speed                         "You are speeding. Slow down"
   }

The "tags", warning_message_stop and warning_message_speed in the example shown above, are called "String Table Tokens" and are used to identify which message is to be displayed.

For more details of string-tables, see the section Option 3: A String Table below.

  Top Next Up Next Down Bottom

Graphic Files

Supported Image Formats

There are some differences in the graphic files supported between Trainz HTML and Web HTML.

Graphic Format Trainz Web Main Points Recommendation
GIF not supported supported Do not use
JPG supported supported
  • lossy compression
  • no transparency
Needed for the main thumbnail image but avoid unless you can take the steps recommended for using JPG images below
BMP supported supported
  • lossless but no compression
  • limited transparency
Avoid
PNG supported supported
  • lossless compression
  • transparency
Use if compatibility with older Trainz versions is NOT needed
TGA supported not supported
  • lossless with optional compression
  • optional transparency
Use if compatibility with older Trainz versions is needed
.texture supported not supported
  • a text file containing the names of image files
  • controls how the images are displayed
Recommended method for all images except thumbnails

The above are not the only image file formats supported by Trainz but those unlisted formats are not common and are not usually recommended.

For Trainz HTML pages displayed on the screen during gameplay, the most commonly used image formats seem to be JPG and TGA. If you are going to test your pages on a standard web browser before testing them in Trainz (a technique that will save both time and frustration) be aware that TGA format files will not be visible in any web browser.

Thumbnails

A thumbnail image MUST be present in the asset. You can create a HTML asset without any other images but there must be a thumbnail image.


Notes:

The thumbnail image:-

  • must be in JPG format.
  • must be 240 pixels wide by 180 pixels tall.
  • does not have to be named thumbnail.jpg as long as the name used is in the Thumbnails container in the config.txt file.

TGA File Compression

While Trainz supports compressed TGA format files, the current advice is NOT to use compression when saving images in this format.


When exporting an image as a TGA file uncheck the image compression setting (example shown left for GIMP 2.10)

JPG Files

JPGs are still the most widely used image format for web pages and all Trainz versions support this format. The main problem with JPG is that it uses a "lossy" compression method - image data is thrown away or deleted every time a JPG image is saved. If you are constantly loading, editing and then saving the same JPG image, then the quality of the image will noticeably decline over time.

The best way to use JPGs is to:-
  • keep the original image in a lossless format such as PNG or TGA
  • when editing the image, always save the edited image in a lossless format
  • only when all the editing has been completed, export the image as a JPG

Texture Files

Texture files are text files that act as a container for an image and control how that image is to be displayed in Trainz
Texture files are NOT graphic files as they were in earlier versions of Trainz and can still be found in built-in and base assets
primary=ashpit.jpg
alpha=ashpit.bmp
tile=st
Texture files (actually .texture.txt files) are standard text files that contain the name of 1 or 2 image files and instructions on how they are to be displayed in Trainz, as shown in the example on the left. This is the recommended format for all image files in Trainz except thumbnails.
Notes:
This format does not replace the other supported image formats (BMP, JPG, PNG or TGA) but simply provides additional options for controlling how those image files are used, particularly their alpha channels.


A detailed description of the .texture file format can be found on the Trainz Wiki Page at:-


Transparency (Alpha Channel)

Transparencies are also called Alpha Channels.

Transparencies in images are essentially colours or layers that are rendered invisible when the image is displayed. This makes parts of the image transparent so the colours or patterns behind the image, such as the background page, can be seen.

Shown below is the Message Popup browser window from a Trainz Session. The two images it contains are from the same original image but displayed in two different image formats.
  • The STOP sign on the left has been exported as a JPG which has no transparency (or alpha channel) so the image background is shown as a colour, in this case white.
  • The STOP sign on the right has been exported as a TGA with its background layer saved as an Alpha Channel which is rendered transparent so the background colour of the browser window shows through.

Image file formats with transparencies or alpha channels that are supported by Trainz are BMP, PNG and TGA.

Graphics Editing Software

There is a wide variety of graphical software applications available that would be suitable for creating Trainz ready images, both commercial and freeware.

Notes:

The minimum requirements for a suitable graphics package for use in creating Trainz HTML assets would be:-

  • load and save (or export) images in JPG and either TGA or PNG formats
  • support for an alpha channel

"Nice to have" features would include:-

  • support for layers
  • text editing
  Top Next Up Next Down Bottom

HTML Files

HTML (Hyper Text Markup Language) is the "language" that creates web pages. Creating HTML files (or web pages) is not a simple process. If you have never worked with HTML before then there will be a learning curve. Fortunately it is possible to start at a very basic level and progress as you learn.

If adding HTML files looks too difficult then Trainz does provide an option that allows you to place simple message windows onto the screen without having to create any HTML files or images. See the section Adding a Message Popup to a Session below.

You can have multiple web pages in a session. Each page will be a separate .html or .htm file in the HTML asset.

Some Things You Should Know About HTML

The image below shows a simple HTML page typed into a basic text editor.
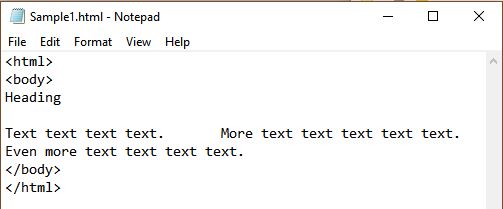
A HTML page is constructed by "tags", words and codes enclosed by "<" and ">" symbols. These tags control the layout of the page and how the text and images are displayed.

If the above page is loaded into a normal web browser, this is what you would see.
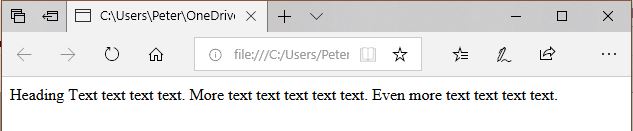
The problems: What happened to the:-

  • blank line between the heading and the first line of text?
  • Return Key codes (or end-of-line characters) at the ends of each line?
  • extra spaces placed between the sentences in the first line of text?

The causes: When displaying a page, HTML ignores:-

  • blank lines,
  • the end-of-line character (and other special characters), and
  • extra spaces between characters


Warning:
HTML is extremely unforgiving when it comes to errors and "typos" in the tags. Simple syntax and spelling errors can lead to hours of frustration while you attempt to find the error. If you don't have the patience or any "bug hunting skills" then perhaps HTML coding is not for you.


...and that is the easy part.

Some Things You Should Know About Trainz HTML

If the page shown above is loaded into a Trainz MiniBrowser, this is what you would see.
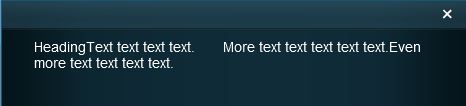

Notes:

In the Trainz Minibrowser:-

  • All browser windows have the same "greenish" gradient background colour (darker on the outer edges and lighter in the middle) and this cannot be changed
  • The default text colour is white (it used to be black which was impossible to read on the background)
  • Extra spaces between characters are NOT ignored
But blank lines and the end-of-line character, amongst others, are still ignored.


Trainz HTML is NOT the same as standard HTML. There are similarities and there are a lot of differences. In general, Trainz HTML is a much smaller and simplier subset of standard HTML. A detailed reference on the version of HTML used in the Trainz Minibrowser can be found at MiniBrowser


If you are experienced with standard HTML you will have to adjust your thinking to use Trainz HTML.

HTML Editors

HTML editors allow you to create HTML files with a minimum of fuss. Most provide tools that can automate much of the repetitive typing work and many provide some error checking features.

Warning:
Because Trainz does not use standard HTML, avoid dedicated HTML applications and Web design packages.


Particularly avoid:-
  • HTML editors and applications that use a graphical interface to move objects such as images and blocks of text around the screen
  • applications programs such as word processors and desktop publishers that can create web pages
... they will create HTML code that will be far too complex for Trainz to handle.


  • Simple text editors, such as MS Notepad supplied with MS Windows or TextEdit on MacOS, will work well but will require you to do a lot of typing and they will not perform any error checking
  • More advanced text editors are available that are "HTML aware" and will recognise HTML "tags" making it easier to enter the tags and to check for their completeness

Shown on the left is the Notepad++ text editor which recognises HTML coding and provides some tools to assist in entering and correcting HTML code. The software has coloured the text segments that it has identifed as HTML tags or parts of tags.

Suitable freeware HTML editing software would include:-

  • Notepad++ (Windows only)
  • Atom (MacOSX and Windows)
The MiniBrowser in Trainz allows you to add Web links to external HTML documents  BUT  the links are limited to pages on the Trainz Wiki or threads in the Trainz Forums only. You cannot add a link to your social media account or favourite railway page.

The Anchor Tag is unquestionably the most powerful tool you can use in a web page. It provides a one-click link to another web page. The link can be a text link (shown as underlined) or it can be a graphic image.

The link is restricted to a page on the Trainz Wiki or a thread in the Trainz Forums. You can set up a page, or a series of linked pages, on the Wiki describing your route or session. Some possibilities:-

  • a driving tutorial of your route
  • loco rosters
  • train schedules
  • list of industries and their commodities
  • tasks to be completed in each session


Some actual examples from the Trainz Wiki that are accessed from HTML Message Pages in Sessions include:-


The Anchor Tag begins with ...

<a href="add link address here...">

... and ends with ...

</a>

In between the starting and ending parts of the tag you place the image or text that will become the link as shown in the text example below.

Anchor Tag

This will display the link in the MiniBrowser as Link

Clicking the link will open the web page in your default web browser program.

The Trainz Wiki has a page giving more information about the MiniBrowser at MiniBrowser. You may be interested in the image tag (<img src="name of image file">) for using images instead of text for the links, and adding tool tips (the tooltip="place tool tip text here") parameter in the Anchor tag.

  Top Next Up Next Down Bottom

Audio Files

Audio files can be added into HTML assets to play sounds when the HTML page is displayed on the screen. Examples would include conductor whistles and "all aboard" calls, etc. The sound is stored as a separate file in the HTML asset.

Audio Specifications


Settings:

Audio files must be recorded using, or converted to:-

  • 8 or 16 bit sample sizes
  • 22kHz (22,050Hz) or 44kHz (44,100Hz) sample rate
  • Mono, stereo or surround format ("surround" is not fully tested)

...and saved using

  • Uncompressed WAV format PCM (Pulse Coded Modulation)


Warning:
Take care when deciding which settings (bit rate, sample rate, number of channels) are to be used for a sound. High settings will produce significantly larger file sizes and often for no noticeable improvements in sound quality


For a short simple sound, such as a telegraph bell or a conductors whistle, lower settings (e.g. 8 bit, 22kHz, mono) would probably be more suitable


Audio Software

The main requirement for audio editing software is that it must be able to save sound files in the WAV file format and meet the specifications listed above.

A suitable freeware audio editing software would be:-

  • Audacity for both MacOSX and Windows

Audacity audio file recording and editing software (shown above).

  Top Next Up Next Down Bottom

Adding a Message Popup to a Session

The built-in Message Popup rule is used to create the message windows that appear on the screen during the running of a session.

The Message Popup Rule has to be added to the session rule list in the Session Editor in Surveyor which you access from the Surveyor Main Menu in TANE or from the Surveyor Edit Menu in TRS19 and Trainz Plus. Each message will need its own Message Popup rule in the session rule list.

The Message Popup rule provides three different methods of creating the messages, and adding graphics and sound if needed. These methods are:-

 from a simple text message typed into the rule with an optional graphic. If needed a sound can be added from an existing HTML asset.
 from a HTML page stored as a file in a HTML asset. This HTML page can have many graphic images, each stored in the HTML asset, and many lines of text. If needed a sound can be added from the same or another HTML asset.
 from a "string-table" in the config.txt file of a HTML asset. If needed a sound can be added from the same or another HTML asset.

Option 1: A Simple Custom Text Message

The simplest and easiest method of adding message windows to a Trainz Session is to use the Message Popup rule with the Custom Text option for all your Session messages.

Notes:

Tick This option has a number of advantages:-

  • No knowledge of HTML is required.
  • You can use a built in graphic (with more available on the DLS)
  • You can use sounds from existing HTML assets
  • There is no need to create a HTML asset

Cross There are also some disadvantages. For each message window:-

  • You can only use one graphic which has to be selected from a list of special "texture" graphics


If you are happy using Option 1, installed graphics and sounds or no graphics and sounds at all, then you do not have to create a HTML asset for your session.


For example:


Settings:

Custom text
In This Example:

Pause game while message is displayed - game play will not be paused
Close previous message popup windows - this is usually a good idea unless you want multiple message windows open
Message location: Top left of the screen has been chosen as the location for the message window. Other positions are Top right, Bottom left and Bottom right
Custom Message - the message entered into the text box will be displayed
Icon - the selected optional icon will be displayed
HTML Wave: General Purpose Session HTML HTML asset contains the optional sound file to be played
Wav Name: all-aboard.wav is the optional sound file to be played
Autoplay Wav - the sound will be played when the page is displayed

If all your Session messages use this option then there is no need to create a HTML asset
To find additional graphic icons that can be added to the Message Popup window, use Content Manager and set a Custom Filter to search for:-
  • Category select Texture- Not Environmental
  • Name type icon
  • On Download Station select True
Not all those shown will be suitable. Double click a possible icon to display its details before downloading.


To find information on how to create your own Message Popup Icons, see the Trainz Wiki Page:-

Option 2: A HTML Page

To use a HTML file use the Message Popup rule with the A pre-defined HTML page option selected.

Use an Existing HTML Asset

You can use HTML files and graphics from HTML assets that are already installed on your system.
There is a General Purpose Session HTML asset that is built into Trainz that contains a series of "basic" HTML message pages and audio files that can be used in a session. An example is shown below.
  • This option has the advantage of not needing to create any new HTML files and assets.
  • But you will need to explore the existing assets, by opening them in Content Manager, to see what is available and if they are suitable for your purposes.

Settings:

A pre-defined HTML page (advanced)
In This Example:

Pause game while message is displayed - this will halt the game play until the window is closed. This may be needed if you have a long introductory HTML information page, otherwise leave unchecked
Close previous message popup windows - this is usually a good idea unless you want multiple message windows open.
Message location: Top left of the screen has been chosen as the location for the message window. Other positions are Top right, Bottom left and Bottom right
HTML Asset: General Purpose Session HTML one of the HTML assets installed with Trainz
HTML Page: right_away.html which is a HTML file inside the General Purpose Session HTML asset
HTML Wave: General Purpose Session HTML HTML asset contains the optional sound file to be played
Wav Name: all-aboard.wav is the optional sound file to be played
Autoplay Wav - the sound will be played when the page is displayed

Create Your own HTML Asset

Creating your own HTML assets allows you to add session information and instructions that are perfectly tailored to each session. This does require creative effort and time, will need more testing and will probably generate a lot of frustration. But the end result can be worth it.

If you have created your own HTML asset it must be committed in Content Manager before it can be used in a Message Popup


All the files (HTML, graphics, audio and the config.txt) are saved in the asset folder as shown in the example below. This example includes a single .html file which references all the .jpg and .tga graphic files. You can add as many HTML files as you need.

Error creating thumbnail: /bin/bash: line 1: /usr/bin/convert: No such file or directory Error code: 127 THIS IS AN EXAMPLE ONLY

The minimum number of files needed in a HTML asset is 2 - the config.txt file and a thumbnail image (a .jpg file).

A useful time saving technique is to view the HTML files in a normal web browser before committing the asset. However, if TGA image files have been used then they will not appear in the browser.


You can edit HTML files so that the pages will be displayed in a normal web browser with white text and a background that approximates the one used in the Trainz MiniBrowser. This makes it easier to test the pages without having to constantly open, edit, update and then commit the HTML assets in Content Manager.

To do this, edit the <body> tag at the top of each HTML page to read ...

<body bgcolor=#192a32 text=#ffffff>

This will have no effect on the appearance of the pages in Trainz.


Option 3: A String Table

To use a string-table for the message text, use the "A predefined string-table entry from a HTML asset" option.

The text to be displayed in the message must be added to the config.txt file of the HTML asset. A series of text messages for different message windows can be placed in this file.
The disadvantage of this option compared to option 1 above is that the config.txt file of the HTML asset has to be edited and the asset re-committed every time a message is added or changed.

For example, the config.txt file of a HTML asset may have a string-table container as shown below:-

string-table
   {
      html_warning_late                             "You are running behind schedule."
      html_warning_early                            "You are running ahead of schedule."
      html_finished_title                           "Session completed!"
   }

The label html_warning_late is a "string-table token" that identifies the message "You are running behind schedule". The Message Popup rule uses this token to identify the message.

For example:-
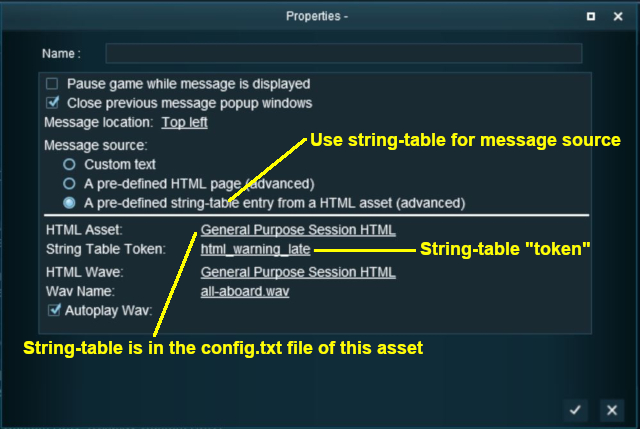

Settings:

A pre-defined string-table entry from a HTML asset (advanced)
In This Example:

Pause game while message is displayed - game play will not be paused
Close previous message popup windows - this is usually a good idea unless you want multiple message windows open
Message location: Top left of the screen has been chosen as the location for the message window. Other positions are Top right, Bottom left and Bottom right
HTML Asset: General Purpose Session HTML one of the HTML assets installed with Trainz
String Table Token: html_warning_late the string table token in the config.txt file of the General Purpose Session HTML asset contains the message to be displayed
HTML Wave: General Purpose Session HTML HTML asset contains the optional sound file to be played
Wav Name: all-aboard.wav is the optional sound file to be played
Autoplay Wav - the sound will be played when the page is displayed


The disadvantage of this Option compared to Option 1 above is that the config.txt file of the HTML asset has to be edited and the asset re-committed every time a message is added or changed.

A String Table With HTML

You can include some simple HTML codes in the text message. If the string-table token and message shown below is included in the config.txt file...

warning_message_stop                "You have passed a stop signal.<br><br><font color=#ffff00><b>Apply your brakes immediately</b></font>"

...and if this token and its HTML asset is used in the Message Popup rule, then the following message will appear on the screen.
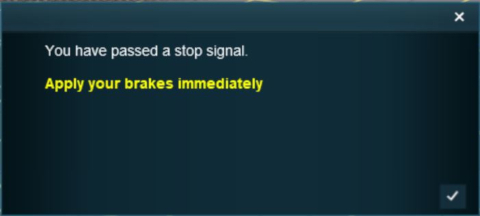
Alternatives to the Message Popup Rule

There are other HTML message window rules that are alternatives to the Message Popup rule. A few possibilities are:-
  Top Next Up    


Trainz Wiki

More Tutorials and Guides to Using Trainz


This page was created by Trainz user pware in May 2018 and was last updated as shown below.