SAR Belalie North Switches V1: Difference between revisions

From TrainzOnline
Jump to navigationJump to search
Pware (talk | contribs)
No edit summary
Pware (talk | contribs)
No edit summary
Line 120: Line 120:
</table>
</table>


<table>
<table width=750>
<tr valign="top">
<tr valign="top">


Line 133: Line 133:
</tr>
</tr>
</table>
</table>
<table>
 
<table width=750>
<tr valign="top">
<tr valign="top">


Line 147: Line 148:
</table>
</table>


<table>
<table width=750>
<tr valign="top">
<tr valign="top">


Line 160: Line 161:
</tr>
</tr>
</table>
</table>
</td>
</tr>


<tr valign="top">
<tr valign="top">

Revision as of 05:30, 29 March 2024

    
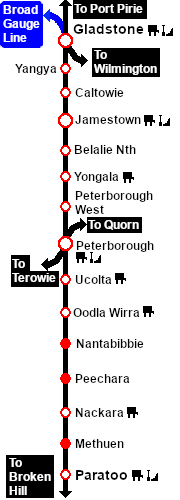
PortPirie-BrokenHill
Jamestown
Location Index
Scenarios

Yongala
PortPirie-BrokenHill
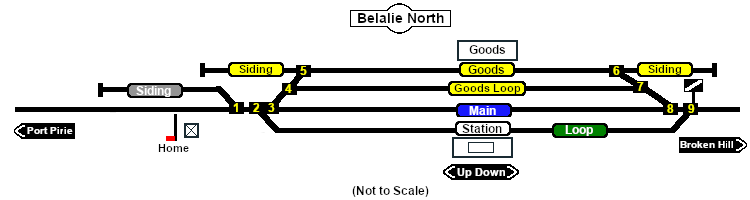
Belalie North Switches map
This is the original v1.0 Belalie North Map and description. For the latest SAR Peterborough Narrow Gauge Division v2.0 version click here. The v2.0 version of the route and sessions requires Trainz Plus or TRS22
  Switches  
No. Name Facing and L/R Directions
(default direction first)
No. Name Facing and L/R Directions
(default direction first)
BN 1 Up (L) Port Pirie, (R) Neck  DE  BN 2 Down (L) Main, (R) Station Loop
BN 3 Down (R) Main, (L) Goods Loop/Goods Shed BN 4 Down (R) Goods Loop, (L) Goods Shed
BN 5 Up (R) Goods Siding Up  DE , (L) Port Pirie BN 6 Down (L) Goods Siding Dn  DE , (R) Broken Hill
BN 7 Up (L) Goods Loop, (R) Goods Shed BN 8 Up (L) Main, (R) Goods Loop/Goods Shed
BN 9 Up (R) Main, (L) Station Loop  
 Switch Sets 
 Port Pirie -  Station  Loop   1 -L  2 -R  Broken Hill -  Station  Loop   9 -L
 Port Pirie -  Main   1 -L  2 -L  3 -R  Broken Hill -  Main   9 -R  8 -L
 Port Pirie -  Goods Loop   1 -L  2 -L  3 -L  4 -R  Broken Hill -  Goods Loop   9 -R  8 -R  7 -L
 Port Pirie -  Goods   1 -L  2 -L  3 -L  4 -L  5 -L  Broken Hill -  Goods   9 -R  8 -R  7 -R  6 -R

PortPirie-BrokenHill

Gladstone-Paratoo Strip Map