How to Use Track Triggers: Difference between revisions
mNo edit summary |
|||
| Line 66: | Line 66: | ||
</tr> | </tr> | ||
<tr valign="top"> | <tr valign="top"> | ||
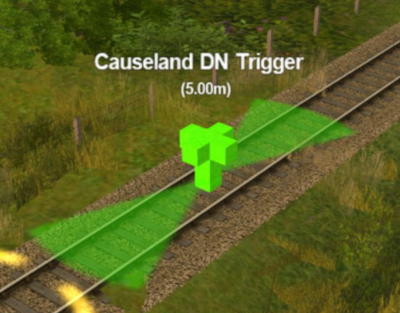
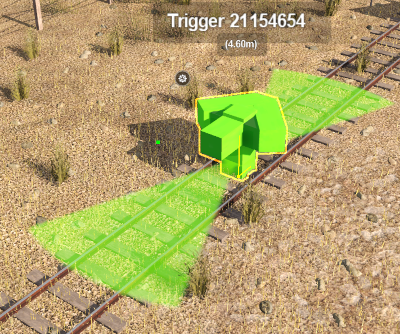
<td>Shown below left is a standard '''Trigger''' and below right is a '''Directional Trigger'''. They are just two examples of several types of '''Track Triggers'''. In both cases:- | <td>Shown below left is a standard '''Track Trigger''' and below right is a '''Directional Track Trigger'''. They are just two examples of several types of '''Track Triggers'''. In both cases:- | ||
<table> | <table> | ||
<tr valign="top"> | <tr valign="top"> | ||
| Line 78: | Line 78: | ||
<tr valign="top"> | <tr valign="top"> | ||
<td width=10>[[image:redDot10x10.png|link=]]</td> | <td width=10>[[image:redDot10x10.png|link=]]</td> | ||
<td>the '''Directional Trigger''' will normally only be triggered if the consist is moving in the direction indicated by the arrow</td> | <td>the '''Directional Track Trigger''' will normally only be triggered if the consist is moving in the direction indicated by the arrow</td> | ||
</tr> | </tr> | ||
<tr valign="top"> | <tr valign="top"> | ||
<td>[[image:RedDot10x10.png|link=]]</td> | <td>[[image:RedDot10x10.png|link=]]</td> | ||
<td>the standard '''Trigger''' will be triggered regardless of the direction of movement</td> | <td>the standard '''Track Trigger''' will be triggered regardless of the direction of movement</td> | ||
</tr> | </tr> | ||
</table> | </table> | ||
| Line 95: | Line 95: | ||
<tr valign="top"> | <tr valign="top"> | ||
<td width=500 align="center">[[image:TrackTrigger.JPG|link=]]<br> | <td width=500 align="center">[[image:TrackTrigger.JPG|link=]]<br> | ||
'''"Standard" Trigger'''</td> | '''"Standard" Track Trigger'''</td> | ||
<td width=500 align="center">[[image:TrackDTrigger.png|link=]]<br> | <td width=500 align="center">[[image:TrackDTrigger.png|link=]]<br> | ||
'''Directional Trigger'''</td> | '''Directional Track Trigger'''</td> | ||
</tr> | </tr> | ||
</table> | </table> | ||
| Line 121: | Line 121: | ||
<tr valign="top"> | <tr valign="top"> | ||
<td width=10>[[image:BlueDot10x10.png|link=]]</td> | <td width=10>[[image:BlueDot10x10.png|link=]]</td> | ||
<td>'''Track | <td>'''Track Triggers''' can be placed in a '''Route Layer''' or in a '''Session Layer'''</td> | ||
</tr> | </tr> | ||
</table> | </table> | ||
| Line 137: | Line 137: | ||
<tr valign="top"> | <tr valign="top"> | ||
<td width=10>[[image:DotPoint.JPG|10px|link=]]</td> | <td width=10>[[image:DotPoint.JPG|10px|link=]]</td> | ||
<td>Placing '''Track Trigger''' in a '''Route layer''' (e.g. in the same layer as the track) means that they will be available in '''all Sessions''' created using that particular Route</td> | <td>Placing a '''Track Trigger''' in a '''Route layer''' (e.g. in the same layer as the track) means that they will be available in '''all Sessions''' created using that particular Route</td> | ||
</tr> | </tr> | ||
<tr valign="top"> | <tr valign="top"> | ||
<td>[[image:DotPoint.JPG|10px|link=]]</td> | <td>[[image:DotPoint.JPG|10px|link=]]</td> | ||
<td>Placing '''Track Trigger''' in a '''Session layer''' means that they will only be available in that Session. This can be useful if two or more Sessions are being created and you want to use different '''Track Trigger''' in each Session</td> | <td>Placing a '''Track Trigger''' in a '''Session layer''' means that they will only be available in that Session. This can be useful if two or more Sessions are being created and you want to use different '''Track Trigger''' in each Session</td> | ||
</tr> | </tr> | ||
</table> | </table> | ||
| Line 179: | Line 179: | ||
<td><span style="font-size: 17px; font-weight: 700;">Notes:'''</span><br> | <td><span style="font-size: 17px; font-weight: 700;">Notes:'''</span><br> | ||
---- | ---- | ||
A '''Trigger''' has two important properties:- | A '''Track Trigger''' has two important properties:- | ||
<table> | <table> | ||
<tr valign="top"> | <tr valign="top"> | ||
<td width=10>[[image:DotPoint.JPG|10px|link=]]</td> | <td width=10>[[image:DotPoint.JPG|10px|link=]]</td> | ||
<td>its name which is needed for all commands and rules that use the '''Trigger''', and</td> | <td>its name which is needed for all commands and rules that use the '''Track Trigger''', and</td> | ||
</tr> | </tr> | ||
<tr valign="top"> | <tr valign="top"> | ||
<td>[[image:DotPoint.JPG|10px|link=]]</td> | <td>[[image:DotPoint.JPG|10px|link=]]</td> | ||
<td>its '''Effect Radius''' (the green "wings" shown in the image above with the radius value, in metres, shown below the | <td>its '''Effect Radius''' (the green "wings" shown in the image above with the radius value, in metres, shown below the '''Track Trigger''' name). This controls how closely an AI train has to approach the '''Track Trigger''' to activate it (smaller radius = closer to the '''Track Trigger''')</td> | ||
</tr> | </tr> | ||
</table> | </table> | ||
| Line 194: | Line 194: | ||
<tr valign="top" bgcolor=#ffffe0> | <tr valign="top" bgcolor=#ffffe0> | ||
<td>[[image:PencilTips.PNG|link=]]</td> | <td>[[image:PencilTips.PNG|link=]]</td> | ||
<td>A "standard" '''Trigger''' has no visible direction and, while it can be rotated, this has '''NO EFFECT''' on its operation. The '''Directional Trigger''' does have a direction because it is only triggered by trains travelling in a specific direction</td> | <td>A "standard" '''Track Trigger''' has no visible direction and, while it can be rotated, this has '''NO EFFECT''' on its operation. The '''Directional Track Trigger''' does have a direction because it is only triggered by trains travelling in a specific direction</td> | ||
</tr> | </tr> | ||
</table> | </table> | ||
| Line 239: | Line 239: | ||
<table bgcolor=#ffffff cellpadding=2> | <table bgcolor=#ffffff cellpadding=2> | ||
<tr valign="top"> | <tr valign="top"> | ||
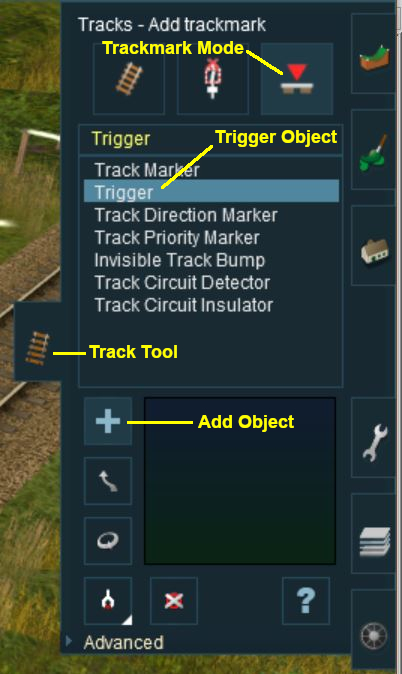
<td colspan=2><span style="font-weight: 700; font-size: 15px;">Steps:</span> To add a '''Trigger''':-</td> | <td colspan=2><span style="font-weight: 700; font-size: 15px;">Steps:</span> To add a '''Track Trigger''':-</td> | ||
</tr> | </tr> | ||
<tr valign="top"> | <tr valign="top"> | ||
| Line 251: | Line 251: | ||
<tr valign="top"> | <tr valign="top"> | ||
<td>[[image:DotPoint3.JPG|link=]]</td> | <td>[[image:DotPoint3.JPG|link=]]</td> | ||
<td><span style="font-weight: 700; font-size: 15px; background-color: lightcyan;">Left Click</span> on the '''Trigger''' shown in the asset list</td> | <td><span style="font-weight: 700; font-size: 15px; background-color: lightcyan;">Left Click</span> on the '''Track Trigger''' shown in the asset list</td> | ||
</tr> | </tr> | ||
<tr valign="top"> | <tr valign="top"> | ||
| Line 259: | Line 259: | ||
<tr valign="top"> | <tr valign="top"> | ||
<td>[[image:DotPoint5.JPG|link=]]</td> | <td>[[image:DotPoint5.JPG|link=]]</td> | ||
<td><span style="font-weight: 700; font-size: 15px; background-color: lightcyan;">Left Click</span> on the track location where the Trigger is to be placed</td> | <td><span style="font-weight: 700; font-size: 15px; background-color: lightcyan;">Left Click</span> on the track location where the '''Track Trigger''' is to be placed</td> | ||
</tr> | </tr> | ||
<tr valign="top"> | <tr valign="top"> | ||
<td colspan=2>This will place the Trigger on the track and open its properties window.</td> | <td colspan=2>This will place the '''Track Trigger''' on the track and open its properties window.</td> | ||
</tr> | </tr> | ||
</table> | </table> | ||
| Line 275: | Line 275: | ||
<tr valign="top"> | <tr valign="top"> | ||
<td width=25>[[image:PencilTips.PNG|link=]]</td> | <td width=25>[[image:PencilTips.PNG|link=]]</td> | ||
<td>Avoid placing a '''Track Trigger''' on a junction. You could accidentally place the | <td>Avoid placing a '''Track Trigger''' on a junction. You could accidentally place the '''Track Trigger''' on the wrong junction branch which means that it will have no effect if the targetted train is directed to the other branch</td> | ||
</tr> | </tr> | ||
</table> | </table> | ||
| Line 287: | Line 287: | ||
<table width=1000> | <table width=1000> | ||
<tr valign="top"> | <tr valign="top"> | ||
<td>As soon as a new | <td>As soon as a new '''Track Trigger''' has been placed, its properties window will open on the screen. It will initially be given a default name and assigned to the currently active layer.</td> | ||
</tr> | </tr> | ||
</table> | </table> | ||
| Line 296: | Line 296: | ||
<tr valign="top"> | <tr valign="top"> | ||
<td width=10>[[image:BlueDot10x10.png|link=]]</td> | <td width=10>[[image:BlueDot10x10.png|link=]]</td> | ||
<td>Except for the '''Directional Track Trigger''', the direction the '''Track | <td>Except for the '''Directional Track Trigger''', the direction the '''Track Trigger''' is pointing has no effect on its operation.</td> | ||
</tr> | </tr> | ||
</table> | </table> | ||
| Line 356: | Line 356: | ||
<tr valign="top"> | <tr valign="top"> | ||
<td>[[image:PencilTips.PNG|link=]]</td> | <td>[[image:PencilTips.PNG|link=]]</td> | ||
<td>Enter a useful | <td>Enter a useful descriptive name for each '''Track Trigger''' - the name will be needed for session rules and driver commands. Many creators base the name on the location (e.g. "Maintown Approach North") | ||
</td> | </td> | ||
</tr> | </tr> | ||
| Line 373: | Line 373: | ||
<tr valign="top"> | <tr valign="top"> | ||
<td width=25>[[image:DotPoint1.JPG|link=]]</td> | <td width=25>[[image:DotPoint1.JPG|link=]]</td> | ||
<td>To change the Trigger name <span style="font-weight: 700; font-size: 15px; background-color: lightcyan;">Left Click</span> on the name text entry box, delete the highlighted default name and enter a new name</td> | <td>To change the '''Track Trigger''' name <span style="font-weight: 700; font-size: 15px; background-color: lightcyan;">Left Click</span> on the name text entry box, delete the highlighted default name and enter a new name</td> | ||
</tr> | </tr> | ||
<tr valign="top"> | <tr valign="top"> | ||
| Line 418: | Line 418: | ||
<table width=1000> | <table width=1000> | ||
<tr valign="top"> | <tr valign="top"> | ||
<td>The '''Effect Radius''' sets the size of green "effect wings" attached both ends of the '''Track Trigger'''. This sets how close a consist has to approach to | <td>The '''Effect Radius''' sets the size of green "effect wings" attached both ends of the '''Track Trigger'''. This sets how close a consist has to approach to '''Track Trigger''' its "event". The smaller the radius the closer it must approach.</td> | ||
</tr> | </tr> | ||
</table> | </table> | ||
| Line 459: | Line 459: | ||
<table bgcolor=#ffffff cellpadding=2> | <table bgcolor=#ffffff cellpadding=2> | ||
<tr valign="top"> | <tr valign="top"> | ||
<td colspan=2><span style="font-weight: 700; font-size: 15px;">Steps:</span> To set a '''Track Triggers''' Effect Radius:-</td> | <td colspan=2><span style="font-weight: 700; font-size: 15px;">Steps:</span> To set a '''Track Triggers''' '''Effect Radius''':-</td> | ||
</tr> | </tr> | ||
<tr valign="top"> | <tr valign="top"> | ||
<td width=25>[[image:DotPoint1.JPG|link=]]</td> | <td width=25>[[image:DotPoint1.JPG|link=]]</td> | ||
<td>In the '''Track Tools''' flyout, <span style="font-weight: 700; font-size: 15px; background-color: lightcyan;">Left Click</span> on the '''Advanced''' button to open the Radius tools and properties. You will have a choice of 4 methods to set and adjust the Effect Radius</td> | <td>In the '''Track Tools''' flyout, <span style="font-weight: 700; font-size: 15px; background-color: lightcyan;">Left Click</span> on the '''Advanced''' button to open the Radius tools and properties. You will have a choice of 4 methods to set and adjust the '''Effect Radius'''</td> | ||
</tr> | </tr> | ||
<tr valign="top"> | <tr valign="top"> | ||
| Line 473: | Line 473: | ||
<tr valign="top"> | <tr valign="top"> | ||
<td width=25>[[image:Ablue.png|link=]]</td> | <td width=25>[[image:Ablue.png|link=]]</td> | ||
<td>To copy the '''Effect Radius''' of an existing '''Trigger''' | <td>To copy the '''Effect Radius''' of an existing '''Track Trigger''' | ||
<table> | <table> | ||
<tr valign="top"> | <tr valign="top"> | ||
| Line 481: | Line 481: | ||
<tr valign="top"> | <tr valign="top"> | ||
<td>[[image:DotPoint3.JPG|link=]]</td> | <td>[[image:DotPoint3.JPG|link=]]</td> | ||
<td><span style="font-weight: 700; font-size: 15px; background-color: lightcyan;">Left Click</span> on the '''Trigger''' whose radius you want to copy - the radius will be copied into the Effect Radius Value text box (the default value is 20.00 metres)</td> | <td><span style="font-weight: 700; font-size: 15px; background-color: lightcyan;">Left Click</span> on the '''Track Trigger''' whose radius you want to copy - the radius will be copied into the '''Effect Radius''' Value text box (the default value is 20.00 metres)</td> | ||
</tr> | </tr> | ||
<tr valign="top"> | <tr valign="top"> | ||
| Line 496: | Line 496: | ||
<tr valign="top"> | <tr valign="top"> | ||
<td width=25>[[image:DotPoint2.JPG|link=]]</td> | <td width=25>[[image:DotPoint2.JPG|link=]]</td> | ||
<td>Type the new value (in metres) into the Effect Radius Value text box</td> | <td>Type the new value (in metres) into the '''Effect Radius''' Value text box</td> | ||
</tr> | </tr> | ||
<tr valign="top"> | <tr valign="top"> | ||
| Line 507: | Line 507: | ||
<tr valign="top"> | <tr valign="top"> | ||
<td>[[image:Cblue.png|link=]]</td> | <td>[[image:Cblue.png|link=]]</td> | ||
<td>To apply a value in the '''Effect Radius Value''' text box (from methods [[image:Ablue.png|link=]], [[image:Bblue.png|link=]] or [[image:Dblue.png|link=]]) to another '''Trigger''' | <td>To apply a value in the '''Effect Radius Value''' text box (from methods [[image:Ablue.png|link=]], [[image:Bblue.png|link=]] or [[image:Dblue.png|link=]]) to another '''Track Trigger''' | ||
<table> | <table> | ||
<tr valign="top"> | <tr valign="top"> | ||
| Line 515: | Line 515: | ||
<tr valign="top"> | <tr valign="top"> | ||
<td>[[image:DotPoint3.JPG|link=]]</td> | <td>[[image:DotPoint3.JPG|link=]]</td> | ||
<td><span style="font-weight: 700; font-size: 15px; background-color: lightcyan;">Left Click</span> on the '''Trigger''' that is to receive the new value (you can click on more than one)</td> | <td><span style="font-weight: 700; font-size: 15px; background-color: lightcyan;">Left Click</span> on the '''Track Trigger''' that is to receive the new value (you can click on more than one)</td> | ||
</tr> | </tr> | ||
</table> | </table> | ||
| Line 522: | Line 522: | ||
<tr valign="top"> | <tr valign="top"> | ||
<td>[[image:Dblue.png|link=]]</td> | <td>[[image:Dblue.png|link=]]</td> | ||
<td>To adjust the Effect Radius value up or down | <td>To adjust the '''Effect Radius''' value up or down | ||
<table> | <table> | ||
<tr valign="top"> | <tr valign="top"> | ||
| Line 530: | Line 530: | ||
<tr valign="top"> | <tr valign="top"> | ||
<td>[[image:DotPoint3.JPG|link=]]</td> | <td>[[image:DotPoint3.JPG|link=]]</td> | ||
<td>Select the '''Trigger'''</td> | <td>Select the '''Track Trigger'''</td> | ||
</tr> | </tr> | ||
<tr valign="top"> | <tr valign="top"> | ||
| Line 538: | Line 538: | ||
<tr valign="top"> | <tr valign="top"> | ||
<td>[[image:DotPoint5.JPG|link=]]</td> | <td>[[image:DotPoint5.JPG|link=]]</td> | ||
<td>The new value will be immediately applied to the selected Trigger as the mouse moves (but only one Trigger at a time)</td> | <td>The new value will be immediately applied to the selected '''Track Trigger''' as the mouse moves (but only one '''Track Trigger''' at a time)</td> | ||
</tr> | </tr> | ||
</table> | </table> | ||
| Line 560: | Line 560: | ||
<tr valign="top"> | <tr valign="top"> | ||
<td>[[image:PencilTips.PNG|link=]]</td> | <td>[[image:PencilTips.PNG|link=]]</td> | ||
<td>Once you have an Effect Radius entered in the value box, you can apply it to any number of '''Track Trigger''' by using method [[image:Cblue.png|link=]] shown above | <td>Once you have an '''Effect Radius''' entered in the value box, you can apply it to any number of '''Track Trigger''' by using method [[image:Cblue.png|link=]] shown above | ||
</td> | </td> | ||
</tr> | </tr> | ||
| Line 571: | Line 571: | ||
<tr valign="top"> | <tr valign="top"> | ||
<td width=629><span id="skipAddS20"></span> | <td width=629><span id="skipAddS20"></span> | ||
=='''In Surveyor 2.0 (S20)'''== | =='''In Surveyor 2.0 (S20)'''== | ||
</td> | </td> | ||
| Line 653: | Line 652: | ||
<table bgcolor=#ffffe0 cellpadding=2> | <table bgcolor=#ffffe0 cellpadding=2> | ||
<tr valign="top"> | <tr valign="top"> | ||
<td colspan=2>[[image:PencilTips.PNG|link=]] <span style="font-size: 15px; font-weight: 700; color: white; background-color: blue;"> Shortcut </span> If you already have a '''Trigger''' placed in your route then:-</td> | <td colspan=2>[[image:PencilTips.PNG|link=]] <span style="font-size: 15px; font-weight: 700; color: white; background-color: blue;"> Shortcut </span> If you already have a '''Track Trigger''' placed in your route then:-</td> | ||
</tr> | </tr> | ||
<tr valign="top"> | <tr valign="top"> | ||
<td width=20>[[image:DotPoint1Blue.png|link=]]</td> | <td width=20>[[image:DotPoint1Blue.png|link=]]</td> | ||
<td>move the tool pointer over the existing | <td>move the tool pointer over the existing '''Track Trigger''' object and hold down the <span style="font-weight: 700; font-size: 15px; color: white; background-color: black;"> Alt </span> key. The object name will appear in a '''ToolTip''' attached to the pointer</td> | ||
</tr> | </tr> | ||
<tr valign="top"> | <tr valign="top"> | ||
<td>[[image:DotPoint2Blue.png|link=]]</td> | <td>[[image:DotPoint2Blue.png|link=]]</td> | ||
<td>while holding down the <span style="font-weight: 700; font-size: 15px; color: white; background-color: black;"> Alt </span> key <span style="font-weight: 700; font-size: 15px; background-color: lightcyan;">Left Click</span> on the | <td>while holding down the <span style="font-weight: 700; font-size: 15px; color: white; background-color: black;"> Alt </span> key <span style="font-weight: 700; font-size: 15px; background-color: lightcyan;">Left Click</span> on the '''Track Trigger''' to identify it in the '''Assets Palette''' and to select the '''Placement Tool'''. Release the key.</td> | ||
</tr> | </tr> | ||
<tr valign="top"> | <tr valign="top"> | ||
| Line 747: | Line 746: | ||
<tr valign="top"> | <tr valign="top"> | ||
<td>[[image:DotPoint4.JPG|link=]]</td> | <td>[[image:DotPoint4.JPG|link=]]</td> | ||
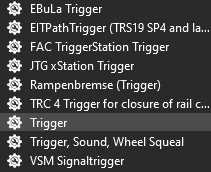
<td><span style="font-weight: 700; font-size: 15px; background-color: lightcyan;">Left Click</span> on the item name '''Trigger''' (or another | <td><span style="font-weight: 700; font-size: 15px; background-color: lightcyan;">Left Click</span> on the item name '''Track Trigger''' (or another '''Track Trigger''' object) in the list - you may have to scroll down the list to find the asset.<br> | ||
[[image:FilterPaletteSearchTriggerScrolled_S20.png|link=]] | [[image:FilterPaletteSearchTriggerScrolled_S20.png|link=]] | ||
<br> | <br> | ||
| Line 769: | Line 768: | ||
</tr> | </tr> | ||
</table> | </table> | ||
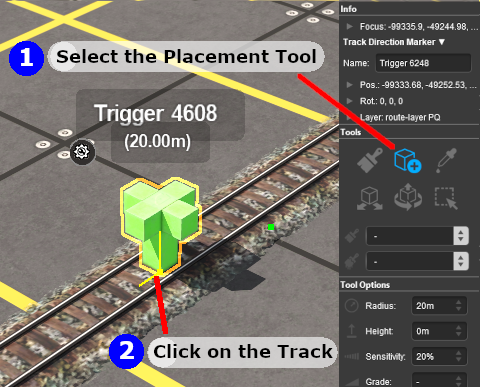
[[image:DotPoint5.JPG|link=]] Place the '''Trigger''' on the track.<br> | [[image:DotPoint5.JPG|link=]] Place the '''Track Trigger''' on the track.<br> | ||
<table width=1000> | <table width=1000> | ||
| Line 788: | Line 787: | ||
<tr valign="top"> | <tr valign="top"> | ||
<td width=25>[[image:DotPoint2Blue.png|link=]]</td> | <td width=25>[[image:DotPoint2Blue.png|link=]]</td> | ||
<td><span style="font-weight: 700; font-size: 15px; background-color: lightcyan;">Left Click</span> on the track at the position where you want to place the '''Trigger'''</td> | <td><span style="font-weight: 700; font-size: 15px; background-color: lightcyan;">Left Click</span> on the track at the position where you want to place the '''Track Trigger'''</td> | ||
</tr> | </tr> | ||
<tr valign="top"> | <tr valign="top"> | ||
<td colspan=2>Once placed a '''Trigger''' can be easily moved if needed.</td> | <td colspan=2>Once placed a '''Track Trigger''' can be easily moved if needed.</td> | ||
</tr> | </tr> | ||
</table> | </table> | ||
| Line 806: | Line 805: | ||
<td><span style="font-size: 17px; font-weight: 700;">Notes:'''</span><br> | <td><span style="font-size: 17px; font-weight: 700;">Notes:'''</span><br> | ||
---- | ---- | ||
To delete a '''Trigger''' (or any asset):- | To delete a '''Track Trigger''' (or any asset):- | ||
<table bgcolor=#ffffff> | <table bgcolor=#ffffff> | ||
<tr valign="top"> | <tr valign="top"> | ||
| Line 828: | Line 827: | ||
<tr valign="top"> | <tr valign="top"> | ||
<td>[[image:DotPoint2.JPG|link=]]</td> | <td>[[image:DotPoint2.JPG|link=]]</td> | ||
<td><span style="font-weight: 700; font-size: 15px; background-color: lightcyan;">Left Click</span> on the '''Trigger'''</td> | <td><span style="font-weight: 700; font-size: 15px; background-color: lightcyan;">Left Click</span> on the '''Track Trigger'''</td> | ||
</tr> | </tr> | ||
<tr valign="top"> | <tr valign="top"> | ||
| Line 854: | Line 853: | ||
<tr valign="top"> | <tr valign="top"> | ||
<td>[[image:PencilTips.PNG|link=]]</td> | <td>[[image:PencilTips.PNG|link=]]</td> | ||
<td>If you need to rotate the '''Trigger''' to face the opposite direction then:- | <td>If you need to rotate the '''Track Trigger''' to face the opposite direction then:- | ||
<table bgcolor=#ffffff> | <table bgcolor=#ffffff> | ||
<tr valign="top"> | <tr valign="top"> | ||
| Line 861: | Line 860: | ||
<tr valign="top"> | <tr valign="top"> | ||
<td width=25>[[image:DotPoint1.JPG|link=]]</td> | <td width=25>[[image:DotPoint1.JPG|link=]]</td> | ||
<td>select the Trigger then <span style="font-weight: 700; font-size: 15px; background-color: lightcyan;">Left Click</span> on its '''Context Menu Icon''' (or press the <span style="font-weight: 700; font-size: 17px; color: white; background-color: black;"> T </span> key)</td> | <td>select the '''Track Trigger''' then <span style="font-weight: 700; font-size: 15px; background-color: lightcyan;">Left Click</span> on its '''Context Menu Icon''' (or press the <span style="font-weight: 700; font-size: 17px; color: white; background-color: black;"> T </span> key)</td> | ||
</tr> | </tr> | ||
<tr valign="top"> | <tr valign="top"> | ||
| Line 871: | Line 870: | ||
</tr> | </tr> | ||
<tr valign="top"> | <tr valign="top"> | ||
<td colspan=2>'''Note:''' the direction that a '''Standard Track Trigger''' faces has no effect on its operation. There are some '''Track Triggers''' that do have a specific direction of operation</td> | <td colspan=2>'''Note:''' the direction that a '''"Standard" Track Trigger''' faces has no effect on its operation. There are some '''Track Triggers''' that do have a specific direction of operation</td> | ||
</tr> | </tr> | ||
</table> | </table> | ||
| Line 886: | Line 885: | ||
<tr valign="top"> | <tr valign="top"> | ||
<td width=25>[[image:PencilTips.PNG|link=]]</td> | <td width=25>[[image:PencilTips.PNG|link=]]</td> | ||
<td>Avoid placing a '''Track Trigger''' on a junction. You could accidentally place the | <td>Avoid placing a '''Track Trigger''' on a junction. You could accidentally place the '''Track Trigger''' on the wrong junction branch which means that it will have no effect if the targetted train is directed to the other branch</td> | ||
</tr> | </tr> | ||
</table> | </table> | ||
| Line 898: | Line 897: | ||
===Change Its Name (S20)=== | ===Change Its Name (S20)=== | ||
The name of the '''Track Trigger''' '''IS''' important. It is needed to identify the Trigger in '''Session Rules'''.<br> | The name of the '''Track Trigger''' '''IS''' important. It is needed to identify the '''Track Trigger''' in '''Session Rules'''.<br> | ||
<table width=1000> | <table width=1000> | ||
<tr valign="top"> | <tr valign="top"> | ||
| Line 908: | Line 907: | ||
<table bgcolor=#ffffff cellpadding=2> | <table bgcolor=#ffffff cellpadding=2> | ||
<tr valign="top"> | <tr valign="top"> | ||
<td colspan=2><span style="font-weight: 700; font-size: 15px;">Steps:</span> To change the name of a '''Trigger''':-</td> | <td colspan=2><span style="font-weight: 700; font-size: 15px;">Steps:</span> To change the name of a '''Track Trigger''':-</td> | ||
</tr> | </tr> | ||
<tr valign="top"> | <tr valign="top"> | ||
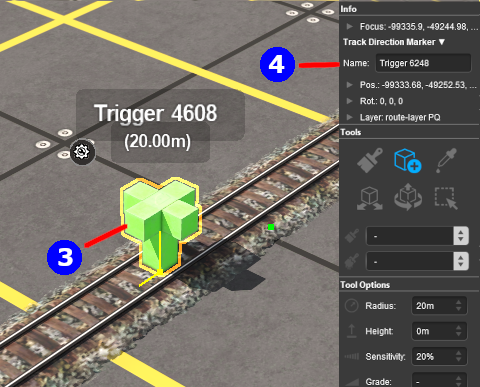
<td width=25>[[image:DotPoint3Blue.png|link=]]</td> | <td width=25>[[image:DotPoint3Blue.png|link=]]</td> | ||
<td>using either the '''Free Move Tool''' or the '''Fine Adjustment Tool''' select (<span style="font-weight: 700; font-size: 15px; background-color: lightcyan;">Left Click</span> on) the '''Trigger''' to be renamed</td> | <td>using either the '''Free Move Tool''' or the '''Fine Adjustment Tool''' select (<span style="font-weight: 700; font-size: 15px; background-color: lightcyan;">Left Click</span> on) the '''Track Trigger''' to be renamed</td> | ||
</tr> | </tr> | ||
<tr valign="top"> | <tr valign="top"> | ||
<td>[[image:DotPoint4Blue.png|link=]]</td> | <td>[[image:DotPoint4Blue.png|link=]]</td> | ||
<td>in the '''Info Palette''' (you may need to make this palette visible - see the '''Notes:''' for '''Step''' <span style="font-weight: 700; font-size: 15px; color: white; background-color: red;"> 1 </span> above) <span style="font-weight: 700; font-size: 15px; background-color: lightcyan;">Left Click</span> in the '''Name:''' entry box. Enter a name for the '''Trigger''' and press the <span style="font-weight: 700; font-size: 15px; color: white; background-color: black;"> Enter </span> key</td> | <td>in the '''Info Palette''' (you may need to make this palette visible - see the '''Notes:''' for '''Step''' <span style="font-weight: 700; font-size: 15px; color: white; background-color: red;"> 1 </span> above) <span style="font-weight: 700; font-size: 15px; background-color: lightcyan;">Left Click</span> in the '''Name:''' entry box. Enter a name for the '''Track Trigger''' and press the <span style="font-weight: 700; font-size: 15px; color: white; background-color: black;"> Enter </span> key</td> | ||
</tr> | |||
</table> | |||
</td> | |||
</tr> | |||
</table> | |||
<br> | |||
<table bgcolor=#000000> | |||
<tr valign="top"> | |||
<td> | |||
<table bgcolor=#ffffe0> | |||
<tr valign="top"> | |||
<td>[[image:PencilTips.PNG|link=]]</td> | |||
<td>Enter a useful descriptive name for each '''Track Trigger''' - the name will be needed for session rules and driver commands. Many creators base the name on the location (e.g. "Maintown Approach North") | |||
</td> | |||
</tr> | </tr> | ||
</table> | </table> | ||
| Line 944: | Line 957: | ||
<table bgcolor=#ffffff cellpadding=2> | <table bgcolor=#ffffff cellpadding=2> | ||
<tr valign="top"> | <tr valign="top"> | ||
<td colspan=2><span style="font-weight: 700; font-size: 15px;">Steps:</span> To adjust the | <td colspan=2><span style="font-weight: 700; font-size: 15px;">Steps:</span> To adjust the '''Effect Radius''' of a '''Track Trigger''':-</td> | ||
</tr> | </tr> | ||
<tr valign="top"> | <tr valign="top"> | ||
<td width=25>[[image:DotPoint5Blue.png|link=]]</td> | <td width=25>[[image:DotPoint5Blue.png|link=]]</td> | ||
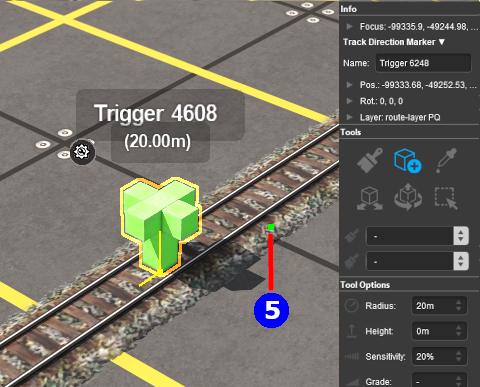
<td><span style="font-weight: 700; font-size: 15px;"><span style="background-color: lightcyan;">Left Click and Drag</span> on the [[image:GreenDot10x10.png|link=]] '''Green Dot''' next to the '''Trigger'''</span>. | <td><span style="font-weight: 700; font-size: 15px;"><span style="background-color: lightcyan;">Left Click and Drag</span> on the [[image:GreenDot10x10.png|link=]] '''Green Dot''' next to the '''Track Trigger'''</span>. | ||
<table> | <table> | ||
<tr valign="top"> | <tr valign="top"> | ||
| Line 1,013: | Line 1,026: | ||
</table> | </table> | ||
<br> | <br> | ||
===Move it Along the Track (S20)=== | ===Move it Along the Track (S20)=== | ||
'''Track Trigger''' can be moved along the track or to other tracks.<br> | A '''Track Trigger''' can be moved along the track or to other tracks.<br> | ||
<table width=1000> | <table width=1000> | ||
<tr valign="top"> | <tr valign="top"> | ||
| Line 1,026: | Line 1,038: | ||
<table bgcolor=#ffffff cellpadding=2> | <table bgcolor=#ffffff cellpadding=2> | ||
<tr valign="top"> | <tr valign="top"> | ||
<td colspan=2><span style="font-weight: 700; font-size: 15px;">Steps:</span> To move the Trigger:-</td> | <td colspan=2><span style="font-weight: 700; font-size: 15px;">Steps:</span> To move the '''Track Trigger''':-</td> | ||
</tr> | </tr> | ||
<tr valign="top"> | <tr valign="top"> | ||
| Line 1,051: | Line 1,063: | ||
<tr valign="top"> | <tr valign="top"> | ||
<td width=10>[[image:DotPoint.JPG|10px|link=]]</td> | <td width=10>[[image:DotPoint.JPG|10px|link=]]</td> | ||
<td>If you drag the object itself and not its '''Attachment Point''' then it will stay at its original height as it is moved along the track. If the track is on a grade then the object will rise above or fall below the track as it is moved. To return the object to its correct height on the track see the next section [[image:PageLink.PNG|link=]] '''[[#Move | <td>If you drag the object itself and not its '''Attachment Point''' then it will stay at its original height as it is moved along the track. If the track is on a grade then the object will rise above or fall below the track as it is moved. To return the object to its correct height on the track see the next section [[image:PageLink.PNG|link=]] '''[[#Move it Vertically (S20)|Move it Vertically (S20)]]''' below.</td> | ||
</tr> | </tr> | ||
<tr valign="top"> | <tr valign="top"> | ||
| Line 1,099: | Line 1,111: | ||
<tr valign="top"> | <tr valign="top"> | ||
<td width=25>[[image:DotPoint7Blue.png|link=]]</td> | <td width=25>[[image:DotPoint7Blue.png|link=]]</td> | ||
<td><span style="font-weight: 700; font-size: 15px; background-color: lightcyan;">Left Click and Drag</span> '''Forward''' or '''Backward''' on the <span style="font-weight: 700; font-size: 15px; color: white; background-color: blue;"> Blue </span> '''Vertical Axis Line''' above the | <td><span style="font-weight: 700; font-size: 15px; background-color: lightcyan;">Left Click and Drag</span> '''Forward''' or '''Backward''' on the <span style="font-weight: 700; font-size: 15px; color: white; background-color: blue;"> Blue </span> '''Vertical Axis Line''' above the '''Track Trigger''' to move it up or down</td> | ||
</tr> | </tr> | ||
<tr valign="top"> | <tr valign="top"> | ||
| Line 1,210: | Line 1,222: | ||
<td><span style="font-size: 17px; font-weight: 700;">Notes:'''</span><br> | <td><span style="font-size: 17px; font-weight: 700;">Notes:'''</span><br> | ||
---- | ---- | ||
The <span style="font-weight: 700; font-size: 15px; color: white; background-color: green;"> Green </span> '''Horizontal Axis Line''' shown as [[image:DotPoint9Blue.png|link=]] in the image pointing forward from the Trigger will move it forward/backward regardless of whether it is on the track or not. It has the same effect as [[image:DotPoint6Blue.png|link=]] <span style="font-weight: 700; font-size: 15px;">Move a Track Trigger Along the Track</span>. However, by using this tool it is possible to move the '''Track Trigger''' beyond the end of the track, if that is ever required.</td> | The <span style="font-weight: 700; font-size: 15px; color: white; background-color: green;"> Green </span> '''Horizontal Axis Line''' shown as [[image:DotPoint9Blue.png|link=]] in the image pointing forward from the '''Track Trigger''' will move it forward/backward regardless of whether it is on the track or not. It has the same effect as [[image:DotPoint6Blue.png|link=]] <span style="font-weight: 700; font-size: 15px;">Move a Track Trigger Along the Track</span>. However, by using this tool it is possible to move the '''Track Trigger''' beyond the end of the track, if that is ever required.</td> | ||
</tr> | </tr> | ||
</table> | </table> | ||
| Line 1,398: | Line 1,410: | ||
</tr> | </tr> | ||
<tr> | <tr> | ||
<td colspan=2><br>This will add the '''Trigger Check''' | <td colspan=2><br>This will add the '''Trigger Check Rule''' to the session.</td> | ||
</tr> | </tr> | ||
</table> <!-- END Step 2 table --> | </table> <!-- END Step 2 table --> | ||
| Line 1,405: | Line 1,417: | ||
<tr valign="top"> | <tr valign="top"> | ||
<td width=25>[[image:DotPoint3.JPG|link=]]</td> | <td width=25>[[image:DotPoint3.JPG|link=]]</td> | ||
<td><span style="font-size: 17px; font-weight: 700;">Open the Trigger Check Rule Properties:</span> | <td><span style="font-size: 17px; font-weight: 700;">Open the '''Trigger Check Rule''' Properties:</span> | ||
<table> <!-- BEGIN Step 3 table --> | <table> <!-- BEGIN Step 3 table --> | ||
<tr valign="top"> | <tr valign="top"> | ||
<td width=25>[[image:DotPoint5Blue.png|link=]]</td> | <td width=25>[[image:DotPoint5Blue.png|link=]]</td> | ||
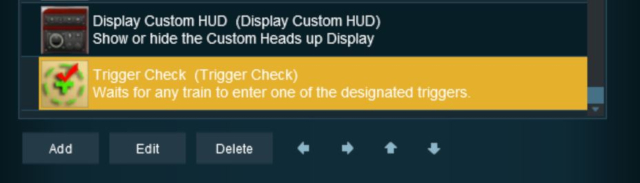
<td>With the '''Trigger Check''' | <td>With the '''Trigger Check Rule''' highlighted (shown below) <span style="font-weight: 700; font-size: 15px; background-color: lightcyan;">Left Click</span> the <span style="color: white; background-color: black; font-weight: 700; font-size: 15px;"> Edit </span> button. This will open the rule properties window | ||
</td> | </td> | ||
</tr> | </tr> | ||
| Line 1,426: | Line 1,438: | ||
<table> <!-- BEGIN Step 4 table --> | <table> <!-- BEGIN Step 4 table --> | ||
<tr valign="top"> | <tr valign="top"> | ||
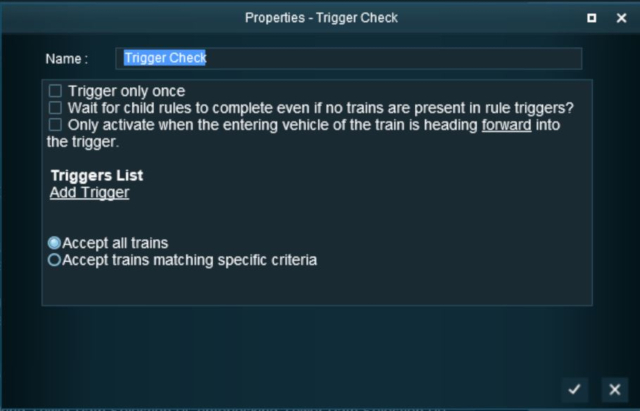
<td colspan=2>For this example we will leave all settings unchanged and simply identify the Trigger to be used.<br> | <td colspan=2>For this example we will leave all settings unchanged and simply identify the '''Track Trigger''' to be used.<br> | ||
In the Trigger Properties | In the '''Trigger Properties Window''' (shown below):-</td> | ||
</tr> | </tr> | ||
<tr valign="top"> | <tr valign="top"> | ||
| Line 1,457: | Line 1,469: | ||
<tr valign="top"> | <tr valign="top"> | ||
<td width=25>[[image:DotPoint5.JPG|link=]]</td> | <td width=25>[[image:DotPoint5.JPG|link=]]</td> | ||
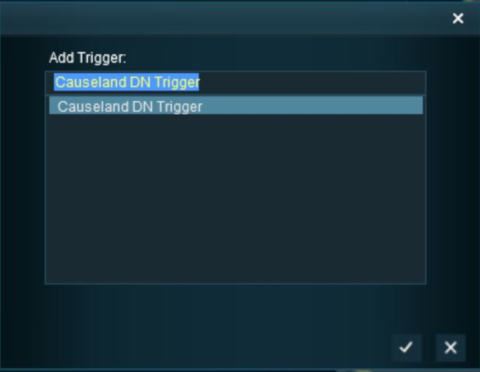
<td><span style="font-size: 17px; font-weight: 700;">Select the Trigger:</span><br> | <td><span style="font-size: 17px; font-weight: 700;">Select the Track Trigger:</span><br> | ||
The '''Trigger Selection Window''' will open and list all the '''Track Triggers''' in your Route. | The '''Trigger Selection Window''' will open and list all the '''Track Triggers''' in your Route. | ||
<table> | <table> | ||
| Line 1,496: | Line 1,508: | ||
=='''Adding a Child Rule'''== | =='''Adding a Child Rule'''== | ||
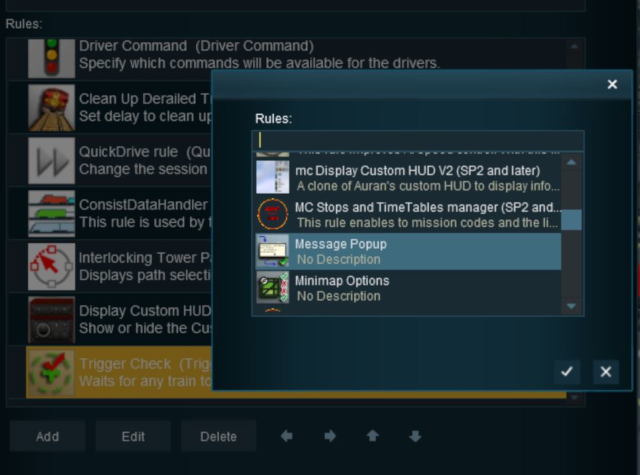
To test your | To test your '''Trigger Event''' you will need to add some '''Session Rules'''. | ||
<table width=1000 cellpadding=2> | <table width=1000 cellpadding=2> | ||
| Line 1,560: | Line 1,572: | ||
<tr> | <tr> | ||
<td colspan=2><br> | <td colspan=2><br> | ||
The '''Message Popup Rule''' is now a '''Child Rule''' of the '''Trigger Check Rule''' and will only be executed ''after'' the Trigger has been activated by a train.</td> | The '''Message Popup Rule''' is now a '''Child Rule''' of the '''Trigger Check Rule''' and will only be executed ''after'' the '''Track Trigger''' has been activated by a train.</td> | ||
</tr> | </tr> | ||
</table> <!-- END Steps Table --> | </table> <!-- END Steps Table --> | ||
| Line 1,715: | Line 1,727: | ||
<tr valign="top"> | <tr valign="top"> | ||
<td>[[image:DotPoint2Blue.png|link=]]</td> | <td>[[image:DotPoint2Blue.png|link=]]</td> | ||
<td>Add a consist to your layout a short distance from the '''Track Trigger''' (but further away than its | <td>Add a consist to your layout a short distance from the '''Track Trigger''' (but further away than its '''Effect Radius'''), save the Surveyor Session, and then test in '''Driver'''</td> | ||
</tr> | </tr> | ||
</table> | </table> | ||
| Line 1,783: | Line 1,795: | ||
<tr valign="top"> | <tr valign="top"> | ||
<td width=25>[[image:DotPoint.JPG|10px|link=]]</td> | <td width=25>[[image:DotPoint.JPG|10px|link=]]</td> | ||
<td>'''[[Driver_Commands_List#WaitForTrigger|Wait For Trigger]]''' - forces an AI controlled train to wait until a specified Trigger has been activated by another train</td> | <td>'''[[Driver_Commands_List#WaitForTrigger|Wait For Trigger]]''' - forces an AI controlled train to wait until a specified '''Track Trigger''' has been activated by another train</td> | ||
</tr> | </tr> | ||
</table> | </table> | ||
Revision as of 01:11, 10 July 2026
|
 |
 |
|
What are Track Triggers? |
 |
|
|
Track Triggers can be programmed to respond when a train (any train or a specific train) passes over them in Driver Mode. The response comes from executing a set of Session Rules that have been attached to a  Trigger Check Rule (or a similar rule) or a Driver Command that is monitoring the trigger. |
||||||||
Shown below left is a standard Track Trigger and below right is a Directional Track Trigger. They are just two examples of several types of Track Triggers. In both cases:-
|
||||||||
|
||||||||

Route or Session? |
|
 |
|
|
 |
Track Triggers can be placed in a Route Layer or in a Session Layer |
|

 |
Information on Route and Session layers can be found at:- |
Adding a Track Trigger |
 |
|
|
|
|
|

In Surveyor Classic (S10) |
|
 |
Adding a Track Trigger (S10)
|
 |
|
||||||||||||||||||
| As soon as a new Track Trigger has been placed, its properties window will open on the screen. It will initially be given a default name and assigned to the currently active layer. |
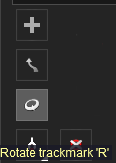
Change its Direction (S10)
|
Except for the Directional Track Trigger, the direction the Track Trigger is pointing has no effect on its operation. |
|
  |
||||||||||
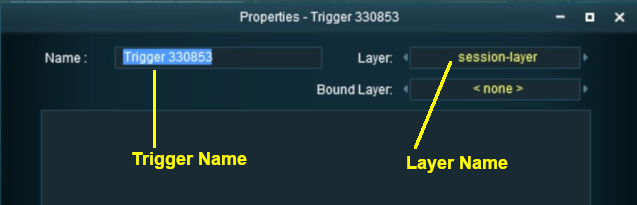
Set its Name and Layer (S10)
|
The name of a Track Trigger is important. |
 |
|
|
Set its Effect Radius (S10)
|
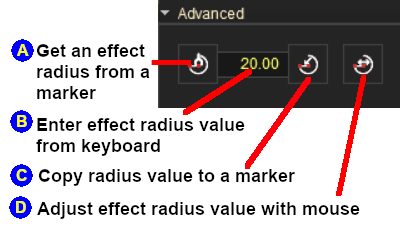
The Effect Radius sets how close a consist has to approach the marker to activate its operation. The default value is 20m. |
|

| At the bottom of the Track Tools flyout menu is an Advanced button. Left Click this button to open the advanced tools. |
| The Effect Radius sets the size of green "effect wings" attached both ends of the Track Trigger. This sets how close a consist has to approach to Track Trigger its "event". The smaller the radius the closer it must approach. |
 |
|
|||||||||||||||||||||||||||||||||||||||


|
In Surveyor 2.0 (S20) |
|
|
|
Adding a Track Trigger (S20)
|
| Steps: To add a Track Trigger:- |
 In the Filter Palette either:- |
|
|
||||||||||||||||||||||||||||||||||||
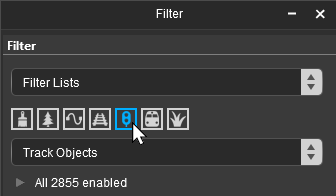
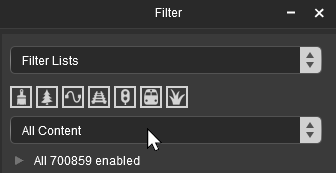
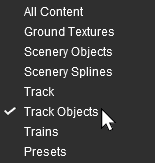


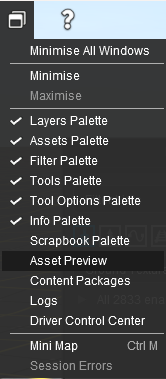


 In the Assets Palette to narrow down the filter list, type "trigger" (UPPER/lower case does not matter) in the Search Text Box
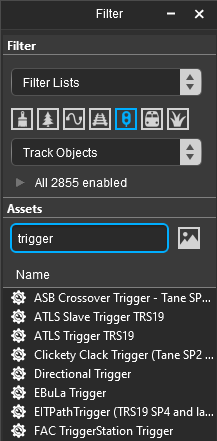 Both pallets shown docked |
|
 Place the Track Trigger on the track.
 |
|
|||||||||||||||||||||||
|
|
||||||||||||||
Change Its Name (S20)
The name of the Track Trigger IS important. It is needed to identify the Track Trigger in Session Rules.
 |
|
||||||||||


Set its Effect Radius (S20)
| The Effect Radius sets the size of green "effect wings" attached to both ends of the Track Trigger. This sets how close a consist has to approach to trigger its "event". The smaller the radius the closer it must approach. In the image shown below, the approaching vehicle will activate the Track Trigger when it is 20m away from it. |
 |
|
||||||||||||||||||||||


| Once you have set the Effect Radius of a Track Trigger it can be quickly duplicated (cloned) in Surveyor 2.0 with those settings and moved to a new location. You can easily edit the name and properties of the clone at the new location. See How to Use S20 Tools - Cloning Objects for the details |
Move it Along the Track (S20)
A Track Trigger can be moved along the track or to other tracks.
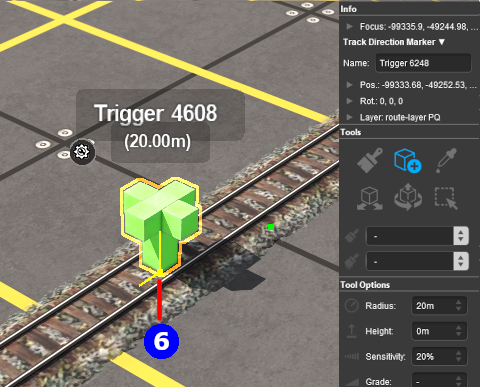 |
|
||||||||||||||

Move it Vertically (S20)
| Track Trigger can be physically placed above or below the track. This feature allows them to be placed, for example, above the track so that they will not be hidden in Surveyor if a consist is parked on the Track Trigger. |
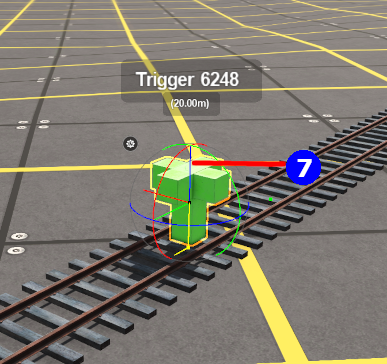 |
|
|||||||||||||||||||

Move it Horizontally (S20)
| Track Triggers can be physically placed left or right alongside the track. This feature allows them to be placed, for example, beside the track so that they will not be hidden in Surveyor if a consist is parked on the Track Trigger. |
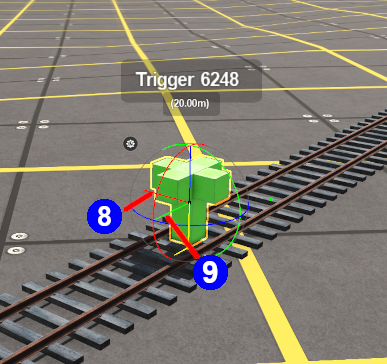 |
|
|||||||||||||||||||||


|
Assign it to a New Layer (S20)
| The Info Palette will show the layer assigned to the currently selected object. To the left of the layer name is a small arrowhead object. | |||||||||||||||||||||||
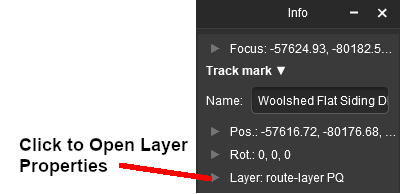 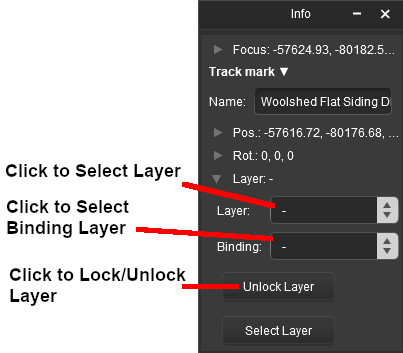 |
|
||||||||||||||||||||||

Creating a Track Trigger Event |
|
|
|
|
|
| When a consist enters the Effect Radius of a Track Trigger it will create an "event" that can be detected and responded to by some Session Rules and some Driver Commands. One such rule is the Trigger Check Rule which is added to a Session in the Session Editor. |
|
More information on the Trigger Check Rule can be found on the Trainz Wiki Rules Page at:- |
| Steps: | |||||||||
|
Open the Session Editor:
|
||||||||
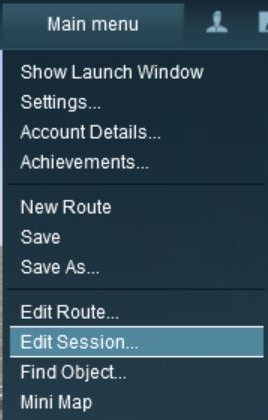
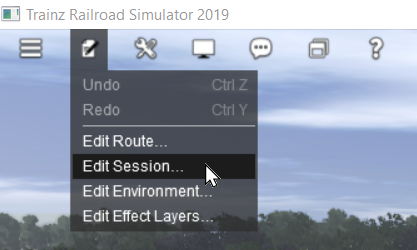
|
Add the Trigger Check Rule: | |||||||||
|
|
| Error creating thumbnail: /bin/bash: line 1: /usr/bin/convert: No such file or directory Error code: 127 | 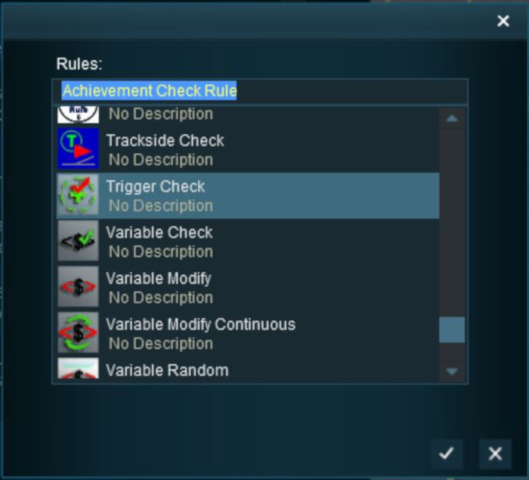 |
This will add the Trigger Check Rule to the session. |
|
 |
Open the Trigger Check Rule Properties:
|
||||
 |
Configure the Rule:
|
||||||||||
|
Select the Track Trigger: The Trigger Selection Window will open and list all the Track Triggers in your Route.
|
||||||||
Adding an Instruction to the Trigger Event |
|
|
|
|
|
Adding a Child Rule
To test your Trigger Event you will need to add some Session Rules.
| Steps: | ||||||||||||||
|
Add A Message Popup Rule:
|
|||||||||||||
|
Indent the Popup Message Rule:
|
||||||||
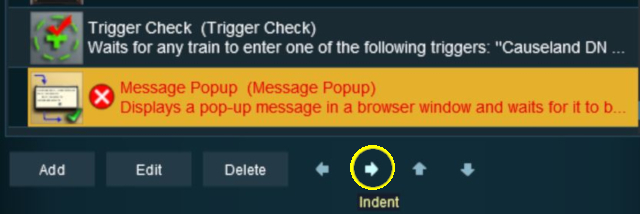
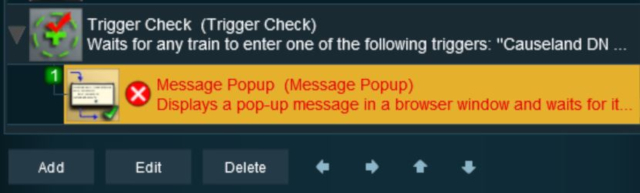
Configuring the Message and Testing |
|
|
| Steps: | |||||
|
Open the Message Popup Rule for Editing:
|
||||
|
|
|||||||||||||||||||||||
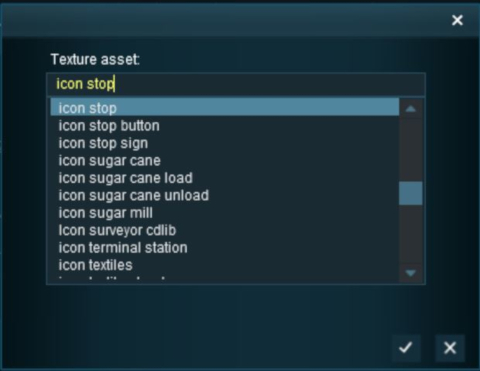
|
Left Click on the  icon to exit the Message Popup Rule and return to the Session Editor |
The completed Message Popup Rule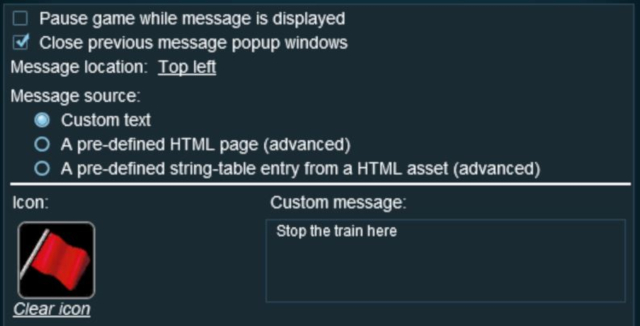 |
|
More information on this rule can be found on the Trainz Wiki Page at:- |
Test the Trigger Event:
|
Another example of using the Trigger Check Rule can be found in the Trainz Wiki Page How to Use Message Popup Rule (Applications).
Alternatives to the Trigger Check Rule |
|
|
|
|
 |
There are other Session Rules that can be used in place of the Trigger Check Rule and Track Trigger. A few possibilities are listed below:-
|
 |
There is a driver command that can be used in place of the Trigger Check Rule:-
|
|
|
Trainz Wiki
|
|

This page was created by Trainz user pware in May 2018 and was last updated as shown below.


