How to Configure Trainz Settings: Difference between revisions
No edit summary |
|||
| Line 227: | Line 227: | ||
<td width=10>[[image:BlueDot10x10.png|link=]]</td> | <td width=10>[[image:BlueDot10x10.png|link=]]</td> | ||
<td>These settings are your display characteristics such as the screen resolution, synchronisation, preferred language and font size.</td> | <td>These settings are your display characteristics such as the screen resolution, synchronisation, preferred language and font size.</td> | ||
</tr> | </tr> | ||
</table> | </table> | ||
| Line 236: | Line 232: | ||
<table width=1000> | <table width=1000> | ||
<tr valign="top"> | <tr valign="top"> | ||
<td width=25>[[image:DotPoint.JPG|link=]]</td> | |||
<td><span style="font-weight: 700; font-size: 15px; background-color: lightcyan;"> Left Click </span> on the <span style="font-weight: 700; font-size: 15px; background-color: #dcdcdc;"> General </span> tab</td> | <td><span style="font-weight: 700; font-size: 15px; background-color: lightcyan;"> Left Click </span> on the <span style="font-weight: 700; font-size: 15px; background-color: #dcdcdc;"> General </span> tab</td> | ||
</tr> | </tr> | ||
| Line 260: | Line 257: | ||
</tr> | </tr> | ||
<tr valign="top"> | <tr valign="top"> | ||
<td><span style="font-weight: 700; font-size: 15px;">IF</span> you have more than one display monitor/screen attached to your computer then you can select the one that '''Trainz''' | <td><span style="font-weight: 700; font-size: 15px;">IF</span> you have more than one display monitor/screen attached to your computer then you can select the one that you want '''Trainz''' to use. | ||
[[image: | <table> | ||
<span style="font-weight: 700; font-size: 15px; background-color: lightcyan;"> Left Click </span> on the menu box or its arrow icon to | <tr valign="top"> | ||
<td> | |||
<table bgcolor=#000000 cellpadding=2> | |||
<tr valign="top"> | |||
<td> | |||
<table bgcolor=#ffffff cellpadding=2> | |||
<tr valign="top"> | |||
<td colspan=2><span style="font-weight: 700; font-size: 15px;">Steps:</span> To Select the Monitor:-</td> | |||
</tr> | |||
<tr valign="top"> | |||
<td width=25>[[image:DotPoint1.JPG|link=]]</td> | |||
<td><span style="font-weight: 700; font-size: 15px; background-color: lightcyan;"> Left Click </span> on the menu box or its arrow icon to show the attached display monitors that your operating system has detected.</td> | |||
</tr> | |||
<tr valign="top"> | |||
<td>[[image:DotPoint2.JPG|link=]]</td> | |||
<td>Then <span style="font-weight: 700; font-size: 15px; background-color: lightcyan;"> Left Click </span> on the display monitor that you want '''Trainz''' to use.</td> | |||
</tr> | |||
</table> | |||
</td> | |||
</tr> | |||
</table> | |||
</td> | |||
<td width=370>[[image:General-PrimaryDisplay.png|link=]]</td> | |||
</tr> | |||
</table> | |||
</td> | |||
</tr> | </tr> | ||
</table> | </table> | ||
| Line 269: | Line 291: | ||
<tr valign="top"> | <tr valign="top"> | ||
<td colspan=2><span style="font-weight: 700; font-size: 15px;">Screen Size and Display Resolution</span></td> | <td colspan=2><span style="font-weight: 700; font-size: 15px;">Screen Size and Display Resolution</span></td> | ||
</tr> | |||
<tr valign="top"> | |||
<td colspan=2>This set the screen size (as in '''full screen''' or '''windowed'''), its '''resolution''' (in pixels) and the refresh rate (in Hertz or cycles per second).</td> | |||
</tr> | </tr> | ||
<tr valign="top"> | <tr valign="top"> | ||
| Line 275: | Line 300: | ||
</tr> | </tr> | ||
<tr valign="top"> | <tr valign="top"> | ||
<td colspan=2>This allows you to resize the window when required and to easily switch to other programs when needed. | <td colspan=2>This allows you to resize the window when required and to easily switch to other programs when needed. The resolution settings drop box cannot be opened if the '''Full Screen''' is not checked.</td> | ||
The resolution settings drop box cannot be opened if the '''Full Screen''' is not checked. | |||
</tr> | </tr> | ||
<tr valign="top"> | <tr valign="top"> | ||
| Line 286: | Line 310: | ||
<table width=1000> | <table width=1000> | ||
<tr valign="top"> | <tr valign="top"> | ||
<td | <td> | ||
< | <table bgcolor=#000000 cellpadding=2> | ||
<tr valign="top"> | |||
< | <td> | ||
<table bgcolor=#ffffff cellpadding=2> | |||
<tr valign="top"> | <tr valign="top"> | ||
<td> | <td> | ||
<table> | <table> | ||
<tr valign="top"> | <tr valign="top"> | ||
<td><span style="font-weight: 700; font-size: 15px;"> | <td colspan=2><span style="font-weight: 700; font-size: 15px;">Steps:</span> To Set the Screen Size and Resolution:-</td> | ||
</tr> | |||
<tr valign="top"> | |||
<td width=25>[[image:DotPoint1.JPG|link=]]</td> | |||
<td><span style="font-weight: 700; font-size: 15px; background-color: lightcyan;"> Left Click </span> on the '''Full Screen''' check box to check it '''ON'''. This will allow the full range of available screen resolutions to be shown and selected.</td> | |||
</tr> | |||
<tr valign="top"> | |||
<td>[[image:DotPoint2.JPG|link=]]</td> | |||
<td><span style="font-weight: 700; font-size: 15px; background-color: lightcyan;"> Left Click </span> on the menu box or its arrow icon to display the list of screen resolutions and refresh rates that your graphics card supports.</td> | |||
</tr> | </tr> | ||
<tr valign="top"> | <tr valign="top"> | ||
<td> | <td>[[image:DotPoint3.JPG|link=]]</td> | ||
<td>Then <span style="font-weight: 700; font-size: 15px; background-color: lightcyan;"> Left Click </span> on the resolution and rate that you want to use.</td> | |||
</tr> | |||
</table> | |||
</td> | |||
</tr> | |||
</table> | |||
</td> | |||
</tr> | </tr> | ||
</table> | </table> | ||
</td> | </td> | ||
< | <td width=195>[[image:General-ScreenRes.png|link=]]</td> | ||
</tr> | |||
</table> | |||
<br> | |||
<table width=1000> | |||
<tr valign="top"> | |||
<td><span style="font-weight: 700; font-size: 15px;">Vertical Synchronization</span></td> | |||
</tr> | |||
<tr valign="top"> | |||
<td>This is a technology that matches (synchronizes) the construction of each video frame between your graphics card and your display monitor.<br> | |||
'''Vertical Synchronization''', when turned on, prevents the next frame from being sent to your display monitor before the previous frame has been fully drawn on its screen.<br> | |||
[[image:General-VertSynch.png|link=]]</td> | |||
</tr> | </tr> | ||
</table> | </table> | ||
| Line 314: | Line 362: | ||
<tr valign="top"> | <tr valign="top"> | ||
<td width=629><span id="stepTabInstalled"></span> | <td width=629><span id="stepTabInstalled"></span> | ||
='''The Install Settings'''= | ='''The Install Settings'''= | ||
</td> | </td> | ||
Revision as of 05:16, 29 July 2026
|
 |
 |
|
|||||||||||||||||

Load the Trainz Launcher |
 |
|
|
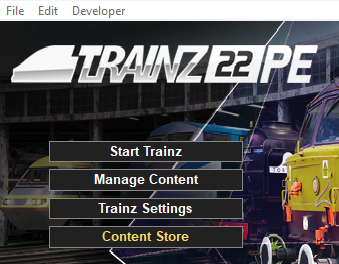
| Start your copy of Trainz which will load to show the Launcher Window (shown below). | ||||||||||
 |
|
|||||||||

Open the Trainz Settings Controls |
|
 |
|
|
 |
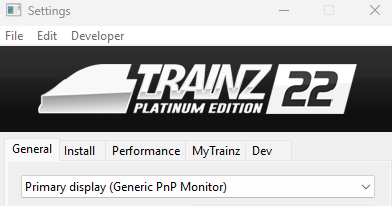
The Trainz Settings control how Trainz interacts with your Operating System and Graphics Display, where it stores your data, its overall performance, etc |
|
It also stores your login credentials which, amongst other things, gives you free access to the Download Station or DLS where assets such as routes, sessions, rolling stock and many different types of scenery can be downloaded and installed |
|
||||||||||||||||||||



The General Settings |
|
|
|
|
|
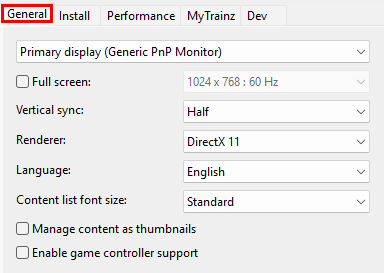
These settings are your display characteristics such as the screen resolution, synchronisation, preferred language and font size. |
 |
Left Click on the General tab |
 |
Display Settings
|
This sets the display monitor that Trainz will run on and its screen resolution. |
| Primary Monitor | |||||||||
IF you have more than one display monitor/screen attached to your computer then you can select the one that you want Trainz to use.
|
|||||||||

| Screen Size and Display Resolution | |
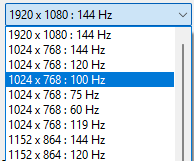
| This set the screen size (as in full screen or windowed), its resolution (in pixels) and the refresh rate (in Hertz or cycles per second). | |
 |
If the Full Screen box is NOT checked then Trainz will run in windowed mode with the Trainz Railroad Simulator bar at the top of the program window and the Windows Tool Bar at the bottom of the screen. |
| This allows you to resize the window when required and to easily switch to other programs when needed. The resolution settings drop box cannot be opened if the Full Screen is not checked. | |
 |
If the Full Screen box is checked then Trainz will run in full screen mode WITHOUT the Trainz Railroad Simulator bar at the top of the program and the Windows Tool Bar at the bottom of the screen. |
|
 |
||||||||||

| Vertical Synchronization |
| This is a technology that matches (synchronizes) the construction of each video frame between your graphics card and your display monitor. Vertical Synchronization, when turned on, prevents the next frame from being sent to your display monitor before the previous frame has been fully drawn on its screen.  |
The Install Settings |
|
|
|
|
|
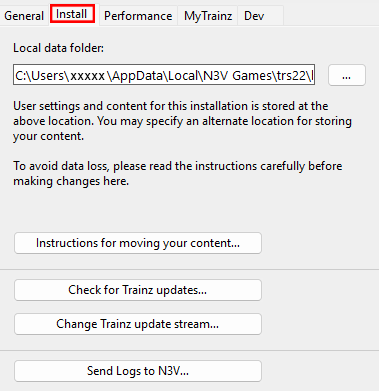
These settings identify the location of your User Data Folder where all your assets are kept and the type of program updates you want to receive. |
|
| Left Click on the Install tab |
 |
The Performance Settings |
|
|
|
|
|
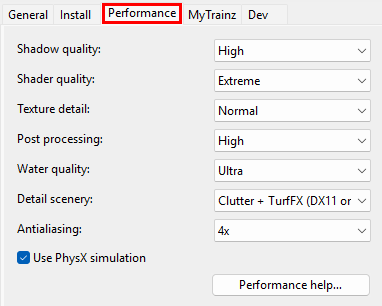
These settings are where you can "fine tune" the performance of the program to better match the hardware of your computer system and the demands of the routes you are running. |
|
You may need to experiment with these settings to get the best match with your system and the routes you run. |
| Left Click on the Performance tab |
 |
The MyTrainz Settings |
 |
|
|
|
|
|
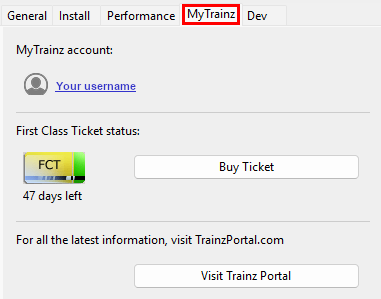
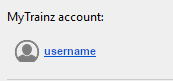
These settings identify your user login details. In some older versions this Tab is labelled Internet. |
|
You can also check your current FCT status and, if required, purchase more FCT access. |
| Left Click on the MyTrainz tab |
 |
|
||||||||||||
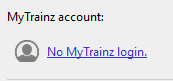
Enter Login Details |
|
 |
|
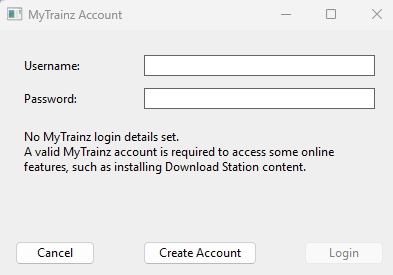
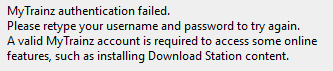
Your Login details are needed to access the Download Station and other online data. |
|
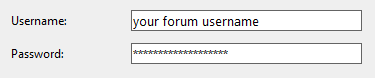
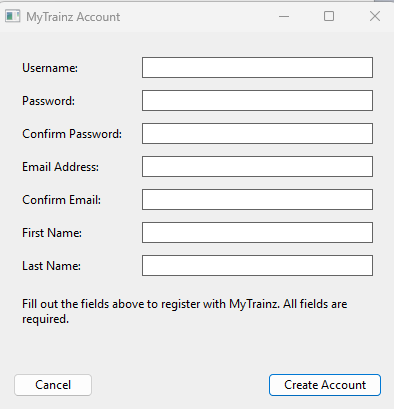
Your Trainz Login is the same as the Trainz Forum Login that you used to purchase or subscribe to your current copy of Trainz. If you do not have a Trainz Forum Login then you can create a new account. |
|
||||||||||||||||||||||||||





Create an Account |
|
|
|
You will need a Trainz Account to be able to access the online features of Trainz including the Download Station where there is a vast library of free assets (routes and sessions, locomotives and rolling stock, signals and tracks, scenery of all types, ground textures, etc) available for you to download and install. |
|
A Trainz Account will also give you a Trainz Forum Login username and password to access the Trainz Forum. |
|

|
|||||||||||||||||||||||
First Class Ticket |
|
|
|
The FCT or First Class Ticket is an optional prepaid feature that gives you higher speed priority access to the Download Station or DLS. |
|
An FCT is automatically included in all Trainz Plus subscriptions for the duration of the subscription. |
| With an FCT:- | |
| Error creating thumbnail: /bin/bash: line 1: /usr/bin/convert: No such file or directory Error code: 127 | there is no limit to how much or how often you can download from the DLS. |
| Error creating thumbnail: /bin/bash: line 1: /usr/bin/convert: No such file or directory Error code: 127 | you get priority Download Station access. |
| Error creating thumbnail: /bin/bash: line 1: /usr/bin/convert: No such file or directory Error code: 127 | Only 1 FCT is needed per account, not 1 per Trainz product. So if you own both TRS19 and TRS22 then the same FCT will be used for both. |
| Error creating thumbnail: /bin/bash: line 1: /usr/bin/convert: No such file or directory Error code: 127 | you will get increased download speeds. The exact speed will depend on external factors such as the speed of your internet connection, the paths taken by the data to reach your system, the access speed of the servers used by N3V and any restrictions imposed by your Internet Service Provider. |
|
 |
The FCT Status indicates how many days are left on your current active FCT.
 button to purchase another FCT (you can activate it at any time after purchase). |
The Dev Settings |
|
|
|
|
|
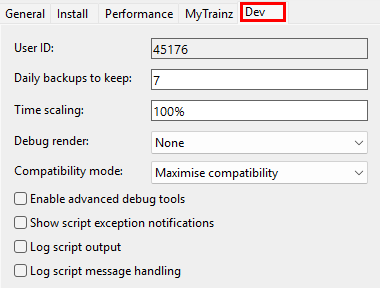
These settings are designed for asset developers ONLY to test the performance and other features of the assets they create. |
|
Unless you are an experienced asset developer you are strongly advised to NOT change these settings. |
|
They also control how often automatic backups will be made of any routes or sessions that you are currently developing in Surveyor. |
| Left Click on the Dev tab |
 |
|
|
Trainz Wiki
 |
More Tutorials and Guides to Using Trainz |
This page was created by Trainz user pware in July 2026 and was last updated as shown below.


