SAR Methuen: Difference between revisions
From TrainzOnline
Jump to navigationJump to search
mNo edit summary |
mNo edit summary |
||
| Line 10: | Line 10: | ||
<td width=330 align="right">[[Image:SAR_PortPirie-BrokenHill_Line.png|link= |alt=Port Pirie-Broken Hill Line ]][[Image:SAR_Nackara_Name.png|link=SAR Nackara |alt=Nackara |Next Up Location]]</td> | <td width=330 align="right">[[Image:SAR_PortPirie-BrokenHill_Line.png|link= |alt=Port Pirie-Broken Hill Line ]][[Image:SAR_Nackara_Name.png|link=SAR Nackara |alt=Nackara |Next Up Location]]</td> | ||
<td width=90 align="center">[[Image:Location Index.png|link=SAR Index |alt=Location Index |EIT Location Index ]]</td> | <td width=90 align="center">[[Image:Location Index.png|link=SAR Index |alt=Location Index |EIT Location Index ]]</td> | ||
<td width=330 align="left">[[Image:SAR_Paratoo_Name.png|link=SAR Paratoo Down |alt=Paratoo |Next Down Location]]</td> | <td width=330 align="left">[[Image:SAR_Paratoo_Name.png|link=SAR Paratoo Down |alt=Paratoo |Next Down Location]][[Image:SAR_PortPirie-BrokenHill_Line.png|link= |alt=Port Pirie-Broken Hill Line ]]</td> | ||
</tr> | </tr> | ||
</table> | </table> | ||
Revision as of 21:52, 4 April 2019
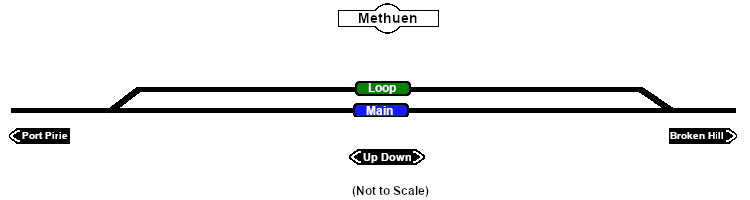
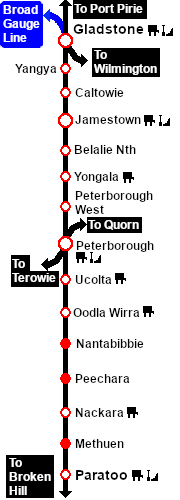
Main Line with a Passing Loop. Unmanned location on the Peterborough to Paratoo section of the Port Pirie to Broken Hill line.
|
 |
|||||||||||||||||||||||||||||||||||||||||||||||||||||||||