SAR Booleroo Centre South: Difference between revisions

From TrainzOnline
Jump to navigationJump to search
Pware (talk | contribs)
mNo edit summary
Pware (talk | contribs)
mNo edit summary
Line 127: Line 127:
<tr>
<tr>
<td colspan=6 align="center">[[Image:line740.png|link=]]</td>
</tr>
</table>
<table bgcolor="LightCyan">
<tr valign="top">
<td align="Center" colspan=2>'''Shunt Locations'''</td>
</tr>
<tr>
<td colspan=2 align="center">[[Image:line740.png|link=]]</td>
</tr>
<tr valign="top">
<td align="center" width=100>[[Image:1green.png|link=]]</td>
<td>'''Main Yard Up'''</td>
</tr>
<tr>
<td colspan=2 align="center">[[Image:line740.png|link=]]</td>
</tr>
<tr valign="top">
<td colspan=2 align="right">'''Shunt locations may not be signalled'''</td>
</tr>
</tr>
</table></td>
</table></td>

Revision as of 22:39, 6 July 2019

Booleroo Centre South  
Switch
Switch North
To North
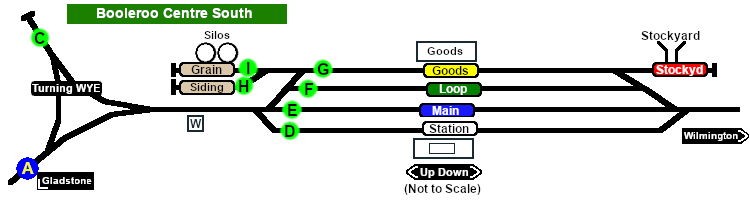
Main Line with Passing, Goods and Station Loops plus loco servicing facilities and a turning WYE. Unmanned location on the Gladstone to Wilmington line. The Wilmington line is unsignalled.
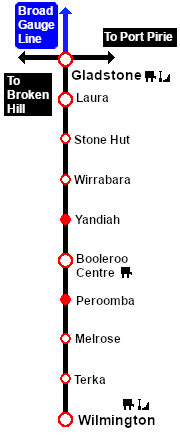
Gladstone-Wilmington Line Yandiah Location Index Peroomba Gladstone-Wilmington Line
From To Tower Paths (South EIT) From To Tower Paths (South EIT)
Approach Dn to WYE DE WYE DE to Gladstone
Approach Dn to Station Station Up to Gladstone
Approach Dn to Main Main Up to Gladstone
Approach Dn to Loop Loop Up to Gladstone
Approach Dn to Goods Goods Up to Gladstone
WYE DE to Station Station Up to WYE DE
WYE DE to Main Main Up to WYE DE
WYE DE to Loop Loop Up to WYE DE
WYE DE to Goods Goods Up to WYE DE
Grain Siding DE to Goods Goods Up to Grain Siding DE
Grain Loader DE to Goods Goods Up to Grain Loader DE
Gladstone-Wilmington Strip Map