SAR Scenarios Tutorial: Difference between revisions
mNo edit summary |
mNo edit summary |
||
| Line 92: | Line 92: | ||
<tr valign="top"> | <tr valign="top"> | ||
<td> | <td> | ||
After starting the ''' | After starting the '''SAR Peterborough Base Session''' find the loco and its consist. '''Either''':- | ||
# Open the '''Finder Tool''' (press '''CTRL-F''') and type, in the '''name''' field, the name of the loco, '''SAR T 258''' (or just '''T 258''' should be enough). Click the '''tick''' icon, '''OR''' | # Open the '''Finder Tool''' (press '''CTRL-F''') and type, in the '''name''' field, the name of the loco, '''SAR T 258''' (or just '''T 258''' should be enough). Click the '''tick''' icon, '''OR''' | ||
# Open the '''Driver List''' (bottom left of the screen) and select the loco from there - click the drivers '''Eye''' icon to jump to the loco. | # Open the '''Driver List''' (bottom left of the screen) and select the loco from there - click the drivers '''Eye''' icon to jump to the loco. | ||
| Line 174: | Line 174: | ||
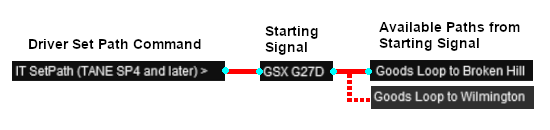
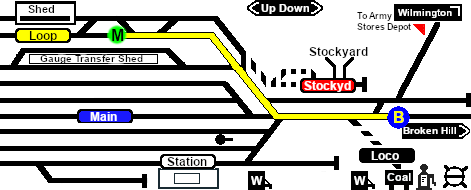
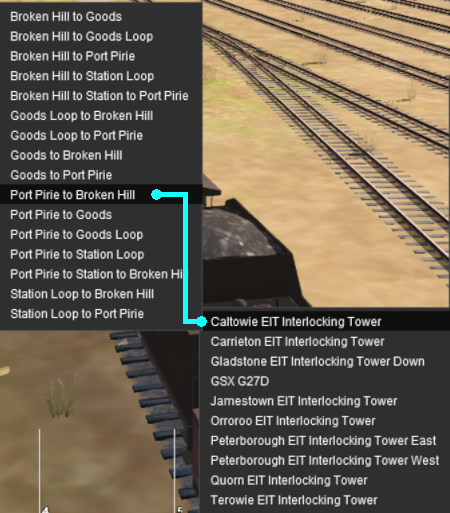
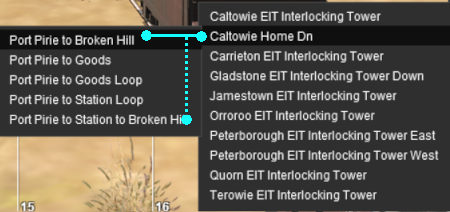
Select the path <span style="font-weight: 700;"><span style="color: white; background-color: black;"> Goods Loop to Broken Hill </span></span>.<br> | Select the path <span style="font-weight: 700;"><span style="color: white; background-color: black;"> Goods Loop to Broken Hill </span></span>.<br> | ||
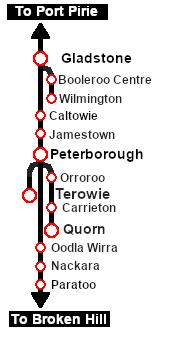
Every path is named according to its starting point (one of six "outside" locations or a track in the local yard) and its destination (one of six "outside" locations or a track in the local yard). The six "outside" locations are '''Port Pirie''', '''Broken Hill''', '''Terowie''', '''Quorn''', '''Wilmington''' and '''Peterborough'''. Those locations may not be the destination or starting point of the consist | Every path is named according to its starting point (one of six "outside" locations or a track in the local yard) and its destination (one of six "outside" locations or a track in the local yard). The six "outside" locations are '''Port Pirie''', '''Broken Hill''', '''Terowie''', '''Quorn''', '''Wilmington''' and '''Peterborough'''. Those locations may not be the destination or starting point of the consist and they indicate the direction of travel only.<br> | ||
<table cellpadding="4" bgcolor=#c1e7e7> <!-- BEGIN Dot Point --> | <table cellpadding="4" bgcolor=#c1e7e7> <!-- BEGIN Dot Point --> | ||
| Line 195: | Line 195: | ||
</table> <!-- END Path M to B Table --> | </table> <!-- END Path M to B Table --> | ||
<br> | <br> | ||
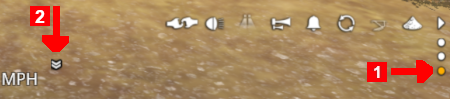
Once the path has been set, use the '''Driver Speed Dial''', the keyboard, on screen controls, or the '''AI''' to drive the train out of '''Gladstone Yard''' to '''Caltowie'''. | Once the path has been set, use the '''Driver Speed Dial''', the keyboard controls ('''W''', '''S''', '''X'''), advanced on screen controls, or the '''AI''' to drive the train out of '''Gladstone Yard''' to '''Caltowie'''. | ||
<br><br> | <br><br> | ||
| Line 266: | Line 266: | ||
</table> <!-- END Switch Maps Table --> | </table> <!-- END Switch Maps Table --> | ||
<br> | <br> | ||
You can now use the '''Driver Speed Dial''' or the keyboard controls to drive the train out of '''Gladstone Yard''' to '''Caltowie'''. Alternatively, for those with advanced steam loco driving skills, you can take control of the throttle, brake and other various devices in the loco cab.<br><br> | You can now use the '''Driver Speed Dial''' or the keyboard controls ('''W''', '''S''', '''X''') to drive the train out of '''Gladstone Yard''' to '''Caltowie'''. Alternatively, for those with advanced steam loco driving skills, you can take control of the throttle, brake and other various devices in the loco cab.<br><br> | ||
[[image:DotPoint2.JPG|link=]] <span style="font-weight: 700; font-size: 17px; background-color: black; color: white;"> AI Control </span><br> | [[image:DotPoint2.JPG|link=]] <span style="font-weight: 700; font-size: 17px; background-color: black; color: white;"> AI Control </span><br> | ||
| Line 402: | Line 402: | ||
</tr> | </tr> | ||
</table> <!-- END Caltowie EIT paths 2 selection --> | </table> <!-- END Caltowie EIT paths 2 selection --> | ||
Once the path has been set, use the '''Driver Speed Dial''', the keyboard, on screen controls, or the '''AI''' to drive the train through '''Caltowie Yard''' to '''Jamestown'''. | Once the path has been set, use the '''Driver Speed Dial''', the keyboard controls ('''W''', '''S''', '''X'''), advanced on screen controls, or the '''AI''' to drive the train through '''Caltowie Yard''' to '''Jamestown'''. | ||
</td> | </td> | ||
<td width=30 bgcolor="lightcyan"> </td> | <td width=30 bgcolor="lightcyan"> </td> | ||
| Line 461: | Line 461: | ||
<td>[[file:DotPoint.JPG|link=]]</td> | <td>[[file:DotPoint.JPG|link=]]</td> | ||
<td>If you are manually driving through a yard, then you '''MUST''' correctly set each <span style="font-weight: 700; background-color: red; color: white;"> Catchpoint </span> on your path yourself otherwise your train will '''DERAIL'''</td> | <td>If you are manually driving through a yard, then you '''MUST''' correctly set each <span style="font-weight: 700; background-color: red; color: white;"> Catchpoint </span> on your path yourself otherwise your train will '''DERAIL'''</td> | ||
</tr> | |||
<tr valign="top"> | |||
<td>[[file:DotPoint.JPG|link=]]</td> | |||
<td>If you are using '''EITs''' or the '''AI Drive''' commands to navigate through a yard, then any <span style="font-weight: 700; background-color: red; color: white;"> Catchpoints </span> along the path of your train will be automatically set to allow the train to safely pass.</td> | |||
</tr> | </tr> | ||
</table> <!-- END Dot Point --> | </table> <!-- END Dot Point --> | ||
<br> | <br> | ||
[[image:DotPoint2.JPG|link=]] <span style="font-weight: 700; font-size: 17px; background-color: black; color: white;"> AI Control </span><br> | [[image:DotPoint2.JPG|link=]] <span style="font-weight: 700; font-size: 17px; background-color: black; color: white;"> AI Control </span><br> | ||
| Line 539: | Line 542: | ||
<td>[[image:Jamestown Map PH.png|link=|alt=Jamestown Loop Path]]</td> | <td>[[image:Jamestown Map PH.png|link=|alt=Jamestown Loop Path]]</td> | ||
<td>'''The path has now been set'''<br><br> | <td>'''The path has now been set'''<br><br> | ||
All that remains now is to use the '''Driver Speed Dial''', the keyboard, on screen controls or the '''AI''' to drive the train into <span style="font-weight: 700;">Jamestown <span style="color: white; background-color: #008100;"> Loop </span></span> and halt at the end of the loop.<br> | All that remains now is to use the '''Driver Speed Dial''', the keyboard controls ('''W''', '''S''', '''X'''), advanced on screen controls or the '''AI''' to drive the train into <span style="font-weight: 700;">Jamestown <span style="color: white; background-color: #008100;"> Loop </span></span> and halt at the end of the loop.<br> | ||
This ends the tutorial but you can continue the '''[[SAR Scenario Depot Fuel Run|Gladstone-Peterborough Depot Fuel]] Scenario'''. | This ends the tutorial but you can continue the '''[[SAR Scenario Depot Fuel Run|Gladstone-Peterborough Depot Fuel]] Scenario'''. | ||
| Line 586: | Line 589: | ||
[[image:Jamestown SW Loop.png|link=|alt=Jamestown Loop Set]]<br> | [[image:Jamestown SW Loop.png|link=|alt=Jamestown Loop Set]]<br> | ||
Use the '''Driver Speed Dial''', the keyboard controls ('''W''', '''S''', '''X''') or the advanced on screen controls to drive the train into <span style="font-weight: 700;">Jamestown <span style="color: white; background-color: #008100;"> Loop </span></span> and halt at the end of the loop.<br> | |||
</td> | </td> | ||
</tr> | </tr> | ||
| Line 594: | Line 598: | ||
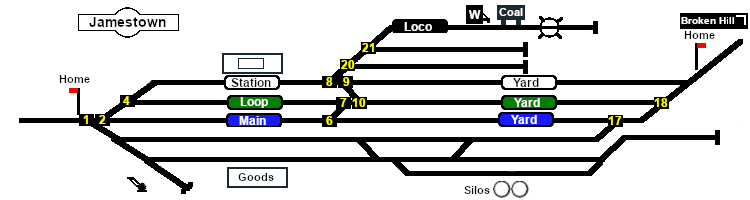
The '''Jamestown''' [[image:Tab_TM_Grey.png|link=|75px]] page (link via [[image:Line_Index_Label.png|link=SAR_Index|Location Index]] - link will open in this window) shows all the '''Jamestown''' track marks.<br> | The '''Jamestown''' [[image:Tab_TM_Grey.png|link=|75px]] page (link via [[image:Line_Index_Label.png|link=SAR_Index|Location Index]] - link will open in this window) shows all the '''Jamestown''' track marks.<br> | ||
<table> <!-- BEGIN Jamestown AI Table --> | |||
<tr valign="top"> | |||
<td>[[image:Jamestown Map TM.png|link=|alt=Jamestown Path]]<td> | |||
<td> | |||
The important '''Track Marks''' for this tutorial scenario are identified on the '''Jamestown''' [[image:Tab_TM_Grey.png|link=|75px]] page as<br> | The important '''Track Marks''' for this tutorial scenario are identified on the '''Jamestown''' [[image:Tab_TM_Grey.png|link=|75px]] page as<br> | ||
[[image:Jamestown TM ApproachLoop.png|link=|alt=Jamestown TMs]]<br> | [[image:Jamestown TM ApproachLoop.png|link=|alt=Jamestown TMs]]<br> | ||
From the open '''Driver Command Menu''' select the <span style="font-weight: 700;"><span style="color: white; background-color: black;"> Drive To Trackmark </span></span> command which will open up a long alphabetical list of track marks. Find and select the track mark <span style="font-weight: 700;"><span style="color: white; background-color: black;"> Jamestown Loop Dn </span></span>.<br> | |||
Use the '''Driver Speed Dial''', the keyboard controls ('''W''', '''S''', '''X'''), the advanced on screen controls or the '''AI''' to drive the train into <span style="font-weight: 700;">Jamestown <span style="color: white; background-color: #008100;"> Loop </span></span> and halt at the end of the loop.<br> | |||
</td> | |||
</tr> | |||
</table> <!-- END Jamestown AI Table --> | |||
This ends the tutorial but you can continue the '''[[SAR Scenario Depot Fuel Run|Gladstone-Peterborough Depot Fuel]] Scenario'''. | |||
</td> | </td> | ||
<td width=30 bgcolor="lightcyan"> </td> | <td width=30 bgcolor="lightcyan"> </td> | ||
| Line 609: | Line 622: | ||
</tr> | </tr> | ||
</table> <!-- END Instruction Set--> | </table> <!-- END Instruction Set--> | ||
<table width=1000> <!-- BEGIN End Links Table --> | <table width=1000> <!-- BEGIN End Links Table --> | ||
<tr valign="top"> | <tr valign="top"> | ||
Revision as of 09:51, 12 March 2021
 SAR Peterborough Scenarios EIT, AI and Manual Driving Tutorial |
| A part of the SAR Peterborough Base Session |
The Tutorial Scenario The scenario used in this tutorial is
This page was created by Trainz user pware in March 2021 and was last updated as shown below. | ||||||||||||||||||||||||||||||||||||||||||||||||||||||||||||||||||||||||||||||||||||||||||||||||||||||||||||||||||||||||||||||||||||||||||||||||||||||||||||||||||||||||||||||||||||||||||||||||||||||||||||||||||||||||||||||