|
|
| Line 147: |
Line 147: |
| <table width=1000> <!-- BEGIN End Links Table --> | | <table width=1000> <!-- BEGIN End Links Table --> |
| <tr valign="top"> | | <tr valign="top"> |
| <td colspan=7>'''Links:''' All links will open in this window</td> | | <td colspan=9>'''Links:''' All links will open in this window</td> |
| </tr> | | </tr> |
| <tr valign="center"> | | <tr valign="center"> |
| <td width=40 align="left">[[image:ArrowLeft.png|link=SAR Scenario Orroroo Grain|30px]]</td> | | <td width=63 align="left">[[image:ArrowLeft.png|link=SAR Scenario Orroroo Grain|30px]]</td> |
| <td width=184 align="center">[[image:Session Scenario Index.png|link=SAR Peterborough Base Session|alt=Scenarios|Scenario Index]]<br>'''[[SAR Peterborough Base Session|Session Scenarios List]]'''</td> | | <td width=125 align="center">[[image:Session Scenario Index.png|link=SAR Peterborough Base Session|alt=Scenarios|Scenario Index]]<br>'''[[SAR Peterborough Base Session|Session Scenarios]]'''</td> |
| <td width=184 align="center">[[Image:Location Index.png|link=SAR Index|alt=Location Index|Location Index]]<br>'''[[SAR Index|Location List]]'''</td> | | <td width=125 align="center">[[Image:Location Index.png|link=SAR Index|alt=Location Index|Location Index]]<br>'''[[SAR Index|Location List]]'''</td> |
| <td width=184 align="center">[[image:Rolling Stock Index.png|link=SAR Scenario Rolling Stock|alt=Rolling Stock]]<br>'''[[SAR Scenario Rolling Stock|Rolling Stock]]'''</td> | | <td width=125 align="center">[[image:SAR Tutorial.png|link=SAR Scenarios Tutorial|alt=Tutorial]]<br>'''[[SAR Scenarios Tutorial|Drive Tutorial]]'''</td> |
| <td width=184 align="center">[[image:Industry Index.png|link=SAR Scenario Industries|alt=Industries]]<br>'''[[SAR Scenario Industries|Active Industries]]'''</td> | | <td width=125 align="center">[[image:Rolling Stock Index.png|link=SAR Scenario Rolling Stock|alt=Rolling Stock]]<br>'''[[SAR Scenario Rolling Stock|Rolling Stock]]'''</td> |
| <td width=184 align="center">[[image:BackToTop.png|link=#top|alt=Top|Top]]</td> | | <td width=125 align="center">[[image:Loco Index.png|link=SAR Peterborough Division Loco Roster|alt=Loco Roster]]<br>'''[[SAR Peterborough Division Loco Roster|Loco Roster]]'''</td> |
| <td width=40 align="left">[[image:ArrowRight.png|link=SAR Scenario Gladstone Shunter|30px]]</td> | | <td width=125 align="center">[[image:Industry Index.png|link=SAR Scenario Industries|alt=Industries]]<br>'''[[SAR Scenario Industries|Active Industries]]'''</td> |
| | <td width=125 align="center">[[image:BackToTop.png|link=#top|alt=Top|Top]]</td> |
| | <td width=62 align="left">[[image:ArrowRight.png|link=SAR Scenario Gladstone Shunter|30px]]</td> |
| </tr> | | </tr> |
| </table> <!-- END End Links Table --> | | </table> <!-- END End Links Table --> |
| Shunting operations that cover the length of Peterborough Yard and Peterborough Depot. |
 |
Getting Started:
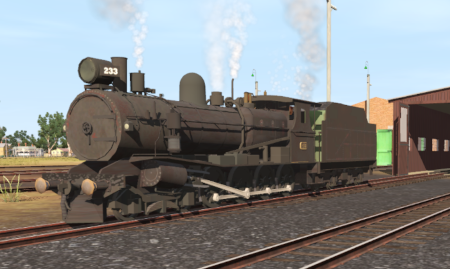
- The first step is to pause the session by pressing the P key.
- Next locate your loco. Either:-
- Open the Finder Tool (press Ctrl F ) and type, in the Name field, the name of the loco. For example SAR T 233 (or just T 233 should be enough). Click the tick icon, OR
- Open the Driver List (bottom left of the screen) and select the loco from there - click the drivers Eye icon to jump to the loco.
- Take a few moments to get your bearings. Use the
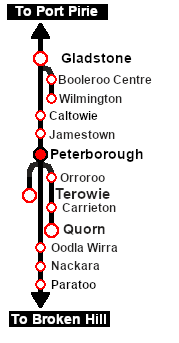
 (this link will open in this window) and click on Peterborough to load its location details and track plans. In each location details page:-
- Each location details page has direct links to the adjacent locations so you can explore along the route.
- When you are ready to start, reload the Peterborough Base Session page (click the Scenarios button on your current location page) and select this Scenario again or just use the Back button on your browser - whichever is quicker.
- Switch back to TRS19 Driver and press the P key to start the session.
|
|
Tutorial:
 |
A tutorial on using these scenarios is provided in the link on the left. The link will open in this window |
|
|
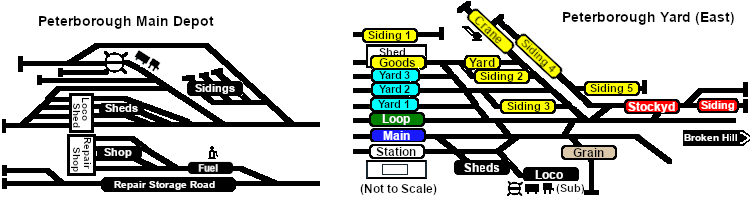
Yard Map: |
 |
Tasks:
- Move the loco out of the Loco Depot and navigate through to the other side of Peterborough Yard onto the Stockyard road.
- Reverse onto Goods Siding 4 and attach to the rake of empty MTW flat wagons stored there.
- Move the empty wagons to the Goods Crane and load.
- Shunt the loaded wagons to Goods Siding 3 and stable.
- Move the loco to Goods Siding 5 and attach to the rake of empty Livestock wagons stored there.
- Shunt the empty wagons to the Stockyard Siding at the far end of the Stockyard road for pickup by a later service.
- Move the loco back into the main depot to the Loco Depot Sidings next to the tall water tower. There are empty coal (CCC) and fuel (Tanker) wagons stored on two of the siding roads.
- Shunt the two wagon sets into a single consist and stable on one of the empty Loco Depot Sidings roads for later pickup and return to Port Pirie.
- Move the loco to the back of the workshop area at the end of the Depot Repair Storage Road .
- Attach to loco SAR T 229 (not in steam) and move it into the repair shop on Depot Repair Shop Road 2 or 3. Detach the loco.
- Return the loco to its starting position on Depot Shed Road 1.
|
Driving Notes:
- You have permission to pass semaphore signals at stop provided you are satisfied that the road ahead is clear.
|
|
|
|
This page was created by Trainz user pware in February 2021 and was last updated as shown below.