SAR Scenario Laura Test Run: Difference between revisions
From TrainzOnline
Jump to navigationJump to search
mNo edit summary |
mNo edit summary |
||
| Line 71: | Line 71: | ||
<td> | <td> | ||
# If you have already closed the opening message window then the first step is to pause the session by pressing the <span style="font-weight: 700; font-size: 15px; color: white; background-color: black;"> P </span> key. | # If you have already closed the opening message window then the first step is to pause the session by pressing the <span style="font-weight: 700; font-size: 15px; color: white; background-color: black;"> P </span> key. | ||
# If you decide to set the session clock to a different starting time then follow the instructions shown in the '''Orders''' section | |||
# Next locate your loco. '''Either''':- | # Next locate your loco. '''Either''':- | ||
#* Open the '''Finder Tool''' (press <span style="font-weight: 700; font-size: 15px; color: white; background-color: black;"> Ctrl </span> <span style="font-weight: 700; font-size: 15px; color: white; background-color: black;"> F </span>) and type, in the '''Name''' field, the name of your selected loco, for example '''SAR T 201''' (or just '''T 201''' which should be enough), then click the '''tick''' icon, '''OR''' | #* Open the '''Finder Tool''' (press <span style="font-weight: 700; font-size: 15px; color: white; background-color: black;"> Ctrl </span> <span style="font-weight: 700; font-size: 15px; color: white; background-color: black;"> F </span>) and type, in the '''Name''' field, the name of your selected loco, for example '''SAR T 201''' (or just '''T 201''' which should be enough), then click the '''tick''' icon, '''OR''' | ||
| Line 105: | Line 106: | ||
</table> <!-- END Blue Border for Tutorial table --> | </table> <!-- END Blue Border for Tutorial table --> | ||
<br> | <br> | ||
<table width=1000> <!-- BEGIN Yard | <table width=1000> <!-- BEGIN nested Yard, Orders, Strip Map tables --> | ||
<tr valign="top"> | <tr valign="top"> | ||
<td> | <td> | ||
| Line 111: | Line 112: | ||
<tr valign="top"> | <tr valign="top"> | ||
<td><span style="font-size: 15px; font-weight: 700; color: white">Orders:</span><br> | <td><span style="font-size: 15px; font-weight: 700; color: white">Orders:</span><br> | ||
<table bgcolor=#e8e8e8 width= | <table bgcolor=#e8e8e8 width=716> <!-- BEGIN Orders and Logo Table --> | ||
<tr valign="top"> | <tr valign="top"> | ||
<td width=716> | <td width=716> | ||
| Line 122: | Line 123: | ||
</td> | </td> | ||
<td width=100>[[image:SAR Train Order Rotated.png|100px|link=|alt=Logo]]</td> | <td width=100>[[image:SAR Train Order Rotated.png|100px|link=|alt=Logo]]</td> | ||
</tr> | |||
<tr valign="top"> | |||
<td colspan=2> | |||
<table width=812 bgcolor="white"> <!-- BEGIN Session Change Times Table --> | |||
<tr valign="top"> | |||
<td>The '''Base Session''' has the clock set to start at [[image:Clock_0800.png|link=]]</td> | |||
</tr> | |||
<tr valign="top"> | |||
<td>This can be changed to any required time. For the details see [[image:WikiLink.PNG|link=]]'''[[SAR Scenario Session Time Change]]'''</td> | |||
</tr> | |||
</table> <!-- END Session Change Times Table --> | |||
</td> | |||
</tr> | </tr> | ||
</table> <!-- END Orders and Logo Table --> | </table> <!-- END Orders and Logo Table --> | ||
| Line 128: | Line 141: | ||
</table> <!-- END Black Border for Orders Table --> | </table> <!-- END Black Border for Orders Table --> | ||
<br> | <br> | ||
<table cellpadding="2" bgcolor="black" width=820> <!-- BEGIN Black border for Driving Notes | <table cellpadding="2" bgcolor="black" width=820> <!-- BEGIN Black border for Driving Notes table --> | ||
<tr valign="top"> | <tr valign="top"> | ||
<td><span style="font-size: 15px; font-weight: 700; color: white">Driving Notes:</span><br> | <td><span style="font-size: 15px; font-weight: 700; color: white;">Driving Notes:</span><br> | ||
<table bgcolor="lightyellow" width=816> <!-- BEGIN Driving Notes | <table bgcolor="lightyellow" width=816> <!-- BEGIN Driving Notes table --> | ||
<tr valign="top"> | <tr valign="top"> | ||
<td> | <td> | ||
| Line 145: | Line 158: | ||
</td> | </td> | ||
</tr> | </tr> | ||
</table> <!-- END Driving Notes | </table> <!-- END Driving Notes table --> | ||
</td> | </td> | ||
</tr> | </tr> | ||
</table> <!-- END Black border for Driving Notes | </table> <!-- END Black border for Driving Notes table --> | ||
</td> | </td> | ||
<td> | <td> | ||
<table width=180> <!-- BEGIN Strip Map Table --> | <table width=180> <!-- BEGIN Strip Map Table --> | ||
<tr valign="top"> | <tr valign="top"> | ||
<td align="center">[[image:SAR Scenario Gladstone Strip Map.png|link=|alt=Strip Map]]<br>[[image:SAR Scenario Route.png|link=|alt=Route Key]]</td> | <td align="center">[[image:SAR Scenario Gladstone Strip Map.png|link=|alt=Strip Map]]<br>[[image:SAR Scenario Route.png|link=|alt=Route Key]]</td> | ||
</tr> | </tr> | ||
| Line 159: | Line 171: | ||
</td> | </td> | ||
</tr> | </tr> | ||
</table> | </table> <!-- END Yard, Orders, Driving Notes, Strip Map tables --> | ||
----- | ----- | ||
<table width=1000> <!-- BEGIN End Links Table --> | <table width=1000> <!-- BEGIN End Links Table --> | ||
Revision as of 10:46, 15 November 2022
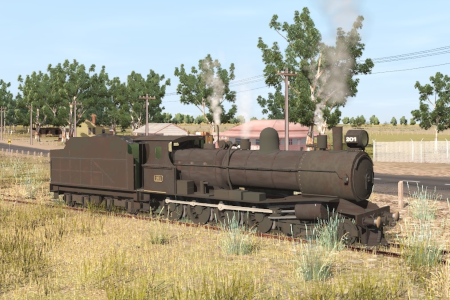
| A loco has just been serviced with some minor repairs to its running gear at the Gladstone Depot Shed. Before it can re-enter service it is required to make a trial run to Laura on the Wilmington Line and back. |  |
 |
|

|
|
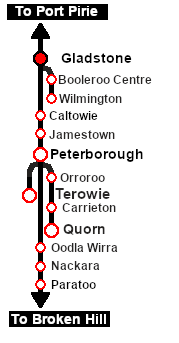
Each location in the layout has a detailed set of track diagrams that provide a variety of useful information The Getting Started guide below gives a summary of what is available.  graphic, or go to the bottom of the page for all the session links (all links will open in this window). |

Getting Started:
|


Tutorial:
|

|
|
||||||||||






This page was created by Trainz user pware in May 2022 and was last updated as shown below.


