SAR Scenario Gladstone Shunter V2: Difference between revisions
From TrainzOnline
Jump to navigationJump to search
Created page with "<!-- V2.0 (seperate V1.0 file) --> <!-- SAR Scenario 13 --> <table width=1000> <!-- BEGIN Title table --> <tr valign="top"> <td width=50 align="left">[[image:ArrowLeftBt..." |
mNo edit summary |
||
| Line 3: | Line 3: | ||
<table width=1000> <!-- BEGIN Title table --> | <table width=1000> <!-- BEGIN Title table --> | ||
<tr valign="top"> | <tr valign="top"> | ||
<td width= | <td width=30 align="center">[[image:ArrowLeftBtn.png|link=SAR Scenario Peterborough Shunter_V2|30px]]<br> | ||
<td width= | <span style="font-weight: 700; font-size: 15px; color: white; background-color: black;"> 12 </span></td> | ||
<td width=940 align="center"><span style="font-size: 21px; font-weight: 700;"> <span style="background-color: black; color: white;"> 13 </span> <span style="background-color: black; color: white;"> Gladstone Shunter </span></span><br> | |||
A scenario in the '''[[SAR Peterborough Base Session_V2|SAR Peterborough Base Session v2.0]]'''<br> | |||
<span style="font-weight: 700;">This scenario has been updated in V2.0. For the original <span style="color: blue;">V1.0</span> scenario, click <span style="background-color: yellow;">[[SAR Scenario Gladstone Shunter_V1|here]]</span></span></td> | <span style="font-weight: 700;">This scenario has been updated in V2.0. For the original <span style="color: blue;">V1.0</span> scenario, click <span style="background-color: yellow;">[[SAR Scenario Gladstone Shunter_V1|here]]</span></span></td> | ||
<td width=30 align="center">[[image:ArrowRightBtn.png|link=SAR Scenario Terowie Shunter_V2|30px]]<br> | |||
<span style="font-weight: 700; font-size: 15px; color: white; background-color: black;"> 14 </span></td> | |||
</tr> | </tr> | ||
</table> <!-- END Title table --> | </table> <!-- END Title table --> | ||
| Line 211: | Line 211: | ||
</tr> | </tr> | ||
<tr valign="center"> | <tr valign="center"> | ||
<td width= | <td width=30 align="center">[[image:ArrowLeftBtn.png|link=SAR Scenario Peterborough Shunter_V2|30px]]<br> | ||
<td width= | <span style="font-weight: 700; font-size: 15px; color: white; background-color: black;"> 12 </span></td> | ||
<td width= | <td width=135 align="center">[[image:Session Scenario Index.png|link=SAR Peterborough Base Session_V2|alt=Scenarios|Scenario Index]]<br>'''[[SAR Peterborough Base Session_V2|Scenario Index]]'''</td> | ||
<td width= | <td width=134 align="center">[[Image:Location Index.png|link=SAR Index_V2|alt=Location Index|Location Index]]<br>'''[[SAR Index_V2|Location Index]]'''</td> | ||
<td width= | <td width=134 align="center">[[image:SAR Tutorial.png|link=SAR Scenarios Tutorial_V2|alt=Tutorial|Drive Tutorial]]<br>'''[[SAR Scenarios Tutorial_V2|Drive Tutorial]]'''</td> | ||
<td width= | <td width=134 align="center">[[image:Rolling Stock Index.png|link=SAR Scenario Rolling Stock_V2|alt=Rolling Stock|Rolling Stock List]]<br>'''[[SAR Scenario Rolling Stock_V2|Rolling Stock List]]'''</td> | ||
<td width= | <td width=134 align="center">[[image:Loco Index.png|link=SAR Peterborough Division Loco Roster_V2|alt=Loco Roster|Loco Roster]]<br>'''[[SAR Peterborough Division Loco Roster_V2|Loco Roster]]'''</td> | ||
<td width= | <td width=134 align="center">[[image:Industry Index.png|link=SAR Scenario Industries_V2|alt=Industries|Active Industries]]<br>'''[[SAR Scenario Industries_V2|Active Industries]]'''</td> | ||
<td width= | <td width=135 align="center">[[image:BackToTop.png|link=#top|alt=Top|Top]]</td> | ||
<td width=30 align="center">[[image:ArrowRightBtn.png|link=SAR Scenario Terowie Shunter_V2|30px]]<br> | |||
<span style="font-weight: 700; font-size: 15px; color: white; background-color: black;"> 14 </span></td> | |||
</tr> | </tr> | ||
</table> <!-- END End Links Table --> | </table> <!-- END End Links Table --> | ||
Revision as of 13:13, 19 May 2024
| Error creating thumbnail: /bin/bash: line 1: /usr/bin/convert: No such file or directory Error code: 127 12 |
13 Gladstone Shunter A scenario in the SAR Peterborough Base Session v2.0 |
Error creating thumbnail: /bin/bash: line 1: /usr/bin/convert: No such file or directory Error code: 127 14 |
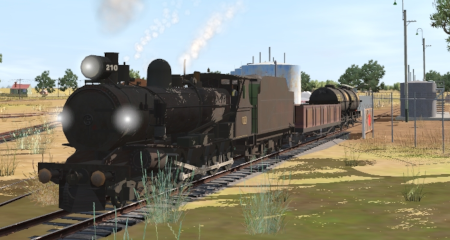
| Shunting operations in Gladstone Yard and nearby sidings. |  |
 |
|
|||||||||||||||

|
|
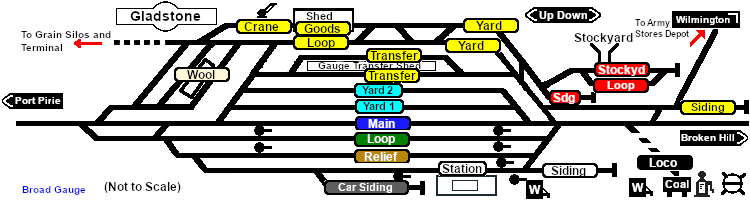
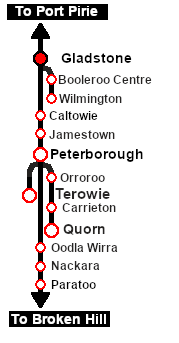
Each location in the layout has a detailed set of track diagrams that provide a variety of useful information The Getting Started guide below gives a summary of what is available.  graphic, or go to the bottom of the page for all the session links (all links will open in this window). |

Getting Started:
|


Tutorial:
|

|
|
|||||||||||



Driving Notes:
|


This page was created by Trainz user pware in February 2021 and was last updated as shown below.


