How to Use Track Triggers: Difference between revisions
mNo edit summary |
mNo edit summary |
||
| Line 5: | Line 5: | ||
<tr valign="middle"> | <tr valign="middle"> | ||
<td width=35>[[image:Information.png|35px|link=]]</td> | <td width=35>[[image:Information.png|35px|link=]]</td> | ||
<td><span style="font-size: 15px;">The information in this Wiki Page describes how to install, configure and use '''Track | <td><span style="font-size: 15px;">The information in this Wiki Page describes how to install, configure and use '''Track Triggers''' in '''T:ANE''', '''TRS19''', '''TRS22''' and '''Trainz Plus'''.</span></td> | ||
</tr> | </tr> | ||
</table> | </table> | ||
| Line 23: | Line 23: | ||
</tr> | </tr> | ||
</table> <!-- END Nav Buttons Table --> | </table> <!-- END Nav Buttons Table --> | ||
<table width=1000> | <table width=1000> | ||
<tr valign="top"> | <tr valign="top"> | ||
<td> | <td width=350> | ||
__TOC__ | __TOC__ | ||
</td> | </td> | ||
| Line 33: | Line 32: | ||
<tr valign="top"> | <tr valign="top"> | ||
<td width=10>[[image:BlueDot10x10.png|link=]]</td> | <td width=10>[[image:BlueDot10x10.png|link=]]</td> | ||
<td>'''Track | <td>'''Track Triggers''' are markers that are invisible in '''Driver''' but visible in '''Surveyor'''</td> | ||
</tr> | </tr> | ||
<tr valign="top"> | <tr valign="top"> | ||
<td>[[image:BlueDot10x10.png|link=]]</td> | <td>[[image:BlueDot10x10.png|link=]]</td> | ||
<td>They are used | <td>They are used to activate some '''Session Rules''' and '''Driver Commands'''</td> | ||
</tr> | </tr> | ||
<tr valign="top"> | <tr valign="top"> | ||
<td>[[image:BlueDot10x10.png|link=]]</td> | <td>[[image:BlueDot10x10.png|link=]]</td> | ||
<td>They | <td>They can be placed in a Route layer or in a Session layer</td> | ||
</tr> | </tr> | ||
</table> | </table> | ||
| Line 55: | Line 50: | ||
<tr valign="top"> | <tr valign="top"> | ||
<td width=629><span id="stepWhat"></span> | <td width=629><span id="stepWhat"></span> | ||
='''What are Track | ='''What are Track Triggers?'''= | ||
</td> | </td> | ||
<td width=50> </td> <!-- Skip Down --> | <td width=50> </td> <!-- Skip Down --> | ||
| Line 66: | Line 61: | ||
</table> <!-- END Nav Buttons Table --> | </table> <!-- END Nav Buttons Table --> | ||
<table width=1000 | <table width=1000> | ||
<tr valign="top"> | <tr valign="top"> | ||
<td | <td colspan=2>'''Track Triggers''' can be programmed to respond when a train (any train or a specific train) passes over them in Driver Mode. The response comes from executing a set of '''Session Rules''' that have been attached to a [[image:WikiLink.PNG|link=]] '''[[Session_Rule_List_with_Parameters#Trigger_Check_Rule|Trigger Check Rule]]''' (or a similar rule) or a '''Driver Command''' that is monitoring the trigger.</td> | ||
</tr> | </tr> | ||
<tr valign="top"> | <tr valign="top"> | ||
<td> | <td>Shown below left is a standard '''Track Trigger''' and below right is a '''Directional Track Trigger'''. They are just two examples of several types of '''Track Triggers'''. In both cases:- | ||
<table> | |||
< | |||
<tr valign="top"> | <tr valign="top"> | ||
<td width=10>[[image:DotPoint.JPG|10px|link=]]</td> | <td width=10>[[image:DotPoint.JPG|10px|link=]]</td> | ||
<td> | <td>they are visible in Surveyor and invisible in Driver</td> | ||
</tr> | </tr> | ||
<tr valign="top"> | <tr valign="top"> | ||
<td>[[image:DotPoint.JPG|10px|link=]]</td> | <td>[[image:DotPoint.JPG|10px|link=]]</td> | ||
<td> | <td>the "green wings" show their '''Effect Radius''', the region where a consist will trigger an "event". The number in brackets show that radius in metres | ||
< | <table> | ||
<tr valign="top"> | <tr valign="top"> | ||
<td | <td width=10>[[image:redDot10x10.png|link=]]</td> | ||
<td>the '''Directional Track Trigger''' will normally only be triggered if the consist is moving in the direction indicated by the arrow</td> | |||
</tr> | </tr> | ||
<tr valign="top"> | <tr valign="top"> | ||
<td>[[image: | <td>[[image:RedDot10x10.png|link=]]</td> | ||
<td> | <td>the standard '''Track Trigger''' will be triggered regardless of the direction of movement although this can be modified in the triggers properties</td> | ||
</tr> | </tr> | ||
</table> | |||
</td> | |||
</tr> | </tr> | ||
</table> | </table> | ||
</td> | </td> | ||
</tr> | </tr> | ||
<tr valign="top"> | <tr valign="top"> | ||
<td width=629><span id="stepRoute"></span> | <td> | ||
<table> | |||
<tr valign="top"> | |||
<td width=500 align="center">[[image:TrackTrigger.JPG|link=]]<br> | |||
'''"Standard" Track Trigger'''</td> | |||
<td width=500 align="center">[[image:TrackDTrigger.png|link=]]<br> | |||
'''Directional Track Trigger'''</td> | |||
</tr> | |||
</table> | |||
</td> | |||
</tr> | |||
</table> | |||
<br> | |||
<table width=1000> <!-- BEGIN Nav Buttons Table NO SKIPS --> | |||
<tr valign="top"> | |||
<td width=629><span id="stepRoute"></span> | |||
='''Route or Session?'''= | ='''Route or Session?'''= | ||
</td> | </td> | ||
| Line 122: | Line 121: | ||
<tr valign="top"> | <tr valign="top"> | ||
<td width=10>[[image:BlueDot10x10.png|link=]]</td> | <td width=10>[[image:BlueDot10x10.png|link=]]</td> | ||
<td>'''Track | <td>'''Track Triggers''' can be placed in a '''Route Layer''' or in a '''Session Layer'''</td> | ||
</tr> | </tr> | ||
</table> | </table> | ||
<br> | <br> | ||
<table width=1000 bgcolor=#000000 cellpadding=2> | |||
<table width=1000 bgcolor=#000000> | |||
<tr valign="top"> | <tr valign="top"> | ||
<td> | <td> | ||
<table bgcolor=#ffffb0> | <table bgcolor=#ffffb0 cellpadding=2> | ||
<tr valign="top"> | <tr valign="top"> | ||
<td>[[image:NotePad.PNG|link=]]</td> | <td width=25>[[image:NotePad.PNG|link=]]</td> | ||
<td><span style="font-size: 17px | <td><span style="font-size: 17px;">'''Notes:'''</span><br> | ||
---- | ---- | ||
< | </td> | ||
</tr> | |||
<tr valign="top"> | <tr valign="top"> | ||
<td width=10>[[image:DotPoint.JPG|10px|link=]]</td> | <td width=10>[[image:DotPoint.JPG|10px|link=]]</td> | ||
<td>Placing '''Track | <td>Placing a '''Track Trigger''' in a '''Route layer''' (e.g. in the same layer as the track) means that they will be available in '''all Sessions''' created using that particular Route</td> | ||
</tr> | </tr> | ||
<tr valign="top"> | <tr valign="top"> | ||
<td>[[image:DotPoint.JPG|10px|link=]]</td> | <td>[[image:DotPoint.JPG|10px|link=]]</td> | ||
<td>Placing '''Track | <td>Placing a '''Track Trigger''' in a '''Session layer''' means that they will only be available in that Session. This can be useful if two or more Sessions are being created and you want to use different '''Track Triggers''' in each Session</td> | ||
</td> | |||
</tr> | </tr> | ||
</table> | </table> | ||
| Line 158: | Line 148: | ||
</table> | </table> | ||
<br> | <br> | ||
<table cellpadding= | <table cellpadding=2 bgcolor="Aquamarine"> | ||
<tr valign="top"> | <tr valign="top"> | ||
<td>[[image:LinkWiki.PNG|link=]]</td> | <td>[[image:LinkWiki.PNG|link=]]</td> | ||
| Line 170: | Line 160: | ||
<tr valign="top"> | <tr valign="top"> | ||
<td width=629><span id="stepAdding"></span> | <td width=629><span id="stepAdding"></span> | ||
='''Adding a Track | ='''Adding a Track Trigger'''= | ||
</td> | </td> | ||
<td width=50>[[image:SkipDown.png|link=#skipAddS10|Skip Down]]</td> | <td width=50>[[image:SkipDown.png|link=#skipAddS10|Skip Down]]</td> | ||
| Line 176: | Line 166: | ||
<td width=46>[[image:BackToTop.png|link=#top|alt=Top|Top]]</td> | <td width=46>[[image:BackToTop.png|link=#top|alt=Top|Top]]</td> | ||
<td width=75>[[image:NextUp.png|link=#stepRoute|alt=Next Up|Next Up]]</td> | <td width=75>[[image:NextUp.png|link=#stepRoute|alt=Next Up|Next Up]]</td> | ||
<td width=75>[[image:NextDown.png|link=# | <td width=75>[[image:NextDown.png|link=#stepCreating|alt=Next Down|Next Down]]</td> | ||
<td width=75>[[image:BackToBottom.png|link=#bottom|alt=Bottom|Bottom]]</td> | <td width=75>[[image:BackToBottom.png|link=#bottom|alt=Bottom|Bottom]]</td> | ||
</tr> | </tr> | ||
</table> <!-- END Nav Buttons Table --> | </table> <!-- END Nav Buttons Table --> | ||
<table | <table bgcolor=#000000 width=900> | ||
<tr valign="top"> | <tr valign="top"> | ||
<td> | <td> | ||
<table | <table bgcolor=#ffffb0 width=896> | ||
<tr valign="top"> | <tr valign="top"> | ||
<td>[[image:NotePad.PNG|link=]]</td> | <td>[[image:NotePad.PNG|link=]]</td> | ||
<td><span style="font-size: 17px; font-weight: 700;">Notes:'''</span><br> | <td><span style="font-size: 17px; font-weight: 700;">Notes:'''</span><br> | ||
---- | ---- | ||
A '''Track | A '''Track Trigger''' has two important properties:- | ||
<table> | <table> | ||
<tr valign="top"> | <tr valign="top"> | ||
<td width=10>[[image:DotPoint.JPG|10px|link=]]</td> | <td width=10>[[image:DotPoint.JPG|10px|link=]]</td> | ||
<td>its name which is needed for all commands and rules that use the '''Track | <td>its name which is needed for all commands and rules that use the '''Track Trigger''', and</td> | ||
</tr> | </tr> | ||
<tr valign="top"> | <tr valign="top"> | ||
<td>[[image:DotPoint.JPG|10px|link=]]</td> | <td>[[image:DotPoint.JPG|10px|link=]]</td> | ||
<td>its '''Effect Radius''' (the | <td>its '''Effect Radius''' (the green "wings" shown in the image above with the radius value, in metres, shown below the '''Track Trigger''' name). This controls how closely a consist (AI or manually controlled) has to approach the '''Track Trigger''' to activate it (smaller radius = closer to the '''Track Trigger''')</td> | ||
</tr> | </tr> | ||
</table> | </table> | ||
| Line 204: | Line 194: | ||
<tr valign="top" bgcolor=#ffffe0> | <tr valign="top" bgcolor=#ffffe0> | ||
<td>[[image:PencilTips.PNG|link=]]</td> | <td>[[image:PencilTips.PNG|link=]]</td> | ||
<td> | <td>A "standard" '''Track Trigger''' has no visible direction and, while it can be rotated, this has '''NO EFFECT''' on its operation. The '''Directional Track Trigger''' does have a direction because it is only triggered by trains travelling in a specific direction</td> | ||
</tr> | </tr> | ||
</table> | </table> | ||
| Line 225: | Line 215: | ||
</table> <!-- END Nav Buttons Table --> | </table> <!-- END Nav Buttons Table --> | ||
===Adding a Track | ===Adding a Track Trigger (S10)=== | ||
<table bgcolor=#000000 cellpadding=2> | <table bgcolor=#000000 cellpadding=2> | ||
| Line 233: | Line 223: | ||
<tr valign="top"> | <tr valign="top"> | ||
<td width=25>[[image:NotePad.PNG|link=]]</td> | <td width=25>[[image:NotePad.PNG|link=]]</td> | ||
<td>'''Track | <td>'''Track Triggers''' are '''Track Objects''' and have to be attached to a track segment.</td> | ||
</tr> | </tr> | ||
</table> | </table> | ||
| Line 242: | Line 232: | ||
<table width=1000> | <table width=1000> | ||
<tr valign="top"> | <tr valign="top"> | ||
<td width= | <td width=410>[[image:TrackTriggerMode.JPG|link=]]</td> | ||
<td> | <td><br> | ||
<table bgcolor=#000000 cellpadding=2> | <table bgcolor=#000000 cellpadding=2> | ||
<tr valign="top"> | <tr valign="top"> | ||
| Line 249: | Line 239: | ||
<table bgcolor=#ffffff cellpadding=2> | <table bgcolor=#ffffff cellpadding=2> | ||
<tr valign="top"> | <tr valign="top"> | ||
<td colspan=2><span style="font-weight: 700; font-size: 15px;">Steps:</span> To add a '''Track | <td colspan=2><span style="font-weight: 700; font-size: 15px;">Steps:</span> To add a '''Track Trigger''':-</td> | ||
</tr> | </tr> | ||
<tr valign="top"> | <tr valign="top"> | ||
| Line 257: | Line 247: | ||
<tr valign="top"> | <tr valign="top"> | ||
<td>[[image:DotPoint2.JPG|link=]]</td> | <td>[[image:DotPoint2.JPG|link=]]</td> | ||
<td><span style="font-weight: 700; font-size: 15px; background-color: lightcyan;">Left Click</span> on the '''Trackmark | <td><span style="font-weight: 700; font-size: 15px; background-color: lightcyan;">Left Click</span> on the '''Trackmark Mode''' button or press the <span style="font-weight: 700; font-size: 15px; color: white; background-color: black;"> V </span> key</td> | ||
</tr> | </tr> | ||
<tr valign="top"> | <tr valign="top"> | ||
<td>[[image:DotPoint3.JPG|link=]]</td> | <td>[[image:DotPoint3.JPG|link=]]</td> | ||
<td><span style="font-weight: 700; font-size: 15px; background-color: lightcyan;">Left Click</span> the | <td><span style="font-weight: 700; font-size: 15px; background-color: lightcyan;">Left Click</span> on the '''Track Trigger''' shown in the asset list</td> | ||
</tr> | </tr> | ||
<tr valign="top"> | <tr valign="top"> | ||
<td>[[image:DotPoint4.JPG|link=]]</td> | <td>[[image:DotPoint4.JPG|link=]]</td> | ||
<td><span style="font-weight: 700; font-size: 15px; background-color: lightcyan;">Left Click</span> the <span style="font-weight: 700; font-size: 15px; color: white; background-color: black;"> + </span> '''Add''' button - it may already be selected - or press the <span style="font-weight: 700; font-size: 15px; color: white; background-color: black;"> A </span> key</td> | <td><span style="font-weight: 700; font-size: 15px; background-color: lightcyan;">Left Click</span> the <span style="font-weight: 700; font-size: 15px; color: white; background-color: black;"> + </span> '''Add Object''' button - it may already be selected - or press the <span style="font-weight: 700; font-size: 15px; color: white; background-color: black;"> A </span> key</td> | ||
</tr> | </tr> | ||
<tr valign="top"> | <tr valign="top"> | ||
<td>[[image:DotPoint5.JPG|link=]]</td> | <td>[[image:DotPoint5.JPG|link=]]</td> | ||
<td><span style="font-weight: 700; font-size: 15px; background-color: lightcyan;">Left Click</span> on the track location where the '''Track | <td><span style="font-weight: 700; font-size: 15px; background-color: lightcyan;">Left Click</span> on the track location where the '''Track Trigger''' is to be placed</td> | ||
</tr> | </tr> | ||
<tr valign="top"> | <tr valign="top"> | ||
<td colspan=2> | <td colspan=2>This will place the '''Track Trigger''' on the track and open its properties window.</td> | ||
</tr> | </tr> | ||
</table> | </table> | ||
| Line 285: | Line 275: | ||
<tr valign="top"> | <tr valign="top"> | ||
<td width=25>[[image:PencilTips.PNG|link=]]</td> | <td width=25>[[image:PencilTips.PNG|link=]]</td> | ||
<td>Avoid placing a '''Track | <td>Avoid placing a '''Track Trigger''' on a junction. You could accidentally place the '''Track Trigger''' on the wrong junction branch which means that it will have no effect if the targetted train is directed to the other branch</td> | ||
</tr> | </tr> | ||
</table> | </table> | ||
| Line 297: | Line 287: | ||
<table width=1000> | <table width=1000> | ||
<tr valign="top"> | <tr valign="top"> | ||
<td> | <td>As soon as a new '''Track Trigger''' has been placed, its properties window will open on the screen. It will initially be given a default name and will be assigned to the currently active layer.</td> | ||
</tr> | </tr> | ||
</table> | |||
<br> | |||
===Change its Direction (S10)=== | |||
<table width=1000 bgcolor="lightcyan" cellpadding=2> | |||
<tr valign="top"> | <tr valign="top"> | ||
<td>[[image: | <td width=10>[[image:BlueDot10x10.png|link=]]</td> | ||
<td> | <td>Except for the '''Directional Track Trigger''', the direction a '''Track Trigger''' is pointing has no effect on its operation.</td> | ||
</tr> | </tr> | ||
</table> | </table> | ||
< | <br> | ||
<table width=1000> | <table width=1000> | ||
<tr valign="top"> | <tr valign="top"> | ||
<td | <td>If you need to change the direction of a '''Track Trigger''' then:- | ||
<table width=610 bgcolor=#000000 cellpadding=2> | |||
<table bgcolor=#000000> | |||
<tr valign="top"> | <tr valign="top"> | ||
<td> | <td> | ||
<table bgcolor=# | <table width=606 bgcolor=#ffffff cellpadding=2> | ||
<tr valign="top"> | |||
<td colspan=2><span style="font-weight: 700; font-size: 15px;">Steps:</span> To Reverse the Direction of a '''Track Trigger''':-</td> | |||
</tr> | |||
<tr valign="top"> | |||
<td width=610> | |||
<table> | |||
<tr valign="top"> | |||
<td width=25>[[image:DotPoint1.JPG|link=]]</td> | |||
<td>In the '''Track Tools Flyout''' (the <span style="font-weight: 700; font-size: 15px; color: white; background-color: black;"> F4 </span> key) select '''Trackmark Mode''' (the <span style="font-weight: 700; font-size: 15px; color: white; background-color: black;"> V </span> key)</td> | |||
</tr> | |||
<tr valign="top"> | |||
<td>[[image:DotPoint2.JPG|link=]]</td> | |||
<td>Then select the '''Rotate Trackmark Tool''' (the <span style="font-weight: 700; font-size: 15px; color: white; background-color: black;"> R </span> key)</td> | |||
</tr> | |||
<tr valign="top"> | <tr valign="top"> | ||
<td>[[image: | <td>[[image:DotPoint3.JPG|link=]]</td> | ||
<td> | <td><span style="font-weight: 700; font-size: 15px; background-color: lightcyan;"> Left Click </span> on the '''Track Trigger'''</td> | ||
</tr> | |||
</table> | |||
</td> | </td> | ||
</tr> | </tr> | ||
| Line 330: | Line 333: | ||
</table> | </table> | ||
</td> | </td> | ||
<td width=385 valign="top">[[image:TracksTrackmarkMode_S10.png|link=]] [[image:TracksTrackmarkModeRotate_S10.png|link=]]</td> | |||
</tr> | </tr> | ||
</table> | </table> | ||
<br> | <br> | ||
=== | ===Set its Name and Layer (S10)=== | ||
<table width=1000 bgcolor="lightcyan" cellpadding=2> | <table width=1000 bgcolor="lightcyan" cellpadding=2> | ||
<tr valign="top"> | <tr valign="top"> | ||
<td width=10>[[image:BlueDot10x10.png|link=]]</td> | <td width=10>[[image:BlueDot10x10.png|link=]]</td> | ||
<td>The | <td>The name of a '''Track Trigger''' is important.</td> | ||
</tr> | </tr> | ||
</table> | </table> | ||
| Line 344: | Line 348: | ||
<table width=1000> | <table width=1000> | ||
<tr valign="top"> | <tr valign="top"> | ||
<td> | <td width=500>[[image:TrackTriggerProperties.JPG|link=]]</td> | ||
<table | <td> | ||
<table bgcolor=#000000> | |||
<tr valign="top"> | <tr valign="top"> | ||
<td> | <td> | ||
<table | <table bgcolor=#ffffe0> | ||
<tr valign="top"> | <tr valign="top"> | ||
<td | <td>[[image:PencilTips.PNG|link=]]</td> | ||
<td>Enter a useful descriptive name for each '''Track Trigger''' - the name will be needed for session rules and driver commands. Many creators base the name on the location (e.g. "Maintown Approach North") | |||
<td> | |||
</td> | </td> | ||
</tr> | </tr> | ||
| Line 375: | Line 364: | ||
</table> | </table> | ||
</td> | </td> | ||
</tr> | </tr> | ||
</table> | </table> | ||
<table width=1000 bgcolor="lightcyan" cellpadding=2> | <table width=1000 bgcolor=#000000 cellpadding=2> | ||
<tr valign="top"> | <tr valign="top"> | ||
<td width=10>[[image:BlueDot10x10.png|link=]]</td> | <td> | ||
<td>The '''Effect Radius''' sets how close a consist has to approach the marker to activate | <table width=996 bgcolor=#ffffff cellpadding=2> | ||
</tr> | <tr valign="top"> | ||
</table> | <td width=25>[[image:Ablue.png|link=]]</td> | ||
<br> | <td>To change the '''Track Trigger''' name <span style="font-weight: 700; font-size: 15px; background-color: lightcyan;">Left Click</span> on the name text entry box, delete the highlighted default name and enter a new name</td> | ||
</tr> | |||
<tr valign="top"> | |||
<td>[[image:Bblue.png|link=]]</td> | |||
<td>To change its assigned layer <span style="font-weight: 700; font-size: 15px; background-color: lightcyan;">Left Click</span> on the layer text entry box (or use its scroll arrowheads) and select a new layer - see the '''Trainz Wiki Page''' [[image:WikiLink.PNG|link=]] '''[[How_to_Use_Layers|How to Use layers]]''' for more details on layers</td> | |||
</tr> | |||
<tr valign="top"> | |||
<td>[[image:Cblue.png|link=]]</td> | |||
<td>To confirm the changes <span style="font-weight: 700; font-size: 15px; background-color: lightcyan;">Left Click</span> on the [[image:Tick.PNG|link=]] icon or the <span style="font-weight: 700; font-size: 15px; color: white; background-color: black;"> Save Changes </span> button (depending on your '''Trainz''' version) at the bottom of the window</td> | |||
</tr> | |||
</table> | |||
</td> | |||
</tr> | |||
</table> | |||
<br> | |||
===Set its Effect Radius (S10)=== | |||
<table width=1000 bgcolor="lightcyan" cellpadding=2> | |||
<tr valign="top"> | |||
<td width=10>[[image:BlueDot10x10.png|link=]]</td> | |||
<td>The '''Effect Radius''' sets how close a consist has to approach the marker to activate its operation. The default value is '''20m'''.</td> | |||
</tr> | |||
</table> | |||
<br> | |||
<table width=1000 bgcolor=#000000 cellpadding=2> | <table width=1000 bgcolor=#000000 cellpadding=2> | ||
<tr valign="top"> | <tr valign="top"> | ||
| Line 409: | Line 418: | ||
<table width=1000> | <table width=1000> | ||
<tr valign="top"> | <tr valign="top"> | ||
<td>The '''Effect Radius''' | <td>The '''Effect Radius''' sets the size of green "effect wings" attached both ends of the '''Track Trigger'''. This sets how close a consist has to approach to '''Track Trigger''' its "event". The smaller the radius the closer it must approach.</td> | ||
</tr> | </tr> | ||
</table> | </table> | ||
| Line 415: | Line 424: | ||
<table width=1000> | <table width=1000> | ||
<tr valign="top"> | <tr valign="top"> | ||
<td width=400>[[image:TrackMarkRadiusTools.png|link=]] | <td width=400>[[image:TrackMarkRadiusTools.png|link=]]<br> | ||
<br> | |||
<table bgcolor=#000000 cellpadding=2> | <table bgcolor=#000000 cellpadding=2> | ||
<tr valign="top"> | <tr valign="top"> | ||
| Line 427: | Line 435: | ||
<tr valign="top"> | <tr valign="top"> | ||
<td width=10>[[image:DotPoint.JPG|10px|link=]]</td> | <td width=10>[[image:DotPoint.JPG|10px|link=]]</td> | ||
<td>[[image:WikiLink.PNG|link=]] '''[[ | <td>[[image:WikiLink.PNG|link=]] '''[[How_to_Use_Track_Direction_Markers|Track Direction Markers]]'''</td> | ||
</tr> | </tr> | ||
<tr valign="top"> | <tr valign="top"> | ||
<td>[[image:DotPoint.JPG|10px|link=]]</td> | <td>[[image:DotPoint.JPG|10px|link=]]</td> | ||
<td>[[image:WikiLink.PNG|link=]] '''[[ | <td>[[image:WikiLink.PNG|link=]] '''[[How_to_Use_Track_Markers|Track Markers]]'''</td> | ||
</tr> | </tr> | ||
<tr valign="top"> | <tr valign="top"> | ||
| Line 451: | Line 459: | ||
<table bgcolor=#ffffff cellpadding=2> | <table bgcolor=#ffffff cellpadding=2> | ||
<tr valign="top"> | <tr valign="top"> | ||
<td colspan=2><span style="font-weight: 700; font-size: 15px;">Steps:</span> To set a '''Track | <td colspan=2><span style="font-weight: 700; font-size: 15px;">Steps:</span> To set a '''Track Triggers''' '''Effect Radius''':-</td> | ||
</tr> | </tr> | ||
<tr valign="top"> | <tr valign="top"> | ||
<td width=25>[[image:DotPoint1.JPG|link=]]</td> | <td width=25>[[image:DotPoint1.JPG|link=]]</td> | ||
<td>In the '''Track Tools''' flyout, <span style="font-weight: 700; font-size: 15px; background-color: lightcyan;">Left Click</span> on the '''Advanced''' button to open the Radius tools and properties. You will have a choice of 4 methods to set and adjust the Effect Radius</td> | <td>In the '''Track Tools''' flyout, <span style="font-weight: 700; font-size: 15px; background-color: lightcyan;">Left Click</span> on the '''Advanced''' button to open the Radius tools and properties. You will have a choice of 4 methods to set and adjust the '''Effect Radius'''</td> | ||
</tr> | </tr> | ||
<tr valign="top"> | <tr valign="top"> | ||
| Line 465: | Line 473: | ||
<tr valign="top"> | <tr valign="top"> | ||
<td width=25>[[image:Ablue.png|link=]]</td> | <td width=25>[[image:Ablue.png|link=]]</td> | ||
<td>To copy the '''Effect Radius''' of an existing '''Track | <td>To copy the '''Effect Radius''' of an existing '''Track Trigger''' | ||
<table> | <table> | ||
<tr valign="top"> | <tr valign="top"> | ||
| Line 473: | Line 481: | ||
<tr valign="top"> | <tr valign="top"> | ||
<td>[[image:DotPoint3.JPG|link=]]</td> | <td>[[image:DotPoint3.JPG|link=]]</td> | ||
<td><span style="font-weight: 700; font-size: 15px; background-color: lightcyan;">Left Click</span> on the '''Track | <td><span style="font-weight: 700; font-size: 15px; background-color: lightcyan;">Left Click</span> on the '''Track Trigger''' whose radius you want to copy - the radius will be copied into the '''Effect Radius''' Value text box (the default value is 20.00 metres)</td> | ||
</tr> | </tr> | ||
<tr valign="top"> | <tr valign="top"> | ||
| Line 488: | Line 496: | ||
<tr valign="top"> | <tr valign="top"> | ||
<td width=25>[[image:DotPoint2.JPG|link=]]</td> | <td width=25>[[image:DotPoint2.JPG|link=]]</td> | ||
<td>Type the new value (in metres) into the Effect Radius Value text box</td> | <td>Type the new value (in metres) into the '''Effect Radius''' Value text box</td> | ||
</tr> | </tr> | ||
<tr valign="top"> | <tr valign="top"> | ||
| Line 499: | Line 507: | ||
<tr valign="top"> | <tr valign="top"> | ||
<td>[[image:Cblue.png|link=]]</td> | <td>[[image:Cblue.png|link=]]</td> | ||
<td>To apply a value in the '''Effect Radius Value''' text box (from methods [[image:Ablue.png|link=]], [[image:Bblue.png|link=]] or [[image:Dblue.png|link=]]) to another '''Track | <td>To apply a value in the '''Effect Radius Value''' text box (from methods [[image:Ablue.png|link=]], [[image:Bblue.png|link=]] or [[image:Dblue.png|link=]]) to another '''Track Trigger''' | ||
<table> | <table> | ||
<tr valign="top"> | <tr valign="top"> | ||
| Line 507: | Line 515: | ||
<tr valign="top"> | <tr valign="top"> | ||
<td>[[image:DotPoint3.JPG|link=]]</td> | <td>[[image:DotPoint3.JPG|link=]]</td> | ||
<td><span style="font-weight: 700; font-size: 15px; background-color: lightcyan;">Left Click</span> on the '''Track | <td><span style="font-weight: 700; font-size: 15px; background-color: lightcyan;">Left Click</span> on the '''Track Trigger''' that is to receive the new value (you can click on more than one)</td> | ||
</tr> | </tr> | ||
</table> | </table> | ||
| Line 514: | Line 522: | ||
<tr valign="top"> | <tr valign="top"> | ||
<td>[[image:Dblue.png|link=]]</td> | <td>[[image:Dblue.png|link=]]</td> | ||
<td>To adjust the Effect Radius value up or down | <td>To adjust the '''Effect Radius''' value up or down | ||
<table> | <table> | ||
<tr valign="top"> | <tr valign="top"> | ||
| Line 522: | Line 530: | ||
<tr valign="top"> | <tr valign="top"> | ||
<td>[[image:DotPoint3.JPG|link=]]</td> | <td>[[image:DotPoint3.JPG|link=]]</td> | ||
<td>Select the '''Track | <td>Select the '''Track Trigger'''</td> | ||
</tr> | </tr> | ||
<tr valign="top"> | <tr valign="top"> | ||
| Line 530: | Line 538: | ||
<tr valign="top"> | <tr valign="top"> | ||
<td>[[image:DotPoint5.JPG|link=]]</td> | <td>[[image:DotPoint5.JPG|link=]]</td> | ||
<td>The new value will be immediately applied to the selected '''Track | <td>The new value will be immediately applied to the selected '''Track Trigger''' as the mouse moves (but only one '''Track Trigger''' at a time)</td> | ||
</tr> | </tr> | ||
</table> | </table> | ||
| Line 552: | Line 560: | ||
<tr valign="top"> | <tr valign="top"> | ||
<td>[[image:PencilTips.PNG|link=]]</td> | <td>[[image:PencilTips.PNG|link=]]</td> | ||
<td>Once you have an '''Effect Radius''' entered in the value box, you can apply it to any number of '''Track | <td>Once you have an '''Effect Radius''' entered in the value box, you can apply it to any number of '''Track Trigger''' by using method [[image:Cblue.png|link=]] shown above | ||
</td> | </td> | ||
</tr> | </tr> | ||
| Line 565: | Line 573: | ||
=='''In Surveyor 2.0 (S20)'''== | =='''In Surveyor 2.0 (S20)'''== | ||
</td> | </td> | ||
<td width=50>[[image:SkipDown.png|link=# | <td width=50>[[image:SkipDown.png|link=#stepCreating|Skip Down]]</td> <!-- skip Down --> | ||
<td width=50>[[image:SkipUp.png|link=#skipAddS10|Skip Up]]</td> <!-- skip Up --> | <td width=50>[[image:SkipUp.png|link=#skipAddS10|Skip Up]]</td> <!-- skip Up --> | ||
<td width=46> </td> | <td width=46> </td> | ||
| Line 586: | Line 594: | ||
</table> | </table> | ||
<br> | <br> | ||
===Adding a Track | ===Adding a Track Trigger (S20)=== | ||
<table width=1000 bgcolor=#000000 cellpadding=2> | <table width=1000 bgcolor=#000000 cellpadding=2> | ||
| Line 594: | Line 602: | ||
<tr valign="top"> | <tr valign="top"> | ||
<td width=25>[[image:NotePad.PNG|link=]]</td> | <td width=25>[[image:NotePad.PNG|link=]]</td> | ||
<td>'''Track | <td>'''Track Triggers''' are '''Track Objects''' and have to be attached to a track segment. The '''Track Trigger''' object can be moved off the track (left, right, above, below) but its '''attachment point''' is always connected to a track segment.</td> | ||
</tr> | </tr> | ||
</table> | </table> | ||
| Line 603: | Line 611: | ||
<table width=1000> | <table width=1000> | ||
<tr valign="top"> | <tr valign="top"> | ||
<td><span style="font-weight: 700; font-size: 15px;">Steps:</span> To add a '''Track | <td><span style="font-weight: 700; font-size: 15px;">Steps:</span> To add a '''Track Trigger''':-</td> | ||
</tr> | </tr> | ||
<tr valign="top"> | <tr valign="top"> | ||
| Line 644: | Line 652: | ||
<table bgcolor=#ffffe0 cellpadding=2> | <table bgcolor=#ffffe0 cellpadding=2> | ||
<tr valign="top"> | <tr valign="top"> | ||
<td colspan=2>[[image:PencilTips.PNG|link=]] <span style="font-size: 15px; font-weight: 700; color: white; background-color: blue;"> Shortcut </span> If you already have a '''Track | <td colspan=2>[[image:PencilTips.PNG|link=]] <span style="font-size: 15px; font-weight: 700; color: white; background-color: blue;"> Shortcut </span> If you already have a '''Track Trigger''' placed in your route then:-</td> | ||
</tr> | </tr> | ||
<tr valign="top"> | <tr valign="top"> | ||
<td width=20>[[image:DotPoint1Blue.png|link=]]</td> | <td width=20>[[image:DotPoint1Blue.png|link=]]</td> | ||
<td>move the tool pointer over the existing | <td>move the tool pointer over the existing '''Track Trigger''' object and hold down the <span style="font-weight: 700; font-size: 15px; color: white; background-color: black;"> Alt </span> key. The object name will appear in a '''ToolTip''' attached to the pointer</td> | ||
</tr> | </tr> | ||
<tr valign="top"> | <tr valign="top"> | ||
<td>[[image:DotPoint2Blue.png|link=]]</td> | <td>[[image:DotPoint2Blue.png|link=]]</td> | ||
<td>while holding down the <span style="font-weight: 700; font-size: 15px; color: white; background-color: black;"> Alt </span> key <span style="font-weight: 700; font-size: 15px; background-color: lightcyan;">Left Click</span> on the | <td>while holding down the <span style="font-weight: 700; font-size: 15px; color: white; background-color: black;"> Alt </span> key <span style="font-weight: 700; font-size: 15px; background-color: lightcyan;">Left Click</span> on the '''Track Trigger''' to identify it in the '''Assets Palette''' and to select the '''Placement Tool'''. Release the key.</td> | ||
</tr> | </tr> | ||
<tr valign="top"> | <tr valign="top"> | ||
| Line 725: | Line 733: | ||
</table> | </table> | ||
<br> | <br> | ||
[[image:DotPoint2.JPG|link=]] In the '''Assets Palette''' to narrow down the filter list, type " | [[image:DotPoint2.JPG|link=]] In the '''Assets Palette''' to narrow down the filter list, type "trigger" ('''UPPER/lower''' case does not matter) in the '''Search Text Box'''<br> | ||
<table width=1000> | <table width=1000> | ||
<tr valign="top"> | <tr valign="top"> | ||
<td align="center">[[image: | <td align="center">[[image:FilterPaletteSearchTrigger_S20.png|link=]]<br>'''Both pallets shown docked'''</td> | ||
<td> | <td> | ||
<br> | <br> | ||
| Line 734: | Line 742: | ||
<tr valign="top"> | <tr valign="top"> | ||
<td>[[image:DotPoint3.JPG|link=]]</td> | <td>[[image:DotPoint3.JPG|link=]]</td> | ||
<td>This will list all the '''Track Objects''' containing the text " | <td>This will list all the '''Track Objects''' containing the text "trigger" in their names or descriptions.</td> | ||
</tr> | </tr> | ||
<tr valign="top"> | <tr valign="top"> | ||
<td>[[image:DotPoint4.JPG|link=]]</td> | <td>[[image:DotPoint4.JPG|link=]]</td> | ||
<td><span style="font-weight: 700; font-size: 15px; background-color: lightcyan;">Left Click</span> on the item name '''Track | <td><span style="font-weight: 700; font-size: 15px; background-color: lightcyan;">Left Click</span> on the item name '''Track Trigger''' (or another '''Track Trigger''' object) in the list - you may have to scroll down the list to find the asset.<br> | ||
[[image: | [[image:FilterPaletteSearchTriggerScrolled_S20.png|link=]] | ||
<br> | <br> | ||
If you are not sure about an asset then <span style="font-weight: 700; font-size: 15px; background-color: lightcyan;">Double Left Click</span> on the name to bring up its image and description.<br> | If you are not sure about an asset then <span style="font-weight: 700; font-size: 15px; background-color: lightcyan;">Double Left Click</span> on the name to bring up its image and description.<br> | ||
| Line 760: | Line 768: | ||
</tr> | </tr> | ||
</table> | </table> | ||
[[image:DotPoint5.JPG|link=]] Place the '''Track | [[image:DotPoint5.JPG|link=]] Place the '''Track Trigger''' on the track.<br> | ||
<table width=1000> | <table width=1000> | ||
<tr valign="top"> | <tr valign="top"> | ||
<td width=480>[[image: | <td width=480>[[image:TriggerAdd_S20.png|link=]]</td> | ||
<td> | <td> | ||
<table width=520 bgcolor=#000000 cellpadding=2> | <table width=520 bgcolor=#000000 cellpadding=2> | ||
| Line 771: | Line 779: | ||
<table width=516 bgcolor=#ffffff cellpadding=2> | <table width=516 bgcolor=#ffffff cellpadding=2> | ||
<tr valign="top"> | <tr valign="top"> | ||
<td colspan=2><span style="font-weight: 700; font-size: 15px;">Steps:</span> To add a '''Track | <td colspan=2><span style="font-weight: 700; font-size: 15px;">Steps:</span> To add a '''Track Trigger''':-</td> | ||
</tr> | </tr> | ||
<tr valign="top"> | <tr valign="top"> | ||
| Line 779: | Line 787: | ||
<tr valign="top"> | <tr valign="top"> | ||
<td width=25>[[image:DotPoint2Blue.png|link=]]</td> | <td width=25>[[image:DotPoint2Blue.png|link=]]</td> | ||
<td><span style="font-weight: 700; font-size: 15px; background-color: lightcyan;">Left Click</span> on the track at the position where you want to place the '''Track | <td><span style="font-weight: 700; font-size: 15px; background-color: lightcyan;">Left Click</span> on the track at the position where you want to place the '''Track Trigger'''</td> | ||
</tr> | </tr> | ||
<tr valign="top"> | <tr valign="top"> | ||
<td colspan=2>Once placed a '''Track | <td colspan=2>Once placed a '''Track Trigger''' can be easily moved if needed.</td> | ||
</tr> | </tr> | ||
</table> | </table> | ||
| Line 795: | Line 803: | ||
<tr valign="top"> | <tr valign="top"> | ||
<td width=25>[[image:PencilTips.PNG|link=]]</td> | <td width=25>[[image:PencilTips.PNG|link=]]</td> | ||
<td>Avoid placing a '''Track | <td>Avoid placing a '''Track Trigger''' on a junction. You could accidentally place the '''Track Trigger''' on the wrong junction branch which means that it will have no effect if the targetted train is directed to the other branch</td> | ||
</tr> | </tr> | ||
</table> | </table> | ||
| Line 810: | Line 818: | ||
<td><span style="font-size: 17px; font-weight: 700;">Notes:'''</span><br> | <td><span style="font-size: 17px; font-weight: 700;">Notes:'''</span><br> | ||
---- | ---- | ||
To delete a '''Track | To delete a '''Track Trigger''' (or any asset):- | ||
<table bgcolor=#ffffff> | <table bgcolor=#ffffff> | ||
<tr valign="top"> | <tr valign="top"> | ||
| Line 821: | Line 829: | ||
<tr valign="top"> | <tr valign="top"> | ||
<td width=25>[[image:Ablue.png|link=]]</td> | <td width=25>[[image:Ablue.png|link=]]</td> | ||
<td>'''Free Move Tool''' (or press <span style="font-weight: 700; font-size: 17px; color: white; background-color: black;"> S </span>) <span style="font-weight: 700; font-size: 15px;">OR</span></td> | <td>[[image:S20_FreeMoveToolIcon.png|link=|20px]] '''Free Move Tool''' (or press <span style="font-weight: 700; font-size: 17px; color: white; background-color: black;"> S </span>) <span style="font-weight: 700; font-size: 15px;">OR</span></td> | ||
</tr> | </tr> | ||
<tr valign="top"> | <tr valign="top"> | ||
<td>[[image:Bblue.png|link=]]</td> | <td>[[image:Bblue.png|link=]]</td> | ||
<td>'''Fine Adjustment Tool''' (or press <span style="font-weight: 700; font-size: 17px; color: white; background-color: black;"> D </span>)</td> | <td>[[image:S20_FineAdjustmentToolIcon.png|link=|20px]] '''Fine Adjustment Tool''' (or press <span style="font-weight: 700; font-size: 17px; color: white; background-color: black;"> D </span>)</td> | ||
</tr> | </tr> | ||
</table> | </table> | ||
| Line 832: | Line 840: | ||
<tr valign="top"> | <tr valign="top"> | ||
<td>[[image:DotPoint2.JPG|link=]]</td> | <td>[[image:DotPoint2.JPG|link=]]</td> | ||
<td><span style="font-weight: 700; font-size: 15px; background-color: lightcyan;">Left Click</span> on the '''Track | <td><span style="font-weight: 700; font-size: 15px; background-color: lightcyan;">Left Click</span> on the '''Track Trigger'''</td> | ||
</tr> | </tr> | ||
<tr valign="top"> | <tr valign="top"> | ||
| Line 846: | Line 854: | ||
</table> | </table> | ||
</td> | </td> | ||
</tr> | </tr> | ||
</table> | </table> | ||
| Line 860: | Line 862: | ||
<tr valign="top"> | <tr valign="top"> | ||
<td width=10>[[image:BlueDot10x10.png|link=]]</td> | <td width=10>[[image:BlueDot10x10.png|link=]]</td> | ||
<td> | <td>Except for the '''Directional Track Trigger''', the direction a '''Track Trigger''' is pointing has no effect on its operation.</td> | ||
</tr> | </tr> | ||
</table> | </table> | ||
| Line 866: | Line 868: | ||
<table width=1000> | <table width=1000> | ||
<tr valign="top"> | <tr valign="top"> | ||
<td>If you need to rotate a '''Track | <td>If you need to rotate a '''Track Trigger''' to face the opposite direction then:-<br> | ||
<table width=1000 bgcolor=#000000> | <table width=1000 bgcolor=#000000> | ||
<tr valign="top"> | <tr valign="top"> | ||
| Line 872: | Line 874: | ||
<table width=996 bgcolor=#ffffff> | <table width=996 bgcolor=#ffffff> | ||
<tr valign="top"> | <tr valign="top"> | ||
<td colspan=2><span style="font-weight: 700; font-size: 15px;">Steps:</span> to reverse the direction of a '''Track | <td colspan=2><span style="font-weight: 700; font-size: 15px;">Steps:</span> to reverse the direction of a '''Track Trigger''':-</td> | ||
</tr> | </tr> | ||
<tr valign="top"> | <tr valign="top"> | ||
<td width=25>[[image:DotPoint1.JPG|link=]]</td> | <td width=25>[[image:DotPoint1.JPG|link=]]</td> | ||
<td>select the '''Track | <td>select the '''Track Trigger''' then <span style="font-weight: 700; font-size: 15px; background-color: lightcyan;">Left Click</span> on its [[image:ContextIconTrackTrigger_S20.png|link=]] '''Context Menu Icon''' (or press the <span style="font-weight: 700; font-size: 17px; color: white; background-color: black;"> T </span> key)</td> | ||
</tr> | </tr> | ||
<tr valign="top"> | <tr valign="top"> | ||
| Line 892: | Line 894: | ||
===Change its Name (S20)=== | ===Change its Name (S20)=== | ||
The name of the '''Track Trigger''' '''IS''' important. It is needed to identify the '''Track Trigger''' in '''Session Rules'''.<br> | |||
''' | |||
<table width=1000> | <table width=1000> | ||
<tr valign="top"> | <tr valign="top"> | ||
<td width=480>[[image: | <td width=480>[[image:TriggerName_S20.png|link=]]</td> | ||
<td> | <td> | ||
<table bgcolor=#000000 cellpadding=2> | <table bgcolor=#000000 cellpadding=2> | ||
| Line 910: | Line 904: | ||
<table bgcolor=#ffffff cellpadding=2> | <table bgcolor=#ffffff cellpadding=2> | ||
<tr valign="top"> | <tr valign="top"> | ||
<td colspan=2><span style="font-weight: 700; font-size: 15px;">Steps:</span> To change the name of a '''Track | <td colspan=2><span style="font-weight: 700; font-size: 15px;">Steps:</span> To change the name of a '''Track Trigger''':-</td> | ||
</tr> | </tr> | ||
<tr valign="top"> | <tr valign="top"> | ||
<td width=25>[[image:DotPoint3Blue.png|link=]]</td> | <td width=25>[[image:DotPoint3Blue.png|link=]]</td> | ||
<td>using either the '''Free Move Tool''' or the '''Fine Adjustment Tool''' select (<span style="font-weight: 700; font-size: 15px; background-color: lightcyan;">Left Click</span> on) the '''Track | <td>using either the [[image:S20_FreeMoveToolIcon.png|link=|20px]] '''Free Move Tool''' or the [[image:S20_FineAdjustmentToolIcon.png|link=|20px]] '''Fine Adjustment Tool''' select (<span style="font-weight: 700; font-size: 15px; background-color: lightcyan;">Left Click</span> on) the '''Track Trigger''' to be renamed</td> | ||
</tr> | </tr> | ||
<tr valign="top"> | <tr valign="top"> | ||
<td>[[image:DotPoint4Blue.png|link=]]</td> | <td>[[image:DotPoint4Blue.png|link=]]</td> | ||
<td>in the '''Info Palette''' (you may need to make this palette visible - see the '''Notes:''' for ''' | <td>in the '''Info Palette''' (you may need to make this palette visible - see the '''Notes:''' for '''Step''' <span style="font-weight: 700; font-size: 15px; color: white; background-color: red;"> 1 </span> above) <span style="font-weight: 700; font-size: 15px; background-color: lightcyan;">Left Click</span> in the '''Name:''' entry box. Enter a name for the '''Track Trigger''' and press the <span style="font-weight: 700; font-size: 15px; color: white; background-color: black;"> Enter </span> key</td> | ||
</tr> | </tr> | ||
</table> | </table> | ||
| Line 925: | Line 919: | ||
</table> | </table> | ||
<br> | <br> | ||
<table bgcolor=#000000 | <table bgcolor=#000000> | ||
<tr valign="top"> | <tr valign="top"> | ||
<td> | <td> | ||
<table bgcolor=# | <table bgcolor=#ffffe0> | ||
<tr valign="top"> | <tr valign="top"> | ||
<td | <td>[[image:PencilTips.PNG|link=]]</td> | ||
<td>'''Track | <td>Enter a useful descriptive name for each '''Track Trigger''' - the name will be needed for session rules and driver commands. Many creators base the name on the location (e.g. "Maintown Approach North") | ||
</td> | |||
</tr> | </tr> | ||
</table> | </table> | ||
| Line 944: | Line 939: | ||
===Set its Effect Radius (S20)=== | ===Set its Effect Radius (S20)=== | ||
<table width=1000> | <table width=1000> | ||
<tr valign="top"> | <tr valign="top"> | ||
<td>The '''Effect Radius''' | <td>The '''Effect Radius''' sets the size of green "effect wings" attached to both ends of the '''Track Trigger'''. This sets how close a consist has to approach to trigger its "event". The smaller the radius the closer it must approach. In the image shown below, the approaching vehicle will activate the '''Track Trigger''' when it is 20m away from it.</td> | ||
</tr> | </tr> | ||
</table> | </table> | ||
<table width=1000 cellpadding=4 bgcolor=#ffffff> | <table width=1000 cellpadding=4 bgcolor=#ffffff> | ||
<tr valign="top"> | <tr valign="top"> | ||
<td width=480>[[image: | <td width=480>[[image:TriggerRadius_S20.png|link=]]</td> | ||
<td> | <td> | ||
<table bgcolor=#000000 cellpadding=2> | <table bgcolor=#000000 cellpadding=2> | ||
| Line 972: | Line 954: | ||
<table bgcolor=#ffffff cellpadding=2> | <table bgcolor=#ffffff cellpadding=2> | ||
<tr valign="top"> | <tr valign="top"> | ||
<td colspan=2><span style="font-weight: 700; font-size: 15px;">Steps:</span> To adjust the | <td colspan=2><span style="font-weight: 700; font-size: 15px;">Steps:</span> To adjust the '''Effect Radius''' of a '''Track Trigger''':-</td> | ||
</tr> | </tr> | ||
<tr valign="top"> | <tr valign="top"> | ||
<td width=25>[[image:DotPoint5Blue.png|link=]]</td> | <td width=25>[[image:DotPoint5Blue.png|link=]]</td> | ||
<td><span style="font-weight: 700; font-size: 15px;"><span style="background-color: lightcyan;">Left Click and Drag | <td><span style="font-weight: 700; font-size: 15px;"><span style="background-color: lightcyan;">Left Click and Drag</span> on the [[image:GreenDot10x10.png|link=]] '''Green Dot''' next to the '''Track Trigger'''</span>. | ||
<table> | <table> | ||
<tr valign="top"> | <tr valign="top"> | ||
| Line 1,014: | Line 996: | ||
<tr valign="top"> | <tr valign="top"> | ||
<td width=10>[[image:DotPoint.JPG|10px|link=]]</td> | <td width=10>[[image:DotPoint.JPG|10px|link=]]</td> | ||
<td>[[image:WikiLink.PNG|link=]] '''[[ | <td>[[image:WikiLink.PNG|link=]] '''[[How_to_Use_Track_Direction_Markers|Track Direction Markers]]'''</td> | ||
</tr> | </tr> | ||
<tr valign="top"> | <tr valign="top"> | ||
<td>[[image:DotPoint.JPG|10px|link=]]</td> | <td>[[image:DotPoint.JPG|10px|link=]]</td> | ||
<td>[[image:WikiLink.PNG|link=]] '''[[ | <td>[[image:WikiLink.PNG|link=]] '''[[How_to_Use_Track_Markers|Track Markers]]'''</td> | ||
</tr> | </tr> | ||
<tr valign="top"> | <tr valign="top"> | ||
| Line 1,034: | Line 1,016: | ||
</tr> | </tr> | ||
</table> | </table> | ||
<table width=1000 | <table width=1000> | ||
<tr valign="top"> | <tr valign="top"> | ||
<td | <td>Once you have set the '''Effect Radius''' of a '''Track Trigger''' it can be quickly duplicated (cloned) in '''Surveyor 2.0''' with those settings and moved to a new location. You can easily edit the name and properties of the clone at the new location. See [[image:WikiLink.PNG|link=]] '''[[How_to_Use_S20_Tools#Cloning_Objects|How to Use S20 Tools - Cloning Objects]]''' for the details</td> | ||
</tr> | </tr> | ||
</table> | </table> | ||
<br> | <br> | ||
<table width=1000 | ===Move it Along the Track (S20)=== | ||
A '''Track Trigger''' can be moved along the track or to other tracks.<br> | |||
<table width=1000> | |||
<tr valign="top"> | <tr valign="top"> | ||
<td width= | <td width=370>[[image:triggerMove_S20.png|link=]]</td> | ||
<td> | <td> | ||
<table bgcolor=#000000 cellpadding=2> | <table bgcolor=#000000 cellpadding=2> | ||
| Line 1,053: | Line 1,035: | ||
<table bgcolor=#ffffff cellpadding=2> | <table bgcolor=#ffffff cellpadding=2> | ||
<tr valign="top"> | <tr valign="top"> | ||
<td colspan=2><span style="font-weight: 700; font-size: 15px;">Steps:</span> To move the '''Track | <td colspan=2><span style="font-weight: 700; font-size: 15px;">Steps:</span> To move the '''Track Trigger''':-</td> | ||
</tr> | </tr> | ||
<tr valign="top"> | <tr valign="top"> | ||
<td width=25>[[image:DotPoint6Blue.png|link=]]</td> | <td width=25>[[image:DotPoint6Blue.png|link=]]</td> | ||
<td><span style="font-weight: 700; font-size: 15px; background-color: lightcyan;">Left Click and Drag</span> '''Forward''' or '''Backward''' on the '''Yellow Dot''', its '''Attachment Point''', next to the '''Track | <td><span style="font-weight: 700; font-size: 15px; background-color: lightcyan;">Left Click and Drag</span> '''Forward''' or '''Backward''' on the '''Yellow Dot''', its '''Attachment Point''', next to the '''Track Trigger''' or on the object itself (see '''Notes:''' below), to move it along the track or to another track</td> | ||
</tr> | </tr> | ||
</table> | </table> | ||
| Line 1,078: | Line 1,060: | ||
<tr valign="top"> | <tr valign="top"> | ||
<td width=10>[[image:DotPoint.JPG|10px|link=]]</td> | <td width=10>[[image:DotPoint.JPG|10px|link=]]</td> | ||
<td>If you drag the object itself and not its '''Attachment Point''' then it will stay at its original height as it is moved along the track. If the track is on a grade then the object will rise above or fall below the track as it is moved. To return the object to its correct height on the track see the next section [[image:PageLink.PNG|link=]] | <td>If you drag the object itself and not its '''Attachment Point''' then it will stay at its original height as it is moved along the track. If the track is on a grade then the object will rise above or fall below the track as it is moved. To return the object to its correct height on the track see the next section [[image:PageLink.PNG|link=]] '''[[#Move it Vertically (S20)|Move it Vertically (S20)]]''' below.</td> | ||
</tr> | </tr> | ||
<tr valign="top"> | <tr valign="top"> | ||
| Line 1,097: | Line 1,079: | ||
===Move it Vertically (S20)=== | ===Move it Vertically (S20)=== | ||
<table width=1000 | <table width=1000> | ||
<tr valign="top"> | <tr valign="top"> | ||
<td>'''Track Trigger''' can be physically placed above or below the track. This feature allows them to be placed, for example, above the track so that they will not be hidden in Surveyor if a consist is parked on the '''Track Trigger'''.</td> | |||
<td>'''Track | |||
</tr> | </tr> | ||
</table> | </table> | ||
| Line 1,106: | Line 1,087: | ||
<table width=1000> | <table width=1000> | ||
<tr valign="top"> | <tr valign="top"> | ||
<td width=370>[[image:TriggerFineAdjustVertical_S20.png|link=]]</td> | |||
<td width= | |||
<td> | <td> | ||
<table bgcolor=#000000 cellpadding=2> | <table bgcolor=#000000 cellpadding=2> | ||
| Line 1,120: | Line 1,095: | ||
<tr valign="top"> | <tr valign="top"> | ||
<td><span style="font-weight: 700; font-size: 15px;">Steps:</span></td> | <td><span style="font-weight: 700; font-size: 15px;">Steps:</span></td> | ||
<td>To move a '''Track | <td>To move a '''Track Trigger''' vertically choose option [[image:Ablue.png|link=]] '''OR''' [[image:Bblue.png|link=]]:-</td> | ||
</tr> | </tr> | ||
<tr valign="top"> | <tr valign="top"> | ||
| Line 1,140: | Line 1,115: | ||
</tr> | </tr> | ||
</table> | </table> | ||
<br> | |||
<br> | <br> | ||
<table bgcolor=#000000 cellpadding=2> | <table bgcolor=#000000 cellpadding=2> | ||
| Line 1,147: | Line 1,123: | ||
<tr valign="top"> | <tr valign="top"> | ||
<td>[[image:PencilTips.PNG|link=]]</td> | <td>[[image:PencilTips.PNG|link=]]</td> | ||
<td>If you need to return the '''Track | <td>If you need to return the '''Track Trigger''' to its original height then:- | ||
<table bgcolor=#ffffff cellpadding=2> | <table bgcolor=#ffffff cellpadding=2> | ||
<tr valign="top"> | <tr valign="top"> | ||
<td colspan=2><span style="font-weight: 700; font-size: 15px;">Steps:</span> To correctly reattach the '''Track | <td colspan=2><span style="font-weight: 700; font-size: 15px;">Steps:</span> To correctly reattach the '''Track Trigger''' to the track:-</td> | ||
</tr> | </tr> | ||
<tr valign="top"> | <tr valign="top"> | ||
| Line 1,176: | Line 1,152: | ||
<tr valign="top"> | <tr valign="top"> | ||
<td width=10>[[image:BlueDot10x10.png|link=]]</td> | <td width=10>[[image:BlueDot10x10.png|link=]]</td> | ||
<td>'''Track | <td>'''Track Triggers''' can be physically placed left or right of the track.</td> | ||
</tr> | </tr> | ||
</table> | </table> | ||
| Line 1,182: | Line 1,158: | ||
<table width=1000> | <table width=1000> | ||
<tr valign="top"> | <tr valign="top"> | ||
<td>This feature allow a | <td>This feature allow a '''Track Trigger''' to be placed so that it will not be hidden in Surveyor if a consist is parked on the trigger. A change in position left or right will have no effect on its operation.</td> | ||
</tr> | </tr> | ||
</table> | </table> | ||
| Line 1,188: | Line 1,164: | ||
<table width=1000> | <table width=1000> | ||
<tr valign="top"> | <tr valign="top"> | ||
<td width= | <td width=480>[[image:TriggerFineAdjustHorizontal_S20.png|link=]]</td> | ||
<td> | <td> | ||
<table bgcolor=#000000 cellpadding=2> | <table bgcolor=#000000 cellpadding=2> | ||
| Line 1,195: | Line 1,171: | ||
<table bgcolor=#ffffff cellpadding=2> | <table bgcolor=#ffffff cellpadding=2> | ||
<tr valign="top"> | <tr valign="top"> | ||
<td colspan=2><span style="font-weight: 700; font-size: 15px;">Steps:</span> To move a '''Track | <td colspan=2><span style="font-weight: 700; font-size: 15px;">Steps:</span> To move a '''Track Trigger''' horizontally:-</td> | ||
</tr> | </tr> | ||
<tr valign="top"> | <tr valign="top"> | ||
| Line 1,202: | Line 1,178: | ||
<tr valign="top"> | <tr valign="top"> | ||
<td width=25>[[image:NotePad.PNG|link=]]</td> | <td width=25>[[image:NotePad.PNG|link=]]</td> | ||
<td>Track Objects can be moved '''along''' the track using the methods shown in the section [[image:PageLink.PNG|link=]] '''[[#Move | <td>Track Objects can be moved '''along''' the track using the methods shown in the section [[image:PageLink.PNG|link=]] '''[[#Move it Along the Track (S20)|Move it Along the Track (S20)]]''' above.<br> | ||
The two methods described below only work if the [[image:S20_FineAdjustmentToolIcon.png|link=|20px]] '''Fine Adjustment Tool''' - the <span style="font-weight: 700; font-size: 17px; color: white;background-color: black;"> D </span> key - is selected.</td> | The two methods described below only work if the [[image:S20_FineAdjustmentToolIcon.png|link=|20px]] '''Fine Adjustment Tool''' - the <span style="font-weight: 700; font-size: 17px; color: white;background-color: black;"> D </span> key - is selected.</td> | ||
</tr> | </tr> | ||
| Line 1,210: | Line 1,186: | ||
<tr valign="top"> | <tr valign="top"> | ||
<td width=25>[[image:DotPoint8Blue.png|link=]]</td> | <td width=25>[[image:DotPoint8Blue.png|link=]]</td> | ||
<td><span style="font-weight: 700; font-size: 15px; background-color: lightcyan;">Left Click and Drag</span> '''Forward''' or '''Backward''' on the <span style="font-weight: 700; font-size: 15px; color: white; background-color: red;"> Red </span> '''Horizontal Axis Line''' attached to the '''Track | <td><span style="font-weight: 700; font-size: 15px; background-color: lightcyan;">Left Click and Drag</span> '''Forward''' or '''Backward''' on the <span style="font-weight: 700; font-size: 15px; color: white; background-color: red;"> Red </span> '''Horizontal Axis Line''' attached to the '''Track Trigger''' to move it left or right of the track</td> | ||
</tr> | </tr> | ||
<tr valign="top"> | <tr valign="top"> | ||
<td>[[image:DotPoint9Blue.png|link=]]</td> | <td>[[image:DotPoint9Blue.png|link=]]</td> | ||
<td><span style="font-weight: 700; font-size: 15px; background-color: lightcyan;">Left Click and Drag</span> '''Forward''' or '''Backward''' on the <span style="font-weight: 700; font-size: 15px; color: white; background-color: green;"> Green </span> '''Horizontal Axis Line''' attached to the '''Track | <td><span style="font-weight: 700; font-size: 15px; background-color: lightcyan;">Left Click and Drag</span> '''Forward''' or '''Backward''' on the <span style="font-weight: 700; font-size: 15px; color: white; background-color: green;"> Green </span> '''Horizontal Axis Line''' attached to the '''Track Trigger''' to move it forward or back in a straight line that will ignore any curves in the track</td> | ||
</tr> | |||
</table> | |||
</td> | |||
</tr> | </tr> | ||
</table> | </table> | ||
| Line 1,221: | Line 1,200: | ||
</table> | </table> | ||
<br> | <br> | ||
===Assign it to a New Layer (S20)=== | |||
<table width=1000 cellpadding=2 bgcolor=#ffffff> | |||
<tr valign="top"> | |||
<td colspan=2>The '''Info Palette''' will show the layer assigned to the currently selected object. To the left of the layer name is a small arrowhead object.</td> | |||
</tr> | |||
<tr valign="top"> | |||
<td>[[image:TrackmarkInfo_S20.png|link=|alt=Info palette]]<br><br> | |||
[[image:TrackmarkLayerInfo_S20.png|link=|alt=Layer control]]</td> | |||
<td> | |||
<table bgcolor=#000000 cellpadding=2> | <table bgcolor=#000000 cellpadding=2> | ||
<tr valign="top"> | <tr valign="top"> | ||
<td> | <td> | ||
<table bgcolor=# | <table bgcolor=#ffffff cellpadding=2> | ||
<tr valign="top"> | <tr valign="top"> | ||
<td> | <td colspan=2><span style="font-weight: 700; font-size: 15px;">Steps:</span> To assign a '''Track Trigger''' to a layer:-</td> | ||
</tr> | |||
< | |||
<tr valign="top"> | <tr valign="top"> | ||
<td colspan=2> | <td colspan=2>In the '''Info Palette''':-</td> | ||
</tr> | </tr> | ||
<tr valign="top"> | <tr valign="top"> | ||
<td width=25>[[image:DotPoint1.JPG|link=]]</td> | <td width=25>[[image:DotPoint1.JPG|link=]]</td> | ||
<td> | <td><span style="font-weight: 700; font-size: 15px; background-color: lightcyan;">Left Click</span> the small arrowhead next to the layer name. This will open the layer properties for the selected object</td> | ||
</tr> | </tr> | ||
<tr valign="top"> | <tr valign="top"> | ||
<td>[[image:DotPoint2.JPG|link=]]</td> | <td>[[image:DotPoint2.JPG|link=]]</td> | ||
<td> | <td><span style="font-weight: 700; font-size: 15px; background-color: lightcyan;">Left Click</span> the '''Layer''' drop down box to select a new layer for the object</td> | ||
</tr> | |||
<tr valign="top"> | |||
<td>[[image:DotPoint3.JPG|link=]]</td> | |||
<td>if required, <span style="font-weight: 700; font-size: 15px; background-color: lightcyan;">Left Click</span> the '''Binding''' drop down box to select a new binding layer for the object. It cannot be bound to its own layer</td> | |||
</tr> | |||
<tr valign="top"> | |||
<td>[[image:DotPoint4.JPG|link=]]</td> | |||
<td>if required, <span style="font-weight: 700; font-size: 15px; background-color: lightcyan;">Left Click</span> the <span style="font-weight: 700; font-size: 17px; color: white; background-color: black;"> Lock Layer </span> button to lock the selected layer. If the layer is already locked then this will be shown as an <span style="font-weight: 700; font-size: 17px; color: white; background-color: black;"> Unlock Layer </span> button</td> | |||
</tr> | </tr> | ||
</table> | </table> | ||
</td> | </td> | ||
</tr> | |||
</table> | |||
<br> | |||
<table bgcolor=#ff0000 cellpadding=2> | |||
<tr valign="top"> | |||
<td> | |||
<table bgcolor=#fcbcbc cellpadding=2> | |||
<tr valign="top"> | |||
<td>[[image:Stop.PNG|link=]]</td> | |||
<td><span style="font-size: 15px; font-weight: 700;">WARNING:</span> | |||
<table> | |||
<tr valign="top"> | |||
<td width=10>[[image:DotPoint.JPG|10px|link=]]</td> | |||
<td>You will not be allowed to place a track object in a layer that is higher up the list than the layer containing the track</td> | |||
</tr> | |||
<tr valign="top"> | |||
<td>[[image:DotPoint.JPG|10px|link=]]</td> | |||
<td>Moving an object from one layer group to another (e.g. from the '''Route Layer Group''' to the '''Session Layer Group''') will change where the object is saved (in the Route or in the Session)</td> | |||
</tr> | </tr> | ||
</table> | </table> | ||
| Line 1,251: | Line 1,265: | ||
</table> | </table> | ||
<br> | <br> | ||
<table cellpadding=2 bgcolor="Aquamarine"> | |||
<table | |||
<tr valign="top"> | <tr valign="top"> | ||
<td | <td>[[image:LinkWiki.PNG|link=]]</td> | ||
<td>Information on layers can be found at:-<br> | |||
* '''[[How to Use Layers]]''' | |||
</td> | |||
</tr> | </tr> | ||
</table> | |||
</td> | |||
</tr> | |||
</table> | |||
<br> | |||
<table width=1000> <!-- BEGIN Nav Buttons Table SECTION w SKIPS --> | |||
<tr valign="top"> | <tr valign="top"> | ||
<td>[[image: | <td width=629><span id="stepCreating"></span> | ||
[[image: | ='''Creating a Track Trigger Event'''= | ||
<td> | </td> | ||
<td width=50> </td> | |||
< | <td width=50>[[image:SkipUp.png|link=#skipAddS20|Skip Up]]</td> | ||
<td> | <td width=46>[[image:BackToTop.png|link=#top|alt=Top|Top]]</td> | ||
<td width=75>[[image:NextUp.png|link=#stepAdding|alt=Next Up|Next Up]]</td> | |||
< | <td width=75>[[image:NextDown.png|link=#stepEvent|alt=Next Down|Next Down]]</td> | ||
<td | <td width=75>[[image:BackToBottom.png|link=#bottom|alt=Bottom|Bottom]]</td> | ||
</tr> | </tr> | ||
</table> <!-- END Nav Buttons Table --> | |||
<table width=1000> | |||
<tr valign="top"> | <tr valign="top"> | ||
<td | <td>When a consist enters the '''Effect Radius''' of a '''Track Trigger''' it will create an "event" that can be detected and responded to by some Session Rules and some Driver Commands. One such rule is the '''Trigger Check Rule''' which is added to a Session in the [[image:WikiLink.PNG|link=]] '''[[How to Use Session Editor|Session Editor]]'''.</td> | ||
</tr> | </tr> | ||
</table> | |||
<table cellpadding=2 bgcolor="Aquamarine"> | |||
<tr valign="top"> | <tr valign="top"> | ||
<td | <td>[[image:LinkWiki.PNG|link=]]</td> | ||
<td> | <td> | ||
More information on the '''Trigger Check Rule''' can be found on the '''Trainz Wiki Rules Page''' at:-<br> | |||
* '''[[Session_Rule_List_with_Parameters#Trigger_Check_Rule|Trigger Check Rule]]'''<br> | |||
</td> | |||
</tr> | </tr> | ||
</table> | |||
<br> | |||
<table width=1000 cellpadding=2> | |||
<tr valign="top"> | <tr valign="top"> | ||
<td | <td colspan=2><span style="font-weight: 700; font-size: 15px;">Steps:</span></td> | ||
</tr> | </tr> | ||
<tr valign="top"> | <tr valign="top"> | ||
<td>[[image: | <td width=25>[[image:DotPoint1.JPG|link=]]</td> | ||
<td> | <td><span style="font-size: 17px; font-weight: 700;">Open the Session Editor:</span><br> | ||
<table> <!-- BEGIN Step 1 table --> | |||
<tr valign="top"> | |||
<td colspan=2>To add the '''Trigger Check Rule''' to a session:- | |||
<table> | |||
<tr valign="top"> | |||
<td width=25>[[image:DotPoint1Blue.png|link=]]</td> | |||
<td>Open the '''Surveyor Main Menu''' in '''TANE''' (shown below left) or the '''Surveyor Edit Menu''' in '''TRS19''' and later '''Trainz''' versions (shown below right)</td> | |||
</tr> | </tr> | ||
<tr valign="top"> | <tr valign="top"> | ||
<td>[[image: | <td>[[image:DotPoint2Blue.png|link=]]</td> | ||
<td> | <td>Select the option <span style="color: white; background-color: black; font-weight: 700; font-size: 15px;"> Edit Session </span> from the drop down menu list</td> | ||
</tr> | </tr> | ||
</table> | </table> | ||
</td> | |||
</tr> | |||
<tr valign="top"> | |||
<td>[[image:EditSessionMenu.JPG|link=]]</td> | |||
<td>[[image:SessionEditMenuSP1.png|link=]]<br></td> | |||
</tr> | |||
</table> <!-- END Step 1 table --> | |||
</td> | </td> | ||
</tr> | </tr> | ||
</table> | </table> | ||
<table | <table width=1000> | ||
<tr valign="top"> | <tr valign="top"> | ||
<td width=25>[[image:DotPoint2.JPG|link=]]</td> | |||
<td><span style="font-size: 17px; font-weight: 700;">Add the Trigger Check Rule:</span></td> | |||
</tr> | |||
<tr valign="top"> | |||
<td> </td> | |||
<td> | <td> | ||
<table | <table width=485> <!-- BEGIN Step 2 table --> | ||
<tr valign="top"> | |||
<td width=25>[[image:DotPoint3Blue.png|link=]]</td> | |||
<td>In the '''Edit Session''' window (shown below left) <span style="font-weight: 700; font-size: 15px; background-color: lightcyan;">Left Click</span> on the <span style="color: white; background-color: black; font-weight: 700; font-size: 15px;"> Add </span> button</td> | |||
</tr> | |||
</table> | |||
</td> | |||
<td> | |||
<table width=485> | |||
<tr valign="top"> | <tr valign="top"> | ||
<td>[[image: | <td width=25>[[image:DotPoint4Blue.png|link=]]</td> | ||
<td> | <td>In the Rule Selection window (shown below right):- | ||
<table> | <table> | ||
<tr valign="top"> | <tr valign="top"> | ||
<td width=10>[[image: | <td width=10>[[image:BlueDot10x10.png|link=]]</td> | ||
<td> | <td>Scroll down the list to select the '''Trigger Check''' rule, and</td> | ||
</tr> | </tr> | ||
<tr valign="top"> | <tr valign="top"> | ||
<td>[[image: | <td>[[image:BlueDot10x10.png|link=]]</td> | ||
<td> | <td><span style="font-weight: 700; font-size: 15px; background-color: lightcyan;">Left Click</span> on the [[image:Tick.PNG|link=]] icon</td> | ||
</tr> | </tr> | ||
</table> | </table> | ||
| Line 1,315: | Line 1,374: | ||
</tr> | </tr> | ||
</table> | </table> | ||
<table | <table width=1000> | ||
<tr valign="top"> | <tr valign="top"> | ||
<td>[[image: | <td>[[image:EditSessionWindowX.JPG|link=|480px]]</td> | ||
<td> | <td>[[image:RuleSelect.JPG|link=]]</td> | ||
</td> | |||
</tr> | </tr> | ||
< | <tr> | ||
</td> | <td colspan=2><br>This will add the '''Trigger Check Rule''' to the session.</td> | ||
</tr> | </tr> | ||
</table> | </table> <!-- END Step 2 table --> | ||
<table width=1000> | <table width=1000> | ||
<tr valign="top"> | |||
<td width=25>[[image:DotPoint3.JPG|link=]]</td> | |||
<td><span style="font-size: 17px; font-weight: 700;">Open the '''Trigger Check Rule''' Properties:</span> | |||
<table> <!-- BEGIN Step 3 table --> | |||
<tr valign="top"> | <tr valign="top"> | ||
<td width= | <td width=25>[[image:DotPoint5Blue.png|link=]]</td> | ||
<td>With the '''Trigger Check Rule''' highlighted (shown below) <span style="font-weight: 700; font-size: 15px; background-color: lightcyan;">Left Click</span> the <span style="color: white; background-color: black; font-weight: 700; font-size: 15px;"> Edit </span> button. This will open the rule properties window | |||
</td> | </td> | ||
</tr> | </tr> | ||
<tr valign="top"> | <tr valign="top"> | ||
<td>[[image: | <td colspan=2>[[image:TriggerCheck.JPG|link=]]</td> | ||
< | </tr> | ||
</table> <!-- END Step 3 table --> | |||
</td> | </td> | ||
</tr> | </tr> | ||
</table> | </table> | ||
<table | <table width=1000> | ||
<tr valign="top"> | <tr valign="top"> | ||
<td> | <td width=25>[[image:DotPoint4.JPG|link=]]</td> | ||
<table | <td><span style="font-size: 17px; font-weight: 700;">Configure the Rule:</span><br> | ||
<table> <!-- BEGIN Step 4 table --> | |||
<tr valign="top"> | <tr valign="top"> | ||
<td width=25>[[image: | <td colspan=2>For this example we will leave all settings unchanged and simply identify the '''Track Trigger''' to be used.<br> | ||
<td><span style="font-size: | In the '''Trigger Properties Window''' (shown below):-</td> | ||
</tr> | |||
</td> | <tr valign="top"> | ||
<td width=25>[[image:DotPoint6Blue.png|link=]]</td> | |||
<td><span style="font-weight: 700; font-size: 15px; background-color: lightcyan;">Left Click</span> on the '''''<span style="text-decoration: underline;">Add Trigger</span>''''' link</td> | |||
</tr> | </tr> | ||
<tr valign="top"> | <tr valign="top"> | ||
<td | <td colspan=2>[[image:TriggerCheckProperties.JPG|link=]]</td> | ||
</tr> | </tr> | ||
<tr valign="top"> | <tr valign="top"> | ||
<td>[[image: | <td colspan=2> | ||
<td> | <table cellpadding=2 bgcolor="Aquamarine"> <!-- BEGIN Table 4 Wiki Table --> | ||
<tr valign="top"> | |||
<td>[[image:LinkWiki.PNG|link=]]</td> | |||
<td> | |||
More information on the settings and options in this rule can be found on the '''Trainz Wiki Rules Page''' at:-<br> | |||
* '''[[Session_Rule_List_with_Parameters#Trigger_Check_Rule|Trigger Check Rule]]'''<br> | |||
</td> | |||
</tr> | |||
</table> <!-- END Table 4 Wiki Table --> | |||
</td> | |||
</tr> | </tr> | ||
</table> | </table> <!-- END Step 4 table --> | ||
</td> | </td> | ||
</tr> | </tr> | ||
</table> | </table> | ||
<table width=1000> | <table width=1000> | ||
<tr valign="top"> | <tr valign="top"> | ||
<td>[[image: | <td width=25>[[image:DotPoint5.JPG|link=]]</td> | ||
<td><span style="font-size: 17px; font-weight: 700;"> | <td><span style="font-size: 17px; font-weight: 700;">Select the Track Trigger:</span><br> | ||
The '''Trigger Selection Window''' will open and list all the '''Track Triggers''' in your Route. | |||
<table> | |||
<tr valign="top"> | |||
<td width=25>[[image:DotPoint7Blue.png|link=]]</td> | |||
<td>Select the '''Track Trigger''' you have just added</td> | |||
</tr> | </tr> | ||
<tr valign="top"> | <tr valign="top"> | ||
<td>[[image: | <td width=25>[[image:DotPoint8Blue.png|link=]]</td> | ||
<td><span style="font-size: | <td><span style="font-weight: 700; font-size: 15px; background-color: lightcyan;">Left Click</span> on the [[image:Tick.PNG|link=]] icon at the bottom of the selection window</td> | ||
</tr> | </tr> | ||
<tr valign="top"> | <tr valign="top"> | ||
<td>[[image: | <td colspan=2>[[image:TriggerList.JPG|link=]]</td> | ||
</tr> | </tr> | ||
<tr valign="top"> | <tr valign="top"> | ||
<td>[[image: | <td>[[image:DotPoint9Blue.png|link=]]</td> | ||
<td><span style="font-size: | <td>Once the '''Track Trigger''' has been added to the rule, <span style="font-weight: 700; font-size: 15px; background-color: lightcyan;">Left Click</span> on the [[image:Tick.PNG|link=]] icon in the '''Trigger Check''' properties window to accept the change and close the Session Editor.</td> | ||
</tr> | |||
</table> <!-- END Step 5 table --> | |||
</td> | |||
</tr> | </tr> | ||
</table> | </table> | ||
<br> | |||
==''' | <table width=1000> <!-- BEGIN Nav Buttons Table --> | ||
<tr valign="top"> | |||
<table width=1000 bgcolor=" | <td width=629><span id="stepEvent"></span> | ||
='''Adding an Instruction to the Trigger Event'''= | |||
</td> | |||
<td width=50>[[image:SkipDown.png|link=#skipConfigure|Skip Down]]</td> | |||
<td width=50> </td> <!-- Skip Up --> | |||
<td width=46>[[image:BackToTop.png|link=#top|alt=Top|Top]]</td> | |||
<td width=75>[[image:NextUp.png|link=#stepCreating|alt=Next Up|Next Up]]</td> | |||
<td width=75>[[image:NextDown.png|link=#stepAlternatives|alt=Next Down|Next Down]]</td> | |||
<td width=75>[[image:BackToBottom.png|link=#bottom|alt=Bottom|Bottom]]</td> | |||
</tr> | |||
</table> <!-- END Nav Buttons Table --> | |||
=='''Adding a Child Rule'''== | |||
To test your '''Trigger Event''' you will need to add some '''Session Rules'''. | |||
<table width=1000 cellpadding=2> | |||
<tr valign="top"> | |||
<td colspan=2><span style="font-weight: 700; font-size: 15px;">Steps:</span></td> | |||
</tr> | |||
<tr valign="top"> | |||
<td width=25>[[image:DotPoint1.JPG|link=]]</td> | |||
<td><span style="font-size: 17px; font-weight: 700;">Add A Message Popup Rule:</span> | |||
<table> <!-- BEGIN Step 1 table --> | |||
<tr valign="top"> | |||
<td>When you are back in the '''Session Editor''' window:- | |||
<table> | |||
<tr valign="top"> | |||
<td width=25>[[image:DotPoint1Blue.png|link=]]</td> | |||
<td>Make sure that the new '''Trigger Check Rule''' is selected (highlighted)</td> | |||
</tr> | |||
<tr valign="top"> | |||
<td>[[image:DotPoint2Blue.png|link=]]</td> | |||
<td><span style="font-weight: 700; font-size: 15px; background-color: lightcyan;">Left Click</span> the <span style="color: white; background-color: black; font-weight: 700; font-size: 15px;"> Add </span> button to add another new rule</td> | |||
</tr> | |||
<tr valign="top"> | |||
<td>[[image:DotPoint3Blue.png|link=]]</td> | |||
<td>Scroll down the rule selection window to find and select the '''Message Popup''' rule</td> | |||
</tr> | |||
<tr valign="top"> | |||
<td colspan=2>[[image:TriggerAddMesPopup.JPG|link=]]</td> | |||
</tr> | |||
<tr valign="top"> | |||
<td>[[image:DotPoint4Blue.png|link=]]</td> | |||
<td><span style="font-weight: 700; font-size: 15px; background-color: lightcyan;">Left Click</span> on the [[image:Tick.PNG|link=]] icon | |||
</td> | |||
</tr> | |||
<tr> | |||
<td colspan=2>The '''Message Popup Rule''' should now appear directly below the '''Trigger Check''' rule. It will display a red cross because it has not yet been configured. | |||
</td> | |||
</tr> | |||
</table> | |||
</td> | |||
</tr> | |||
</table> <!-- END Step 1 table --> | |||
</td> | |||
</tr> | |||
</table> | |||
<table width=1000> | |||
<tr valign="top"> | |||
<td>[[image:DotPoint2.JPG|link=]]</td> | |||
<td><span style="font-size: 17px; font-weight: 700;">Indent the Popup Message Rule:</span><br> | |||
<table> <!-- BEGIN Step 2 table --> | |||
<tr valign="top"> | |||
<td>The '''Message Popup Rule''' has to be ''indented'' so that it becomes a '''Child''' of the '''Trigger Check Rule''' and is controlled by that rule.<br> | |||
[[image:SessionRuleIndent.JPG|link=]]</td> | |||
</tr> | |||
<tr valign="top"> | |||
<td>With the '''Message Popup Rule''' highlighted <span style="font-weight: 700; font-size: 15px; background-color: lightcyan;">Left Click</span> on the '''''Indent''''' (''right arrow'') button. This should indent the '''Message Popup''' rule one level inwards (as shown below). | |||
</td> | |||
</tr> | |||
<tr valign="top"> | |||
<td>[[image:SessionRuleIndented.JPG|link=]]</td> | |||
</tr> | |||
<tr> | |||
<td><br> | |||
The '''Message Popup Rule''' is now a '''Child Rule''' of the '''Trigger Check Rule''' and will only be executed ''after'' the '''Track Trigger''' has been activated by a train.</td> | |||
</tr> | |||
</table> <!-- END Steps Table --> | |||
</td> | |||
</tr> | |||
</table> | |||
<br> | |||
<table width=1000> <!-- BEGIN Nav Buttons Table SKIPS NO SECTIONS --> | |||
<tr valign="top"> | |||
<td width=629><span id="skipConfigure"></span> | |||
=='''Configuring the Message and Testing'''== | |||
</td> | |||
<td width=50>[[image:SkipDown.png|link=#stepAlternatives|Skip Down]]</td> <!-- skip Down --> | |||
<td width=50>[[image:SkipUp.png|link=#stepEvent|Skip Up]]</td> <!-- skip Up --> | |||
<td width=46> </td> | |||
<td width=75> </td> | |||
<td width=75> </td> | |||
<td width=75> </td> | |||
</tr> | |||
</table> <!-- END Nav Buttons Table --> | |||
<table width=1000 cellpadding=2> | |||
<tr valign="top"> | |||
<td colspan=2><span style="font-weight: 700; font-size: 15px;">Steps:</span></td> | |||
</tr> | |||
<tr valign="top"> | |||
<td width=25>[[image:DotPoint1.JPG|link=]]</td> | |||
<td><span style="font-size: 17px; font-weight: 700;">Open the Message Popup Rule for Editing:</span><br> | |||
<table> <!-- BEGIN Step 1 table --> | |||
<tr valign="top"> | |||
<td>[[image:DotPoint1Blue.png|link=]]</td> | |||
<td>With the '''Message Popup Rule''' highlighted and indented (as shown above) <span style="font-weight: 700; font-size: 15px; background-color: lightcyan;">Left Click</span> the <span style="color: white; background-color: black; font-weight: 700; font-size: 15px;"> Edit </span> button. The '''Message Popup Rule''' properties window will appear (as shown below)</td> | |||
</tr> | |||
<tr> | |||
<td colspan="2"> | |||
----</td> | |||
</tr> | |||
</table> <!-- END Step 1 table --> | |||
</td> | |||
</tr> | |||
</table> | |||
<table width=1000> | |||
<tr valign="top"> | |||
<td> | |||
<table width=500> | |||
<tr valign="top"> | |||
<td width=25>[[image:DotPoint2.JPG|link=]]</td> | |||
<td><span style="font-size: 17px; font-weight: 700;">Configure the Message:</span> | |||
<table> <!-- BEGIN Step 2 table --> | |||
<tr valign="top"> | |||
<td>Set the properties as shown:- | |||
<table> | |||
<tr valign="top"> | |||
<td width=25>[[image:DotPoint1Blue.png|link=]]</td> | |||
<td>Check '''ON''' ''Close previous message popup windows''</td> | |||
</tr> | |||
<tr valign="top"> | |||
<td>[[image:DotPoint2Blue.png|link=]]</td> | |||
<td>Select '''Option Button''' ''Custom text''</td> | |||
</tr> | |||
<tr valign="top"> | |||
<td>[[image:DotPoint3Blue.png|link=]]</td> | |||
<td>Enter a short text message</td> | |||
</tr> | |||
</table> | |||
</td> | |||
</tr> | |||
<tr valign="top"> | |||
<td width=475 colspan=2>[[image:MessagePopupText.JPG|475px|link=]]</td> | |||
</tr> | |||
</table> <!-- END Step 2 table --> | |||
</td> | |||
</tr> | |||
</table> | |||
</td> | |||
<td> | |||
<table width=500> | |||
<tr valign="top"> | |||
<td width=25>[[image:DotPoint3.JPG|link=]]</td> | |||
<td><span style="font-size: 17px; font-weight: 700;">(Optional) Add a Message Icon:</span> | |||
<table> <!-- BEGIN Step 3 table --> | |||
<tr valign="top"> | |||
<td> | |||
<table> | |||
<tr valign="top"> | |||
<td width=25>[[image:DotPoint1Blue.png|link=]]</td> | |||
<td><span style="font-weight: 700; font-size: 15px; background-color: lightcyan;">Left Click</span> the link '''''<span style="text-decoration: underline;">click here to set</span>''''' (shown left) and either:- | |||
<table> | |||
<tr valign="top"> | |||
<td width=25>[[image:Ablue.png|link=]]</td> | |||
<td>Scroll down the Texture Asset Selection List (shown below) to find a suitable icon, <span style="font-weight: 700; font-size: 15px;">OR</span></td> | |||
</tr> | |||
<tr valign="top"> | |||
<td>[[image:Bblue.png|link=]]</td> | |||
<td>Simply type "icon stop" in the text box to use one of the builtin icons</td> | |||
</tr> | |||
</table> | |||
</td> | |||
</tr> | |||
<tr valign="top"> | |||
<td>[[image:DotPoint2Blue.png|link=]]</td> | |||
<td><span style="font-weight: 700; font-size: 15px; background-color: lightcyan;">Left Click</span> on the [[image:Tick.PNG|link=]] icon to select the icon</td> | |||
</tr> | |||
</table> | |||
</td> | |||
</tr> | |||
<tr valign="top"> | |||
<td>[[image:IconStop.JPG|link=]]</td> | |||
</tr> | |||
</table> | |||
</td> | |||
</tr> | |||
</table> | |||
</td> | |||
</tr> | |||
</table> | |||
<table width=1000> | |||
<tr valign="top"> | |||
<td width=25>[[image:DotPoint4.JPG|link=]]</td> | |||
<td><span style="font-weight: 700; font-size: 15px; background-color: lightcyan;">Left Click</span> on the [[image:Tick.PNG|link=]] icon to exit the '''Message Popup Rule''' and return to the '''Session Editor'''</td> | |||
</tr> | |||
</table> | |||
<!-- END Step 2 Wiki; Table --> | |||
<table width=1000> | |||
<tr valign="top"> | |||
<td>The completed Message Popup Rule<br> | |||
[[image:MessagePopupStop.JPG|link=]]</td> | |||
</tr> | |||
</table> | |||
<br> | |||
<table cellpadding=2 bgcolor="Aquamarine"> <!-- BEGIN Step 2 Wiki; Table --> | |||
<tr valign="top"> | |||
<td>[[image:LinkWiki.PNG|link=]]</td> | |||
<td> | |||
More information on this rule can be found on the '''Trainz Wiki Page''' at:-<br> | |||
* '''[[How to Use Message Popup Rule]]'''<br> | |||
</td> | |||
</tr> | |||
</table> | |||
<br> | |||
<table width=1000> | |||
<tr valign="top"> | |||
<td>[[image:DotPoint5.JPG|link=]] <span style="font-size: 17px; font-weight: 700;">Test the Trigger Event:</span><br> | |||
<table> <!-- BEGIN Step 4 table --> | |||
<tr valign="top"> | |||
<td> | |||
<table width=1000> | |||
<tr valign="top"> | |||
<td width=25>[[image:DotPoint1Blue.png|link=]]</td> | |||
<td>Exit the '''Session Editor'''</td> | |||
</tr> | |||
<tr valign="top"> | |||
<td>[[image:DotPoint2Blue.png|link=]]</td> | |||
<td>Add a consist to your layout a short distance from the '''Track Trigger''' (but further away than its '''Effect Radius'''), save the Surveyor Session, and then test in '''Driver'''</td> | |||
</tr> | |||
</table> | |||
</td> | |||
</tr> | |||
</table> <!-- END Step 4 table --> | |||
</td> | |||
</tr> | |||
</table> <!-- END Steps Table --> | |||
<br> | |||
Another example of using the '''Trigger Check Rule''' can be found in the '''Trainz Wiki Page''' [[image:WikiLink.PNG|link=]] '''[[How to Use Message Popup Rule (Applications)]]'''. | |||
<br> | |||
<table width=1000> <!-- BEGIN Nav Buttons Table --> | |||
<tr valign="top"> | |||
<td width=629><span id="stepAlternatives"></span> | |||
='''Alternatives to the Trigger Check Rule'''= | |||
</td> | |||
<td width=50> </td> | |||
<td width=50>[[image:SkipUp.png|link=#skipConfigure|Skip Up]]</td> | |||
<td width=46>[[image:BackToTop.png|link=#top|alt=Top|Top]]</td> | |||
<td width=75>[[image:NextUp.png|link=#stepEvent|alt=Next Up|Next Up]]</td> | |||
<td width=75> </td> | |||
<td width=75>[[image:BackToBottom.png|link=#bottom|alt=Bottom|Bottom]]</td> | |||
</tr> | |||
</table> <!-- END Nav Buttons Table --> | |||
<table cellpadding=2 bgcolor=#ffffff> | |||
<tr valign="top"> | |||
<td width=50>[[image:RulesWiki.PNG|link=]]</td> | |||
<td width=950>There are other '''Session Rules''' that can be used in place of the '''Trigger Check Rule''' and '''Track Trigger'''. A few possibilities are listed below:- | |||
<table> | |||
<tr valign="top"> | |||
<td width=10>[[image:DotPoint.JPG|10px|link=]]</td> | |||
<td>'''[[Session_Rule_List_with_Parameters#Directional_Trigger_Check_Rule|Directional Trigger Check Rule]]''' - identical to the '''Trigger Check Rule''' but adds the ability to test the train direction. Requires the use of a special '''Directional Trigger'''. For an example of its use see the '''Trainz Wiki Page''' [[image:WikiLink.PNG|link=]] '''[[How to Control Signals in Sessions|Controlling Signals in Sessions]]'''</td> | |||
</tr> | |||
<tr valign="top"> | |||
<td>[[image:DotPoint.JPG|10px|link=]]</td> | |||
<td>'''[[Session_Rule_List_with_Parameters#Trackside_Check_Rule|Trackside Check Rule]]''' - very similar to the '''Trigger Check Rule''' but provides some different options</td> | |||
</tr> | |||
<tr valign="top"> | |||
<td>[[image:DotPoint.JPG|10px|link=]]</td> | |||
<td>'''Navigation Points''' (see the '''How to Guides''' below) are more complex but provide more advanced controls and options</td> | |||
</tr> | |||
<tr valign="top"> | |||
<td>[[image:DotPoint.JPG|10px|link=]]</td> | |||
<td>'''[[Session_Rule_List_with_Parameters#Multiple Resource Check Rule|Multiple Resource Check Rule]]''' - monitors and acts on changes in multiple industry or multiple wagon resource (commodity) levels</td> | |||
</tr> | |||
<tr valign="top"> | |||
<td>[[image:DotPoint.JPG|10px|link=]]</td> | |||
<td>'''[[Session_Rule_List_with_Parameters#Resource Verify Rule (fixed)|Resource Verify Rule]]''' - monitors and acts on changes in a single industry or wagon resource (commodity) level</td> | |||
</tr> | |||
<tr valign="top"> | |||
<td>[[image:DotPoint.JPG|10px|link=]]</td> | |||
<td>'''[[Session_Rule_List_with_Parameters#Timecheck Rule|Timecheck Rule]]''' - triggers an event at a set time. | |||
</td> | |||
</tr> | |||
</table> | |||
</td> | |||
</tr> | |||
</table> | |||
<br> | |||
<table cellpadding=2 bgcolor=#ffffff> | |||
<tr valign="top"> | |||
<td width=50>[[image:CommandsWiki.png|link=]]</td> | |||
<td width=950>There is a '''driver command''' that can be used in place of the '''Trigger Check Rule''':- | |||
<table> | |||
<tr valign="top"> | <tr valign="top"> | ||
<td width= | <td width=25>[[image:DotPoint.JPG|10px|link=]]</td> | ||
<td> | <td>'''[[Driver_Commands_List#WaitForTrigger|Wait For Trigger]]''' - forces an AI controlled train to wait until a specified '''Track Trigger''' has been activated by another train</td> | ||
</tr> | </tr> | ||
</table> | </table> | ||
</td> | </td> | ||
</tr> | </tr> | ||
</table> | </table> | ||
<table width=1000> <!-- BEGIN Nav Buttons Table --> | <table width=1000> <!-- BEGIN Nav Buttons Table --> | ||
<tr valign="top"> | <tr valign="top"> | ||
<td width=729><span id="bottom"></span> </td> | <td width=729><span id="bottom"></span> </td> | ||
<td width=46>[[image:BackToTop.png|link=#top|alt=Top|Top]]</td> | <td width=46>[[image:BackToTop.png|link=#top|alt=Top|Top]]</td> | ||
<td width=75>[[image:NextUp.png|link=# | <td width=75>[[image:NextUp.png|link=#stepAlternatives|alt=Next Up|Next Up]]</td> | ||
<td width=75> </td> | <td width=75> </td> | ||
<td width=75> </td> | <td width=75> </td> | ||
| Line 1,489: | Line 1,807: | ||
<span style="font-size: 17px;">'''Related Links'''</span><br> | <span style="font-size: 17px;">'''Related Links'''</span><br> | ||
* '''[[How to Use Track Direction Markers]]''' | * '''[[How to Use Track Direction Markers]]''' | ||
* '''[[How to Use Track Markers]]''' | |||
* '''[[How to Use Track Priority Markers]]''' | * '''[[How to Use Track Priority Markers]]''' | ||
</td> | </td> | ||
</tr> | </tr> | ||
| Line 1,498: | Line 1,816: | ||
</table> | </table> | ||
---- | ---- | ||
This page was created by Trainz user '''<span class="plain;s">[http://online.ts2009.com/mediaWiki/index.php/User:Pware pware]</span>''' in | This page was created by Trainz user '''<span class="plain;s">[http://online.ts2009.com/mediaWiki/index.php/User:Pware pware]</span>''' in May 2018 and was last updated as shown below. | ||
---- | ---- | ||
[[Category:How-to guides]] | [[Category:How-to guides]][[Category:Rules]] | ||
Revision as of 10:37, 11 July 2026
|
 |
 |
|
What are Track Triggers? |
 |
|
|
Track Triggers can be programmed to respond when a train (any train or a specific train) passes over them in Driver Mode. The response comes from executing a set of Session Rules that have been attached to a  Trigger Check Rule (or a similar rule) or a Driver Command that is monitoring the trigger. |
||||||||
Shown below left is a standard Track Trigger and below right is a Directional Track Trigger. They are just two examples of several types of Track Triggers. In both cases:-
|
||||||||
|
||||||||

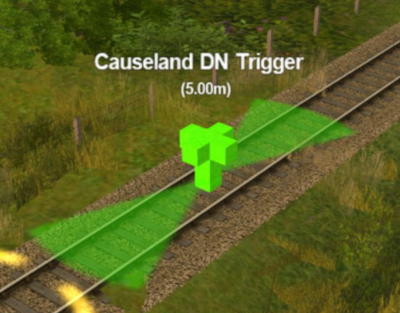
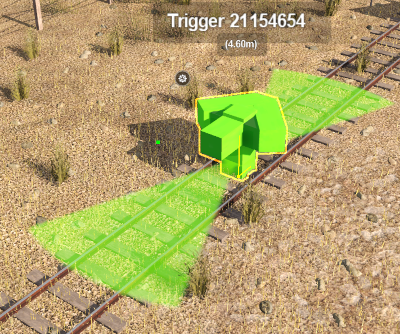
Route or Session? |
|
 |
|
|
 |
Track Triggers can be placed in a Route Layer or in a Session Layer |
|

 |
Information on Route and Session layers can be found at:- |
Adding a Track Trigger |
 |
|
|
|
|
|

In Surveyor Classic (S10) |
|
 |
Adding a Track Trigger (S10)
|
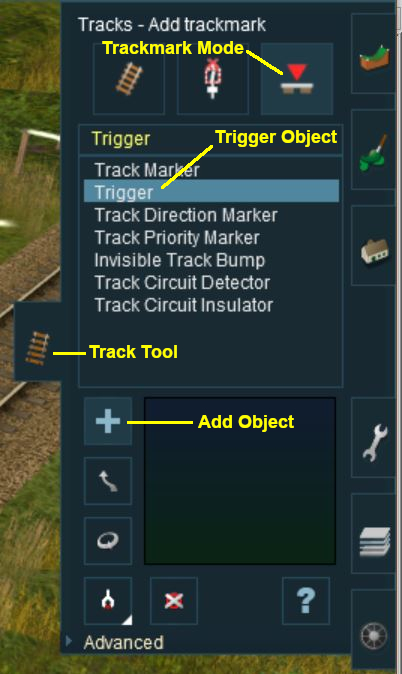 |
|
||||||||||||||||||
| As soon as a new Track Trigger has been placed, its properties window will open on the screen. It will initially be given a default name and will be assigned to the currently active layer. |
Change its Direction (S10)
|
Except for the Directional Track Trigger, the direction a Track Trigger is pointing has no effect on its operation. |
If you need to change the direction of a Track Trigger then:-
|
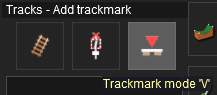 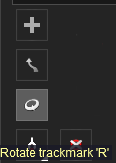 |
||||||||||
Set its Name and Layer (S10)
|
The name of a Track Trigger is important. |
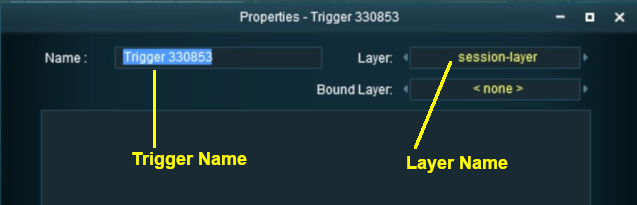 |
|
|


Set its Effect Radius (S10)
|
The Effect Radius sets how close a consist has to approach the marker to activate its operation. The default value is 20m. |
|

| At the bottom of the Track Tools flyout menu is an Advanced button. Left Click this button to open the advanced tools. |
| The Effect Radius sets the size of green "effect wings" attached both ends of the Track Trigger. This sets how close a consist has to approach to Track Trigger its "event". The smaller the radius the closer it must approach. |
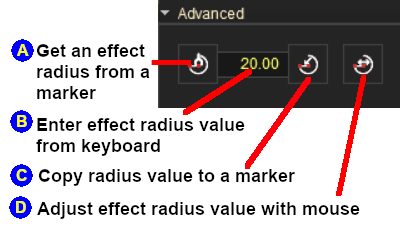 |
|
|||||||||||||||||||||||||||||||||||||||

|
In Surveyor 2.0 (S20) |
|
|
|
Adding a Track Trigger (S20)
|
| Steps: To add a Track Trigger:- |
 In the Filter Palette either:- |
|
|
||||||||||||||||||||||||||||||||||||
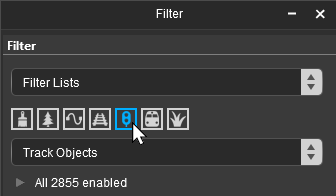
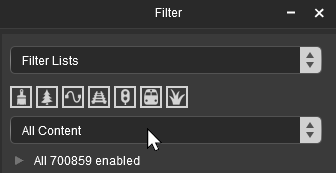
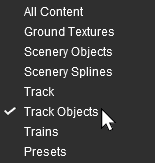


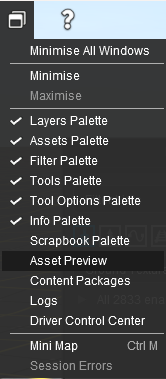


 In the Assets Palette to narrow down the filter list, type "trigger" (UPPER/lower case does not matter) in the Search Text Box
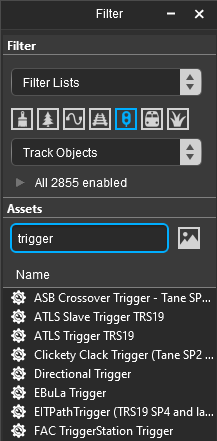 Both pallets shown docked |
|
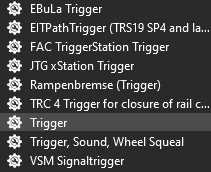
 Place the Track Trigger on the track.
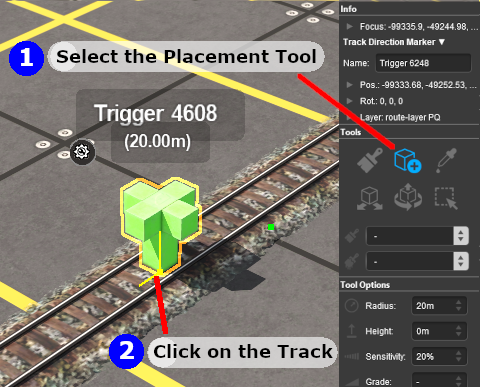 |
|
||||||||||||||||||||||||||
Change its Direction (S20)
|
Except for the Directional Track Trigger, the direction a Track Trigger is pointing has no effect on its operation. |
If you need to rotate a Track Trigger to face the opposite direction then:-
|
|||||||

Change its Name (S20)
The name of the Track Trigger IS important. It is needed to identify the Track Trigger in Session Rules.
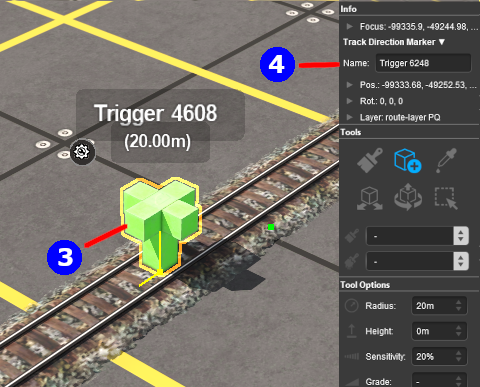 |
|
||||||||||


Set its Effect Radius (S20)
| The Effect Radius sets the size of green "effect wings" attached to both ends of the Track Trigger. This sets how close a consist has to approach to trigger its "event". The smaller the radius the closer it must approach. In the image shown below, the approaching vehicle will activate the Track Trigger when it is 20m away from it. |
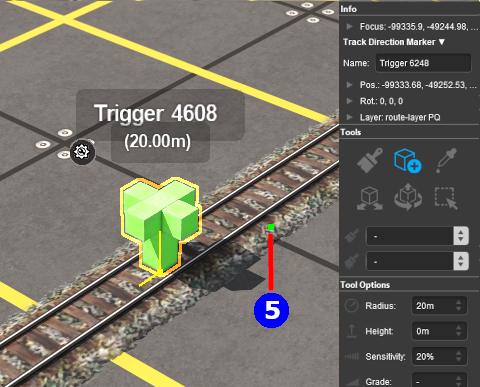 |
|
||||||||||||||||||||||


| Once you have set the Effect Radius of a Track Trigger it can be quickly duplicated (cloned) in Surveyor 2.0 with those settings and moved to a new location. You can easily edit the name and properties of the clone at the new location. See How to Use S20 Tools - Cloning Objects for the details |
Move it Along the Track (S20)
A Track Trigger can be moved along the track or to other tracks.
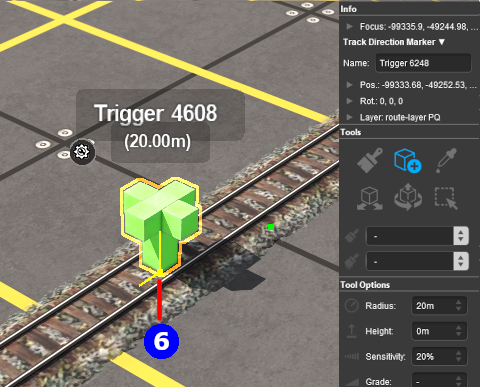 |
|
||||||||||||||

Move it Vertically (S20)
| Track Trigger can be physically placed above or below the track. This feature allows them to be placed, for example, above the track so that they will not be hidden in Surveyor if a consist is parked on the Track Trigger. |
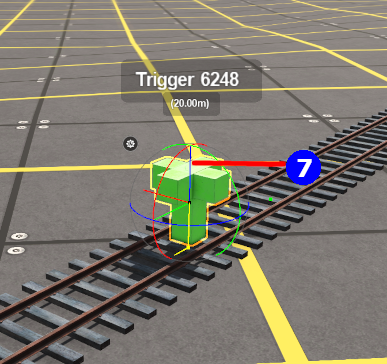 |
|
||||||||||||||||||

Move it Horizontally (S20)
|
Track Triggers can be physically placed left or right of the track. |
| This feature allow a Track Trigger to be placed so that it will not be hidden in Surveyor if a consist is parked on the trigger. A change in position left or right will have no effect on its operation. |
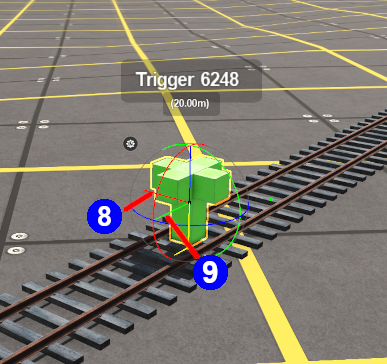 |
|
|||||||||||


Assign it to a New Layer (S20)
| The Info Palette will show the layer assigned to the currently selected object. To the left of the layer name is a small arrowhead object. | |||||||||||||||||||||||
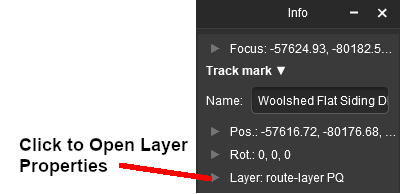 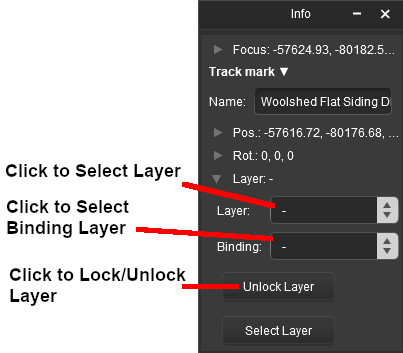 |
|
||||||||||||||||||||||

Creating a Track Trigger Event |
|
|
|
|
|
| When a consist enters the Effect Radius of a Track Trigger it will create an "event" that can be detected and responded to by some Session Rules and some Driver Commands. One such rule is the Trigger Check Rule which is added to a Session in the Session Editor. |
|
More information on the Trigger Check Rule can be found on the Trainz Wiki Rules Page at:- |
| Steps: | |||||||||
|
Open the Session Editor:
|
||||||||
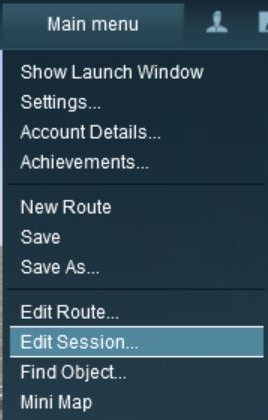
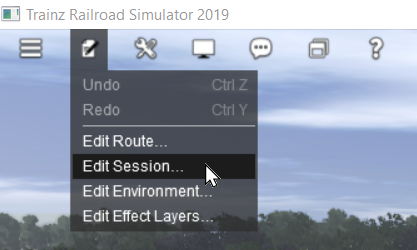
|
Add the Trigger Check Rule: | |||||||||
|
|
| Error creating thumbnail: /bin/bash: line 1: /usr/bin/convert: No such file or directory Error code: 127 | 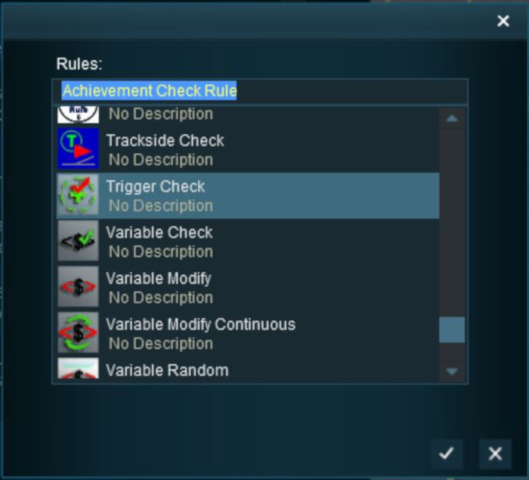 |
This will add the Trigger Check Rule to the session. |
|
 |
Open the Trigger Check Rule Properties:
|
||||
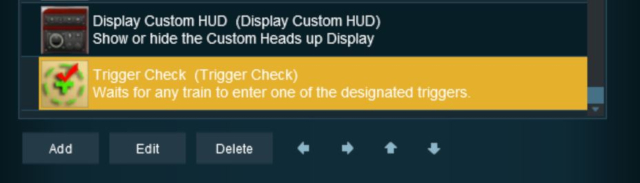
 |
Configure the Rule:
|
||||||||||
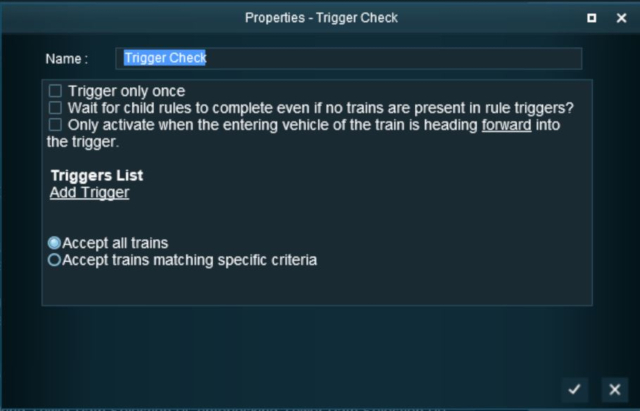
|
Select the Track Trigger: The Trigger Selection Window will open and list all the Track Triggers in your Route.
|
||||||||
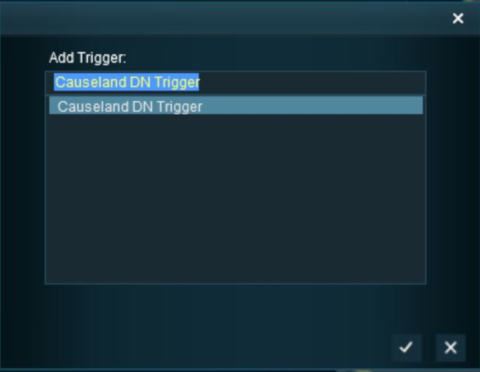
Adding an Instruction to the Trigger Event |
|
|
|
|
|
Adding a Child Rule
To test your Trigger Event you will need to add some Session Rules.
| Steps: | ||||||||||||||
|
Add A Message Popup Rule:
|
|||||||||||||
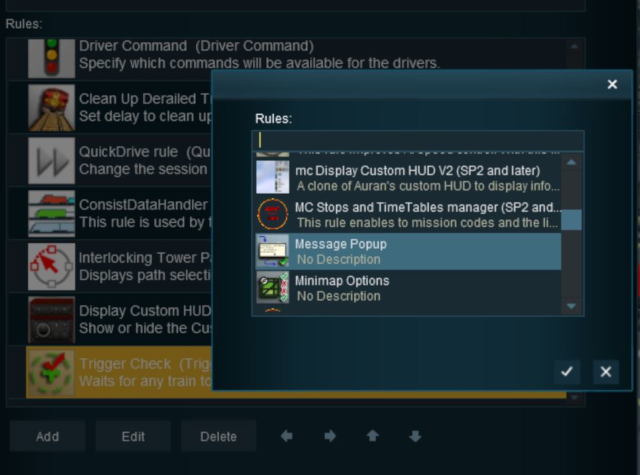
|
Indent the Popup Message Rule:
|
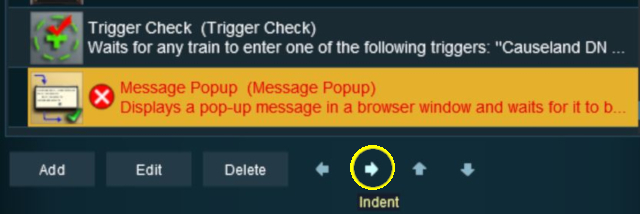
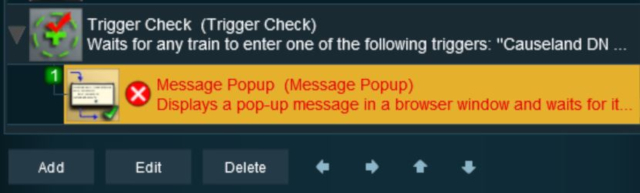
Configuring the Message and Testing |
|
|
| Steps: | |||||
|
Open the Message Popup Rule for Editing:
|
||||
|
|
|||||||||||||||||||||||
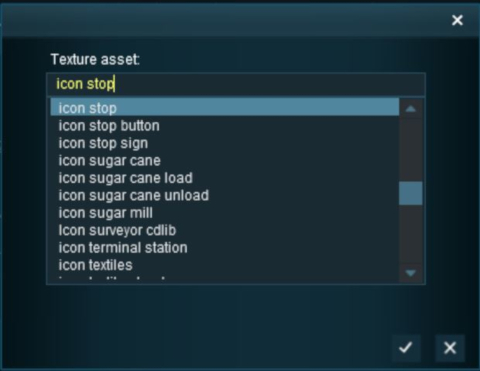
|
Left Click on the  icon to exit the Message Popup Rule and return to the Session Editor |
The completed Message Popup Rule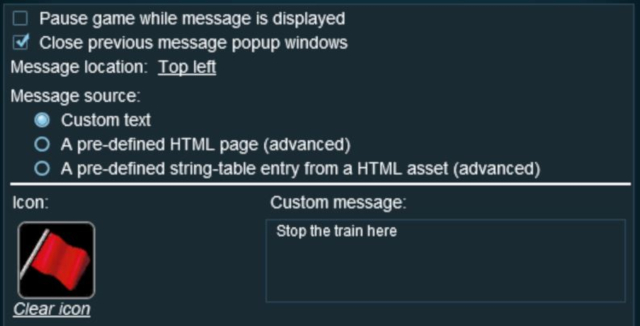 |
|
More information on this rule can be found on the Trainz Wiki Page at:- |
Test the Trigger Event:
|
Another example of using the Trigger Check Rule can be found in the Trainz Wiki Page How to Use Message Popup Rule (Applications).
Alternatives to the Trigger Check Rule |
|
|
|
|
 |
There are other Session Rules that can be used in place of the Trigger Check Rule and Track Trigger. A few possibilities are listed below:-
|
 |
There is a driver command that can be used in place of the Trigger Check Rule:-
|
|
|
Trainz Wiki
|
|

This page was created by Trainz user pware in May 2018 and was last updated as shown below.


